AIV Nixie User manual


2
Attention! Danger!
Electric shock hazard! The clock contains high-voltage part of the Nixie tubes power
supply.
Never:
•Immerse the clock into the water or other liquids or flush them with water
•Disassemble the clock or replace Nixie tubes with the power supply on
Warning
Before connecting the clock make sure the supply voltage corresponds to the output
voltage of the AC power adaptor and the voltage of the local grid corresponds to that
of the adaptor.
In case of the AC power adaptor damage replace it for a similar one. To ensure the
clock safe operation use only recommended AC power adaptor.
The clock contains fragile glass elements –Nixie tubes. Be careful during the
operation, cleaning and care.
Put the clock in the locations not accessible for children aged under 8. Do not allow
the children to play with the clock or disassemble it.
Make sure the power-supply cord does not hang off the table, cabinet or another
clock installation position.
The clock body is made of wood which makes it susceptible to humidity and ambient
temperature effects. The clock storage and operation in high or low humidity and
temperature as well as their sharp changes are not admissible. Failure to observe
these requirements may result in the body damage, cracking and deformation.
The clock is intended for the use inside heated rooms only. In case of the clock
improper use, failure to observe operation conditions or non-observance of the
requirements stated herein the warranty becomes null and void and AiV Electronics
Company assumes no responsibility for any resulting damage.

3
CONTENTS
1.Important Information ................................................ 5
2.Introduction ............................................................. 5
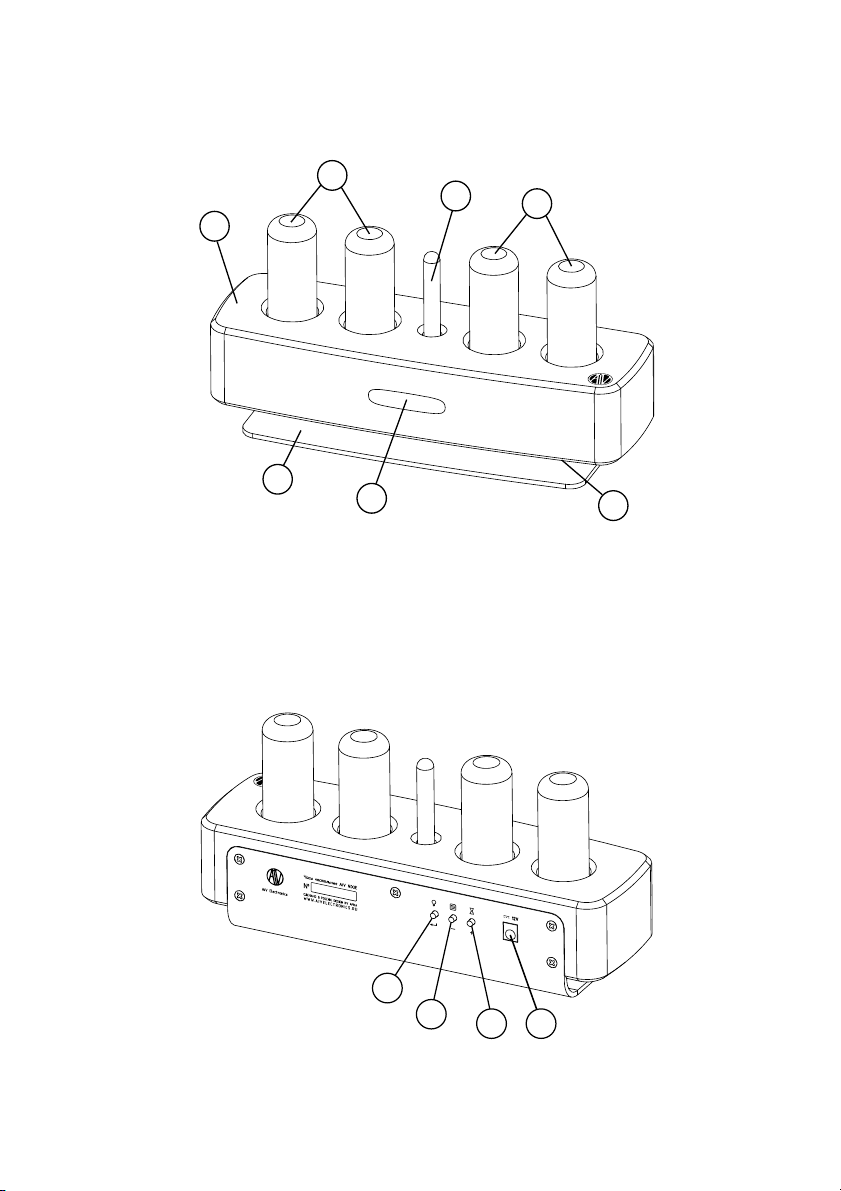
3.Appearance And Controls...........................................7
4.Pre-Operation Procedure ...........................................8
5.Set-Up And Controls ................................................ 11
5.1. Time Button .........................................................................................11
5.2. Menu Button........................................................................................13
5.3. Led Button ..........................................................................................15
5.4. Manufacturers Values Reset............................................................... 16
6.Functions................................................................17
6.1. Digit Scroll During The Minute Change.................................................. 17
6.2. First Zero Display .............................................................................. 17
6.3. Date/Year Display ............................................................................. 17
6.4. “Night”Mode...................................................................................... 17
6.5. “Day”Mode........................................................................................ 17
6.6. Tube Brightness................................................................................. 18
6.7. Glonass/Gps Satellite Loss Indication.................................................. 18
7.Care And Maintenance...............................................19
7.1. The Clock Body Care........................................................................... 19
7.2. Tube Care (Cathode Recovery)............................................................. 19
8.Troubleshootng........................................................21
9.Specifications......................................................... 23

4
AiV Nixie Clock delivery set:
1. AiV Nixie clock –No. 1.
2. IN-18 Nixie tubes –No. 4.
3. AC power adaptor 12 V, 1 A –No. 1.
4. User Manual –No. 1.
5. Warranty Card –No. 1.
6. Package –No. 1.

5
Congratulations on buying an AiV Electronics product!
To receive support, additional information or information of the Company new
products visit our web-site www.aivelectronics.ru
1. IMPORTANT INFORMATION
Before using AiV Nixie clock carefully read this Manual and retain it for future
use as reference guide. The warranty does not cover any damage caused by
the failure to observe this Manual.
Should you have any questions or need additional information, visit the Company
site: www.aivelectronics.ru
2. INTRODUCTION
AiV Nixie electronic clock is intended to display exact time using the data from
GLONASS/GPS satellite navigation system using a built-in receiver with an
active antenna ensuring the reception of the satellite signals in a standard
room (apartment, office).
The clock body is made of solid exotic wood, steel and plexiglass.
The information is displayed using IN-18 Nixie tubes filled with inert gas with
the digits glowing red-orange colour (the digit height is 40 mm). The glowing
brightness is adjustable.
The clock is equipped with LED illumination to perform night lamp functions. The
illumination colour and brightness are adjustable.
On the clock front panel there is a touch slider to facilitate the clock set-up
and illumination control.

6
AiV Nixie Clock Features:
Feature Advantages
IN-18 Nixie tubes for time display
•Exclusive appearance
•Large digit size (40 mm.)
•No heating
Built-in GLONASS/GPS receiver
with an active antenna
•Exact time determination
•Does not need to set and adjust the time
Real-time clock backup power
supply from the ionistor
•Real-time clock operation without power-
supply for max. 3 days
•Does not need replacement (like batteries)
and degradation (like accumulators)
Built-in adjustable RGB-illumination
•Stylish appearance
•Night lamp function
Touch slider •Convenient and fast set-up, illumination
brightness adjustment ïîäñâåòêè
Electronic components with
unlimited service life* •Expanded service life
“Day”and “Night”modes
•Individual user set-up
•Power saving
•IN-18 Nixie tube expanded service life
GLONASS/GPS satellite loss
indication
•Notice of the impossibility to determine the
time by GLONASS/GPS
IN-18 Nixie tube glow adjustable
brightness
•Digit brightness adjustment depending on
the room illumination
*
–
excluding AC power adaptor and IN-18 Nixie tubes.

7
3. APPEARANCE AND CONTROLS
2
4
56
3
3
1
1. The clock wooden body
2. Steel pedestal
3. IN-18 Nixie tubes (hours, minutes)
4. Divider (second mark)
5. Touch slider
6. LED RGB-illumination
7. +12 V power terminal
8. TIME (+) button
9. MENU (-)button
10. LED (input)
10
987

8
4. PRE-OPERATION PROCEDURE
Before Switching On
Before switching the clock on for the first time please carefully read this
Manual.
After the transportation take the clock out of the package and leave it for 2
hours at room temperature. Remember that the clock wooden body is
extremely susceptible to the environmental impacts.
IN-18 Nixie Tube Installation
Install IN-18 Nixie tubes into the sockets on the clock top side.
Attention! Be careful when installing the tubes!
Negligence and haste may result in the damage of the tubes and the clock
itself.
The tubes MUST be installed one by one.

9
Install the tubes only in the vertical position by pressing the tubes! Do NOT
attempt to sway the tubes to facilitate the installation: it may result in the
tube connector and contact failure.
Observe the tube orientation!
IN-18 tubes have fourteen contacts. The spacing between the first and the last
contacts is increased –use it as the marker of the tube correct position
during their installation.
Only after making sure that all the outputs of IN-18 Nixie tubes fit the relevant
contacts of the clock terminal perform the indicator final installation by the
vertical pressing onto it with a slight effort until it stops holding the clock
body.
Positioning Location Selection
After installing all the four tubes select the place for the clock permanent
location. During the location selection consider the possibility of the signal
reception from GLONASS/GPS satellite navigation systems. The signal reception
depends on the clock position indoors, from the room position inside the building
and adjacent buildings covering the sky. Toner films on the windows also
substantially affect the clock operation. It is not recommended to install the

10
clock in the rooms without windows, in the basements etc. because the exact
time signal reception there will be impossible which will bias the time readings.
It is not recommended to install the clock at the distance of more than 3 m
from the window. GLONASS/GPS built-in antenna location and direction is
shown in the Figure below.
Automatic Time Determination Using GLONASS/GPS
Connect the AC power adaptor. The clock will be switched on and start
working. During the first actuation wait until the clock identify the satellites
and automatically set the exact time. It may take from ten seconds to one hour.
If the time is determined within one minute, you selected the location with an
excellent satellite signal level. If the time is determined within 5–10 minutes,
the clock position is good.
If the time is not determined for one hour we recommend selecting a different
location in the room. If this is impossible, see Section 8 for more detailed
information.

11
5. SET-UP AND CONTROLS
AiV Nixie clock has a slider and 3 set-up and control buttons.
Use “+”and “-”buttons (or the slider) for the menu navigation or changing the
parameter current value. Use “”to enter the menu section or save the
current value. To exit the set-up mode, press and hold “”.
5.1. TIME Button
Press and hold TIME button the switch the clock over to the time/date/time
zone set-up mode.
1. Set the current hour by UTC+0 (zero
time zone) using “+”and “-” buttons or
the slider.
Press “”.

12
2. Set the minutes by UTC+0 (zero time
zone) using “+”and “-” buttons or the
slider.
Press “”.
3. Set your time zone by UTC using “+”
and “-” buttons or the slider (see the
Notes below).
Press “”.
4. Set the current year using “+”and “-
” buttons or the slider.
Press “”.
5. Set the current month using “+”and
“-” buttons or the slider.
Press “”.
6. Set the current date using “+”and “-
” buttons or the slider.
Press “”to exit the
time/date/time zone set-up mode.
Note. If the clock automatically determined the time by the GLONASS/GPS satellite
signals, the manually input data will be ignored and replaced.

13
Note. The GLONASS/GPS time is transmitted for UTC+0 time zone to which the time set
for your time zone is added. The correspondence between the value input and your
time zone is provided in the table below.
For plus time zones For minus time zones
UTC+0 0 UTC-1 14
UTC+1 1 UTC-2 15
UTC+2 2 UTC-3 16
UTC+3 3 UTC-4 17
UTC+4 4 UTC-5 18
UTC+5 5 UTC-6 19
UTC+6 6 UTC-7 20
UTC+7 7 UTC-8 21
UTC+8 8 UTC-9 22
UTC+9 9 UTC-10 23
UTC+10 10 UTC-11 24
UTC+11 11 UTC-12 25
UTC+12 12
UTC+13 13
5.2. MENU Button
Press and hold MENU button to enter the clock operation parameter main menu.
Press “+”and “-”for the navigation over the main menu items. Press “”to
enter the menu section.
Use “+”and “-”buttons (or the slider) for changing the parameter current
value in the menu section. Use “”to save the current value and return to
the main menu.
To exit the set-up mode, press and hold “”.
The table below provides the items of the main menu, section descriptions and
potential set-up options. See Section 6 for more details of the purpose of all
the settings.

14
No. Menu Section Description
Parameter Value Options
1 Digit scroll effect during
the minute change
0 –Off
1 –Fast scroll*
2 –Slow scroll
2 First Zero Display 0 –Do not display the first zero
1 –Display the first zero*
3 Display the date/year
every 15 seconds
0 –Off*
1 –Display of the date only MM/DD
2 –Date/year display MM/DD →YYYY
4 “Night”mode
0 –Off*
1 –On
If off, the menu items 5–8 are not accessible
5 “Night”mode ON time Setting the time of the “Night”mode actuation
23:30*
6 “Night”mode OFF time Setting the time of the “Night”mode de-actuation
7:00*
7 Tube brightness in the
“Night”mode
Tube glow brightness (0–10)
5*
If the Brightness is 0, the tubes will be
completely off in the night time
8 Illumination brightness in
the “Night”mode
Illumination brightness (0–255)
50*
If the Brightness is 0, the illumination will be
completely off in the night time âûêëþ÷àåòñÿ
9 “Day”mode
0 –Off*
1 –On
If off, the menu items 10–12 are not accessible
10 “Day”mode ON time Setting the time of the “Day”mode actuation
8:00*
11 “Day”mode ON time Setting the time of the “Day”mode de-actuation
18:00*
12 Selection of the Days of
the Week for “Day”Mode
Setting of the days of the week
1 (Mo) →2 (Tu) →3 (We) →4 (Th) →5 (Fr)
→6 (Sa) →7 (Su)

15
0 –this day the “Day”mode is off
1 –this day the “Day”mode is on
Mo, Tu, We, Th, Fr –ON; Sa, Su –OFF.*
13 Tube Brightness Tube glow brightness (1–10)
10*
14 GLONASS/GPS Satellite
Loss Indication
0 –Off
1 –On*
*
–
Default value
5.3. LED Button
Fast pressing of the LED button switches over the illumination colour from the
colours saved. The first of the colours saved is the user one. It is followed by
six preset colours. The last one is the mode of the smooth colour change mode.
The illumination colours are set in HSB (Hue, Saturation, Brightness) mode. The
table below provides the parameters of the preset colours.
No. Description
1 User
2 Red-orange (IN-18 Nixie tube colour)
3 Green
4 White warm
5 White cold (maximum brightness)
6 Blue
7 Pink
8 Changing colours
Note. After the power is switched on the user colour and default brightness are set.

16
Press and hold LED button to enter the menu of setting the user illumination
colour and default brightness.
1. Set the hue using “+”and “-”buttons or
the slider.
Press “”.
Possible hue values are 0
–
767.
2. Set the saturation using “+”and “-”
buttons or the slider.
Press “”.
Possible saturation values are 0
–
255.
3. Set the default brightness using “+”and
“-” buttons or the slider.
Press “”to exit the user colour
settings mode.
Possible brightness values are 0
–
255.
5.4. Manufacturers Values Reset
If the clock setting resulted in the wrong settings which caused its complete
or partial inoperability, use the function of the manufacturers values reset. To
do this, switch the clock power off, press and hold the middle button (MENU),
simultaneously switching the power supply on. When switched on the clock will
restore the manufacturers settings.

17
6. FUNCTIONS
6.1. Digit Scroll during the Minute Change
This function actuation adds an original “slot machine”effect of scrolling the
digits every minute when the time changes.
Apart from the peculiar visual effect this function prevents the tube cathode
poisoning (for more details see Section 7.2).
6.2. First Zero Display
Switch the first zero display on/off for the time interval from 00 to 09 hours.
6.3. Date/Year Display
Switch the display of the current date only or the current date and year every
15 seconds on/off. This function actuation prevents the tube cathode poisoning
(for more details see Section 7.2).
6.4. “Night”Mode
“Night”mode enables reducing the tube glow and illumination brightness for a
better comfort in the night time.
Set the time of the “Night”mode as well the tube glow and illumination
brightness actuation/de-actuation time (complete de-actuation is possible).
Note. If you press any button or touch the slider when the
“
Night
”
mode is active, the
clock will exit the
“
Night
”
mode for 1 minute.
Note. If the set intervals of the
“
Night
”
and
“
Day
”
intervals overlap, the
“
Night
”
mode
has a priority.
6.5. “Day”Mode
“Day”mode enables reducing the clock energy consumption and extends the IN-
18 tubes service life by means of their complete de-actuation in the day
(working) time when there are no people in the room and the time display is not
required. In this mode the indicators and illumination is completely off.

18
Set the “Day”mode actuation/de-actuation time and the days of the week on
which the mode will be activated automatically.
Note. If you press any button or touch the slider when the
“
Day
”
mode is active, the
clock will exit this mode for the whole current day.
Note. If the set intervals of the
“
Night
”
and
“
Day
”
intervals overlap, the
“
Night
”
mode
has a priority.
6.6. Tube Brightness
Enables setting the IN-18 Nixie tube glow brightness. Reduced brightness
extends the tube service life and substantially reduces the power consumption.
6.7. GLONASS/GPS Satellite Loss Indication
If within 24 hours the clock did not synchronize the time by GLONASS/GPS
satellites, the satellite loss indication is on. The indication is performed by
double blinking of the second mark. To recover the normal reception, see
Section 8.
If for some reasons the clock is located in the place where GLONASS/GPS
satellite system reception is impossible, switch the satellite loss indication off
for the second time mark normal operation.

19
7. CARE AND MAINTENANCE
7.1. The Clock Body Care
The clock body does not need any special care or protection coating
application throughout the entire service life. To remove the dust accumulated
off the body and tubes use dry or slightly wet cloth without any detergents.
Do NOT wash the clock or wipe them with wet cloth! Do NOT wipe the clock
body with alcohol-containing liquids!
7.2. Tube Care (Cathode Recovery)
IN-18 Nixie tubes, like any other glow-discharge tubes, are susceptible to
cathode poisoning effect. This effect is demonstrated in case of the long-term
glow of one digit in the tube which results in the oxidation of the local areas
of the tube cathodes. This effect is manifested as non-uniform glow areas in
the digit as shown in the picture below.
In AiV Nixie clock cathode recovery mode is provided. The cathodes are
recovered by means of their multi-hour heating caused by increased current.
The recovery should be performed for each tube and each digit in the tube.
Only one digit may be recovered at a time. The clock function hereby is not
accessible. Depending on the poisoning degree the recovery of each digit may
take from 1 to 10 hours.

20
To recover the cathodes perform the following steps:
1. Remember the tubes and digits with non-uniform glow.
2. Switch the clock power supply off.
3. Remove the tubes out of the clock by pulling them strictly vertically
upwards.
4. Insert the tube to be recovered into the extreme right socket (minute units
socket). Other sockets may be left empty.
Attention! Electric shock hazard! The tube sockets are under high voltage. Do
not touch the contacts to avoid electrical shock.
5. Press and hold the right-hand (TIME) and left-hand (LED) buttons
simultaneously and switch the power supply on. The clock will switch over
to the tube cathode recovery mode.
6. Using “+”and “-” buttons select the digit to be recovered in the tube.
7. The Nixie tube recovery process will start. Hereby the tube will glow
brighter and heat stronger. It is necessary to visually check the recovery
process end. For this purpose the cathode recovery mode is de-actuated
for 3 seconds every 30 seconds and the tube operates in the normal mode
(with a normal brightness). At this time visually assess whether the non-
uniform glow areas are still present in the digit selected. Continue the
process until the digit uniform glow has been completely recovered.
8. Using “+”and “-” buttons select the next digit to be recovered in the tube
and repeat Step 7 until all the digits in the current tube have been
recovered.
9. Switch the clock power supply off. Remove the recovered tube. If another
tube needs recovery, repeat Steps 4-8. When all the tubes have been
recovered, install them into the clock and switch the power supply on for
the clock normal operation.
Table of contents
Popular Clock manuals by other brands

Omron
Omron S8T-DCBU-02 instruction manual

Oregon Scientific
Oregon Scientific JM889 user manual

Dukane
Dukane Dukane 24A715M installation manual

Gorgy Timing
Gorgy Timing LEDI 1.60 user guide

La Crosse Technology
La Crosse Technology 513-1918B quick start guide

Isgus
Isgus Perfect 2020 OPERATING AND INSTALLATION Manual