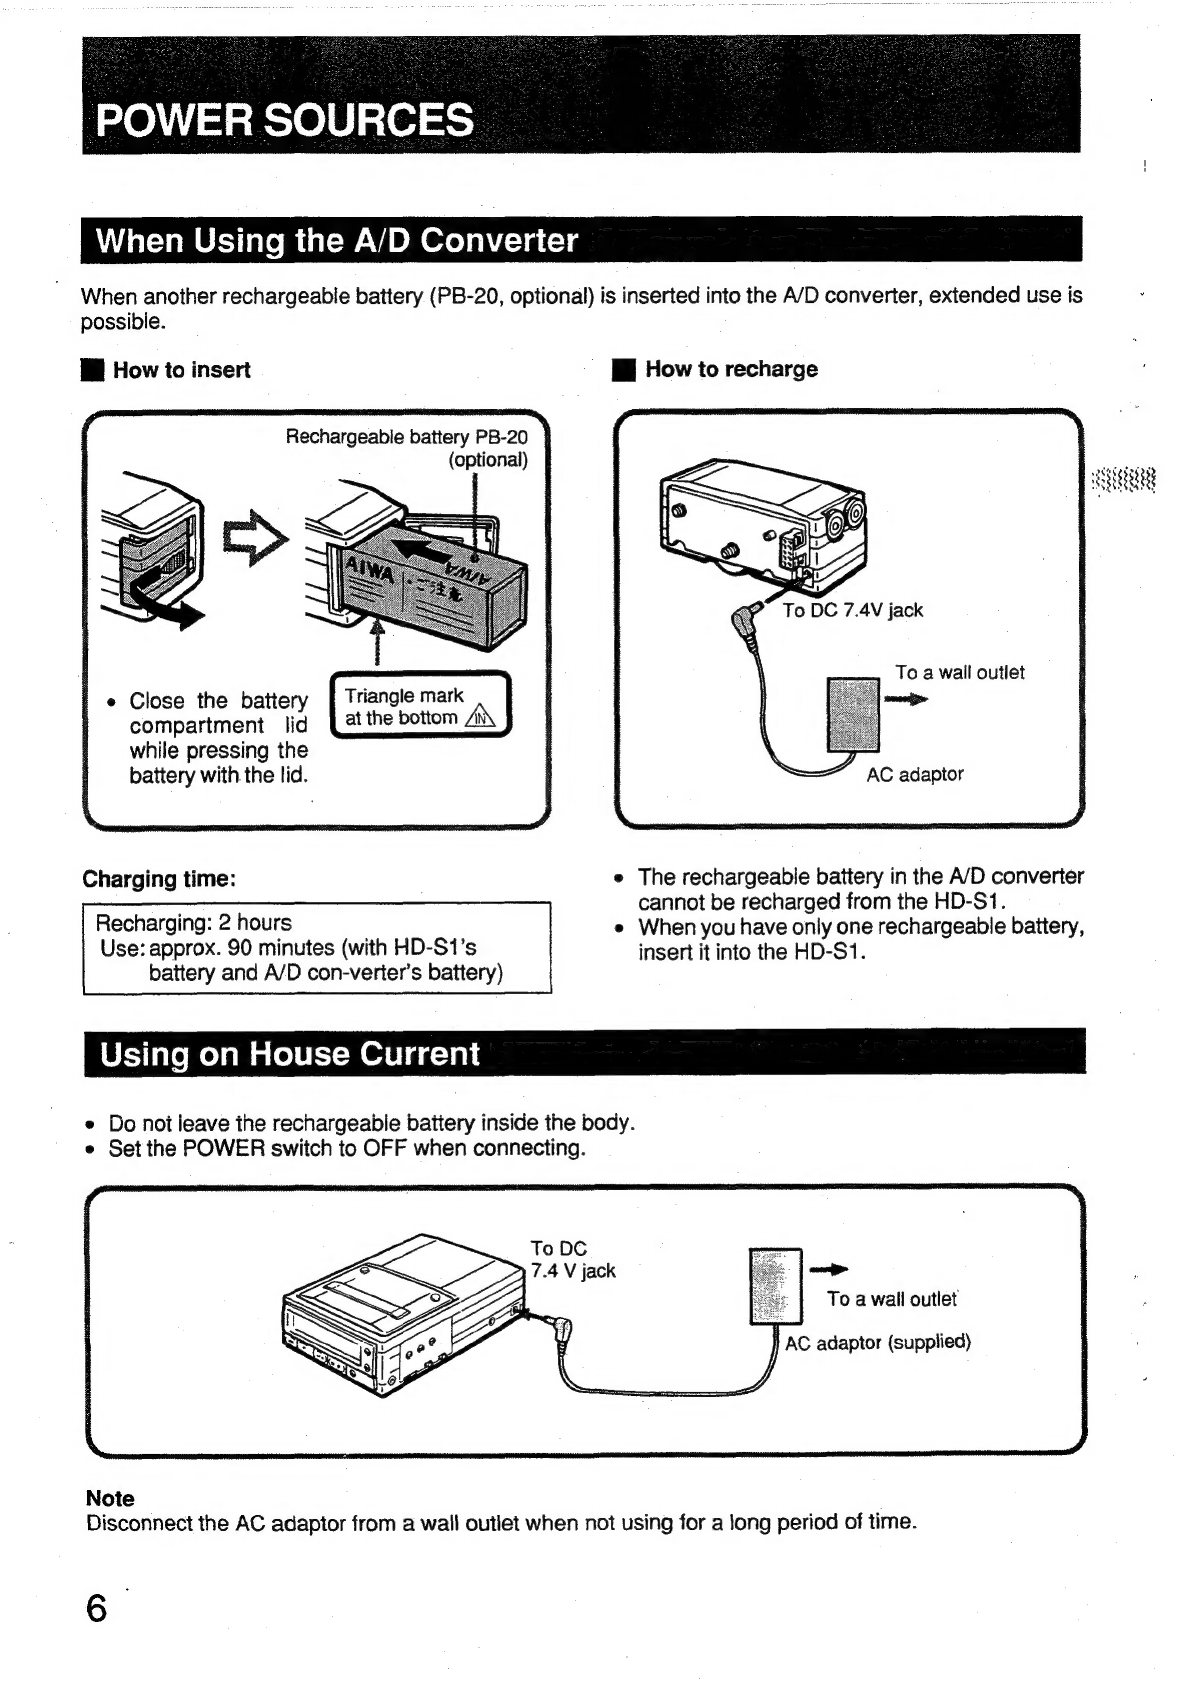
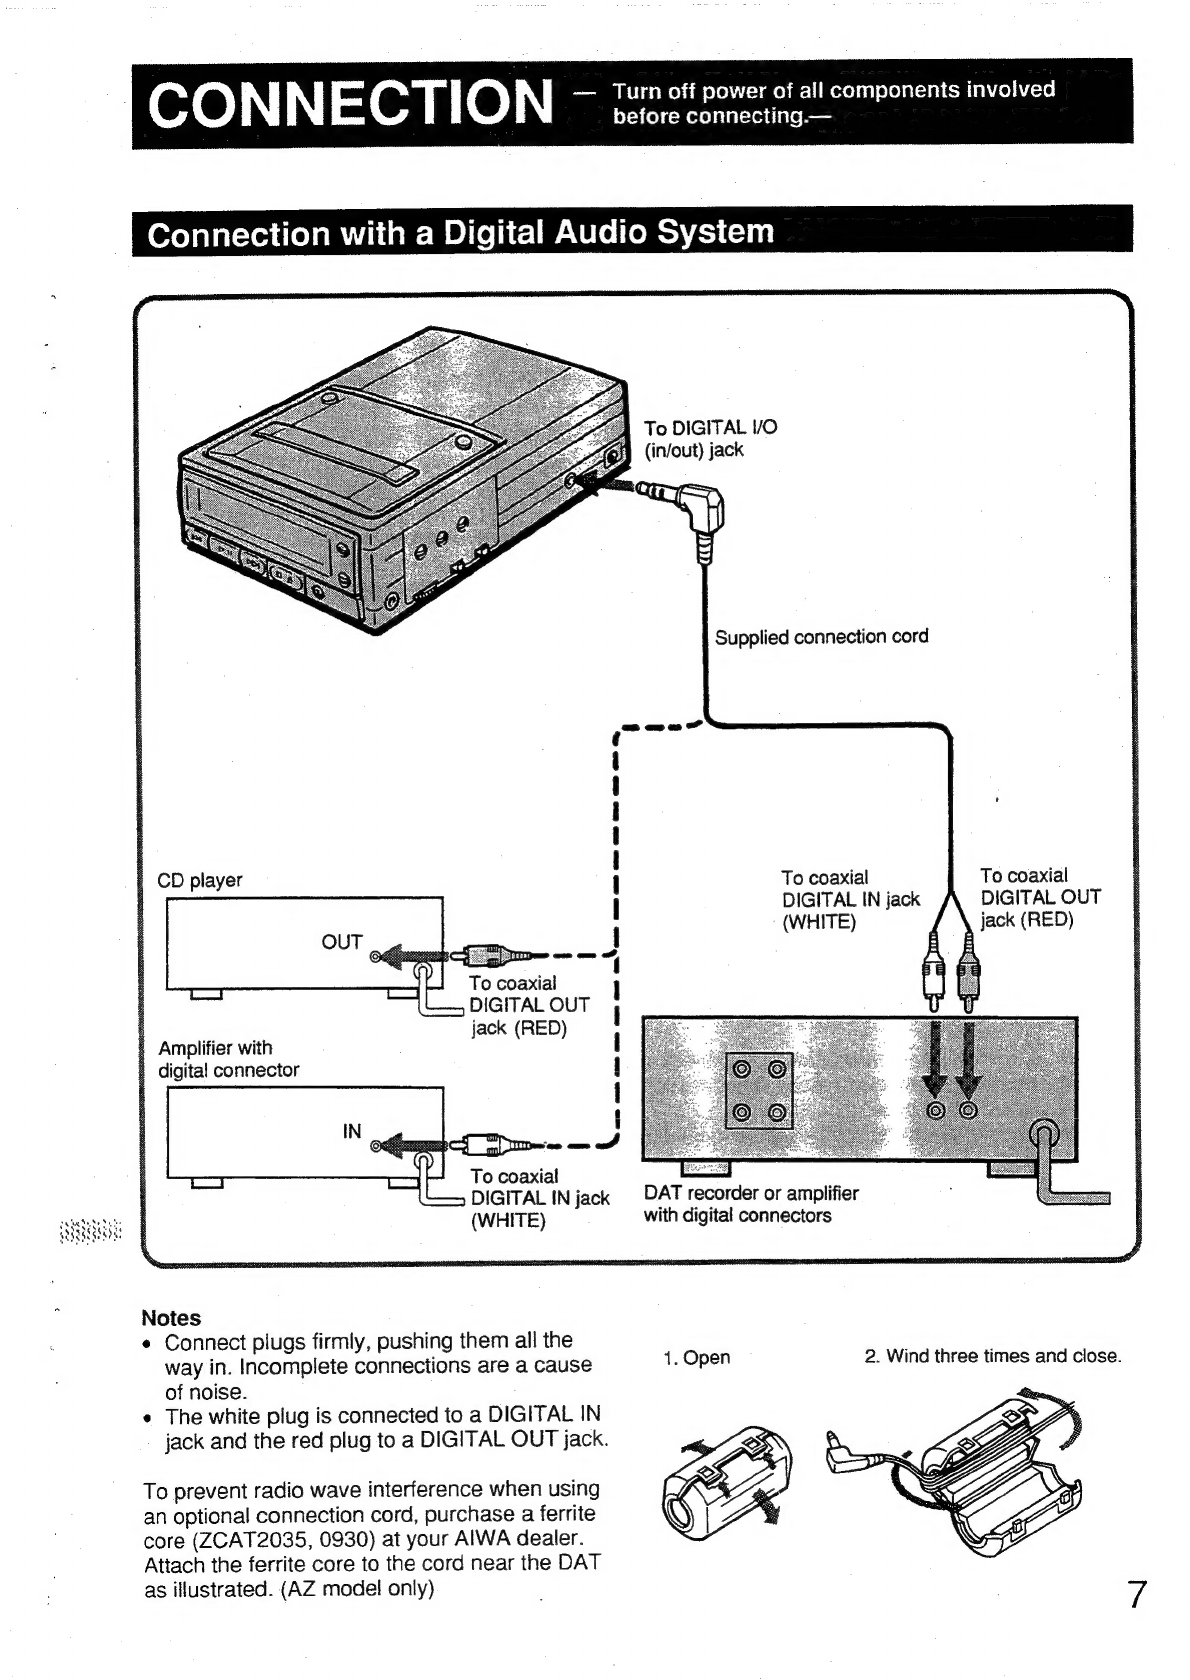
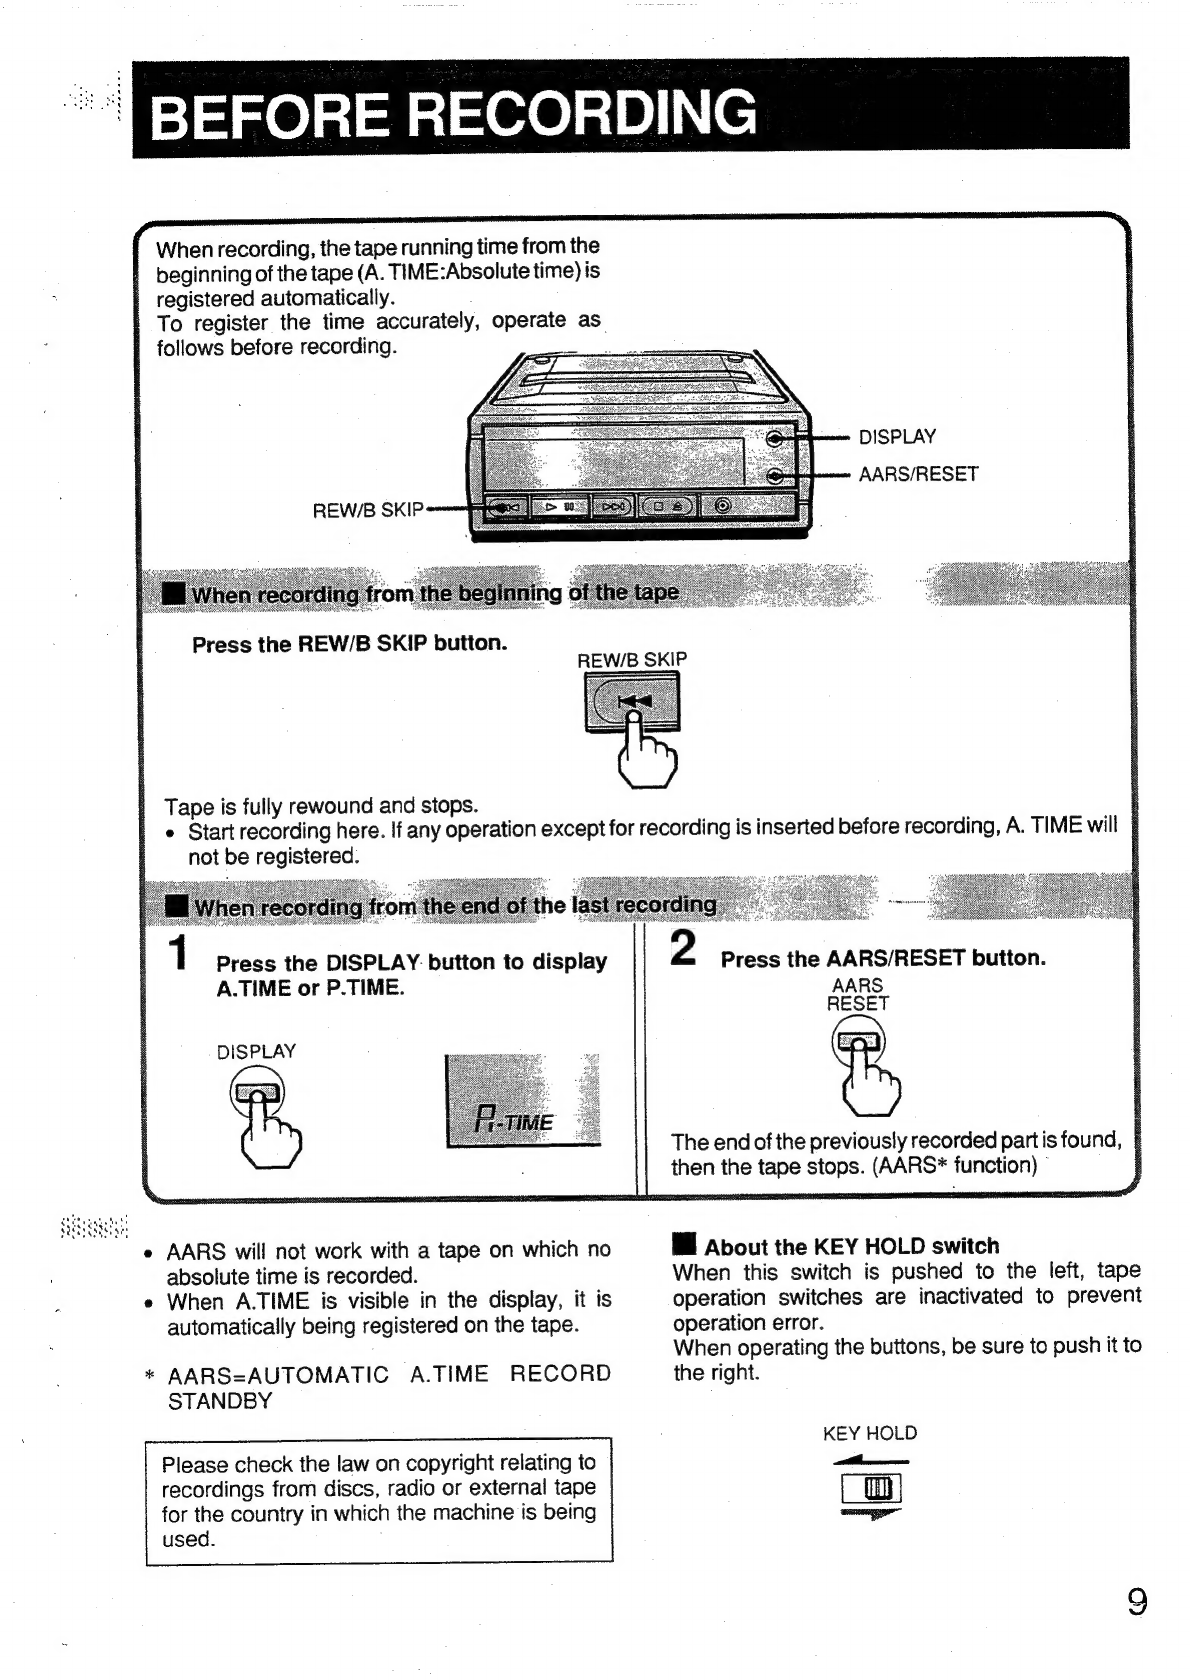
Aiwa HD-S1 User manual

AIWA
OPERATING
INSTRUCTIONS
|
a
DIGITAL
AUDIO
TAPE
RECORDER
MAGNETOFONO
DE
CINTA
AUDIODIGITAL
IMPORTANT
.
(For
the:
customers
|
inthe
United
Kingdom)
|
The
wires:in:
this
mains
;
lead
are
coloured:in:
accordance
with
the
following
code:
:
Blue:
Neutral
Brown:
Live
As
the
colours
of
the
wires
in
the
mains
lead
of
this
apparatus
may
not
correspond
with
the
coloured
markings
identifying
the
terminals
in
your
plug
proceed
as
follows.
The
wire
which
is
coloured
blue
must
be
connected
to
the
terminal
which
is
marked
with
the
letter
N
or
coloured
black.
The
wire
which
is
coloured
brown
must
be
connected
to
the
termina!
which
is
marked
with
the
letter
L
or
coloured
red.
Hi
|
sa
|
a
Digital
A
Rudo

@
This
unit
should
not
be
bumped
or
roughly
handled.
Excessive
force
can
damage
the
unit.
MM
Avoid
use
or
placement
in
the
following
locations:
e
Extremely
hot
locations,
such
as
inside
a
car
parked
in
the
sun
e
Humid
or
dusty
locations
e
Locations
with
strong
vibrations
e
Extremely
cold
locations
Mi
When
using
near
a
radio
tuner
or
TV
lf
noise
interferes
with
the
sound
or
picture
of
the
radio
tuner
or
TV,
move
this
unit
away
from
the
radio
tuner
or
TV.
Hl
When
using
at
the
beach
or
in
the
rain:
Be
careful
that
water
drops
and
sand
do
not
get
in
the
unit.
They
may
cause
damage.
Hi
When
not
using
for
a
long
period
of
time:
Remove
the
cassette
tape.
If
the
tape
is
left
in
for
along
period
of
time,
it
may
cause
damage
inside
by
sticking
to
the
tape
head
or
other
parts.
Hl
About
the
volume
setting
Before
beginning
playback,
turn
the
volume
all
the
way
down,
then
turn
up
gradually
to
the
desired
volume
level
during
playback.
If
the
initial
noise
level
of
a
digital
tape
is
used
as
a
guide
to
setting
the
volume
(as
may
be
done
with
ordinary
cassettes),
the
resulting
playback
volume
can
be
extremely
loud,
and
may
possibly
destroy
the
speakers.
When
using
headphones,
be
careful
not
to
damage
your
ears
with
high
volume
levels.
Main
Features
Hf
About
condensation
If
left
in
a
room
made
warm
and
damp
by
a
heater,
water
droplets
may
form
inside;
this
is
known
as
condensation.
If
left
as
is,
the
tape
may
not
only
get
entangled
in
the
internal
mechanism
and
fail
to
work
properly;
both
the
tape
and
the
mechanism
could
be
damaged.
This
recorder
is
equipped
with
safety
features
to
prevent
this,
but
to
be
safe,
do
not
leave
tapes
inside
the
recorder
if
there
is
any
possibility
of
this
occuring.
Remove
tapes
from
the
recorder
when
not
in
use.
When
condensation
occurs,
only
the
STOP/EJECT
button
operates.
If
water
droplets
form
during
operation,
the
CAUTION
indicator
flashes
and
operation
stops.
Press
the
STOP/EJECT
button,
remove
the
cassette
and
leave
with
the
cassette
hoider
open,
for
approximately
2
hours.
i
Care
and
maintenance
Wipe
the
cabinet
and
panels
with
a
dry,
soft
cloth.
Thinners,
benzine,
and
alcohol
are
to
be
avoided,
as
they
can
damage
the
surface.
Ml
Head
cleaning
If
the
heads
become
dirty
or
dusty,
the
sound
may
be
intermittent
or
noise
may
occur.
To
prevent
these
phenomena,
clean
the
heads
using
a
commercially
available
DAT
head
cleaning
tape.
To
reduce
the
risk
of
fire
or
electric
shock,
do
not
expose
this
appliance
to
rain
or
moisture.
e
Compact,
light
DAT
recorder
you
can
hold
in
your
hand
e
3-way
power
for
use
anywhere
e
Subcode
registration
for
high-speed
search
e
Multi-function
counter
showing
elapsed
recording
time
(A.
TIME),
elapsed
playing
time
of
aselection
(P.
TIME)
or
tape
counter
Answering
the
new
standard
SCMS
for
aed
digital
recording
e
A/D
converter
supplied
eset
de
Racsrat
eta

sekey
dy
es
MORNE)
Peak
level
meter
NAMES
OF
PARTS
AND
THEIR
FUNCTIONS
Display
Cassette
holder
REW/B
SKIP
button
Press
to
rewind
(from
stop),
RENUMBER
button
or
to
skip
and
search
back
for
a
previous
track
(during
play).
ID
MARK
button
PLAY/PAUSE
button
“Pause”
is
automatically
_
ID
ERASE
button
released
after
10
minutes.
DC
7.4
V
jack
F
FWD/F
SKIP
button
Press
to
fast
forward
(from
stop),
or
to
skip
ahead
tracks
(during
play).
DIGITAL
I/O
(in/out)
jack
INPUT
selector
switch
STOP/EJECT
button
KEY
HOLD
switch
REC
button
AARS/RESET
button
Phones
VOLUME
DISPLAY
button
PHONES
jack
(Chooses
Absolute
Time,
playing
time
of
a
selection,
or
counter
numbers)
System
module
connector
For
the
connection
of
A/D
converter
POWER
switch
nen
Flexible
arm
attachment
A/D
converter
mounting
screw
Battery
compartment
lid
Display
OVER
indicator
(for
excessive
input
level)
Track
number/Skip
number
START
ID
indicator
Y
BATTERY
indicator
CAUTION
indicator
OVER
om,
oo
oa
A-rme
lu
REC
indicator
Counter
PLAY
indicator
3

BALANCE
control
Lock
pin
REC
LEVEL
control
Mounting
screw
Connector
ANALOG
OUT
jack
ANALOG
IN
jack
Battery
compartment
lid
LINE/MIC
switch
MIC
ATT
switch
Carrying
case

POWER
SOURCES
i
How
to
insert
|
e
Set
the
POWER
switch
to
OFF
when
|
inserting
the
rechargeable
battery.
Rechargeable
battery
PB-20
(supplied)
Triangle
mark
at
the
bottom
A\
|
e
Close
the
battery
compartment
lid
while
|
pressing
the
battery
with
the
lid.
Charging
time:
Recharging:
2
hours
(with
one
PB-20
in
the
HD-S1)
Use:
approx.
55
minutes
Wi
Notes
on
the
rechargeable
battery
e
To
avoid
overcharging,
take
care
not
to
recharge
it
for
over
8
hours.
e
Use
only
the
supplied
AC
adaptor
for
recharging.
e
Remove
it
when
not
using.
e
Use
the
unit
in
temperatures
between
5°C
to
35°C
to
assure
quality
performance.
"
¢
Whennotusing
the
unit,
set
the
POWER
switch
to
OFF.
The
rechargeable
battery
wears
when
the
POWER
switch
is
ON
even
if
the
unit
is
not
in
operation.
Ml
Battery
wear
When
the
BATTERY
indicator
flickers
in
the
display,
recharge
it
or
replace
it
with
a
recharged
one.
If
use
is
continued,
the
BATTERY
indicator
will
go
out
and
operation
will
stop.
e
When
operation
stops,
set
the
POWER
switch
to
OFF
or
take
the
battery
out.
Leaving
as
is
will
deteriorate
the
battery.
Use
with
the
Rechargeable
Battery
Wl
How
to
recharge
|
e
Charge
for
more
than
2
hours
when
using
|
for
the
first
time
or
after
3
months
have
§
|
passed
without
use.
1
e
Set
the
POWER
switch
to
OFF
when
|
recharging.
:
POWER
switch
“OFF”
To
DC
7.4
V
jack
oO
a
wall
outlet
AC
adaptor
(supplied)
|
i
Battery
maintenance
e
The
supplied
rechargeable
battery
can
be
recharged
approximately
300
tinves.
e
Lead
rechargeable
batteries
are
easy
to
discharge,
and
take
a
longer
time
to
be
recharged
if
left
without
use.
Recharging
fully
soon
after
use
prevents
excessive
and
neediess
discharge.
e
Replace
the
rechargeable
battery
with
a
new
one
(PB-20,
optional)
when
it
operates
for
successively
shorter
times,
even
when
fully
recharged.
Mi
AUTO
POWER
OFF
function
if
the
unit
is
not
in
operation
for
about
5
minutes,
the
power
automatically
goes
off.
To
turn
on
the
power,
set
the
POWER
switch
to
ON
after
once
setting
it
to
OFF.

When
Using
the
A/D
Converter
When
another
rechargeable
battery
(PB-20,
optional)
is
inserted
into
the
A/D
converter,
extended
use
is
possible.
BW
How
to
insert
Hi
How
to
recharge
Rechargeable
battery
PB-20
(optional)
|
©
Close
the
battery
|
Triangle
mark
|
compartment
lid
(atthe
bottom
/A\
while
pressing
the
battery
with
the
lid.
Charging
time:
e
The
rechargeable
battery
in
the
A/D
converter
:
cannot
be
recharged
from
the
HD-S1.
Recharging:
2
hours
e
When
you
have
only
one
rechargeable
battery,
Use:
approx.
90
minutes
(with
HD-S1’s
insert
it
into
the
HD-S1.
battery
and
A/D
con-verter’s
battery)
Using
on
House
Current
|
e
Do
noi
leave
ihe
rechargeabie
battery
inside
the
body.
e
Set
the
POWER
switch
to
OFF
when
connecting.
>
To
a
wall
outlet
AC
adaptor
(suppiied)
Note
Disconnect
the
AC
adaptor
from
a
wall
outlet
when
not
using
for
a
long
period
of
time.
6

CONNECTION
7~
rece
percs
crit
components
involved
ols
ie)
goa
ere)
410216]
01016
foes
CD
player
a:
>
a>
Gu
cu
GES
GED
Re
Ch
2
Boaeen
om am
o&,
g
(M)
A
j
—
a
To
coaxial
1]
DIGITAL
OUT
|
jack
(RED)
Amplifier
with
i
1
I
a
'
digital
connector
To
coaxial
DIGITAL
IN
jack
(WHITE)
Notes
¢
Connect
plugs
firmly,
pushing
them
all
the
way
in.
Incomplete
connections
are
a
cause
of
noise.
«
The
white
plug
is
connected
to
a
DIGITAL
IN
jack
and
the
red
plug
to
a
DIGITAL
OUT
jack.
To
prevent
radio
wave
interference
when
using
an
optional
connection
cord,
purchase
a
ferrite
core
(ZCAT2035,
0930)
at
your
AIWA
dealer.
Attach
the
ferrite
core
to
the
cord
near
the
DAT
as
illustrated.
(AZ
model
only)
To
DIGITAL
VO
(in/out)
jack
Supplied
connection
cord
aaa”
To
coaxial
DIGITAL
OUT
jack
(RED)
To
coaxial
DIGITAL
IN
jack
DAT
recorder
or
amplifier
with
digital
connectors
1.
Open
2.
Wind
three
times
and
close.

Connection
with
Analog
Audio
System
e
Before
connecting,
attach
the
A/D
converter.
(See
below)
Preamplifier,
integrated
amplifier,
A/V
amplifier,
receiver,
other
recorder
DAT
or
tape
f
E
DAT
or
tape
deck
output
9
Bs
deck
input
(WHITE)
(WHITE)
Supplied
connection
cord
Notes
e
When
using
this
unit
with
a
car
stereo,
connect
the
PHONES
jack
of
the
HD-S1
(or
the
ANALOG
OUT
jack
on
the
A/D
converter)
to
the
cassette
deck
of
the
car
stereo
using
a
commercially
available
cassette-
type
car
connecting
pack.
e
The
red
plug
is
connected
to
the
right
(R)
channel
and
the
white
plug
to
the
left
(L).
How
to
Attach
the
A/D
Converter
to
the
HD-S1
|
»
Turn
the
HD-S1
power
off.
Connector
@
Put
the
connector
into
the
HD-S1.
|
@)
Slide
the
A/D
converter
in
the
direction
of
the
|
arrow
as
shown.
|
@)
Tighten
the
mounting
screw.
e
To
remove,
loosen
the
mounting
screw
and
detach
the
A/D
converter
from
the
HD-S1.

a)
BEFORE
RECORDING
When
recording,
the
tape
running
time
from
the
beginning
of
the
tape
(A.
TIME:Absolute
time)
is
registered
automatically.
To
register
the
time
accurately,
operate
as
follows
before
recording.
REW/B
SKIP
Press
the
REW/B
SKIP
button.
Tape
is
fully
rewound
and
stops.
REW/B
SKIP
DISPLAY
AARS/RESET
°
Start
recording
here.
If
any
operation
except
for
recording
is
inserted
before
recording,
A.
TIME
will
§
not
be
registered.
1
Press
the
DISPLAY.
button
to
display
A.TIME
or
P.TIME.
DISPLAY
ues
e
AARS
will
not
work
with
a
tape
on
which
no
absolute
time
is
recorded.
e
When
A.TIME
is
visible
in
the
display,
it
is
automatically
being
registered
on
the
tape.
*
AARS=AUTOMATIC
A.TIME
RECORD
STANDBY
Please
check
the
law
on
copyright
relating
to
recordings
from
discs,
radio
or
external
tape
for
the
country
in
which
the
machine
is
being
used.
.
2
Press
the
AARS/RESET
button.
AARS
RESET
The
end
of
the
previously
recorded
partis
found,
then
the
tape
stops.
(AARS*
function)
MM
About
the
KEY
HOLD
switch
When
this
switch
is
pushed
to
the
left,
tape
operation
switches
are
inactivated
to
prevent
operation
error.
When
operating
the
buttons,
be
sure
to
push
it
to
the
right.
KEY
HOLD
SS
emg

1
insert
a
cassette.
STOP/EJECT
The
side with
the
tape
visible
faces
up.
2
Set
the
INPUT
switch
to
D
(digital).
INPUT
DandA
To
pause
Press
the
PLAY/PAUSE
button.
To
resume
Press
the
PLAY/PAUSE
button
again.
10°
3
Press
the
PLAY/PAUSE
button
while
pressing
the
REC
button.
The
unit
will
enter
the
record
mode,
but
the
tape
drive
will
be
in
pause.
PLAY/PAUSE
4
Press
the
PLAY/PAUSE
button
to
start.
light
PLAY/PAUSE
To
take
out
the
cassette
Press
the
STOP/EJECT
button
in
stop
mode.
To
check
the
sound
before
recording
Press
the
REC
button
to
monitor.

Hi
Notes
on
recording
from
digital
sources
e
Recorded
level
and
recorded
balance
cannot
be
changed
when
recording
from
digital
sources.
e
When
the
digital
input
signal
is
unstable
or
intermittent,
the
HD-S1
automatically
enters
the
PAUSE
mode.
Recording
resumes
when
the
signal
once
again
becomes
consistent.
e
lf
nothing
is
connected
to
the
digital
input
jack,
the
recording
pause
mode
cannot
be
released
by
pressing
the
PLAY/PAUSE
button.
fl
The
cassette
accidental
erasure
prevention
tab
Recording
over
any
previously
recorded
signal
will
permanently
erase
it.
To
save
a
recording,
make
sure
the
tab
on
the
cassette
is
slid
to
the
open
position.
To
record
over
a
previously
recorded
tape,
make
sure
that
this
tab
is
in
the
closed
position.
WF
Digital
dubbing
By
connecting
to
another
DAT,
it
is
possible
to
do
tape-to-tape
digital
dubbing
via
the
digital
connectors
of
the
two
recorders.
If
the
tape
being
duplicated
contains
START
IDs,
they
will
be
duplicated
on
the
tape
copy.
The
record
level
will
be
exactly
the
same
on
the
original
and
copied
tapes:
Unlike
START
IDs,
program
numbers
are
not
transferred.
The
HD-S1's
renumbering
function
can
assign
program
numbers.
e
{tis
restricted
to
do
digital
dubbing
from
the
tape
which
is
digital
recorded
by
the
DAT
with
SCMS.
Hi
What’s
SCMS
(Serial
Copy
Management
System)?
SCMS
is
the
system
that
restricts
tape-to-tape
digital
dubbing
(copying)
in
order
to
protect
the
copyright.
It
is
possible
to
do
digital
recording
from
digital
sources
with
the
copyright
(the
sources
with
the
copy
prohibit
signals,
such
as
CDs
and
DAT
music
tapes).
However,
it
is
not
possible
to
do
digital
dubbing
from
the
tapes
recording
those
sources.
Renesas
digital
digital
Recording
possible
(closed)
Recording
is
not
possible
(open).
WH
About
DAT
cassettes
e
Unlike
analog
cassette
tapes,
recording
and
playback
are
possible
on
only
one
side
of
a
cassette.
e
The
cassette
shells
are
designed
to
inhibit
the
entry
of
dust
during
normal
use.
Do
not
force
the
protective
panels
open.
Constant
exposure
to
high
smoke
levels
can
cause
damage
to
tape.
accidental
erasure
prevention
tab
recognition
holes
music
tapes
and
so
on
CDs,
DAT
=
3
The
copy
prohibit
signal
is
recorded
on
the
analog
recorded
tapes
by
the
HDA-1,
A/D
converter.
Digital
dubbing
is
possible
only
once.
digital
digital
converter
:
HDA-1
DAT
with}
Sa
+
=>
Iscus
microphone.
and
soon
HD-S1
11

RECORDING
PAN
at-lfolem
a(-lere}celinie|
cmt
ML,
a
3
Set
the
LINE/MIC
switch
to
LINE.
LINE/MIC
LINE
MIC
al
1
Insert
a
cassette.
STOP/EJECT
4
Check
the
record
ievel.
1)
Press
the
REC
button;
the
level
meter
will
show
input
levels
but
the
tape
transport
will
not
be
engaged.
2)
Feed
the
A/D
converter
a_
signal
represeniative
of
the
loudest
signal
anticipated
during
recording.
3)
Set
the
level
and
the
balance
by
using
the
peak
level
meter.
v
The
side
of
the
tape
visible
faces
up.
REC
2
Set
the
INPUT
switch
to
A
(adaptor).
INPUT
Dead
MIN
MAX
L
R
BALANCE
(REC
LEVEL]
40
-30
-20
-10
-6
-3
-1
O
LEFT
ULUPEURUDEDRDOBUOUSERRORDEDEGRSQERODIEMS
RIGHTHRDE
EEE EEE
12

5
Press
the
PLAY/PAUSE
button
while
|
pressing
the
REC
button.
PLAY/PAUSE.
blinks
6
Press
the
PLAY/PAUSE
button
once
|
more
to
begin
recording.
PLAY/PAUSE
ches
de
wee?
SHER
Mf
Adjusting
the
record
level
Adjust
the
REC
LEVEL
knob
so the
meter
does
not
go
past
0
cB
at
the
loudest
point
in
the
music.
lf
0
dB
is
passed,
the
OVER
indicator
appears.
If
itis
displayed
continually,
the
recorded
sound
will
be
distorted,
so
lower
the
recordJevel
accordingly.
13

atcrere)celfalem
item
uiledge)elalelal=
1
Insert
a
cassette.
STOP/EJ
4
Set
the
INPUT
switch
to
A
(adaptor).
ECT
or
The
side
of
the
tape
visible
faces
up.
5
Press
the
REC
button
and
adjust
record
level
and
recorded
balance.
2
Connect
a
microphone
to
the
ANALOG
IN
jack.
3
Set
the
LINE/MIC
switch
to
MIC.
MIN
MAX
LINE/MIC
=
L
R
BALANCE
[REC
LEVE
14

6
Press
the
PLAY/PAUSE
button
while
|
pressing
the
REC
button.
PLAY/PAUSE
REC
7
press
the
PLAY/PAUSE
button
once
|
more
to
begin
recording.
PLAY/PAUSE
Wl
About
recording
from
direct
microphone
input
When
it
is
impossible
to
record
without
distortion
or
when
a
low
enough
recording
level
cannot
be
set,
set
the
MIC
ATT
switch
to.20
dB
and
readjust
record
level.
Hi
To
erase
a
recording
If
the
previously
recorded
tape
is
recorded
over
again,
the
previous
recording
will
be
erased.
To
erase
without
recording
any
sound;
set
the
INPUT
switch
to
A,
set
the
LINE/MIC
switch
of
the
A/D
converter
to
LINE,
and
turn
the
REC
LEVEL
knob
to
MIN,
then
operate
the
steps
of
recording.
Hi
Nonrecorded
sections
(blanks)
and
silent
recorded
sections
Although
both
are
silent,
digital
tape
recorders
make
a
distinction
between
nonrecorded
sections
or
blanks
(sections
which
have
never
been
recorded)
and
silent
recorded
sections.
Unlike
blanks,
silent
recorded
sections
have
subcode
signals
and
ATF
signals
recorded
on
them.
lf
there
are
blanks,
it
may
take
a
long
time
to
conduct
a
search
or
A.TIME
(the
recording
time
from
the
beginning)
may
not
be
registered
correctly.
Therefore,
when
recording
from
partway
through
the
tape,
use
AARS
function
to
record
without
blank.
This
unit
is
not
compatible
with
the
long-play
mode
or
4-channel
mode.
15

1
If
there
is
an
amplifier
connected
to
the
HD-S1,
turn
the
volume
down.
2
'
Insert
a
cassette.
lights
STOP/EJECT
4
Readjust
amplifier
volume
and/or
|
headphone
level
to
the
desired
listening
|
The
side
of
the
tape
level.
visible
faces
up.
Using
Headphones
,
We
recommend
connecting
the
headphones
to
h
j
:
it.
Press
the
PLAY/PAUSE
button.
the
PHONES
jack
of
the
remote
control
uni
Press
the
PLAY/PAUSE
button
again.
Press
the
STOP/EJECT
button
in
stop
mode
Press
the
STOP/EJECT
button.

To
skip
tracks
Press
F
FWD/F
SKIP
1
during
play.
Press
the
same
number
of
times
as
the
number
of
tracks
you
want
to
skip.
(Example
of
selecting
the
fifth
track
to
the
one
playing
now
by
pressing
five
times.)
Play
of
the
selected
track
is
about
to
begin.
Note
e
Press
k@<@
once
to
rewind
to
the
beginning
of
the
track
playing
now.
The
window
shows
R-1.
Wi
The
Track
format
DAT
tracks
are
divided
as
shown
in
the
diagram.
The
sound
signal
is
converted
into
a
PCM
(pulse
code
modulated)
digital
signal
and
recorded.
ATF
(automatic
tracking
finding)
recording
is
done
on
both
sides
of
the
PCM
signal,
enabling
stable
tracking
with
the
rotating
head
alone.
Further
outside
the
ATF
tracks
are
the
subcode
areas.
Codes
used
for
high-speed
searches
may
be
recorded
in
the
subcode
areas.
The
HD-S1
uses
start
IDs,
recorded
tape
running
time
(Absolute
TIME)
and
program
numbers.
Finding
Track
Start
To
find
a
previous
track
Press
REW/B
SKIP
k@<@
during
play.
Press
the
same
number
of
times
as
the
number
of
tracks
you
want
to
skip.
(Example
of
selecting
the
second
track
to
the
one
playing
now
by
pressing
three
times.)
Piay
of
the
selected
track
is
about
to
begin.
tape
width
3.81
mm

In
addition
to
the
digital
audio
signal
containing
the
sound,
DAT
will
also
register
subcodes
that
make
this
tape
a
great
deal
more
convenient
to
use.
When
registering
or
erasing
subcode
information,
the
cassette
shell’s
record
prevention
tab
must
be
in
the
closed
(recordable)
position.
When
additions
and
changes
to
the
subcodes
are
completed,
remember
to
protect
them
and
the
sound
recording
by
returning
the
tab
to
its
open
(recording
protected)
position.
Subcodes
that
can
be
registered
by
this
recorder
“Shows
the
sequential
recorded
Automatically
time
from
the
beginning
of
the
tape.
Automatically
during
the
recording
Manually
during
recording
or
playback
Shows
the
beginning
of
a
Automatically
during
the
track.
recording
By
RENUMBER
function
~A.TIME:
Absolute
time
START
ID
(Registered
for
9
seconds
on
the
beginning
of
a
track)
PROGRAM
NO.
(Registered
for
9
seconds
on
the
beginning
of
a
track)
Shows
the
number
of
tracks
(in
sequence).
e
START
!D:
ID
is
a
shortened
form
of
Identification
Code.
|
About
START
IDs
|
|
7
START
!Ds
mark
the
beginnings
of
programs.
If
they
are
registered,
the
location
of
programs
during
playback
is
easy.
They
are
registered
automatically
during
recording,
or
manually
at
the
desired
location
during
recording
or
playback.
While
START
IDs
are
being
registered,
only
the
STOP/EJECT
button
functions.
i
How
registering
is
done
automatically
e
PROGRAM
NOs
are
aiso
regisiered
with
START
IDs.
e
START
IDs
may
also
be
registered
following
or
during
pianissimo
or
extremely
low-level
music.
e
START
IDs
may
not
be
registered
if
narration
or
sy
ia
earache
hand
clapping
is
recorded
between
programs.
the
critical
level
e
START
IDs
are
not
registered
automatically
during
tape-to-tape.
digital
dubbing.
jum
3
seconds
or
more
18
war
atewey
ye
re
Pa
Pee
Pater
he
Teg
SSUES

Ml
To
register
IDs
at
the
desired
locations
START
IDs
are
not
registered
automatically
during
recording
digital
signals
or
when
the
sound
signals
do
not
break
between
selections.
in
such
a
case,
-
they
can
be
registered
manually
as
follows:
Press
ID
MARK
at
the
desired
point
during
playback
or
recording.
Press
ID
MARK.
“—”
&
START
ID
registration
START
ID
is
registered
for
9
seconds
from
the
point
the
button
pressed.
START
ID
indicator
flickers
during
registering.
Note
More
than
18
seconds
must
elapse
between
START
!Ds
for
proper
track
location
during
playback.
WB
How
to
erase
START
IDs
1
Find
the
START
ID
you
want
to
erase.
2
Press
the
ID
ERASE
button
during
playback
after
you
have
passed
this
start
ID.
Press
ID
ERASE.
ee
START
ID
(Py
RAM
NO
START
ID
return
This
START
ID
is
erased.
The
START
ID
indicator
flickers
during
erasure.
The
PROGRAM
NO
is
also
erased
at
the
same
time.
Wl
To
revise
program
numbers
The
order
of
program
numbers
are
disrupted
when
registering
or
erasing
START
IDs
on
a
previously
recorded
tape
or
during
rerecording.
The
program
numbers
of
a
tape
on
which
the
START
IDs
has
been
altered
can
be
quickly
and
simply
revised
using
the
RENUMBER
funciton.
Press
the
RENUMBER
button
during
playback
or
at
stop.
RENUMBER
After
the
tape
has
automatically
rewound
to
the
beginning,
the
first
START
ID
is
detected
and
the
program
numbers
are
added
in
succession,
starting
from
1.
During
registration,
the
sound
on
the
tape
is
audible.
After
the
program
number
has
been
automatically
registered
on
the
first
9
seconds
of
the
program,
the
recorder
automatically
fast
forwards
to
the
START
ID
of
the
next
track.
Note
The
renumbering
function
does
not
work
on
tapes
with
no
recorded
absolute
time.
19

EFFECTIVE
USE
OF
THE
COUNTER
_
DISPLAY
Tape
running
time
(A.
TIME)
(P.
TIME)
The
tape
running
time
(A.
TIME),
program
elapsed
time
(P.
TIME)
and
tape
counter
are
displayed
on
the
counter.
Press
the
DISPLAY
button
to
change
the
display.
e
A.TIME
display
is
not
shown:
When
A.TIME
is
not
registered,
window
displays
aoars
”
even
if
any
selections
are
recorded.
e
P.TIME
display
is
not
shown:
(a)When
START
IDs
are
not
registered.
(6)
During
fast
forwarding,
rewinding
or
searching
for
a
track.
@)When
starting
playback
from
the
middie
of
the
track.
P.TIME
is
not
displayed
until
the
next
START
1D.
e
How
to
reset
the
tape
counter:
Press
the
AARS/RESET
button
when
the
tape
counter
is
displayed.
Display
changes
to
“0000”.
The
buttons
function
the
same
as
the
ones
of
the
HD-S1,
except
for
the
REC
(record)
button.
e
Tape
cannot
be
ejected
when
pressing
the
STOP
button.
Set
the
MODE
switch
to
REC,
then
press
the
PLAY/PAUSE
button
while
pressing
the
REC
button.
(Recording
is
paused.)
Press
the
PLAY/PAUSE
button
again
to
start
recording.
e
When
not
recording,
set
the
MODE
switch
to
PROTECT
to
prevent
unintended
recording
(The
REC
button
will
not
function).
20
Connect
the
plug
to
the
PHONES
jack
of
the
HD-S1.
Push
the
KEY
HOLD
switch
upwards.
dphone
Connect
the
headphones
plug
to
the
PHONES
jack,
and
adjust
the
VOLUME
control.
e
Set
the
VOLUME
control
of
HD-S1
to
higher
the
middle.
ation
x2
Push
the
KEY
HOLD
switch
in
the
direction
of
the
arrow,
and
the
tape
operation
buttons
will
not
function.
Other manuals for HD-S1
2
Table of contents
Other Aiwa Recording Equipment manuals

Aiwa
Aiwa XC-RW500 User manual

Aiwa
Aiwa RM-P33 User manual

Aiwa
Aiwa CSD-A510 User manual

Aiwa
Aiwa CSD-A280LH User manual

Aiwa
Aiwa HV-FX7800 - SERVICE User manual

Aiwa
Aiwa XC-RW500 User manual

Aiwa
Aiwa TP-S90 User manual

Aiwa
Aiwa XC-RW500 User manual

Aiwa
Aiwa HV-FX6500 User manual

Aiwa
Aiwa TP-VS805 User manual