Aiwa TS-W45 User manual

ACTIVE SPEAKER SYSTEM (POWEREII SU13WOOFER)
SISTEMADE ALTAVOCESACTIVOS(ALTAVOZ[)E SUBGRAVESACTIVO)
ENCEINTEACOUSTIQUE ACTIVE (CAISSON IDEGRAVES ALIMENTE)
TS=W45

OWNER’S RECORD
For your convenience, record the model number and serial number
(you will find them on the rear of your set) in the space provided below.
Please refer to them when you contact your AIWA dealer in case of
difficulty,
Model No. TS-W45 U
Serial No.
1A~,●
RISK OF ELECTRIC SHOCK
DO NOT OPEN Al ●
“CAUTION:TO REDUCE THE RISK OF
ELECTRIC SHOCK,
DO NOT REMOVE COVER (OR BACK).
NO USER-SERVICEABLE PARTS INSIDE.
REFER SERVICING TO QUALIFIED
SERVICE PERSONNEL.”
Explanation of Graphical Symbols:
AThe lightning flash with arrowhead symbol,
within an equilateral triangle, is intended to alert
the user to the presence of uninsulated
“dangerous voltage” within the product’s
enclosure that may be of sufficient magnitude
to constitute arisk of electric shock to persons.
AThe exclamation point within an equilateral
triangle is intended to alert the user to the
presence of important operating and
●maintenance (servicing) instructions in the
literature accompanying the appliance.
WARNING: TO REDUCE THE RISK OF FIRE OR
ELECTRIC SHOCK, DO NOT EXPOSE
THIS APPLIANCE TO RAIN OR
MOISTURE.
TABLE OF CONTENTS
FEATURES ......................................................................... 2
PRECAUTIONS .................................................................. 4
POSITIONING ..................................................................... 6
Connections .................................................................. 6
OPERATION ....................................................................... 8
SPECIFICATIONS ............................................................ 10
FEATURES
●VOLUME control
●PHASE switch (NORMAfJREVERSE)
You can use the PHASE switch to change the quality or volume
of sound reproduced by the powered subwoofer.
●AUTO POWER function
You can set the powered subwoofer to be powered on
automatically when it receives signal from the stereo system.
●Two-way connection to the amplifier
The TS-W45 can be connected to equipment either with an RCA
phono jack for asuper woofer, or typical L and Rspeaker
terminals,
●SINGLE VENTED BAN DPASS system
TS-W45 adopts aSINGLE VENTED BAN DPASS system in
which port (1), duct (1), and air cavity (2) compose an acoustic
bandpass filter in front of air cavity(1). By virtue of this structure,
the bass reproduction limit is extended and sounds higher than
middle range frequencies are reduced in the SINGLE VENTED
BANDPASS system. This makes it possible for the TS-W45 to
reproduce powerful bass sound,
Speaker unit Air cavity(l)
II
r
;...!?...-“-.-,,.i
.....,,,....
-[T]
.3 ~
A2ii+
i.“
Port(1) Duct(l) Air cavity(2)
I
Acoustic bandpass filter
2

lN[)ICE TABLE DES MATIERES
CARACTERISTICAS ....m..................................................... 3
PRECAUCIONES ............................................................... 5
UBICACION ........................................................................ 7
CONEXIONES .................................................................... 7
OPEIRACiONES .................................................................. 9
ESPECIFICACIONES ....................................................... 11
CARACTERISTICAS
“Control VOLUME
“Selector PHASE (NORMAUREVERSE)
Usted podra utilizar el selector PHASE para cambiar la calidad
oel volumen del sonido reproducido por el altavoz de subgraves
act ivo.
*Funcion AUTO POWER
Poclra hater que el altavoz de subgraves activo se encienda
automaticarnente cuando reciba seiiales del sistema estereo.
*Dos formas de conexion al amplificador
El lS-W45 podra conectarse aequipos que posean toma fono
RCA para altavoz de supergraves oterminals para altavoces
tipicos LyR.
oSistema PASABANDA DE UNA SALIDA
El l“S-W45 adopta un sistema PASABANDA DE UNA SALIDA
en el que el orificio (1), el conducto (1) yla cavidad de aire (2)
forrnan un filtro pasabanda actistico en frente de la cavidad de
aire (1). Debido aesta estructura, el Iimite de reproduction de
Ios graves se amplia yIos sonidos mas altos que Ias frecuencias
de la gama media son reducidos en el sistema PASABANDA
DE UNA SALIDA. Esto hate posible que el TS-W45 pueda
reproducer un potente sonido grave.
Unidad del altavoz Cav [d de sire(l)
Orificio(l )Conducto(l )Cavidad de sire(2)
I
Filtro pasabanda actistico
CARACTERISTIQUES ...................................................... 3
PRECAUTIONS ........... .............i... m.................................... 5
POSITIONNEMENT ............................................................. ‘7
CONNEXIONS ... ... ... ... . .... .. .... ....m ..... ... ... .. .. ... .. .. ... .. ... .... ... . 7
UTILISATION ... ...m..r .....u ... .. ... .. ..... .. .... ... .. ... .. .. .. ... .. ... ... ... .... 9
SPECIFICATIONS ...............................................................ll
CARACTERISTIIQllJES
●Commande VOLUME
●Selecteur PHASE (NORMAUREVERSE)
On peut utiliser Ie selecleur PHASE pour changer la qualite CIU
Ie volume du son restitue par Ie caisson de graves alimente,
●Fonction mise sous tensicm automatique
On peut regler Ie caisson de graves pour qu’il soit alimente
automatiquernent quand il regoit un signal de la cha~ne stereo.
●Deux faqons de raccorder aI’amplificateur
On peut raccorder Ie TS-W45 a un appareil equipe soit d’une
prise phono RCA pour ca,isson de graves, soit de bornes
d’enceintes classiques Let R,
●SYSTEME PASS E-13ANDE AEVENT SIMPLE
Le TS-W45 est muni d’un systeme PASSE-BANDE AEVENT
SIMPLE clans Iequel I’orifice (l), Ie conduit (1) et la cavit6 d’air
(2) constituent un filtre passe-bande acoustique devant la cavit6
d’air (1), Grace acette structure, la Iimite de reproduction des
graves est etendue et Ies sons plus eleves que Ies frequencies
de la gamme moyenne sort r&duits clans Ie systeme PASS[=-
BANDE AEVENT SIMP[_E. Ceci permet au TS-W45 cle
reproduire des graves puissants,
Haut-mrleur Cavite d’air(l )
‘1 I
~fice(l )CcmdLlit(l )Cavit@d’air(2)
Filtre pa:=;de acoustique
3

PRECAUTIONS
Follow the advice below for safe and correct operation.
ON AC voltage
Before connecting AC cord, check that the rated voltage shown
on the rear panel matches your local voltage,
AC 120 V, 60 tiz
Positioning
●Do not use the unit in places which are extremely hot, cold, dusty
or humid.
●The unit should be situated with adequate space around it so
that proper heat ventilation is assured. Allow 10 cm clearance
from the rear and the top of the unit, and 5 cm from the each
side.
-Do not place the unit on a bed, rug, or similar surface that may
block the ventilation openings.
-Do not install the unit in abookcase, cabinet, or airtight rack
where ventilation may be impeded.
Using the unit near aTV set
Although the unit is magnetically shielded, there maybe cases in
which the picture on some TV sets may become magnetically
distorted.
●If the TV picture is distorted, turn off the power of the TV set
once, and after 15 to 30 minutes turn it on again.
●If there seems to be no improvement, move the unit further away
from the TV set.
cFurthermore, be sure not to place magnets or objects using
magnets, such as audio racks, toys etc. near the TV set. These
may cause magnetic distortion to the picture due to their
interaction with the unit.
Howling or buzzing sound
Ahowling or buzzing sound maybe heard if aturntable or astereo
system is placed near the unit. Move the unit away from the
equipment or decrease the volume.
Safety
●When connecting and disconnecting the AC cord, always grasp
the plug. Do not pull the cord by itself since pulling the cord may
damage it and thus be hazardous.
●When you are not going to use the unit for along period of time,
disconnect the AC cord. If the cord is plugged in, asmall amount
of current keeps on flowing to the unit even if the power button is
not ON,
Cleaning
To clean the cabinet, use asoft cloth slightly moistened with a
mild detergent solution. Do not use strong solvents, such as
alcohol, benzine or thinner.
Keep away magnetic items
Keep cassette tapes, personal credit card etc. using magnetic
cordina awav from the unit as the recorded information mav be
erase~or so-me noise may be added on cassette tapes
IShould any problem occur, disconnect the AC cord and refer
servicing to qualified personnel only,
4

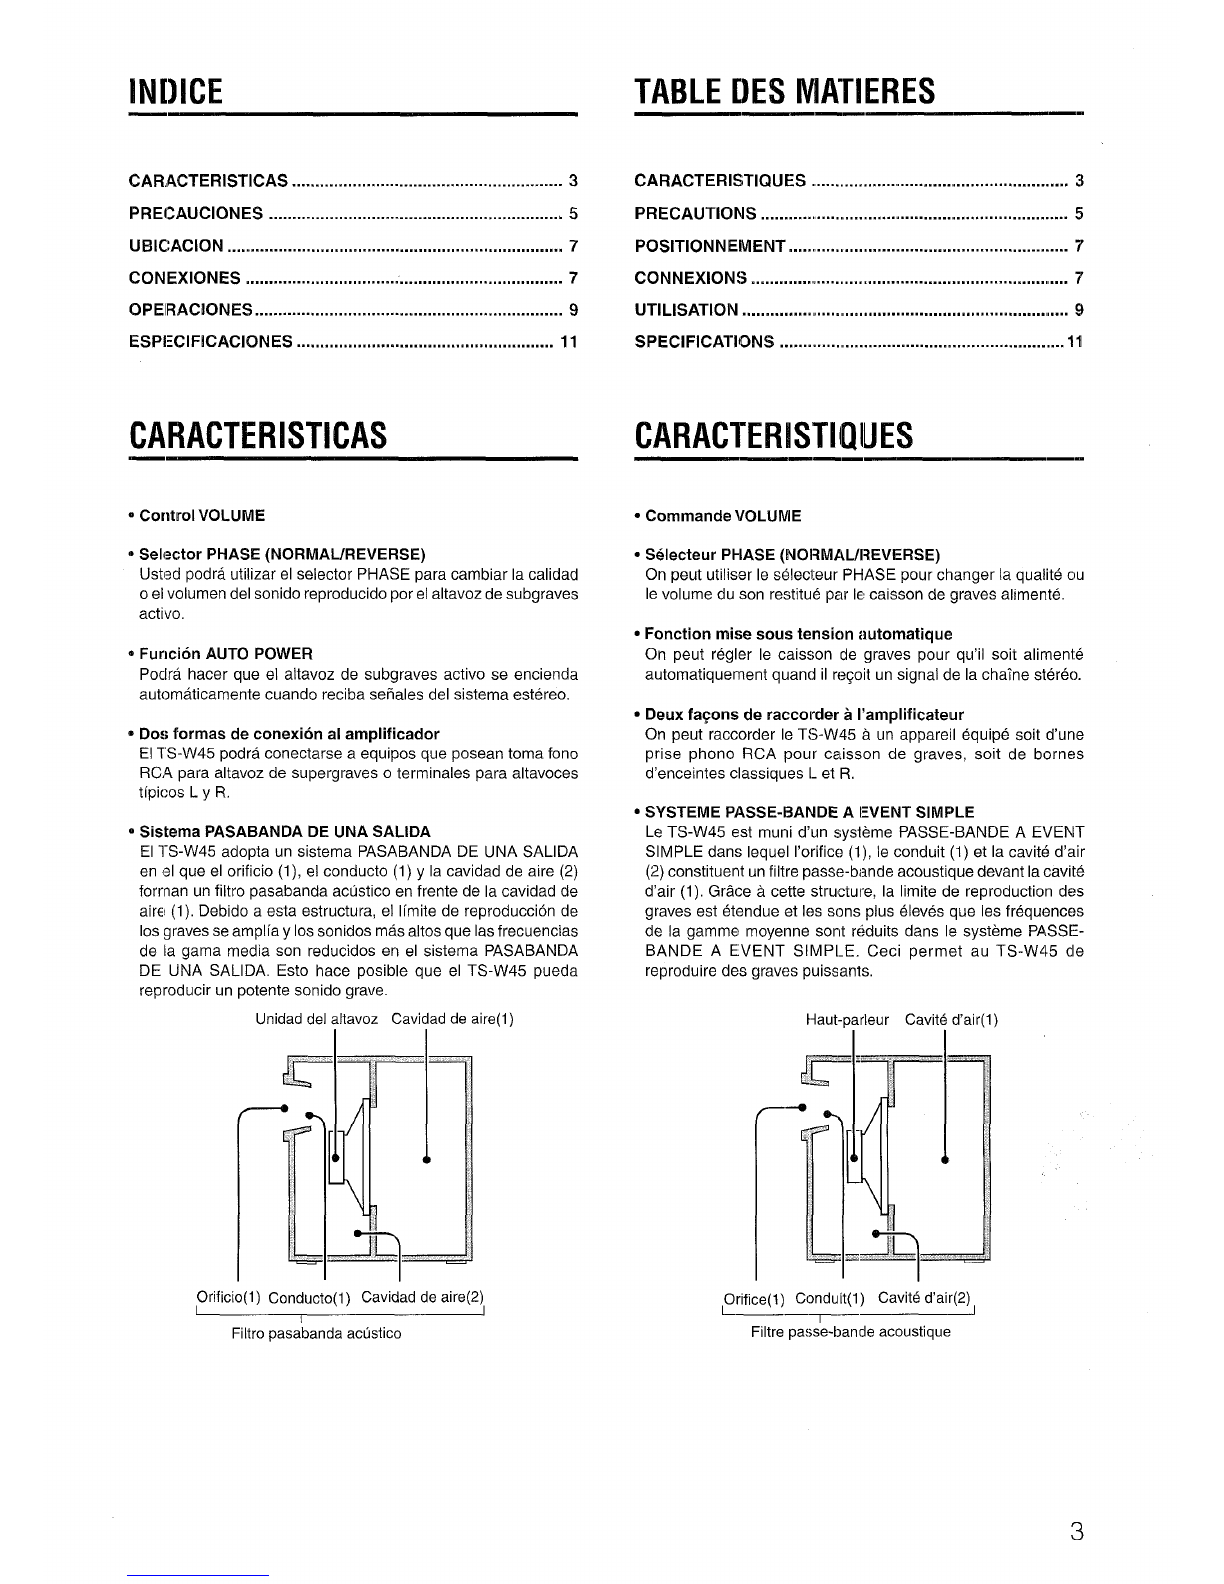
PFWCAUCIONES PRECAUTIONS
Para Iograr una operation segura ycorrects, siga 10s consejos
ofrecidos acontlnuacion.
Acelrca de la tension de CA
Antes de conectar el cable de allmentaclon de CA, compruebe si
la tension nominal mostrada en el panel trasero concuerda con la
tension de su locahdad.
120 VCA 60 Hz
Ubicacion
MNo ut[hce la unidad en Iugares extremadamente calldos, fries,
polvorientos ni htimedos.
*La urrldad debera situarse donde tenga suflclente espac[o Iibre
asu alrededor, para que la ventilation apropiada quede
asegurada DeJe un espaclo Ilbre de 10 cm por la parte posterior
ysuperior de la unidad, y5cm por cada Iado,
-No ponga la unldad sobre una cama, una alfombra osuperhc}es
similares que podr(an tapar Ias aberturas de ventilaciorr,
-No mstale la unidad en una Ilbreria, mueble oestanter(a cerrada
hermeticarnente donde la venhlaclon no sea adecuada.
Utili:zacion de la unidad cerca de un televisor
Aunque la unldad esta magnetlcamente apantallada, puede
suceder que Ias imageries de algunos televisors sufran
dlstorslones magnetlcas,
@Si Ias imageries del televisor sufren distorsiones, desconecte la
allmentacion del televlsor, yvuelva aconectarla despues de 15
a 30 minutes,
*Cuando parezca que no se producen mejoras, ale]e la unidad
del televisor.
*Ademas, no coloque imanes nl objetos que Ios utlllcen, como
bastidores de audio, juguetes, etc. cerca del televisor. Estos
objetos podr~an causar la dlstorslon magnetlca de Ias imageries
debido asu interaction con la unidad
Sonido de aullido ozumbido
SI coloca un giradlscos o un slstema estereo cerca de la unldad,
es pc)sible que oiga un sonido de aullido ozumbido. Aleje la unidad
de este equlpo oreduzca el volumen.
Seguridad
*Para conectar ydesconectar el cable de alimentacion de CA,
tire siempre del enchufe. No tire nunca del propio cable porque
poclria daharlo yresultaria peligroso.
*Cuando no vaya autilizar la unidad durante mucho tiempo,
desconecte el cable de alimentacion de CA. Si deja el cable
enchufado, clrculara una pequeha cantldad de cornente por la
unidad incluso aunque el boton de alimentacion no este en ON.
Lirnpieza
Para Ilmplar la caja, uthce un paho suave hgeramente humedecldo
en una solution poco concentrada de detergence. No use
dlsolventes fuertes, como alcohol, bencina, ni dlluldor de pmtura
Mantenga alejados objetos magneticos
Manienga Ios casetes, Ias tarqetas de credito, etc. que utilicen
codiflcaclon magnetica alejados de la unidad, porque la
information grabada podr~a borrarse, o en Ias cintas podria entrar
clerk] ruido.
Suivre Ies conseils ci-dessous pour utiliser I’appareil correctement
et en toute securite.
Tension du secteur
Avant de brancher Ie cordon secteur, s’assurer que la tensicm
nominale indiquee sur Ie parnneau arriere correspond acelle du
secteur local.
Secteur 120 V, 60 Hz
Positionnement
●Ne pas utiliser I’apparell clans un endroii tres chaud, frold,
poussiereux cm humide.
●Lapparell dolt etre posltlonne avec un espace sufflsant autour
afin d’assurer une dissipaticm adequate de la chaleur, Laisser
un espace de 10 cm derriere et dessus I’apparell, et un espace
de 5 cm de chaque c0t6.
-Ne pas mettre I’appareil sur un lit, un tapis ou sur une surface
slmllalre qui pourrait obstruer Ies orifices de ventilation.
-Ne pas mettre I’apparell clans une bibliotheque, un coffret ou
un meuble completement fermle ou I’aeration serait msufflsante,
Utilisation de I’appareil pres d’un teieviseur
Blen que I’apparell solt hbllndage antlmagnetlque, I’Image de
certains televiseurs peut subir une distortion magnetlque.
●SI I’Image du televiseur est deformee, mettre Ie telewseur hors
tension, puis Ie remettre sous tension au bout de 15a 30 minutes.
●SI la .Wuatlon ne s’ameliore pas, elolgner I’apparell du televiseur.
●En outre, velller a ne pas placer des aimants ou objets corlenant
un aimant, comme des racks audio, des ]ouets ou autres pr+s
du televiseur, Leur interaction avec I’appareil peut provoquer une
distortion magnehque de I’image.
Hurlement ou ronronrnement
Un hurlement ou un ronronnernent risque de se produ!re si
I’appareil se trouve pres d’un itourne-dlsque ou d’une chaine
stereo. Elo]gner I’appareil de cet appareil ou baisser Ie volume.
Securite
ePour brancher ou debrancher Ie cordon d’alimentatlon secteur,
tenlr la fiche. Ne Jamals tirer sur Ie cordon proprement dlt car ii
pourrait &re endommage, ce qul serak dangereux.
*Si on ne compte pas utiliser I’apparell pendant Iongtemps,
debrancher Ie cordon d’ahrnerltatlon secteur. S’Il est raccorc%
au secteur, une petite quantite cle courant circule clans I’appareil,
m~me si I’interrupteur d’allmentatlon n’est pas sur ON,
Nettoyage
Pour nettoyer Ie coffret, utiliser un chiffon doux legerement
Impregne d’une solwhon detergence deuce. Ne pas utiliser cie
solvant puissant, comme de I’alcool, de la benzine ou du diluant.
Eloigner Ies objets ainnantes
Eloigner Ies cassettes, cartes de credils ou autres objets acode
magnetique de I’appareil car Ies donnees enregistrees pourraient
6tre effacees et Ies cassettes nsqueralent d’6tre alterees par des
parasites.
IEn cas de probleme, debrancher Ie cordon d’alimentation
secteur et consulter urwquement un technlclen quahfle. 1
SI tlene algun problems, desconecte el cable de ahmentaclon
de CA yconsulte solamente apersonal de reparaclon
cual)flcado,
5

L
1
If@@
,1
$.
,0
Ml \J
❑1
.
m“
❑-2,3 -.
Ji2J
10
00
ID
POSITIONING
Because low-frequency sound reproduced by the powered
subwoofer is mostly non-directional, the listener will be unable to
localize the bass source. Accordingly, the powered subwoofer
provides maximum flexibility in terms of positioning. For the most
effective low-frequency sound, the powered subwoofer should be
placed on the floor close to awall or in acorner of the room.
CONNECTIONS
Connect the speaker cords before connecting the AC cord.
Connect in ❑way if your stereo system has aSUPER
WOOFER output jack. [f not, connect in ❑way.
Never connect in both of ❑and ❑ways simultaneously.
❑Connecting an AIWA stereo system with
aSUPER WOOFER or SUB WOOFER
output jack (RCA phono jack) to the
powered subwoofer
Preparations
Turn off the power of this unit.
1
2
Connect the SUPER WOOFER or SUB WOOFER jack on the
stereo system side ~to the INPUT 1(FROM SUPER
WOOFER TERMINAL) jack on the powered subwoofer Owith
the supplied connecting cord.
Set the INPUT SELECT switch to”1”.
❑Connecting astereo system with typical
Land Rspeaker terminals to the powered
subwoofer
Preparations
Turn off the power of the stereo system and remove the speaker
cords from the speaker terminals on the system.
1
2
3
Connect the stereo system speaker terminals @to the INPUT
2(FROM SPEAKERS OUT) terminals”on the powered
subwoofer @with the supplied speaker cords 0.
Make sure the L and Rand the @and @cords are connected
correctly.
Using the speaker cords removed in “Preparations” above,
connect the right and left speakers 6) 0to the SPEAKERS
OUT terminals on the powered subwoofer Q).
Set the INPUT SELECT switch to “2.
Connecting the AC cord
Connect the AC cord to awall outlet.
Use Iefffright speakers whose impedance corresponds with the
value specified on the stereo system.
6

IJBICACION POSITIONNEIVIENT
Comcl el sonido de baja frecuencia reproducido por el altavoz de
subgraves activo es practicamente no directional, el oyente no
podra Iocalizar la fuente de graves, Por consiguiente, el altavoz
de subgraves activo proporciona la maxima flexibilidad en terminos
de ubicacion. Para obtener el sonido mas efectivo de bajas
frecuencias, el altavoz de subgraves activo debera colocarse sobre
el piso cerca de un pared o en una esquina de la sala.
CONEXIONES
Conecte Ios cables de Ios altavoces antes de conectar el cable
de alimentacion de CA.
Conecte de la forma ❑si su sistema estereo tiene una toma
de salida SUPER WOOFER. Si no, conecte de la forma El.
Nunca conecte simultaneamente de Ias formas ❑y❑.
❑Conexion de un sisterna estereo AIWA
provisto de toma de salida SUPER
WOOFER oSUB WOOFER (toma fono
RCA) al altavoz de subgraves activo
Preparatives
Desconecte la alimentacion de esta unidad.
1
2
Conecte la toma SUPER WOOFER oSUB WOOFER del
sistema estereo o a la toma INPUT 1(FROM SUPER
WOOFER TERMINAL) del altavoz de subgraves activo @con
el cable conector suministrado.
Ponga el selector INPUT SELECT en “l”.
EIConexion aun sistema estereo con
terminals de altavoces tipicos LyRpara
a!tavoz de subgraves activo
Preparatives
Desconecte la alimentacion del sistema estereo yextraiga Ios
cables de Ios altavoces de Ios terminals para altavoces del
sistema.
1
2
3
Conecte Ios terminals de altavoces del sistema estereo ~a
Ios terminals INPUT 2(FROM SPEAKERS OUT) del altavoz
de subgraves activo @con Ios cables de altavoz suministrados
0.
Cerciorese de que Ios conductors @y@para Ios altavoces
izquierdo (L) yderecho (R) esten correctamente conectados.
Utilizando Ios cables de Ios altavoces desconectados en
Wreparativos”, conecte Ios altavoces derecho eizquierdo, @
Y@, aIos terminals SPEAKERS OUT del altavoz de
subgraves activo @.
Ponga el selector INPUT SELECT en “2”.
Conexi6n del cable de CA
Corwxion del cable de CA a una toma de la red.
mm
Utilice altavoces izquierdo/derecho cuya impedancia corresponds
al valor es~ecificado en el sistema estereo.
Etant donne que Ie son de basse fr6quence reproduit par Ie caisson
de graves est pratiquement ncm-directionnel, il est impossible de
Iocaliser la source des graves. Par consequent, on dispose d’une
grande flexibility en termes de pc,sitionnement. Cependant, pour
obtenir un son de basse frequerrce optimum, il est recommande
de placer Ie caisson de graves sur Ie sol pres d’un mur ou clans un
coin de la piece.
CONNEXKINS
———— —.
Raccorder Ies cordons d’enceinte avant de brancher le cordon
d’alimentation secteur,
Connecter de la fagon ❑si la chaine st~reo possede une
prise de sortie SUPER WOOFEFL SirIon, connecter de la fagon
❑.Ne jamais connecter des fa$ons ❑et El en m~me temps.
~Conneltion d’une chalne stereo AIWA
dotee d’une priss de sortie SUPER
WOOFER QUSU131WOOFER(prise ptmno
RCA) au caisson de graves
Preparations
Couper I’alimentation de cet appareil
Raccorder la prise SUF’ER WOOFER ou SUB WOOFER de la
chalne o a la prise INF)UT 1(FROM SUPER WOOFER
TERMINAL) du caisson de graves @avec [e cordon cle
raccordement fourni.
Regler Ie s~lecteur lNl”UT SE[LECT sur “l”.
❑Connexion d’une clhaiinest64reociotee de
bornes d’enceinite classiques Let Rau
caisson de graves
Preparations
Mettre la chahw? hors tension et d6brancher Ies cordons d’enceinte
des ses bornes,
1
2
3
Raccorder Ies bornes d’enceinte de la cha?ne stereo @aux
bornes INPUT 2(FROM SF’EAKERS OUT) du caisson de
graves Oavec Ies cordons d’enceinte fournis e.
Veilier aconnecter correctement Ies cordons @et ~des
canaux gauche (L) et droit (R).
Raccorder Ies enceintes gaLlche et droite @~aux bornes
SPEAKERS OUT du caisson de graves OaI’aide des cordons
d’enceinte que I’on adebranches ala partie “Preparations”,
Regler Ie selecteur INPU1- SELECT sur “2.
Branchement du cordon cf’alimentation secteur
Brancher Ie cordon d’alirnentation secteur a une prise murale.
~
Utiliser des enceintes gauchle et droite d’une impedance
correspondanl aux specifications de la chalne stereo.
7

FRONT I3—) REAR
1
(3 VOLUME
OPERATION
ADJUSTING THE VOLUME BALANCE
;g-q:
,&%i~ Adjust the volume balance between the powered subwoofer and
1$ the left and right speakers of the connected stereo system.
la-,- 1Press the POWER button.
r.+,..:
g~~st The indicator above the button lights up.
,:6.&
..... 2Start playback on the connected stereo system.
a=”q
.7,,&
,,*.% 3Adjust the volume of the powered subwoofer.
!,,,*
-,“,.~j
~z!%
.,
~... Moderate volume setting
To get natural bass sounds, adjust the volume of the powered
subwoofer according to its position and the graphic equalizer
setting of the stereo system.
Adjustment examples
@Set the VOLUME control to alittle lower than the middle when
the subwoofer is placed on the floor and the graphic equalizer
is set to off.
@Set the VOLUME control to the middle when the subwoofer is
positioned higher than the floor and the graphic equalizer is
set to off.
m
●To avoid overloading the powered subwoofer, do not set the
volume of the stereo system so high that the sound is distorted.
●Low frequency sounds may be distorted when they are
emphasized by the graphic equalizer on the stereo system. Adjust
the VOLUME control on the powered subwoofer or the graphic
equalizer on the stereo system.
●If the powered subwoofer will not be used for along period of
time, press the POWER button to turn off the power, and unplug
the AC cord from the wall outlet.
CHANGING THE PHASE +❑
Depending upon the room or the characteristics of the right and
left speakers, sound from the powered subwoofer may seem
unnatural or unusually loud or soft.
In this case, try changing the PHASE switch setting. Set to the
NORMAL or REVERSE position, whichever sounds better.
USINGTHE AUTO POWER FUNCTION+ ❑
Before using this function, make sure the POWER button is set to
ON.
While the AUTO POWER switch is set to ON, the power is
automatically turned on when receiving asignal input from either
INPUT 1or INPUT 2.
The power is automatically turned off if no signal is input for a
while and the indicator of the POWER button becomes dimmer, If
input signal is too weak, this function does not effect.
While the AUTO POWER switch is set to OFF, the power is turned
on or off by pressing the POWER button.
8

OPERACIONES UTILISATION
AJIJSTE DEL EQUILIBRIA DEL VOLUMEN
Ajuste el equilibria del volumen entre el altavoz de subgraves activo
yIos altavoces izquierdo yderecho del sistema estereo conectado.
1Presicme el boton POWER.
El indicador situado encima del boton se encendera.
2lnicie la reproduction del sistema estereo
conectado.
3Ajuste el volumen del altavoz de subgraves active.
Ajuete del volumen aun nivel moderado
Para obtener sonido con graves naturales, ajuste el volumen del
altavoz de subgraves activo de acuerdo con su ubicacion ycon el
ajuste del ecualizador grafico del sistema estereo.
Ejernplos de ajuste
@Cuando haya colocado el altavoz de subgraves en el piso,
yel ecualizador grafico este desactivado, ponga el control
VOLUME en una position Iigeramente inferior ala central.
@Cuando haya colocado el altavoz de subgraves en un Iugar
situado amayor altura que el piso yel ecualizador grafico
este desactivado, ponga el control VOLUME en la position
central.
ma
$Para evitar la sobrecarga del altavoz de subgraves active, no
ajuste el volumen del sistema estereo demasiado alto de forma
que se distorsione el sonido.
*Los sonidos de baja frecuencia pueden distorsionares cuando
se acentuen con el ecualizador grafico del sistema estereo.
Ajuste el control VOLUME del altavoz de subgraves activo odel
ecualizador grafico del sistema estereo.
@Cuando no vaya autilizar el altavoz de subgraves activo durante
mucho tiempo, presione el boton POWER para desconectar la
alimentacion, ydesenchufe el cable de alimentacion de CA del
tomacorriente de la red.
CAMB1O DE LA FASE +❑
Dependiendo de la sala o de Ias caracteristicas de Ios altavoces
derecho eizquierdo, el sonido del altavoz de subgraves activo
puede resultar innatural, oexcepcionalmente fuerte osuave.
En tat case, pruebe acambiar el ajuste del selector PHASE.
Pon~lalo en la position NORMAL oREVERSE, la que ofrezca el
mejor sonido.
UTILIZATION DE LA FUNCION DE
ENCENDIDO AUTOMATIC +❑
Antes de utilizar esta funcion, asegtirese de que el boton POWER
este en ON.
Mientras el conmutador AUTO POWER este en ON, la
alimentacion se conectara automaticamente cuando se reciba una
sefial procedente de INPUT 1 0 INPUT 2.
La alimentacion se desconectara automaticamente si no entra
ninguna serial durante un rato yel indicador del boton POWER
pierde intensidad. Si la sefial de entrada es muy debil, estafuncion
no s~ activara.
REGLAGE DE L/\ BAILANCE [)U VOLUME
Regler la balance du volume entre Ie caisson de graves et Ies
enceintes gauche et droi’te de la chahe sterdo raccordee.
1Appuyer sur la touche IPOWER.
Le temoin situe au-dessus de la touche s’allume.
2Demarrer la lecture sur la chatne stereo raccordee.
3Regler Ie volume du caisson de graves.
Reglage sur un niveau de volume mod&e
Pour obtenir des sons de basse frequence naturels, regler Ie
volume du caisson de graves selon son emplacement et selon Ie
reglage de I’egaliseur graphique de la chalne stereo.
Exemples de reglage
@Regler la commande VOLUME a un niveau un peu inferieur a
la moitie quand Ie caisson de graves est pose sur Ie sol et
que I’egaliseur graphique est hors service,
@Regler la commande VOL\JMIE ala moitie quand Ie caisson de
graves est place a un endrc~it plus haul[ que ie sol et que
I’egaliseur graphique est hors service.
~
●Afin d’eviter de surcharge k; calisson de graves, ne pas regler Ie
volume de la cha~ne stereo sur un niveau trop eleve qui
deformerait Ie son.
●Les sons de basse frequence risquent d’&re deformes quand
ils sent accentues par l’~gahseur graphique de la chalne stereo.
R6gler la commande VOLUME du caisson de graves C)U
I’egaliseur graphique de la chaine stereo.
●Si on ne compte pas utiliser Ie caisson de graves pendant
Iongtemps, appuyer sur la touche POWER pour Ie mettre hors
tension et debrancher Ie corclon d’alimentation secteur de la prise
murale.
CHANGEMENT DE LA PHASE +❑
SeIon Ie type de piece et Ies caracteristiques des enceintes gauche
et droite, Ie son provenant du caisson de graves peut manquer
de naturel ou sembler anormaletment fort ou doux.
Dans ce cas, essayer de changer Ie r6glage du selecteur PHASE.
Le regler sur NORMAL oLl REVERSE, selon la position qui donne
Ies meilleurs resultats.
UTILISATION DE LA FONCTION MISE SOUS
TENSION AUTOMATIQUE + ~
Avant d’utiliser cette fonction, s’assurer que la touche PC)WER
est reglee sur ON.
Quand Ie selecteur AUTO PQWER est regle sur ON, Ie caisscm
de graves est automatiquement mis sous tension quand il regc)it
un signal par I’entree INPUT 1OIJ INPUT 2.
Si aucun signal n’est entre pendant quelques instant:s,
I’alimentation est automatiquement toupee et la Iuminosite clu
temoin de la touche POWEF{ diminue. Si Ie signal d’entr6e est
trop faible, cette fonction est inoperante.
Quand Ie selecteur AUTO POWER est reglb sur OFF, la mise
sous ou hors tension se fait en appuyant sur la touche POWER.
Mierltras el conmutador AUTO POWER este en OFF, la
alimentacion se conectara ydesconectara pulsando el boton
POWER.
‘9

10

ESPECIFICACIONES SPECIFICATIONIS
Terminals de entrada
Toma INPUT 1
Terminals INPUT 2
Sensibilidad/impedancia de entrada
INPUT 1:0,3 V/50 kiloohmios (a 60 Hz)
INPUT 2:3 V/4,4 kiloohmios (L yR) (a 60 Hz)
Terminals de salida
Terminals SPEAKERS OUT
Salida de potencia NORMA FTC
50 vatios, mfn. valor eficaz, a 6 ohmios, de 45
Hz a 150 Hz, con no mas del 1%de distortion
armonica total
50 vatios (6 ohmios, 17. de distortion
armonica total a 60 Hz)
60 vatios (8 ohmios, 10 Y. de distortion
armonica total a 60 Hz)
Respuesta en frecuencia
35 Hz – 200 HZ
Tipo de altavoz TLpo reflejo de graves
Unidad de altavoz 20 cm (tipo magneticamente apantallado)
Alimentacion 120 VCA, 60 HZ
Consumo 40 w
Dimensioned (an/al/prf)
385 x 325 x 345 mm
Peso 7,5 kg
Accesorioa suministrados
Cable conector con clavijas fono RCA(1)
Cables de altavoces (2)
Las especificaciones yel aspecto externo estan sujetos acambio
sin previo aviso debido amejoras del producto.
Bornes d’entree Prise INPUT 1
Bornes INFIUT 2
Sensibility/impedance d’entrt$e
INPUT 1:0,3 V/50 kilohms (~ 60 Hz)
INPUT 2:3 V/4.,4 kilohms (Let R) (a 60 Hz)
Bornes de sortie Bornes SPEAKERS OUT
Puissance de sortieNORME F1-C
50 watts, Vlin. RMS sous 8ohms, de 45 Hz a
150 Hz, avec pas plus de 1 %de distortion
harmonique totale.
50 watts (8 ohms, 1°A de distortion harmonique
totale, 60 Flz)
60 watts (8 ohlms, 10 Y. de distortion
harmonique totale, 60 Hz)
Reponse en frkquence
35 Hz --200 HZ
Type d’enceinte Type bass-reflex
Haut-parieur 20 cm (Type ablindage antimagnetique)
Alimentation Secteur 1210V, 60Hz
Puissance absorbee
40 w
Dimensions (l/h/p) 365 x :325x 345 mm
Poids 7,5 kg
Accessoires fwrnisCordon de racoordement afiches phono RCA
(1)
Cordons d’enceinte (2)
Les specifications et I’appa.rence exterieure sent modifiable saris
preavis clans Ie but d’ameliorer Ie produit.
11

Printed in Malaysia 8Z-YP2-903-01
981225AMI-U-2
Other manuals for TS-W45
3
This manual suits for next models
1
Table of contents
Other Aiwa Speakers System manuals