Akaso V50X User manual

USER MANUAL
AKASO V50X Action Camera

01
What’s in the box
Your V50X
Getting Started
Overview of modes
Customizing your V50X
Connecting to the Roadcam app
Offioading your content
Playing back your content
Deleting videos and photos nn your V50X
Reformatting your microSD card
Maintenance your camera
Maximizing battery life
Adjusting the zoom level
Battery storage and handling
Remote
Mounting your camera
Contact us
2
3
4
6
11
19
19
21
21
22
22
22
22
23
23
25
27
CONTENTS

Quick Start Guide
AKASOV50X Action Camera
How to use all sorts of accessories of action camera?
Scan the following QR code or enter the
website to watch the video.
Unboxing: 00:00-00:19
How to remove the camera from the box it's mounted on? : 00:20-00:31
How to remove the camera from the waterproof case? : 00:32-01:05
How to mount the camera to a tripod? : 01:17-01:49
How to mount the camera to your body? : 01:50-02:08
How to mount the camera to a self stick? : 02:09-02:55
How to mount the camera to a bike? : 02:56-04:34
How to mount the protective backdoor? : 04:35-04:59
How to mount the camera to a helmet? : 05:03-11:16
www.youtube.com/watch?v=UqKtElRXqI8&feature=youtu.be
02 03
WHAT’S IN THE BOX YOUR V50X
V50X
Mount 4 Mount 5 Mount 6 Mount 7 Mount 8 Remote
Mount 2 Mount 3
Waterproof
Housing
Helmet
Mounts Protective
Backdoor USB Cable
Bandages Quick Start Guide
Battery
Changer Tethers Lens Cloth
Handele Bar/
Pole Mount

Note:
1. Please format the microSD card first in this camera before using. To keep your microSD
card in good condition, reformat it on a regular basis. Reformatting erases all of your
content, so be sure to offload your photos and videos first.
2. FAT32 format microSD card stops recording when the storage of each file is over 4GB
and starts to record again on a new file.
POWERING ON + OFF
To Power On:
Press and hold Mode button for three seconds. The camera beeps while the camera status
light is on. When information appears on the LCD display or the camera status screen,
your camera is on.
To Power Off:
Press and hold the Mode button for three seconds. The camera beeps while the camera
status light is off.
SWITCHING MODE:
To Switch Mode:
Press the Mode button after you turn on the camera, you can switch the mode.
To Exit Mode:
Press the Mode button to exit mode.
TURNING ON / OFF Wi-Fi
To turn on Wi-Fi:
Turn on camera, press Up button to turn on Wi-Fi.
To turn off Wi-Fi:
Press Up button to turn off Wi-Fi.
Note: Camera does not record sound when it is in the waterproof case.
04 05
GETTING STARTED
1. Shutter / Select Button
2. Indicator
3. Power / Mode Button
4. MicroSD Slot
5. Micro HDMI Port
6. Mini USB Port
7. Lens
8. Screen
9. Up Button
10. Speaker
11. Down Button
12. Battery Door
Note: Camera does not record sound when it is in the waterproof case.
Welcome to your AKASO V50X. To capture video and photos, you need a microSD card
(sold separately).
MICROSD CARDS
Use brand name memory cards that meet these requirements:
• MicroSD, microSDHC, or microSDXC
• Class 10 or UHS-III rating
• Capacity up to 64GB 100MB/s (FAT32)

06 07
There are 9 modes: Photo, Self-Timer, Burst Photo, Time Lapse Photo, Video,
Slow Motion, Time Lapse Video, Still Photo and Driving Mode.
OVERVIEW OF MODES
PHOTO MODE
In Photo mode, press Shutter button, the camera takes a photo.
SELF-TIMER MODE
In Self-timer mode, press OK button, it takes a self-timer photo.
BURST PHOTO MODE
In Burst Photo mode, press Shutter button, the camera takes 3 photos per second,
5 photos per second or 10 photos per second.

08 09
TIME LAPSE PHOTO MODE
In Time Lapse Photo Mode, press Shutter button, the camera takes a serial of photos at
3s / 5s / 10s intervals.
VIDEO MODE
Video Mode is the default mode when you turn on the camera.
In Video Mode, press Shutter button, the camera starts recording video. Press Shutter
button to stop recording video.
SLOW MOTION VIDEO MODE
In Slow Motion video mode, press Shutter button, the camera records slow motion video.
TIME LAPSE VIDEO MODE
In Time Lapse Video mode, press Shutter button, the camera records video from frames
captured at specific intervals.
Time Lapse Video is captured without audio.

10 11
STILL PHOTO MODE
In Still Photo mode, the camera takes a photo every 3 Sec/ 5 Sec/ 10 Sec/ 30 Sec
automatically during video recording.
DRIVING MODE
In Driving Mode, you connect the camera with car cigarette lighter, the camera will turn on
automatically if you start your car and will turn off if you stop your car.
CUSTOMIZING YOUR V50X
VIDEO SETTING
1. Resolution: 4K 30fps, 2.7K 30fps, 2K 60fps, 2K 30fps, 1080P 90fps, 1080P 60fps,
1080P 30fps, 720P 120fps, 720P 60fps, 720P 30fps
Default setting is 4K 30fps.
2. Image Stabilization: OFF/ON
Default setting is off.
3. Gyroscope: OFF/ON
Default setting is off.
This setting adjsts the footage to offset for motion during capture. The result is smoother
footage, especially in activities with relatively samll but fast motion including cycling,
motorcycling, and handheld uses.
4. Video Encode: H.264, H.265
Default setting is H.264.
A video codec is an electronic circuit or software that compresses or decompresses digital
video. It converts uncompressed video to a compressed format or vice versa. According to
multiple studies, HEVC, High Efficiency Video Coding (H.265) should deliver up to 50%
better compression than H.264 in video on demand (VOD) applications, which means

12 13
better quality at half the bit rate. In live encoding, which obviously has to be performed in
real time, the initial expectations are a 35% bandwidth reduction at similar quality levels.
Alternatively, HEVC can also enable larger resolution movies, whether 2K or 4K.
In addition, encoding existing SD and HD content with HEVC rather than H.264 will add to
cost savings and/or the ability to stream higher quality video to lower bit rate connections.
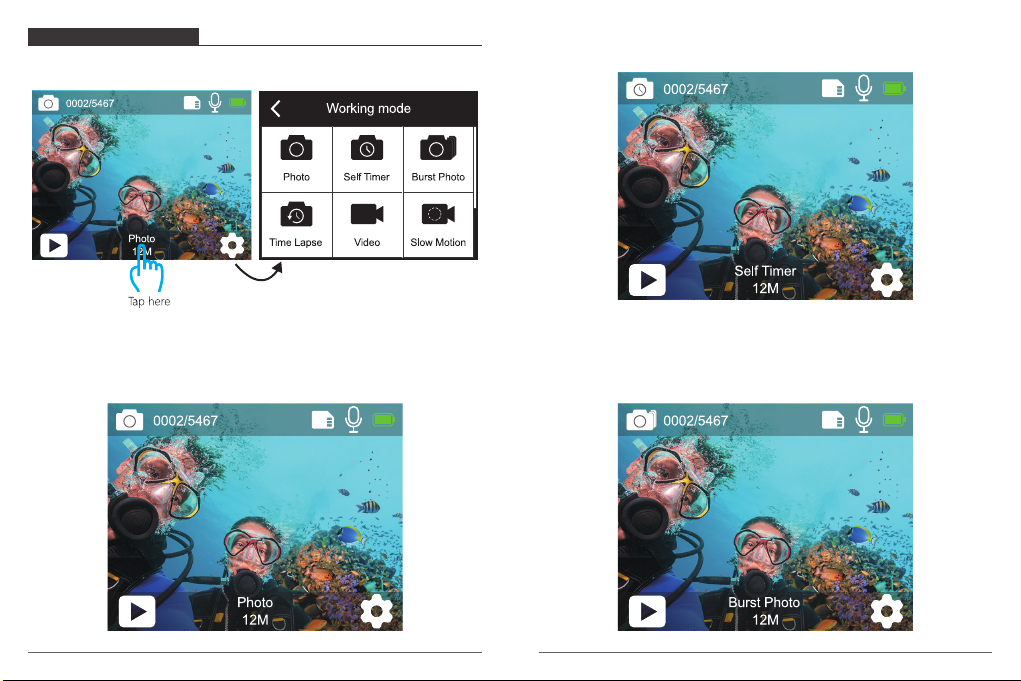
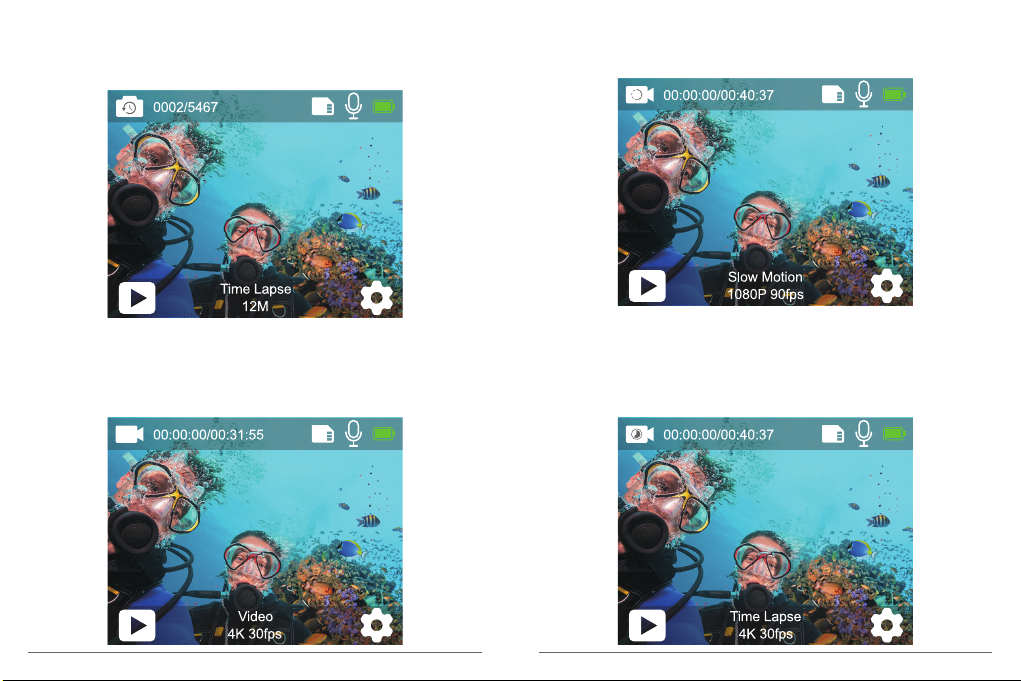
5. Slow Motion: 1080P 90fps, 720P 120fps
Default setting is 1080P 90fps.
Slow motion is an effect in film-making whereby time appears to be slowed down.
Note: If you want to record slow motion video, please turn off Image Stabilization first.
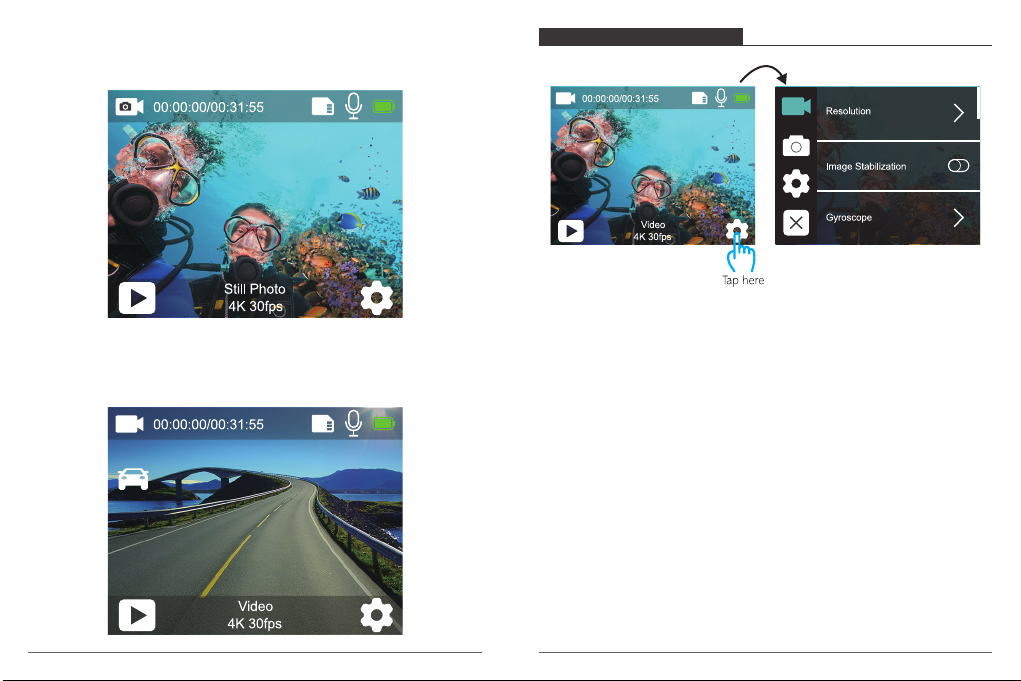
6. Still Photo: 4K 30fps
Default setting is 4KP 30fps.
7. Still Photo Time: 3 Sec, 5 Sec, 10 Sec, 30 Sec
Default setting is 3 Sec.
In still photo mode, the camera takes a photo every 3 Sec/ 5 Sec/ 10 Sec/ 30 Sec
automatically during video recording.
8. Time Lapse Interval: 0.2 Sec, 0.3 Sec, 0.5 Sec, 1 Sec, 2 Sec, 5 Sec, 10 Sec, 30 Sec, 1 Min
Default setting is 0.5 Sec.
Time Lapse Video creates video from frames captured at specific intervals. This option lets
you capture a time lapse event and immediately view or share it as a video. Time Lapse
Video is captured without audio.
Select 2 seconds means recording 2 seconds to get one frame per second.
For example: If you select 4K/30FPS and 2 seconds, you need to record 60 seconds, then
you can get 1 second video for 4K/30FPS.
9. Loop Recording Time: Off, 3 Min., 5 Min, 7 Min
Default setting is off.
Using Loop Recording, you can continuously record video, but save only the moments
that you want. For example, if you select a 5-minute interval, only the previous 5 minutes
are saved when you press the Shutter button to stop recording. If you record for 5 minutes
and do not press the Shutter button to stop recording and save, the camera records a
new 5-minute interval by recording over your previous 5 minutes of footage. When the
microSD card is full, the new files will cover the old one if loop recording is on.
10. External Microphone: ON/OFF
Default setting is off.
11. Audio Record: ON/OFF
Default setting is ON.
Turn off Audio Record, the camera does not record sound when you record video.
12. Exposure Value: -2,-1.7,-1.5,-1.3, -1, -0.5, -0.3, 0, +0.3, +0.5, +1, +1.3, +1.5, +1.7, +2
Default setting is 0.
By default, your camera uses the entire image to determine the appropriate exposure level.
However, Exposure lets you select an area that you want the camera to prioritize when
determining exposure. This setting is particularly useful in shots where an important region
might otherwise be over- or underexposed.
When you change this setting, the LCD display immediately shows you the effect on your
image. If you change modes, the camera returns to using the entire scene to determine
the correct level of exposure.
13. ISO: Auto, 100, 200, 400, 800
Default setting is Auto.
ISO determines the camera’s sensitivity to light, and creates a trade-off between brightness
and resulting image noise. Image noise refers to the degree of graininess in the image.
In low light, higher ISO values result in brighter images, but with greater image noise.
Lower values result in lower image noise, but darker images. When you change this
setting, the LCD display immediately shows you the effect on your image.
14. White Balance: Auto, Tungsten, Fluorescent, Daylight, Cloudy, Dawn
Default setting is Auto.
White Balance lets you adjust the color temperature of videos and photos to optimize for
cool or warm lighting conditions. When you change this setting, the LCD display
immediately shows you the effect on your image.

14 15
15. Meter: Center, Average, Spot
Default setting is Average.
In photography, the metering mode refers to the way in which a camera determines
exposure. Cameras generally allow the user to select between center, average or spot
metering modes. The different metering modes allow the user to select the most
appropriate one for use in a variety of lighting conditions.
16. Color: Natural, Black & White, Sepia
Default setting is Natural.
1. Resolution: 12M, 8M, 5M, 3M
Default setting is 12M.
2. Self-Timer: 1 Sec, 3 Sec, 5 Sec, 10 Sec, 30 Sec
Default setting is 3 Sec.
A Self Timer gives a delay between pressing the shutter release and the shutter's firing.
It is most commonly used to let photographers to take a photo of themselves (often with
family).
3. Burst Photo: 3shots/1s, 5shots/1s, 10shots/1s
Default setting is 3shots/1s.
Burst captures up to 30 photos in 8 seconds, so it is perfect for capturing fast-moving
activities.
4. Time Lapse Photo: 3 Sec, 5 Sec, 10 Sec, 30 Sec, 1 Min
Default setting is 3 Sec.
Time Lapse Photo captures a series of photos at specified intervals. Use this mode to
capture photos of any activity, then choose the best ones later.
5. Scene: Auto, Light Painting
Default setting is Auto.
6. Exposure Value: -2, -1.7, -1.5, -1.3, -1, -0.5, -0.3, 0, +0.3, +0.5, +1, +1.3, +1.5, +1.7, +2
Default setting is 0.
By default, your camera uses the entire image todetermine the appropriate exposure level.
However, Exposure lets you select an area that you want the camera to prioritize when
determining exposure. This setting is particularly useful in shots where an important region
might otherwise be over- or underexposed.
When you change this setting, the LCD display immediately shows you the effect on your
image. If you change modes, the camera returns to using the entire scene to determine
the correct level of exposure.
7. Exposure Time: Auto, 2 Sec, 5 Sec, 10 Sec, 30 Sec
Default setting is Auto.
The exposure time, respectively period of exposure means the time span for which the film
of a traditional camera or a sensor of a modern digital camera is actually exposed to the
light so as to record a picture.
8. ISO: Auto, 400, 800, 1600, 3200
Default setting is Auto.
ISO determines the camera’s sensitivity to light, and creates a trade-off between brightness
and resulting image noise. Image noise refers to the degree of graininess in the image.
In low light, higher ISO values result in brighter images, but with greater image noise.
Lower values result in lower image noise, but darker images. When you change this
setting, the LCD display immediately shows you the effect on your image.
9. White Balance: Auto, Tungsten, Fluorescent, Daylight, Cloudy, Dawn
Default setting is Auto.

16 17
White Balance lets you adjust the color temperature of videos and photos to optimize for
cool or warm lighting conditions. When you change this setting, the LCD display
immediately shows you the effect on your image.
10. Meter: Center, Average, Spot
Default setting is Average.
In photography, the metering mode refers to the way in which a camera determines
exposure. Cameras generally allow the user to select between center, average or spot
metering modes. The different metering modes allow the user to select the most
appropriate one for use in a variety of lighting conditions.
11. Sharpness: Strong, Normal, Soft
Default setting is Normal.
Sharpness controls the quality of details captured in your video footage or photos. When
you change this setting, the touch display immediately shows you the effect on your image.
12. Color: Natural, Black & White, Sepia
Default setting is Natural.
13. Photo Quality: Fine, Normal, Economy
Default setting is Fine.
1. Sounds: Volume, Key Tone, Touch Tone, Boot Tone
You can adjust the volume of the camera and turn on/off key tone, touch tone or boot
tone.
2. Distortion Calibration: ON/OFF
Default setting is OFF.
Turn on Distortion Calibration, it can correct the image distortion.
3. Angle: 170°, 140°, 110°, 70°
Default setting is 170°.
The angle refers to how much of the scene (measured in degrees) can be captured
through the camera lens. Super Wide angle captures the largest amount of the scene,
while Narrow angle captures the least.
4. Diving Mode: ON/OFF
Default setting is OFF.
Turn on Diving Mode, it can compensate for the lack of red light in underwater scenes.
Diving Mode is designed to be used in tropical and blue water, optimized for use between
10 and 80 feet.
5. WDR: ON/OFF
Default setting is OFF.
Wide Dynamic Range (WDR) retains a greater level of detail in the dark and bright areas
of an image. The result is a photo that is properly exposed for both of these extremes.
This setting is especially useful for scenes that are backlist or that have large bright regions
and a dark foreground. WDR is available in Video mode only.
6. Auto Power Off: Off, 1 Min, 3 Min, 5 Min, 10 Min
Default setting is OFF.
Powers off your V50X after a period of inactivity to save battery life.
7. Screen Saver: Off, 30 Sec, 1 Min, 3 Min
Default setting is 1 Min.
Turns off the display after a period of inactivity to save battery life. To turn on the display
again, press any button on the camera.

18 19
8. Language: English / Français / Deutsch / Español / Italiano/ Português
Default setting is English.
9. Date Format: YYYY/MM/DD, MM/DD/YYYY, DD/MM/YYYY
Default setting is MM/DD/YYYY
10. Set Date: MM/DD/YYYY
You can set the date of the camera.
11. Set Time: HH/MM
You can set the time of the camera.
12. Date Stamp: Off, Date & Time, Date
Default setting is Date & Time.
If you select Date & Time, this camera adds Date & Time to the videos and photos you
take.
13. Power Frequency: 50Hz, 60Hz
Default setting is 50Hz.
14. Format Card
To keep your microSD card in good condition, reformat it on a regular basis. Reformatting
erases all of your content, so be sure to offload your photos and videos first.
To reformat your card, please enter System Setting, then scroll through the options to
locate and tap “Format Card”, then tap “Confirm”.
15. Reset: Reset to factory? Cancel/Confirm
This option resets all settings to their default values.
16. About: Model/ Version
You can check the model and version of your V50X.
CONNECTING TO THE ROADCAM APP
OFFLOADING YOUR CONTENT
The Roadcam app lets you control your camera remotely using a smartphone or tablet.
Features include full camera control, live preview, playback, download and sharing of
content.
1. Download Roadcam app from Google Play or Apple Store.
2. Turn on the camera, press and hold up button for 3 seconds to turn on Wi-Fi.
3. Turn on Wi-Fi of your phone, connect to the Wi-Fi SSID: “AKASO_V50X”.
4. Enter the password: 1234567890.
5. Open the app Roadcam. Tap ”Add Recorder”. You connect to the Roadcam app
successfully.
OFFLOADING YOUR CONTENT TO A COMPUTER
To play back your video and photos on a computer, you must first transfer these files to a
computer. Transferring also frees up space on your micro SD card for new content.
To offload files to a computer using a card reader (sold separately) and your computer’s
file explorer, connect the card reader to the computer, then insert the micro SD card. You
can then transfer files to your computer or delete selected files on your card. You can also
offload files to a computer using a USB cable.
OFFLOADING YOUR CONTENT TO SMARTPHONE OR TABLET
1. Connect to the Roadcam app.
2. Open the Roadcam app. Tap ‘Add Recorder’. Then tap the icon at the middle of the
screen.
3. Tap “HD Photo” icon.
4. Tap any file for 3 seconds. Then you can select many files.
5. Tap . You download the files successfully to your phone.

20 21
You can playback your content on the camera’s LCD display, your computer, TV, or
smartphone/tablet.
You can also playback content by inserting the microSD card directly into a device, such as
a computer or compatible TV. With this method, playback resolution depends on the
resolution of the device and its ability to playback that resolution.
VIEWING VIDEOS AND PHOTOS ON YOUR V50X
1. Press and hold down button for 3 seconds or tap file icon to enter Playback mode.
If your microSD card contains a lot of content, it might take a minute for it to load.
2. Tap any video or photo file.
3. Tap Forward or Backward icon to playback video or photo files.
DELETING VIDEOS AND PHOTOS ON YOUR V50 PRO
PLAYING BACK YOUR CONTENT
Delete videos and photos with touch screen:
1. Tap file icon to enter playback mode. If your micro SD card contains a lot of content,
it might take a minute for it to load.
2. Tap and tap the video or photo file you want to delete
3. Tap , the screen shows “Are you sure delete files? Cancel/ Confirm”.
4. Tap “Confirm”. The selected file will be deleted.
Delete videos and photos with buttons:
1. Press and hold down button for 3 seconds to enter playback mode. If your microSD
card contains a lot of content, it might take a minute for it to load.
2. Press down button several times to locate the file you want to delete. Press shutter
button. Then press and hold shutter button for 3 seconds. The screen shows “Are you
sure delete files? Cancel/ Confirm”
3. Press down button then shutter button. The selected file will be deleted.

22 23
REFORMATTING YOUR MICROSD CARD
MAINTENANCE YOUR CAMERA
BATTERY STORAGE AND HANDLING
MAXIMIZING BATTERY LIFE
ADJUSTING THE ZOOM LEVEL
To keep your microSD card in good condition, reformat it on a regular basis. Reformatting
erases all of your content, so be sure to offload your photos and videos first.
1. Turn on V50X.
2. Enter System Setting.
3. Scroll through the screen to locate and tap “Format Card”, then tap “Confirm”.
4. Tap “Confirm”. Then you format your microSD card successfully.
Follow these guidelines to get the best performance from your camera:
1. For best audio performance, shake the camera or blow on the mic to remove debris
from the microphone holes.
2. To clean the lens, wipe it with a soft, lint-free cloth. Do not insert foreign objects around
the lens.
3. Don’t touch the lens with fingers.
4. Keep the camera away from drops and bumps, which may cause damage to the parts
inside.
5. Keep the camera away from high temperature and strong sunshine to avoid being
damaged.
The camera contains sensitive components, including the battery. Avoid exposing your
camera to very cold or very hot temperatures. Low or high temperature conditions may
temporarily shorten the battery life or cause the camera to temporarily stop working
properly. Avoid dramatic changes in temperature or humidity when using the camera, as
condensation may form on or within the camera.
Do not dry the camera or battery with an external heat source such as a microwave oven
or hair dryer. Damage to the camera or battery caused by contact with liquid inside the
camera is not covered under the warranty.
Do not store your battery with metal objects, such as coins, keys or necklaces. If the
battery terminals come in contact with metal objects, this may cause a fire.
Do not make any unauthorized alterations to the camera. Doing so may compromise
safety, regulatory compliance, performance, and may void the warranty.
WARNING: Do not drop, disassemble, open, crush, bend, deform, puncture, shred,
microwave, incinerate or paint the camera or battery. Do not insert foreign objects into
the battery opening on the camera. Do not use the camera or the battery if it has been
damaged-for example, if cracked, punctured or harmed by water. Disassembling or
puncturing the battery can cause an explosion or fire.
If the battery reaches 0% while recording, the camera saves the file and powers off.
To maximize battery life, follow these guidelines when possible:
• Turn off Wireless Connections
• Capture video at lower frame rates and resolutions
• Use Screen Saver setting.
The Zoom function lets you adjust how close or far away the subject appears in your
photo. The default is no zoom. Zoom function is available in Video and Photo Mode.
V50X can 4X zoom.
1. Turn on V50X.
2. Enter Video or Photo Mode.
3. Press and hold Up or Down button to adjust the zoom level.
REMOTE
Photo Button
Video Button
Splashproof only, not waterproof

24 25
VIDEO
To record Video, verify the camera is in Video mode.
To start recording:
Press the Grey Video Button. The camera will emit one beep and the camera light will
flash while recording.
To stop recording:
Press the Grey Video Button again. The camera will emit one beep and the camera light
will stop flashing while recording.
PHOTO
To capture a photo, verify the camera is in Photo mode.
To take a photo:
Press the Red Photo Button. The camera will emit a camera shutter sound.
CR2032 BATTERY REPLACEMENT FOR V50X REMOTE
1. Use a 1.8mm Phillips tip screwdriver to remove the 4 screws on the back cover of the
remote, allowing you to open it.
2. Remove another 4 screws on PCB board.
3. Lift the PCB board and slide out the battery, as shown in the picture.
Note: Do NOT rotate the PCB board to avoid reversing the camera and video button functions.
4. Install the new battery, keeping the “+” pole facing up.
5. Install all 4 screws back onto the PCB board.
6. Install all 4 screws back into the cover.

26 27
Attach your camera to helmets, gear and equipment.
MOUNTING YOUR CAMERA
For any problem with AKASO products, please feel free to contact us, we will respond within
24 hours.
E-mail: [email protected]
Tel: (888) 466-9222 (US) Mon-Fri (except holiday) 9am-5pm (EST)
Official website: www.akasotech.com
CONTACT US

INHALT
Was Ist In Der Box
Ihre V50X
Loslegen
Übersicht Der Modi
Anpassen Ihres V50X
Herstellen Einer Verbindung Mit Der Roadcam-app
Lade Deinen Inhalt
Wiedergabe Ihrer Inhalte
Löschen Von Videos Und Fotos Auf Ihrem V50X
Neuformatierung Ihrer Micro Sd-karte
Wartung Ihrer Kamera
Maximierung Der Akkulaufzeit
Lagerung Und Handhabung Des Akkus
Fernbedienung
Montage Ihrer Kamera
Kontaktiere Uns
29
30
31
33
38
46
47
49
49
50
50
50
50
51
54
55
Deutsch
Quick Start Guide
AKASOV50X Action Camera
Wie man alle Arten Zusatzgeräte der Tätigkeitskamera benutzt?
Scannen Sie den folgenden QR-Code oder rufen Sie
die Website auf, um das Video anzusehen.
www.youtube.com/watch?v=UqKtElRXqI8&feature=youtu.be
WAS IST IN DER BOX
Wasserdicht
Gehäuse Handele Bar/
Pole Mount Mount 1 Mount 2 Mount 3
Mount 4
Helmhalterungen Schützende
Hintertür USB-Kabel Veränderung
Bandagen Batterie Schnellstartanleitung
Anbindungen Linsengerinnsel
Mount 5 Mount 6 Mount 7 Mount 8 Fernbedienung
Unboxing: 00: 00-00: 19
Wie entferne ich die Kamera aus der Box, auf der sie montiert ist? : 00: 20-00: 31
Wie entferne ich die Kamera aus dem wasserdichten Gehäuse? : 00: 32-01: 05
Wie montiere ich die Kamera auf einem Stativ? : 01: 17-01: 49
Wie montiere ich die Kamera an meinem Körper? : 01: 50-02: 08
Wie montiere ich die Kamera an einem Self-Stick? : 02: 09-02: 55
Wie montiere ich die Kamera an einem Fahrrad? : 02: 56-04: 34
Wie montiere ich die schützende Hintertür? : 04: 35-04: 59
Wie montiere ich die Kamera an einem Helm? : 05: 03-11: 16
28 29

IHRE V50X
7
3
4
5
12
2
1
6
89
10
11
1. Auslöser / Auswahltaste
2. Indikator
3. Power / Mode Taste
4. Micro SD Slot
5. Micro-HDMI-Anschluss
6. Mini-USB-Anschluss
7. Linse
8. Bildschirm
9. Nach-oben-Taste
10. Lautsprecher
11. Nach-unten-Taste
12. Batteriefach
Hinweis: Die Kamera nimmt im wasserdichten Gehäuse keinen Ton auf.
LOSLEGEN
Willkommen zu Ihrem neuen V50X. Zum Aufnehmen von Videos und Fotos benötigen Sie
eine Micro-SD-Karte (separat erhältlich).
MICROSD KARTEN
Verwenden Sie Markenspeicherkarten, die diese Anforderungen erfüllen:
• MicroSD, MicroSDHC, or MicroSDXC
• Klasse 10 oder UHS-III
• Kapazität bis zu 64 GB 100 MB/s (FAT32)
30 31

Hinweis:
1. Bitte formatieren Sie die Micro-SD-Karte zuerst in dieser Kamera, bevor Sie sie
verwenden. Formatieren Sie Ihre Micro-SD-Karte regelmäßig neu, um einen
einwandfreien Zustand zu gewährleisten. Durch das Neuformatieren werden alle Ihre
Inhalte gelöscht. Stellen Sie daher sicher, dass Sie zuerst Ihre Fotos und Videos
auslagern.
2. Die Micro-SD-Karte im FAT32-Format stoppt die Aufzeichnung, wenn der Speicher jeder
Datei mehr als 4 GB beträgt, und beginnt erneut mit der Aufzeichnung einer neuen
Datei.
EIN - UND AUSSCHALTEN
Einschalten:
Halten Sie die Modustaste drei Sekunden lang gedrückt. Die Kamera piept, während die
Kamera-Statusanzeige leuchtet. Wenn Informationen auf dem LCD-Display oder dem
Kamerastatusbildschirm angezeigt werden, ist Ihre Kamera eingeschaltet.
Ausschalten:
Halten Sie die Modustaste drei Sekunden lang gedrückt. Die Kamera piept, während die
Kamera-Statusanzeige ausgeschaltet ist.
SCHALTMODUS:
So wechseln Sie den Modus:
Drücken Sie die Modustaste, nachdem Sie die Kamera eingeschaltet haben. Sie können
den Modus wechseln.
So beenden Sie den Modus:
Drücken Sie die Modustaste, um den Modus zu verlassen.
Ein - und Ausschalten von Wi-Fi
So aktivieren Sie Wi-Fi:
Schalten Sie die Kamera ein und halten Sie die Aufwärtstaste drei Sekunden lang gedrückt,
um Wi-Fi einzuschalten.
So deaktivieren Sie WLAN:
Drücken Sie die Up-Taste, um Wi-Fi auszuschalten.
Hinweis: Die Kamera nimmt im wasserdichten Gehäuse keinen Ton auf.
Es gibt 9 Modi:
Foto, Selbstauslöser, Serienbild, Zeitrafferfoto, Video, Zeitlupe, Zeitraffervideo, Standbild
und Fahrmodus.
FOTO-MODUS
Drücken Sie im Fotomodus den Auslöser. Die Kamera nimmt ein Foto auf.
ÜBERSICHT ÜBER DIE MODI
0002/5467
Foto
12M
Arbeitsmodus
Foto Selbstauslöser Foto platzen
Zeitraffer Video Zeitlupe
0002/5467
Foto
12M
Hier drücken
32 33

SELBSTAUSLÖSER-MODUS
Drücken Sie im Selbstauslösermodus die Taste OK, um ein Selbstauslöserfoto
aufzunehmen.
0002/5467
Selbstauslös
12M
BURST-FOTO-MODUS
Drücken Sie im Serienbildmodus den Auslöser. Die Kamera nimmt 3 Fotos pro Sekunde,
5 Fotos pro Sekunde oder 10 Fotos pro Sekunde auf.
0002/5467
Foto platzen
12M
TZEITRAFFER-FOTOMODUS
Drücken Sie im Zeitraffer-Fotomodus den Auslöser. Die Kamera nimmt eine Fotoserie in
Intervallen von 3 s / 5 s / 10 s auf.
0002/5467
Zeitraffer
12M
VIDEO MODUS
Der Videomodus ist der Standardmodus, wenn Sie die Kamera einschalten.
Drücken Sie im Videomodus den Auslöser, um die Videoaufnahme zu starten. Drücken Sie
den Auslöser, um die Videoaufnahme zu beenden.
00:00:00/00:31:55
Video
4K 30fps
34 35
Other manuals for V50X
7
Table of contents
Languages:
Other Akaso Action Camera manuals

Akaso
Akaso EK7000 User manual

Akaso
Akaso BRAVE 4 PRO User manual

Akaso
Akaso Brave 4 User manual

Akaso
Akaso Brave 7 User manual

Akaso
Akaso Brave 6 Plus User manual

Akaso
Akaso V50X User manual

Akaso
Akaso V50 Pro SE User manual

Akaso
Akaso V50 Elite User manual

Akaso
Akaso V50 Elite User manual

Akaso
Akaso EK7000 User manual

Akaso
Akaso V50X User manual

Akaso
Akaso Brave 4 Elite User manual

Akaso
Akaso V50 Elite User manual

Akaso
Akaso V50X User manual

Akaso
Akaso Brave 6 Plus User manual

Akaso
Akaso Brave 4 User manual

Akaso
Akaso V50X User manual

Akaso
Akaso EK7000 User manual

Akaso
Akaso Brave 4 User manual

Akaso
Akaso EK7000 User manual