Akaso BRAVE 4 PRO User manual

BRAVE 4 PRO
V35AX
ACTION CAMERA
01 02 03
04 05 06 07 08 09
10 11 12 13 14 15
16 17 18 19 20 21
22 23 24 25 26 27
28 29 30 31 32 33
34 35 36 37 38 39
40

Important Messages------------------------------------------------------------------------- 01
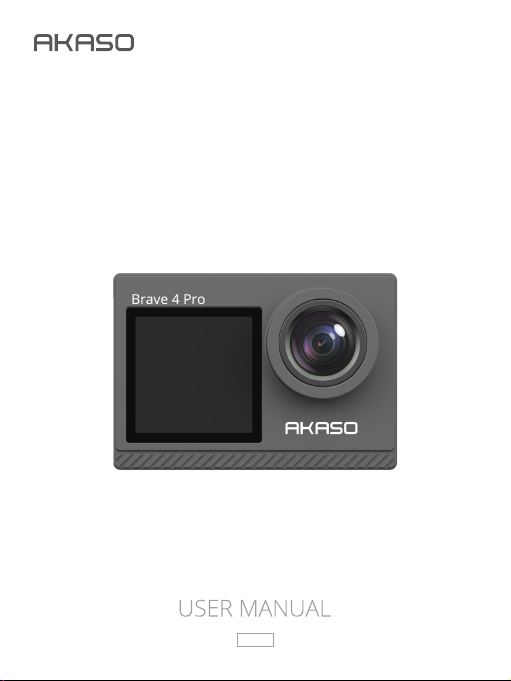
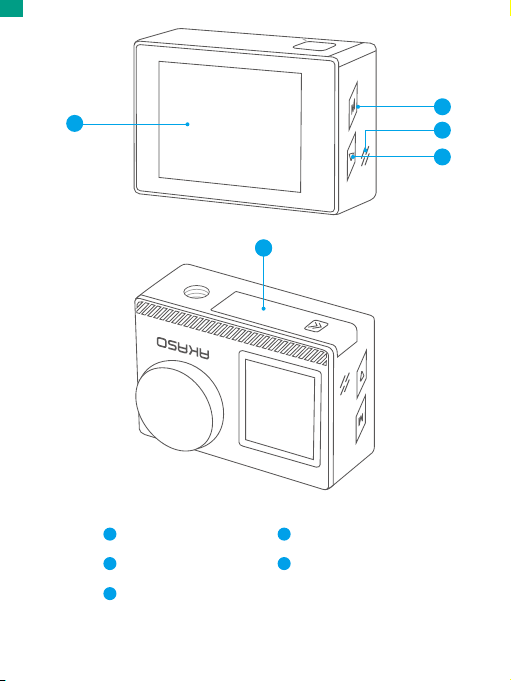
Your Brave 4 Pro ------------------------------------------------------------------------------ 02
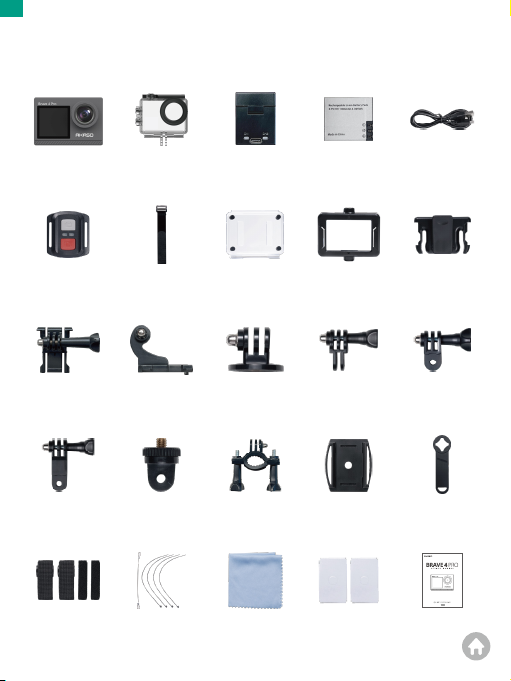
What’s in the Box------------------------------------------------------------------------------ 04
Camera Specifications ---------------------------------------------------------------------- 05
Getting Started--------------------------------------------------------------------------------- 06
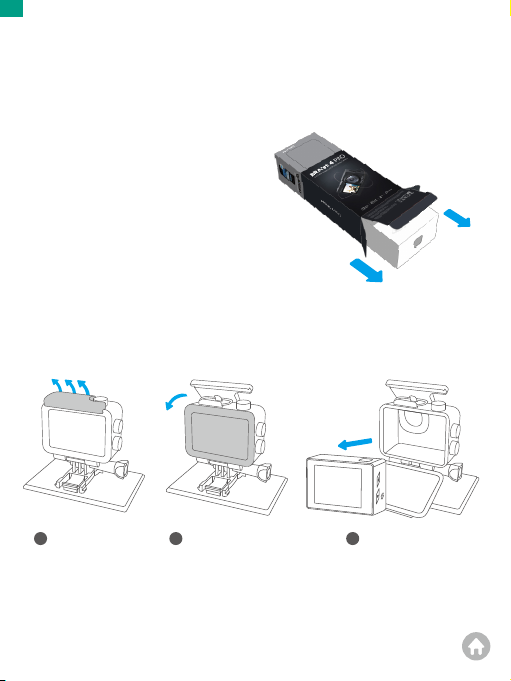
1. First Use ---------------------------------------------------------------------------------------- 06
2. Operation Instructions--------------------------------------------------------------------- 10
3. Indicators -------------------------------------------------------------------------------------- 12
4. Memory card use---------------------------------------------------------------------------- 13
Video Menu-------------------------------------------------------------------------------------- 14
1. Video Modes ---------------------------------------------------------------------------------- 14
2. Video Settings -------------------------------------------------------------------------------- 16
Photo Menu ------------------------------------------------------------------------------------- 20
1. Photo Modes---------------------------------------------------------------------------------- 20
2. Photo Settings -------------------------------------------------------------------------------- 22
System Settings-------------------------------------------------------------------------------- 25
Connecting to the AKASO GO APP------------------------------------------------------ 29
Playing Back Your Content ---------------------------------------------------------------- 31
1. Playing Back Files on Your Brave 4 Pro ----------------------------------------------- 31
2. Playing Back Files on the AKASO GO APP -------------------------------------------- 31
Downloading Your Content --------------------------------------------------------------- 32
1. Offloading Your Content to A Computer --------------------------------------------- 32
2. Downloading Your Content to A Smartphone -------------------------------------- 32
Adjusting Zoom Levels---------------------------------------------------------------------- 33
Reformatting Your Memory Card------------------------------------------------------- 33
Remote ------------------------------------------------------------------------------------------- 34
Contents
01 02 03
04 05 06 07 08 09
10 11 12 13 14 15
16 17 18 19 20 21
22 23 24 25 26 27
28 29 30 31 32 33
34 35 36 37 38 39
40
EN

Maintaining Your Camera ----------------------------------------------------------------- 35
Battery Maintenance ------------------------------------------------------------------------ 36
Mounting Your Camera--------------------------------------------------------------------- 38
Contact Us --------------------------------------------------------------------------------------- 40
01 02 03
04 05 06 07 08 09
10 11 12 13 14 15
16 17 18 19 20 21
22 23 24 25 26 27
28 29 30 31 32 33
34 35 36 37 38 39
40
EN

Important Messages
Congratulations on your new AKASO Brave 4 Pro Action Camera! You must be
excited to use your Brave 4 Pro, however, please spend time reading this manual
before using it. You need to get to know all its features now so as to get the most
out of it.
1. This camera is a precise product. Please protect it from falling or colliding in
case it’s badly damaged.
2. Please place this camera away from machines or matters rich in strong
magnetic fields or power, such as motors or magnets.
3. Please make sure the camera work at its operating temperature. Do not leave it
exposed to high or low-temperature areas for a long period of time in case its
service life is shortened.
4. Please make sure to securely attach the action camera to the waterproof case
before diving in case water leaks in, causing malfunction on it.
5. Please do not charge the battery for a long period of time. Keep it away from
kids and pets in case of any incident.
6. Please take the battery out of the camera if you do not use it for a long period
of time.
7. Please store this camera away from any sharp metals and wet compartments.
Warm Tip: In case your camera does not work normally or encounters any photo
or video quality issues, please feel free contact customer support for help by
sending emails to our official email address [email protected].
01 02 03
04 05 06 07 08 09
10 11 12 13 14 15
16 17 18 19 20 21
22 23 24 25 26 27
28 29 30 31 32 33
34 35 36 37 38 39
40
EN

9
11
10
8
1412
Note: The camera will not record sound when it is in the waterproof case.
Touch Screen
Mode/Up Button
Speaker
8
10
9
Down Button
Battery Cover
11
12
01 02 03
04 05 06 07 08 09
10 11 12 13 14 15
16 17 18 19 20 21
22 23 24 25 26 27
28 29 30 31 32 33
34 35 36 37 38 39
40
EN

Waterproof
Housing x 1 Battery Charger
x 1 Battery
x 2 USB Cable
x 1
Remote Control
x 1 Remote Control
Strap x 1
C Mount
x1
Buckle Mount
x1 J-Hook Mount
x1 A Mount
x1 D Mount
x1
Spanner
x 1
E Mount
x1 H Mount
x 1 Helmet Mount
x 2
F Mount
x1
Bandage
x 4 Tether
x 5 Lens Cloth
x 1 3M Adhesive Tape
x2 Quick Start
Guide x 1
Clip 1
x 1
Protective
Backdoor x 1 Clip 2
x 1
What’s in the Box
01 02 03
04 05 06 07 08 09
10 11 12 13 14 15
16 17 18 19 20 21
22 23 24 25 26 27
28 29 30 31 32 33
34 35 36 37 38 39
40
EN

Brand
Name
Model
Size
Net weight
Material
Battery capacity
Battery life
Wireless network
Working Temperature
External Microphone
AKASO
4K Versatile Brave 4 Pro Action Camera
Brave 4 Pro
66×44×34mm
112g
Plastic, silicone, glass
1350mAh
120 minutes
RF 2.4G+Wifi 2.4GHz
-5~45(23~113)
Supports external microphones (sold separately)
with USB-C ports
Camera specifications
01 02 03
04 05 06 07 08 09
10 11 12 13 14 15
16 17 18 19 20 21
22 23 24 25 26 27
28 29 30 31 32 33
34 35 36 37 38 39
40
EN

Getting Started
1. First Use
1.1 Unboxing
Open the packing box along the
dotted line, then take the Brave 4 Pro
action camera together with its
accessories out of the packing box.
1.2 Take the camera out of the waterproof housing
Pull up the waterproof housing buckle as indicated by the arrow to open the
protective backdoor, then take the camera out of the housing.
Lift the housing
buckle upwards
aOpen the protective
backdoor
bRemove the camera
from the housing
c
01 02 03
04 05 06 07 08 09
10 11 12 13 14 15
16 17 18 19 20 21
22 23 24 25 26 27
28 29 30 31 32 33
34 35 36 37 38 39
40
EN

1.3 Take the waterproof housing out of the packing box
Unscrew the screw rod counterclockwise using either your hands or the included
spanner.Once the screw rod is removed, take out the housing. Next, tear off the
silicon gel and pull up the mount buckle. Finally, push the buckle backward to
detach it from the housing.
Unscrew the screw rod with
the spanner
Remove the screw rod and the
waterproof housing
b
a
Tear off the silicon gel
cPull up the mount
buckle
dPush it backward
e
01 02 03
04 05 06 07 08 09
10 11 12 13 14 15
16 17 18 19 20 21
22 23 24 25 26 27
28 29 30 31 32 33
34 35 36 37 38 39
40
EN

1.4 Charge the battery
Plug the battery charger into a USB outlet, then put the battery into the battery
charger till the indicator turns blue.
Warm tip: The battery charger indicator will turn red while charging. It will turn
blue when fully charged.
1.5 Install the battery
Push down the buckle of the battery cover to open the cover, then put the battery
into the battery slot, and then close the battery cover. (You can pull up the battery
strip to take the battery out of the slot.)
01 02 03
04 05 06 07 08 09
10 11 12 13 14 15
16 17 18 19 20 21
22 23 24 25 26 27
28 29 30 31 32 33
34 35 36 37 38 39
40
EN

1.6 Install the Micro SD card
Make sure the camera is turned OFF first. Find the Micro SD card slot beside the
power port, then insert the memory card half way in, and use the fingernail to
push the card all the way inward until it clicks and locks in place.
1.7 Charge
Connect the camera to a USB adapter or a computer with the USB-C charging
cable. When the camera is fully charged, please unplug the USB cable.
01 02 03
04 05 06 07 08 09
10 11 12 13 14 15
16 17 18 19 20 21
22 23 24 25 26 27
28 29 30 31 32 33
34 35 36 37 38 39
40
EN

1.8 Power on
Press and hold the Power button for 3 seconds to turn on the Brave 4 Pro action
camera. (Please make sure the battery cover is properly closed before turning on
the camera.)
2. Operation Instructions
2.1 Powering on or off
When the camera is turned off, long press the Power button for 3 seconds to turn
on the camera.
When the camera is turned on, long press the Power button for 3 seconds to turn
off the camera.
2.2 Pressing the Shutter Button
When the camera is in Photo or Video mode, press the Shutter button to take
photos or capture videos.
(1) Press the Shutter button to start taking photos or recording video.
(2) Press the Shutter button again to stop recording. (In Video mode only)
2.3 Switching Modes
When the camera is turned on, tap the mode icon in the bottom of he screen to
enter the mode menu, then choose the desired shooting mode. You can also
press the Mode/Up button to switch modes. To exit the current mode, simply
press the Mode button or enter the mode menu to tap the “X” icon.
There are 9 modes of this action camera: Normal, Timelapse Video, Loop Recording,
and Slow Motion, Photo, Burst Photo, Timelapse Photo, Self-Timer, and Wifi.
01 02 03
04 05 06 07 08 09
10 11 12 13 14 15
16 17 18 19 20 21
22 23 24 25 26 27
28 29 30 31 32 33
34 35 36 37 38 39
40
EN

2.4 Zooming in or out
On the preview screen, tap the “+” icon to zoom in, and tap the“-” icon to zoom
out. Brave 4 Pro action camera supports up to 5X.
2.5 Playback
On the preview screen, press the Down button or tap the Playback icon in the
bottom left corner to enter the playback screen. You can switch between the
video and photo files. To exit the Playback screen, simply press the “X” icon in the
upper right corner.
2.6 Switching view modes
When the camera is turned on, press and hold the Mode/Up button to switch to
the front screen to take selfies. To switch back to the view mode of the
touchscreen, simply long press the Mode/Up button again.
Normal
4K30fps x1.0
00:00:00 03:21:11
01 02 03
04 05 06 07 08 09
10 11 12 13 14 15
16 17 18 19 20 21
22 23 24 25 26 27
28 29 30 31 32 33
34 35 36 37 38 39
40
EN

3. Indicators
Charging Indicator (Red)
Remains on while charging; turns off when the camera is fully charged.
Working Indicator (Blue)
Remains on when the camera is turned on; flashes while shooting or recording.
Wifi Indicator (Red)
Flashes when Wifi is turned on; remains on when connected.
2.7 Turning Wifi On or Off
Turning on Wifi
When the camera is turned on, tap the mode icon on the bottom screen to enter
the mode menu, and tap the Wifi icon to turn on Wifi. The camera will enter Wifi
mode and display the Wifi information in 3 seconds.
Turning off Wifi
In Wifi mode, press the OK button or tap the “X” icon on the Wifi screen to turn off
Wifi.
Mode
Normal
Timelapse
Video
Photo Burst Photo
Timelapse
Photo Wifi
SSID: AKASO-Brave4Pro-**-****
PWD: 1234567890
Waiting for Wifi Connection...
Press the OK button to turn
off Wifi
Normal
4K30fps x1.0
00:00:00 03:21:11
01 02 03
04 05 06 07 08 09
10 11 12 13 14 15
16 17 18 19 20 21
22 23 24 25 26 27
28 29 30 31 32 33
34 35 36 37 38 39
40
EN

4. Memory card use
To capture video or take photos, you need to insert a Micro SD card (sold separately).
Please use brand name memory cards that meet the following requirements:
(1) U3
(2) Capacity up to 64GB (FAT32)
Warm tips:
1. Please format the memory card in this camera before using it for better compatibility.
2. To keep your memory card in good condition, reformat it on a regular basis.
Reformatting erases all your content, so please make sure to offload your photos
and videos before reformatting. FAT32 format memory card will stop recording
and starts to record again on a new file when the file size reaches 4GB.
Notes
1. Please do not use the Micro SD card in environments exposed to strong
currents or magnetic fields.
2. Please do not touch the Micro SD card or leave it touched by any mental items
in case it’s squeezed, bent, or falling.
3. Please keep the Micro SD card away from water, wet areas, or places with
erosive items.
4. Please insert the Micro SD card into the card slot in the right direction.
5. Please do not insert any foreign item into the Micro SD card slot.
6. Please turn off the camera before inserting or removing the Micro SD card.
01 02 03
04 05 06 07 08 09
10 11 12 13 14 15
16 17 18 19 20 21
22 23 24 25 26 27
28 29 30 31 32 33
34 35 36 37 38 39
40
EN

Video Menu
1. Video Mode
The camera is in Normal Video mode by default when it’s turned on. Video modes
of this camera include Normal, Timelapse Video, Loop Recording, and Slow Motion.
1.1 Normal Video Mode
In Normal Video mode, press the Shutter button, the camera will record normal
video. You can also enter the video mode menu to enable Normal Video mode.
You can tap the “+”or “-”icon to zoom in or out.
1.2 Timelapse Video Mode
To enter Timelapse Video mode, you can tap the mode icon on the bottom screen
to enter the mode menu, and tap “Timelapse Video". In this mode, press the Shutter
button, the camera will take a series of videos at the set interval. You can tap the
“+” or “-” icon to zoom in or out.
x1.0
Video Resolution
Video Mode
Image Stabilization
Video
Slow Motion
Loop video
Normal
4K30fps x1.0
00:00:00 03:21:11
Normal
4K30fps x1.0
00:00:00 03:21:11
Timelapse Video
4K30fps x1.0
00:00:00 03:21:11
Mode
Normal
Timelapse
Video
Photo Burst Photo
Timelapse
Photo Wifi
01 02 03
04 05 06 07 08 09
10 11 12 13 14 15
16 17 18 19 20 21
22 23 24 25 26 27
28 29 30 31 32 33
34 35 36 37 38 39
40
EN

1.3 Loop Recording Mode
To enter Loop Recording mode, please first make sure the camera is in Normal
Video mode. Second, tap the Settings icon in the bottom right corner of the screen
to enter the video settings page. Third, tap “Video Mode” to choose “Loop Video”
from the video mode menu. Last, go back to the preview screen. In this mode,
press the Shutter button, the camera will record a loop video of the set length.
You can tap the “+” or “-” icon to zoom in or out. Before recording loop videos, you
can enter the video settings page, and scroll down to “Loop Recording” to set the
loop recording time.
1.4 Slow Motion Mode
To enter Slow Motion mode, please first make sure the camera is in Normal Video
mode. Second, tap the Settings icon in the bottom right corner of the screen to
enter the video settings page. Third, tap “Video Mode” to choose “Slow Motion”
from the video mode menu. Last, go back to the preview screen. In this mode,
press the Shutter button, the camera will record slow motion video at the set
resolution and speed. You can tap the “+” or “-” icon to zoom in or out. Before
recording slow motion videos, you can enter the video settings page, and tap
“Slow Motion Movie” to change the frame rate and speed.
Video Resolution
Video Mode
Image Stabilization
Video
Slow Motion
Loop video
Normal
4K30fps x1.0
00:00:00 03:21:11
Loop Recording
4K30fps x1.0
00:00:00 03:21:11
Video Resolution
Video Mode
Image Stabilization
Video
Slow Motion
Loop video
Normal
4K30fps x1.0
00:00:00 03:21:11
Slow Motion
720P 4X x1.0
00:00:00 03:21:11
01 02 03
04 05 06 07 08 09
10 11 12 13 14 15
16 17 18 19 20 21
22 23 24 25 26 27
28 29 30 31 32 33
34 35 36 37 38 39
40
EN

2. Video Settings
(1) Video Resolution:
4K30fps/2.7K30fps/1080P120fps/1080P60fps/1080P30fps/720P240fps/720P120fps
/720P60fps/720P 30fps (Default setting: 4K 30fps)
This camera is capable of recording video up to 4K30fps, with higher resolution
offering greater clarity and detail due to the increased number of pixels. However,
higher resolution video also results in larger file sizes.
Note:
① 4K30, 2.7K30, 1080P120, 1080P30, 720P240, and 720P30 are not available in
Slow Motion mode.
② Capturing high-resolution or high-fps videos in low-temperature scenes can
consume more power.
(2) Video Mode:
You can choose the video mode you want.
• Video:
In this mode, the camera will start recording normal videos after you press the
Shutter button. To stop recording, simply press the Shutter button again.
• Slow Motion: 2.7K 2X, 1080P 2X, 720P 4X, 720P 2X
Slow Motion Video, also known as high-frame-rate video, refers to a technique
where the camera records video at a higher frame rate and then plays it back at a
lower speed, typically 30 frames per second, resulting in a smoother and more
dramatic effect.
Note: 4K30, 2.7K30, 1080P120, 1080P30, 720P240, and 720P30 are not available
in Slow Motion mode.
• Loop Video: 2Min, 3Min, 5Min (Default setting: 2Min)
If you set Loop Recording to the “3Min” option in Loop Recording mode, the camera
will record a video and save the content every 3 minutes. In this mode, when the
01 02 03
04 05 06 07 08 09
10 11 12 13 14 15
16 17 18 19 20 21
22 23 24 25 26 27
28 29 30 31 32 33
34 35 36 37 38 39
40
EN
Other manuals for BRAVE 4 PRO
2
Table of contents
Languages:
Other Akaso Action Camera manuals

Akaso
Akaso EK7000 User manual

Akaso
Akaso Brave 7 LE User manual

Akaso
Akaso Brave 8 User manual

Akaso
Akaso EK7000 User manual

Akaso
Akaso EK7000 User manual

Akaso
Akaso Brave 7 User manual

Akaso
Akaso Brave 6 User manual

Akaso
Akaso V50 Elite User manual

Akaso
Akaso V50 Pro SE User manual

Akaso
Akaso Brave 7 User manual