AKCP IO-digital8 User manual

!
!
!
!
!
!
!
!
!
!
!
IO-digital8
(Phoenix Connectors)
User Manual!
!
!
!
Copyright*©*2010,*AKCP*Co.,*Ltd.*
Provided by official AKCP-Distributor Didactum https://www.didactum-security.com/en/
*
!

!
2!
!!!!!!!!!!!!!!!!!!!!!!!!!!!!!!!!!!!!!!!!!!!!!!!!!!!!!!!!!!!!!!!!!!!!!!!!!!!!!!!!!!!!!!!!!!!!!!!!!!!!!!!!!!!!!!!!!!!!!!!!!!!!!!!!!!!!!!!!!!!IO-Digital8!User!Manual!!
!
!
1) Introduction
•What is IO-digital8?
•How to use this manual
•Package contents
•Connection points
2) Installation
•Connecting to the base unit
•Setting up a sensor
3) Sensor Settings
Provided by official AKCP-Distributor Didactum https://www.didactum-security.com/en/

!
3!
!!!!!!!!!!!!!!!!!!!!!!!!!!!!!!!!!!!!!!!!!!!!!!!!!!!!!!!!!!!!!!!!!!!!!!!!!!!!!!!!!!!!!!!!!!!!!!!!!!!!!!!!!!!!!!!!!!!!!!!!!!!!!!!!!!!!!!!!!!!IO-Digital8!User!Manual!!
1) Introduction
1. What is IO-digital8?
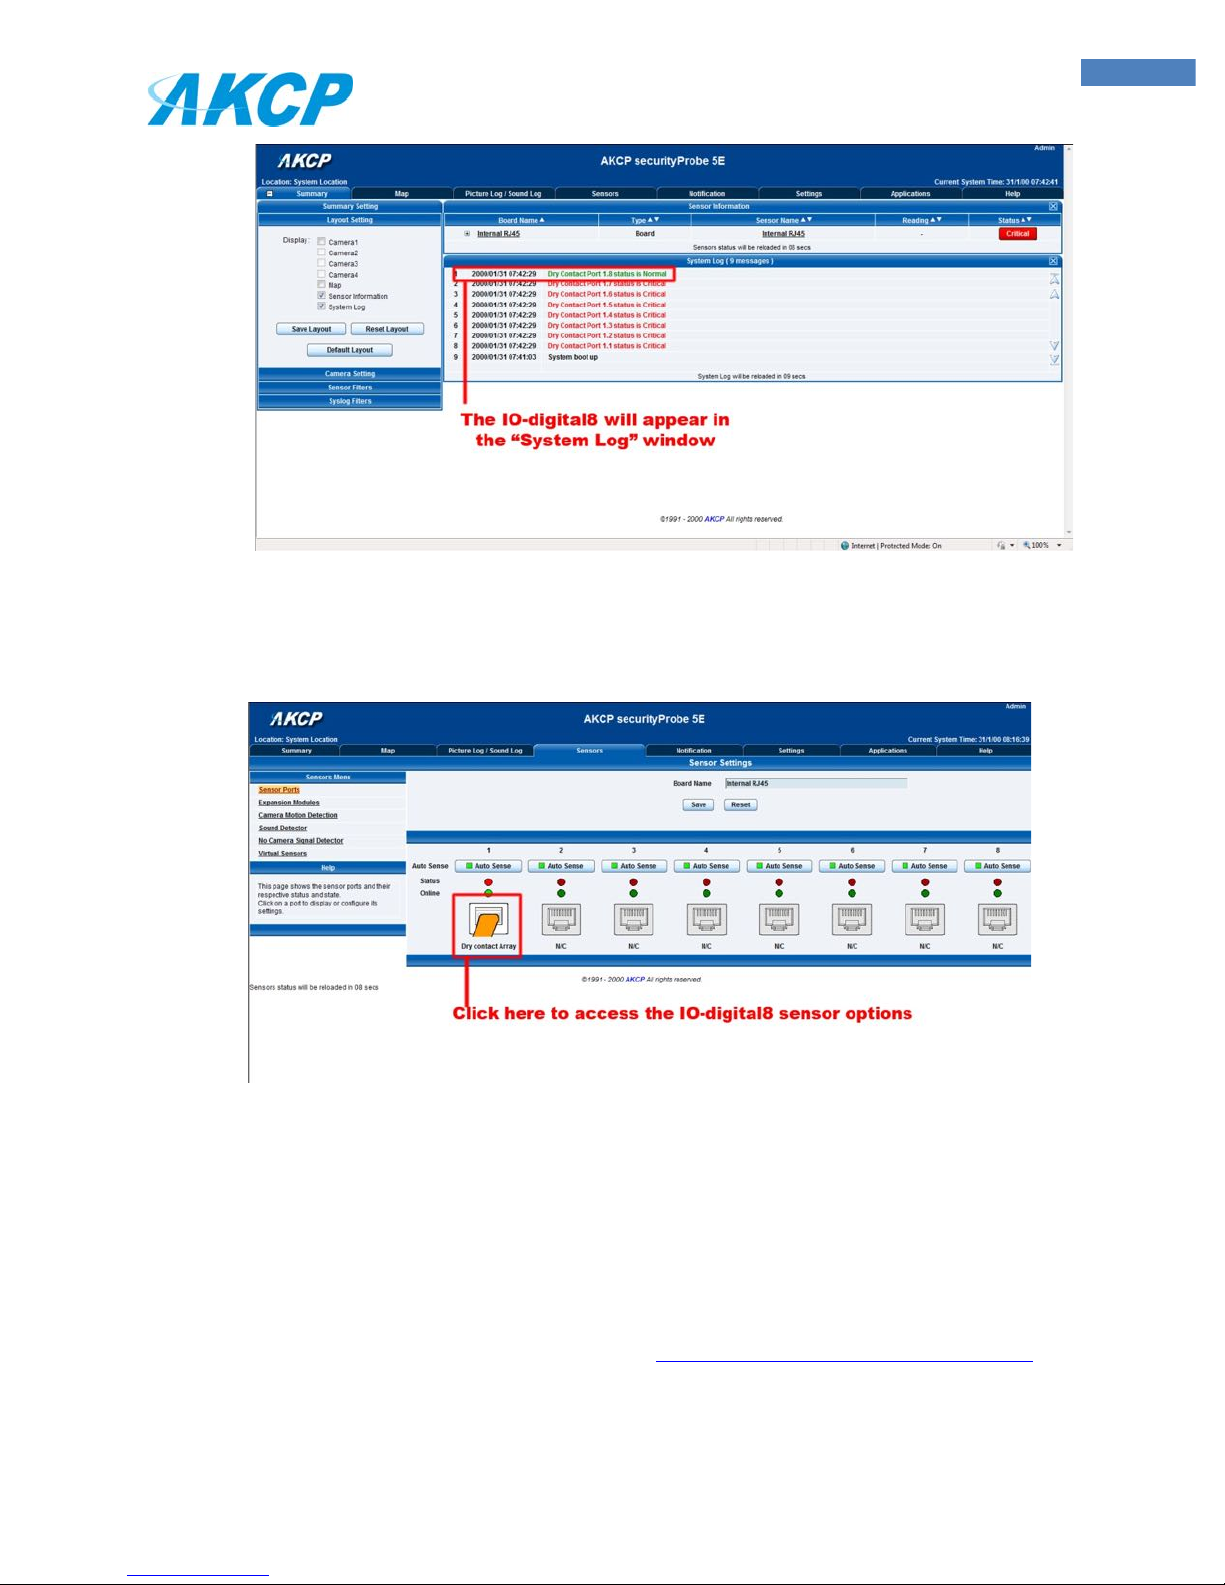
The IO-digital8 module extends the securityProbe 5E capabilities by connecting an additional eight
dry contacts to a single intelligent sensor port on the securityProbe-5E.
2. How to use this manual
This manual is meant to provide the user with a step by step guide on how to configure and set up
their unit. It utilizes screen shots in an effort to make things simpler for the user to follow. It is split up
into sections that form “mini tutorials”. These cover the basic set up and common configurations of
the unit, and give an introduction to its most useful features.
At the end of the manual there is a FAQ section that provides some further in-depth information
regarding specific set ups and answers some commonly asked questions. If you need any further
technical support staff will be only too pleased to help you with any information you require.
3. Package Contents
Your IO-Digital8 package contains the following items:-
•8x terminal block connectors
•1x 5 ft straight cable
Provided by official AKCP-Distributor Didactum https://www.didactum-security.com/en/

!
4!
!!!!!!!!!!!!!!!!!!!!!!!!!!!!!!!!!!!!!!!!!!!!!!!!!!!!!!!!!!!!!!!!!!!!!!!!!!!!!!!!!!!!!!!!!!!!!!!!!!!!!!!!!!!!!!!!!!!!!!!!!!!!!!!!!!!!!!!!!!!IO-Digital8!User!Manual!!
4. Connection Points
Fig 1. Side panels
1. Terminal Block connectors
There are eight female terminal block connectors on the IO-digital8, these are for connecting
your additional dry contacts via the male terminal block connector.
2. RJ45 Connection point
This is for connecting the IO-digital8 to the base unit via straight cable.
1) Installation
1. Connecting to the base unit
Below is a diagram showing how to connect the IO-Digital8 to the AKCP securityProbe 5E.
To begin setup the unit by following the instructions below:-
Provided by official AKCP-Distributor Didactum https://www.didactum-security.com/en/

!
5!
!!!!!!!!!!!!!!!!!!!!!!!!!!!!!!!!!!!!!!!!!!!!!!!!!!!!!!!!!!!!!!!!!!!!!!!!!!!!!!!!!!!!!!!!!!!!!!!!!!!!!!!!!!!!!!!!!!!!!!!!!!!!!!!!!!!!!!!!!!!IO-Digital8!User!Manual!!
2. Setting up a Sensor
In this section we will now go through the basic set up of a sensor. This basic set up process
is applicable to all of our dry contact sensors. If you require information on specific functions
of a particular sensor then please download the manual for that sensor from our website, or
locate it on your product CD.
a) Plug the sensor into one of the female terminal block connection points on the side panel of
the unit.
a) Now point your browser to the IP address of the unit (default, 192.168.0.100). Next you need
to login as the administrator using your administrator password (default is “public”). You will
then be taken to the summary page. This is shown below.

!
6!
!!!!!!!!!!!!!!!!!!!!!!!!!!!!!!!!!!!!!!!!!!!!!!!!!!!!!!!!!!!!!!!!!!!!!!!!!!!!!!!!!!!!!!!!!!!!!!!!!!!!!!!!!!!!!!!!!!!!!!!!!!!!!!!!!!!!!!!!!!!IO-Digital8!User!Manual!!
The IO-digital8 should be listed, along with its current status.
b) By clicking on the “Sensors” tab (indicated below). This will bring you to the following page,
the sensors page:-
As you can see in the above image, the IO-digital8 as shown connected to port number one
Once you have clicked on the sensor port you require you will be bought to the following
page:-
Provided by official AKCP-Distributor Didactum https://www.didactum-security.com/en/

!
7!
!!!!!!!!!!!!!!!!!!!!!!!!!!!!!!!!!!!!!!!!!!!!!!!!!!!!!!!!!!!!!!!!!!!!!!!!!!!!!!!!!!!!!!!!!!!!!!!!!!!!!!!!!!!!!!!!!!!!!!!!!!!!!!!!!!!!!!!!!!!IO-Digital8!User!Manual!!
3. Sensor Settings
1. Dry contact Array tabs
Each dry contact sensor is listed in numeric order as “Dry contact Array”; Click any one of these
to be taken to the settings page of the sensor chosen.
2. Sensor Name
By clicking in this box you can change the name of each sensor to anything you desire.
3. Sensor Status

!
8!
!!!!!!!!!!!!!!!!!!!!!!!!!!!!!!!!!!!!!!!!!!!!!!!!!!!!!!!!!!!!!!!!!!!!!!!!!!!!!!!!!!!!!!!!!!!!!!!!!!!!!!!!!!!!!!!!!!!!!!!!!!!!!!!!!!!!!!!!!!!IO-Digital8!User!Manual!!
This displays your chosen sensors current status.
4. Online / Offline
This shows you if your chosen sensor is currently online or offline.
5. Direction
Here you can set the direction of your sensor to either input or output, if you select output you will
be shown the following options:-
5a. Output Status
Here you can set a custom description for when your sensor records either a high or low status
reading.
5b. Control Mode
Here you can set your control mode to either manual control, notification control, or time control.

!
9!
!!!!!!!!!!!!!!!!!!!!!!!!!!!!!!!!!!!!!!!!!!!!!!!!!!!!!!!!!!!!!!!!!!!!!!!!!!!!!!!!!!!!!!!!!!!!!!!!!!!!!!!!!!!!!!!!!!!!!!!!!!!!!!!!!!!!!!!!!!!IO-Digital8!User!Manual!!
5c. Notification Control and Cycle Time
If you select “Notification control” from the options shown in fig 5b, you will then need to set your
notification options. Here you can chose from either Low or high, or you can chose to cycle your
notification.
If you choose to cycle your notification, you can set the time in the option below:-
6. Normal State
Here you can select between an open circuit (+5 Volts) or a closed circuit (GND).
7. Enable Graph
This option allows you to enable your graphing data. To access your graph, click “click here to view
graph”
This will display the page shown below which contains all your graphing data.
Provided by official AKCP-Distributor Didactum https://www.didactum-security.com/en/

!
10!
!!!!!!!!!!!!!!!!!!!!!!!!!!!!!!!!!!!!!!!!!!!!!!!!!!!!!!!!!!!!!!!!!!!!!!!!!!!!!!!!!!!!!!!!!!!!!!!!!!!!!!!!!!!!!!!!!!!!!!!!!!!!!!!!!!!!!!!!!!!IO-Digital8!User!Manual!!
8. Sensors URL

!
11!
!!!!!!!!!!!!!!!!!!!!!!!!!!!!!!!!!!!!!!!!!!!!!!!!!!!!!!!!!!!!!!!!!!!!!!!!!!!!!!!!!!!!!!!!!!!!!!!!!!!!!!!!!!!!!!!!!!!!!!!!!!!!!!!!!!!!!!!!!!!IO-Digital8!User!Manual!!
In the “Sensor URL” box you can assign a website to your chosen sensor, this will be displayed
within sensor information on the “Map” interface on the summary page. The website link can be
opened in the current window or in a new window.
9. Status Options
The first set of options allows you to specify the amount of time that a sensor must remain in a new
status before accepting and reporting on that status.
The second box displays a set of options which allow you to set the minimum time between each
status.
10. Enable Calendar
Here you have options to display your calendar, you can set hours in the day, and days in the
week in which you would like your sensor to report and not report.

!
12!
!!!!!!!!!!!!!!!!!!!!!!!!!!!!!!!!!!!!!!!!!!!!!!!!!!!!!!!!!!!!!!!!!!!!!!!!!!!!!!!!!!!!!!!!!!!!!!!!!!!!!!!!!!!!!!!!!!!!!!!!!!!!!!!!!!!!!!!!!!!IO-Digital8!User!Manual!!
Provided by official AKCP-Distributor Didactum https://www.didactum-security.com/en/
Table of contents
Other AKCP Accessories manuals
Popular Accessories manuals by other brands

Force Flow
Force Flow WIZARD 4000 Operation & maintenance manual

Honeywell
Honeywell C7600B Product data

Vega
Vega VEGAPULS 68 operating instructions

NOVAK
NOVAK XBR SPORT - PROFILE & GEARING GUIDE manual

Panasonic
Panasonic Zener Diodes MAZAxxx Series Specifications

AIREDALE
AIREDALE LogiCool OnRak Technical, Installation, Operational and Maintenance Manual