AKUA Pin Press User manual

Pin Press User Guide | January 2015
TM
Pin Press

TABLE OF CONTENTS
The AkuaTM Pin Press ......................................................1
1. Using The Pin Press ................................................2-5
2. Materials & Preparation: Plates, Paper, and Ink.......6-13
Selecting Akua Ink ..............................................7
Modifiers .........................................................8-9
Applicators & Plates ....................................10-11
Paper.............. .............................................12-13
3. Creating the Image ..............................................14-33
Additive Monotype .......................................16-17
Subtractive Monotype ..................................18-19
Viscosity Monotype ......................................20-23
Trace Monotype ...........................................24-25
Stencils .......................................................26-29
Ghost Printing..............................................30-31
Drypoint ......................................................32-33
4. After Printing ......................................................34-39
Cleaning up & Storing Press .............................35
Drying & Storing Prints ................................36-39
5. Troubleshooting ..................................................40-45
Written by
Susan Rostow, Inventor of Akua Inks & Accessories
Co-writes and Copy Edits
Brittany Kleinschnitz and Christina Pumo
Photography and Design
Christina Pumo and Brittany Kleinschnitz

www.AkuaInks.com 1
The Akua Pin Press
It is a common misconception that one needs to make a large
investment in equipment in order to create high quality prints.
The Pin Press offers high performance at a fraction of the cost of
a traditional press and mobility that allows you to create prints
wherever you want to go. The Pin Press’ ergonomic design allows
artists to minimize impact on the body and provides an ideal
storage solution when the Press is not in use.
Less pressure is required when printing the surface of the plate
(e.g. monotype), as opposed to printing the depths of the plate
(e.g. an intaglio/etching) which requires the pressure of an etching
press. Therefore, the Pin Press is an ideal tool for all monotype
techniques. Additionally, great results can also be obtained from
incised plates (e.g. for drypoint printmaking) this is because the
burr of the drypoint holds the ink.
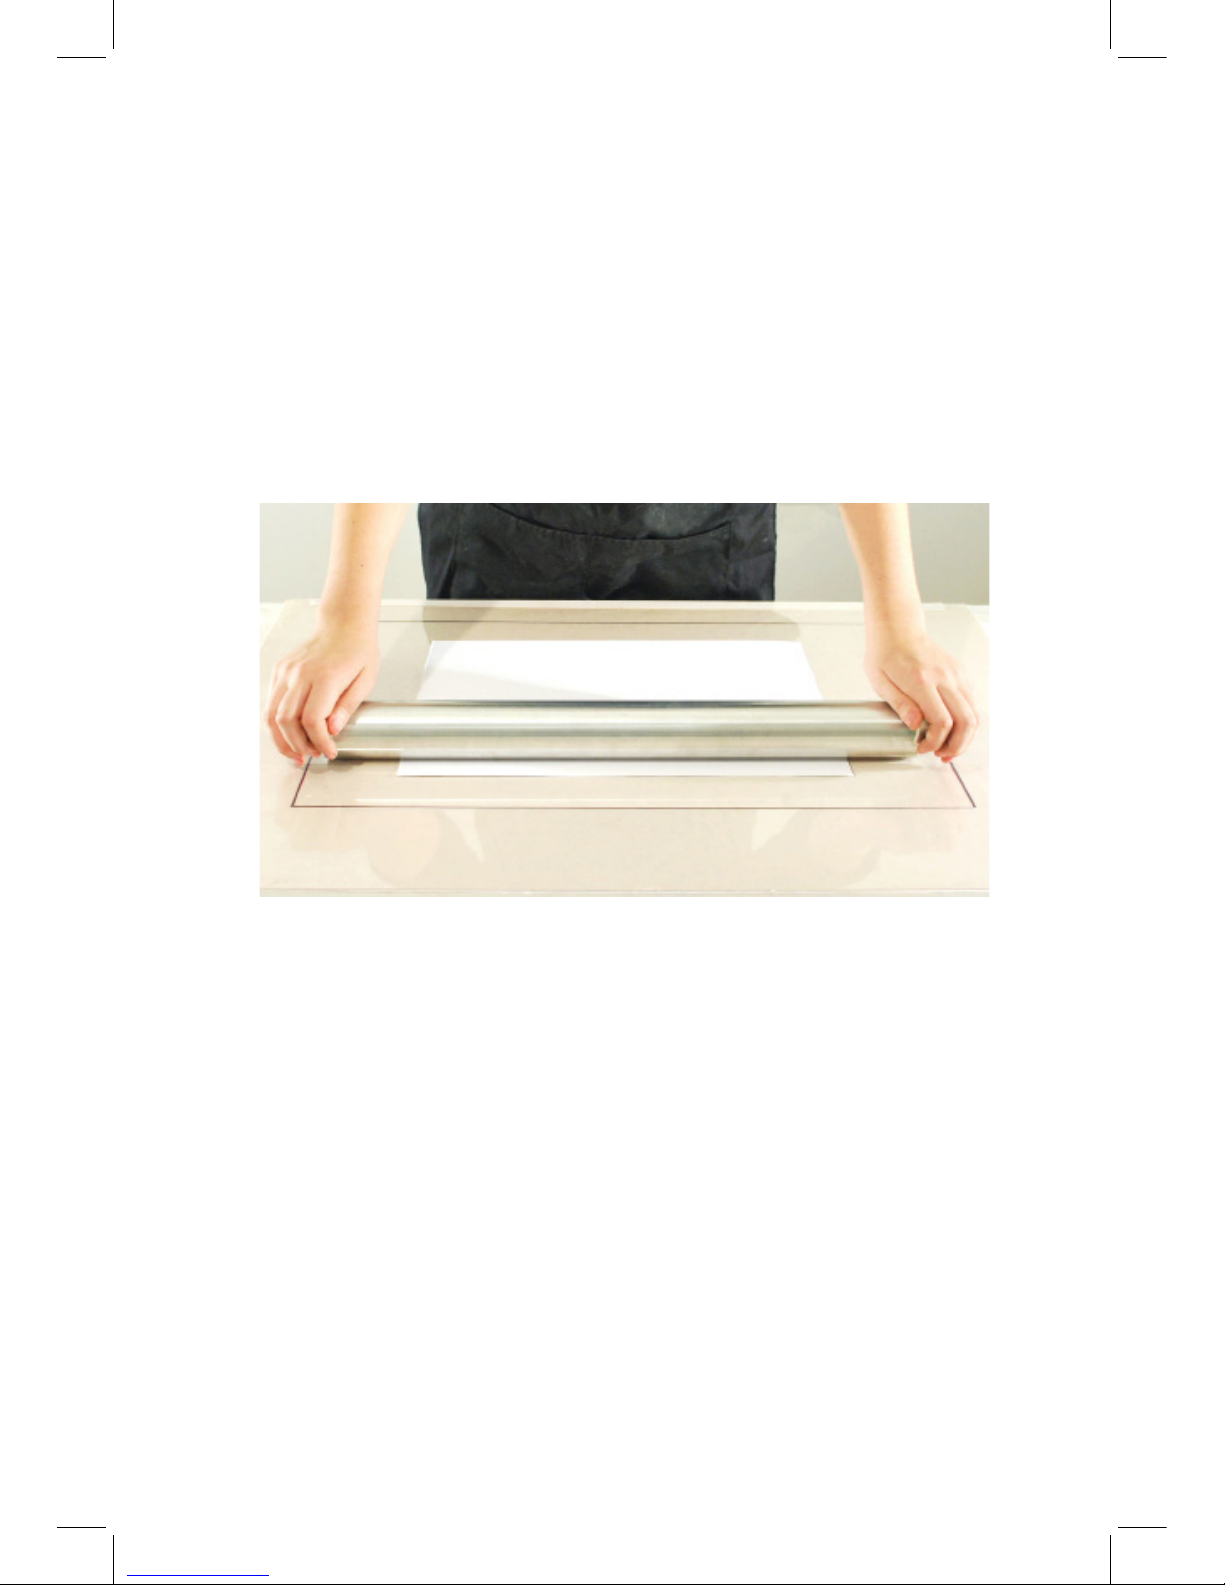
The crescent-shaped
handles swivel and act stand
when not in use.
Rest the palm of your hands
on the flat side of the crescent-
shaped handles when printing.
PREFACE
Writing instructions for a creative thinker is a challenging task. I
wonder, “How can I cover so many printmaking possibilities and
variables in just a 14 page booklet? Will I be able to help the wide
range of personalities who flip these pages looking for the answers on
how to pull a successful print with the Pin Press?” Then, I remember
that printmakers are problem solvers and will understand that the
information in this user guide is intended to be used as a starting point.
I am certain you will contribute your own innovations and discoveries.
Pick up your Pin Press and roll with it!
-Susan Rostow, Inventor of Akua Inks & Accessories
The Akua Pin Press, received the “Best New Product” Award at the
International Art Materials Trade Association Conference in 2011.

2 www.AkuaInks.com
USING THE
PIN PRESS
Using the Pin Press requires the right balance between the amount of
ink applied to the plate, the character of the paper, and the amount of
pressure applied.
Press Beds
A heavy glass tabletop is recommended for use with the Pin
Press. If one is not available, a tempered glass surface (¼”
thickness or greater) for successful printing is recommended, as
surfaces like wooden tables, laminated surfaces and Plexiglas®
do not always provide a consistently flat surface. To check to see
if a surface is flat, lay your Pin Press down flat on the press bed.
Next, take a sheet of paper and try to insert the paper between
the press and the glass surface. If the paper slips through, there
is a dip in the glass. Flip the glass over and check again. For
optimum leverage, place the glass on a table slightly lower than
hip level.

www.AkuaInks.com 3
REGISTRATION
For quick and easy registration, place a registration template
under the glass. Standard paper sizes were used (5x7, 8x10,
11x14, etc.) to create this template. Line up your plate with the
appropriately sized outline and then do the same with the paper,
laying it on top of the plate.
When positioning your plate, add a drop or two (depending on the
size of your plate) of water underneath the printing plate. The
water will prevent the plate from moving. Be careful not to add too
much water as it can spread under pressure and possibly stain the
paper margins.
KEEPING YOUR PLATE IN POSITION
BEFORE YOU BEGIN
Lay the Pin Press down so the roller lays flush to the press bed
surface to check for flatness.

4 www.AkuaInks.com
1. Once you have created your
image, place the plate on a
level surface.
NOTE: Tempered glass is
recommended as a press bed.
Press bed shown with
registration template.
2. Lay your paper onto the
plate.
3. Gently place the Pin Press
on the center of the paper.
4. Using light pressure, place
the palm of your hands on
the flat side of the crescent-
shaped handles. Do not hold
onto the roller itself. Roll back
and forth in small passes a few
times to allow the paper and
plate to stick together.
STEPS:

www.AkuaInks.com 5
5. Apply more pressure with
the roller. Roll completely off
the edges of the plate from
all directions (horizontally,
vertically and diagonally) to
ensure even coverage.
6. Lift and check a corner
of the print before pulling
the paper from the plate. To
check the transfer, keep one
hand lightly pressing the
other half of the paper on the
plate to keep the paper/plate
registration.
7. Apply more pressure with
the roller as needed.
8. After printing, rest the Pin
Press on the flat side of both
handles.

6 www.AkuaInks.com
MATERIALS AND
PREPARATION:
• Inks
• Modifiers
• Applicators
• Paper
• Plates
• Pin Press

www.AkuaInks.com 7
For Rolling Up
Akua IntaglioTM Ink
Akua Intaglio Ink offers strong color density right from
the jar with no modification for roll ups.
Akua Liquid PigmentTM Ink
Akua Liquig Pigment without modification is too thin
to print roll ups by hand. Mix with AkuaTM Tack Thickener.
For Brushwork
Akua Intaglio Ink
If Akua Intaglio is too thick to brush, add a few drops
of AkuaTM Blending Medium to loosen.
Akua Liquid Pigment Ink
For hand-printing with Akua Liquid Pigment, it may be
necessary to add a drop or two of AkuaTM Retarder to the
ink.
For Drypoint
Akua Intaglio Ink is recommended.
SELECTING AKUA INKS
- gum based
- fluid
- soy based
- heavy body

8 www.AkuaInks.com
MODIFIERS
Release Agent
Use with Akua Liquid Pigment & Akua Intaglio. It
has two purposes:
1) Monotype Ghost Prints: After printing a
monotype there may be some residue of ink
remaining on the plate. Release Agent can be used
to print a second lighter version of the first print.
Roll a thin, even layer of Release Agent on top of
remaining of ink on the plate and print. Wait 3-5
minutes to print.
2) High Shine with Akua Intaglio Metallic Inks:
Roll Akua Release AgentTM over the metallic ink
that was applied to the plate. Wait 3-5 minutes
and print.
Transparent Base
Use with Akua Liquid Pigment & Akua Intaglio.
Transparent Base is Akua Intaglio Ink base
without pigment. Adding Akua Liquid Pigment to
Transparent Base will thicken Akua Liquid Pigment
and create new intaglio or relief colors. Adding
Akua Intaglio ink’s to this base will increase ink
transparency. Transparent Base is light amber in
color.
Akua Mag Mix
(Also called “Akua Ink Stiffener”)
Use with Akua Intaglio. Mix into Akua Intaglio Ink
to add depth and stiffen the ink. It is white in color
with a stiff consistency but dries clear. It is not
suitable for Akua Liquid Pigment.

www.AkuaInks.com 9
Tack Thickener
Use with Akua Liquid Pigment.
It thickens Akua Liquid Pigment
for heavier roll-up applications
for monotype and block printing.
It is medium amber in color
with a
consistency similar to
molasses.
Retarder
Use with Akua Liquid
Pigment, not suitable for Akua
Intaglio. Slows drying rate,
acts as a release. A few drops
in the ink are essential when
printing on dry paper. Ideal
for hot, dry or cold climates.
It is a clear liquid.
Extender
Use with Akua Liquid Pigment.
Extender is used to thin Akua
Liquid Pigment if it becomes
too thick. It is not recommended
for use with Akua Intaglio Inks.
It is medium amber in color with
a liquid consistency.
Blending Medium
Use with Akua Liquid Pig-
ment or Akua Intaglio Inks.
Use to thin the ink for brush-
work, create wash effects or
use as a resist for viscosity
monotype. It is a clear liquid.

10 www.AkuaInks.com
NEEDLE APPLICATORS
Akua Needle Applicators
for Akua Liquid Pigment
The small bellows bottle fits
in the palm of the hand.
With a gentle push, Akua
Liquid Pigment flows from
the bellows bottle through
the needle tips. Refillable
bellows holds 1 fl. oz. of Akua
Liquid Pigment. Ink is sold
separately.
Needle Tips
Steel Angled Tips: Sturdy 1/2” tip for precise
detail. Available in fine, medium, and wide tips.
Plastic Straight Tips: Super flexible 1/2” tip for
very delicate detail. Available in the fine size.
Plastic Tapered Tip: Rigid 1-1/4” for bold lines and
selected areas of color. Available in wide size.
Steel Angled Plastic Straight Plastic Tapered
The AkuaTM Needle Applicator Set offers three styles of
interchangable tips that pair with the bellows bottles to create
various types of lines and marks with Akua Liquid Pigment.

www.AkuaInks.com 11
PLATES
SELECTING THE PLATE
While nearly any smooth, non-porous surface (e.g. acetate, mylar,
acrylic, plastic-coated freezer paper, polycarbonate, copper, zinc,
glass, wood, rubber, etc.) can serve as a plate, Akua Printmaking
PlatesTM are ideal for use with the Pin Press. Specifically designed
for monotype and drypoint processes, Akua Printmaking Plates
are made of 100%, crystal clear / no tint PETG plastic and their
soft, malleable surfaces allow for easily-incised lines and a smooth
transfer from ink to paper. Whatever plate you opt to use, please
note that thinner plates (1/16” or thinner) are best for use with
the Pin Press.
Creating a drypoint on an Akua Printmaking Plate
Rolling up on an Akua Printmaking Plate

12 www.AkuaInks.com
PAPER
For monotype and drypoint printing with the Pin Press, smooth,
dampened printmaking paper such as Arnhem 1618®is
recommended.
Certain papers can be printed dry depending on their
characteristics.
DAMPENING THE PAPER
IN A WET PACK
(Light to Heavyweight Paper)
1. Lay out a plastic sheet and
place a piece of paper in the
middle. Spray the entire sheet
of paper with water using a
spray bottle.
2. Dampen multiple sheets of
paper by layering one on top
of the other, spraying each
time you add a sheet. Spray
the top and bottom of the
first sheet, followed by only
spraying the top surface of
each subsequent sheet. This
allows the top of the previous
sheet to wet the back of the
next layer.
3. Fold the plastic sheet
around the stack of paper
and seal so air does not get
in. Let it sit for at least 15
minutes. Blot before printing
if wet spots are visible on the
surface.
TIP: Paper left for 24 hours
should not require blotting.

www.AkuaInks.com 13
For Eastern papers (Washi, Kozo, etc.) dampen by placing between
damp blotters (newsprint, lint-free towls, etc.) and wrap in plastic.
Let the paper sit until it feels evenly moist.
USING DAMP BLOTTERS (Tissue paper to Lightweight)
SOAKING IN A WATER TRAY (Medium to Heavyweight Paper)
Locate a tray/container large enough to fit an entire sheet of
paper (lying flat) and fill with water until the paper is completely
submerged. On average, soak time can range from 5-20 minutes
in the tray, depending upon the weight of the paper. For exaple,
245gsm will lean towards a 5-10 minute soak time while a
320gsm paper will lean towards a 10-20 minute soak time.
Tissue Paper approx. 12-20
Super Light approx. 30-65
Light Weight approx. 100-180
Medium Weight approx. 200-245
Heavy Weight approx. 300-350
Paper Type GSM
Drypoint prints on Japanese paper
Determining Paper Weight

14 www.AkuaInks.com
CREATING
THE
IMAGE

www.AkuaInks.com 15
The Pin Press was designed specifically for use with all types of
monotype printmaking, including additive, subtractive, viscosity,
and trace processes. However, it can be used for other printmaking
process such as stencils, stamps, and drypoint plates.
Any brand of water- or oil-based ink can be used with the Pin
Press. For best results we recommend Akua Inks. Because Akua
Inks do not dry on a non absorbent surface, artists can enjoy an
endless amount of time creating images. Akua can be applied
with a wide range of tools including, but not limited to: brushes;
brayers; sponges; Akua Needle Applicators, etc.
Printing with the Pin Press requires a heavier application of ink
than when printing with a traditional etching press to compensate
for the ligher pressure between plate and paper.
Development of the piece:
Fantasy of Feathers
18” x 24” Additive Monotype
by Melody Knight Leary
see printed piece on pg. 38

16 www.AkuaInks.com
ADDITIVE MONOTYPE
MATERIALS NEEDED:
- Akua Intaglio and/or Akua Liquid Pigment Inks
- Printing plate (Akua Printmaking Plate recommended)
- Gloves (Nitrile recommended)
- Ink knife
- Akua Needle Applicators, mark-making tools, paintbrush
- Printmaking paper (Arnhem 1618® recommended)
MATERIALS SUGGESTED:
- Akua Modifiers: Blending Medium, Transparent Base, Release
Agent
An additive monotype is created when ink is applied (with a brush,
brayer, etc.) directly on a plate, that is then printed onto paper.

www.AkuaInks.com 17
STEPS:
Akua Liquid Pigment
1. Create an image on a plate
by using a paintbrush, brayer,
Akua Needle Applicators, or
any other mark-making tool.
Akua Liquid Pigment requires
the addition of Akua Retarder
to keep the ink moist.
TIP: To avoid
bubble of ink at
the begining of your line, start on
a piece of paper before you draw
on plate.
2. When using Akua Needle
Applicators, be sure to check
for puddles of ink that could
spread with the pressure
of the printing process.
To remove, use a piece of
smooth, lint-free tissue to blot
excess ink.
Akua Intaglio
1. When using Akua Intaglio
ink, add Blending Medium to
loosen the ink for brushwork
and wash effects.
For steel angled
tips, make sure
the angle of the
tip is parallel to
the plate to avoid
scratching.

18 www.AkuaInks.com
SUBTRACTIVE MONOTYPE
(REDUCTIVE MONOTYPE)
MATERIALS NEEDED:
- Akua Intaglio Ink
- Akua Liquid Pigment Ink [modify with Tack Thickener]
- Printing plate (Akua Printmaking Plate recommended)
- Gloves (Nitrile recommended)
- Rubber brayer (Speedball®Soft Rubber Brayer recommended)
- Ink knife
- Mark-making tools such as cotton swabs, paper towels,
matboard, etc.
- Printmaking paper (Arnhem 1618® recommended)
The subtractive monotype, also known as the reductive method,
or dark field monotype, entails rolling up the plate with ink first,
wiping out the darkened field (with tools such as AkuaTM Wiping
Fabric, rags, sticks, etc.).
Table of contents