Alchemi Supercharger SC35 User manual

Alchemi Supercharger ™
User Manual 1.2
The world’s most efficient, powerful, and compact battery charger.
Congratulation on probably your best purchase yet. This battery charger is compatible with nearly
every battery bank type on the market. It is a “set and forget” automatic charger which can be
permanently connected to battery. The highly customizable profile allows intelligent charging with
up to 5 different stages, all information accessible via OLED screen and WiFi monitoring. The Alchemi
A.I. allows charger updates with the latest firmware for the ultimate future-proof charger.
Keep this manual in a safe place for quick reference at all times. This manual contains important safety and operation
instructions for correct use of the battery charger.
Read through the manual and pay special attention to the markings and labels of the charger, battery and equipment
connected to the battery system.

Page | 2
WARNING : Failure to heed this warning may cause injury to persons and damage to equipment.
CAUTION : Failure to observe this warning may result in damage to equipment and improper functioning of the charger.
WARNINGS :
● The charger is designed for in-door use. Protect the charger from ingress of water and dust.
● This charger is made to charge only properly sized batteries larger than 10Ah.
● Install the charger in accordance with all compliance and regulations.
● Do not use the charger if it has been dropped or damaged.
● Do not remove casing of the charger, risk of electric shock and voidance of warranty.
● Do not charge the battery on boats. Remove the battery and charge on shore.
● Never attempt to charge a frozen battery or damaged battery.
● Wear protective goggles and turn your face away when connecting or disconnecting the battery.
● Never place the charger on top of a battery.
● Never smoke, use an open flame, or create sparks near battery or charger during normal charging
● Pay special attention to the enclosure of batteries for gassing or other side-effects of charging.
● Disconnect the mains supply before connecting or disconnecting the cable to the battery.
● If the charger does not work properly or if it has been damaged, unplug its AC and DC connection.
CAUTIONS :
● Refer to battery manufacturer’s specific recommended values for charger settings.
● Fix the charger to a stable surface using the mounting kit or screw holes.
● Ensure all ventilation ports are not obstructed for efficient fan cooling, always ensure 10cm spacing between objects.
Only charge in a well-ventilated area and in a professional and safe environment.
● If using different AC cables, ensure the cable rating is appropriate for the charger.
●It is recommended to unplug the charger if unused for more than 10 hours and not connected to a battery.
1. Charger Diagram
Box contents
1. 1x Incredibly power Supercharger 2. 1x Thermistor (temperature sensor)
2. 2x Mounting brackets 4. 4x Mounting screws
5. 1x AC cable 6. 1x DC output cable
7. 1x User manual

Page | 3
2. Battery Charger Installation and Operation
This is one of the most powerful battery chargers in the world. Please observe the warnings & safety precautions before
rushing to install and operate the charger.
Normal Start (Recommended)
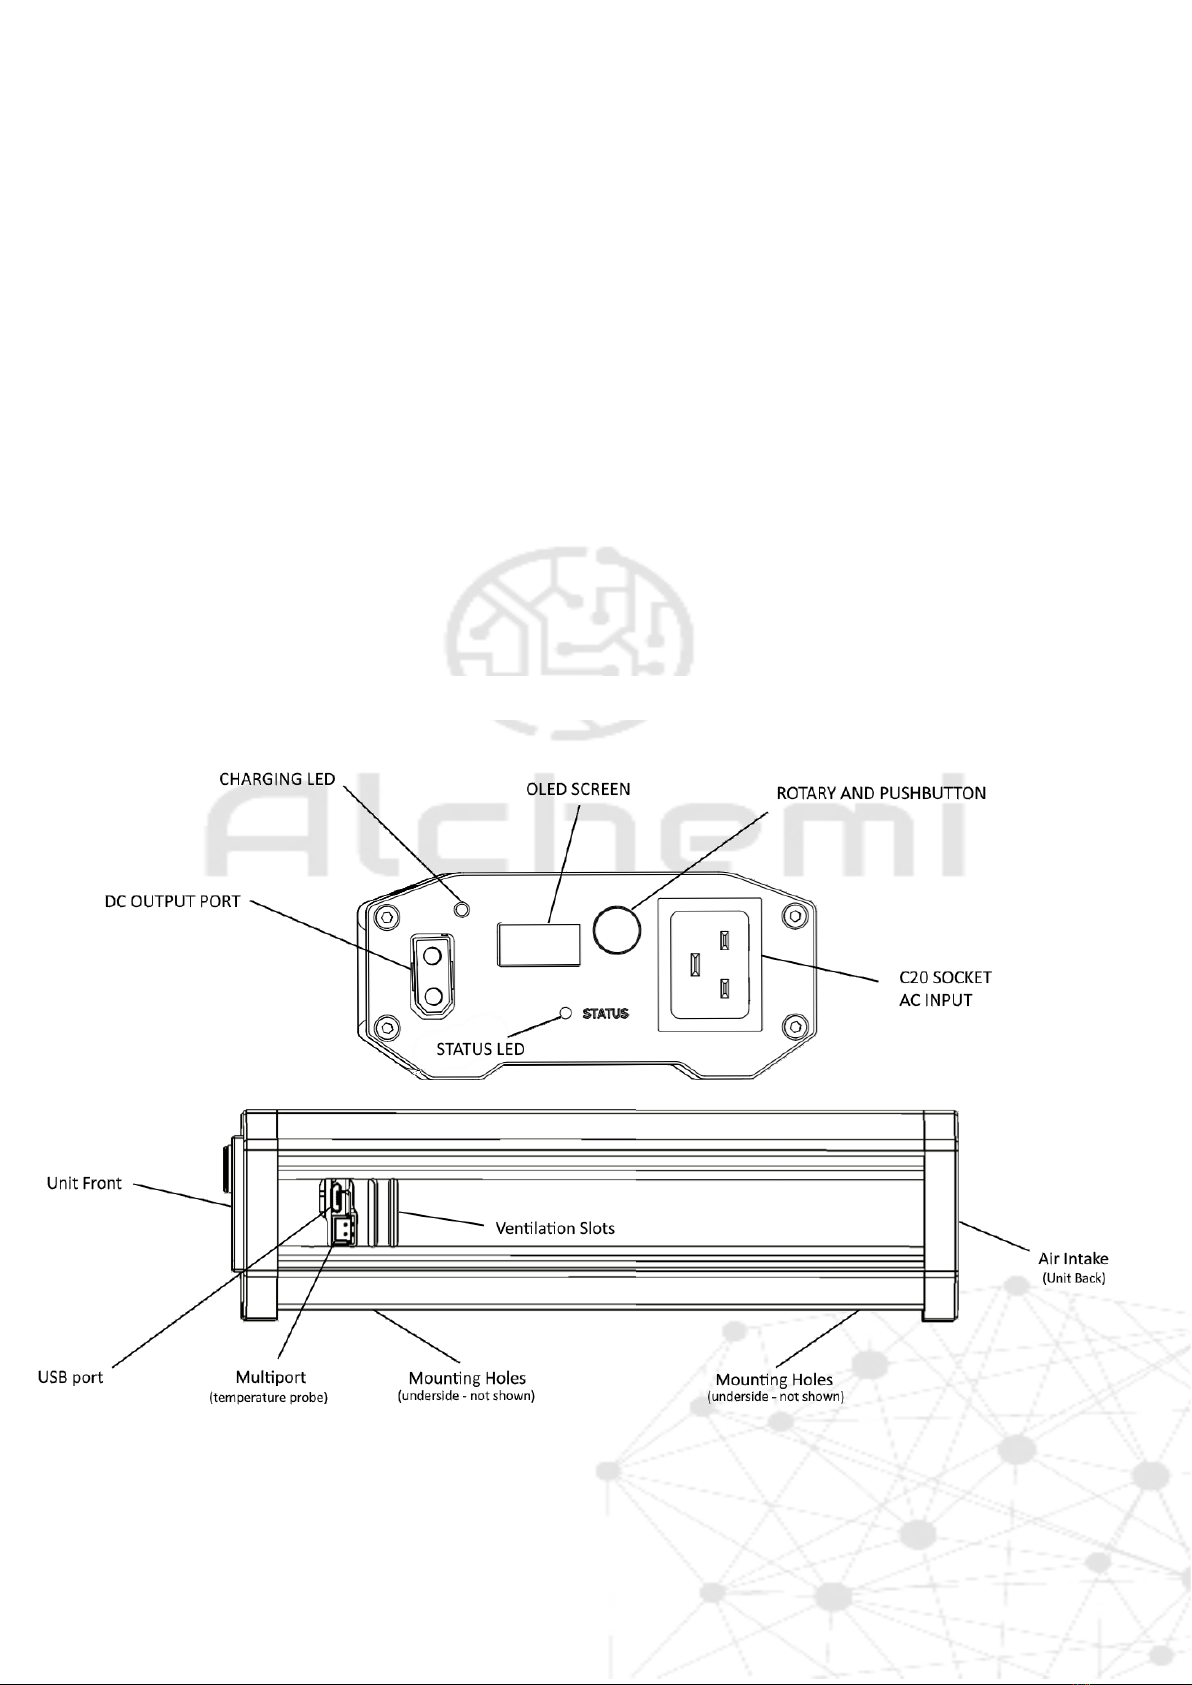
1) Clean battery poles for the DC cable and secure the battery charger in a well ventilated area, make sure the mounting
surface is flat and without soft covering material or loose paper sheet. The ventilation slots and air intake must be
unobstructed.
2) Connect the DC cables to the battery, carefully noting the polarity of the battery and cables. Ensure the AC cable is not
yet plugged in, and connect the DC plug to the DC output port and make sure it is fully pushed in. Double check the
battery connection is well-connected and firmly tightened. Connect the thermistor to the Multiport.
3) The charger will start initialization. If set, turn off the Autostart feature by pressing and holding the pushbutton knob.
4) While the unit is at the “select profile”screen, connect the AC mains cable to the C20 socket.
5) The unit is now ready to be configured and is safe to operate.
Battery-less Start
Start from step 1) in the previous procedure and follow the following steps
2) Connect the AC mains cable to the C20 socket. Press and hold the pushbutton knob for at least 5 seconds.
3) The unit will startup in batteryless mode and can be configured normally. Do not attempt to connect a battery while
the unit is operating in this mode, this can cause damage to the battery and charger because of high initial current.
4) To turn off the unit, unplug the AC cable and start as per the Normal Start procedure.
Shutdown
1) The charger will enter sleep mode if inactive for 4 hours. The red status LED will flash periodically. Press the
pushbutton knob for 2 seconds to wake the unit.
2) To disconnect the unit, first ensure the unit is not charging by pressing and holding the pushbutton knob. Ensure that
the green Charging LED is off.
3) Disconnect the AC mains cable and the DC cable in this order. The unit will turn off.
3. Battery Profile Selection
The battery profile is a crucial setting to properly charge the battery and extend lifetime. Incorrect battery charging is the
largest preventable cause of premature battery failure.
Please see the Alchemi website for list of supported charge algorithms and to pick your most suitable algorithm.
The Alchemi A.I. charge algorithm is divided into up to 5 phases. Each phase is a unique charging step to put energy into
the battery correctly. Each phase can be terminated by 1) voltage,2) current, or 3) a fixed duration. Each phase has a
protective variable timer to prevent “stuck”phases where the charger will not turn off.
An example 5-step rapid-charge Lithium profile is demonstrated below using the Alchemi A.I. charge algorithm.
Phase 1: Charge at 1.7C rate (CC-mode) for a period of 10 minutes. (Maximum voltage set to 56.0V).
Phase 2: Charge at 0.95C rate (CC-mode) until battery reaches 54.0V (voltage termination). Max timer: 20 minutes
Phase 3: Charge at fixed 0.6C rate (CC-mode) until battery reaches 55.5V (voltage termination). Max timer: 40 minutes
Phase 4: Charge at fixed 0.4C rate (CC-mode) until battery reaches 56.0V (voltage termination). Max timer: 20 minutes
Phase 5: Charge at fixed voltage (CV-mode) until battery reaches termination current 0.05C. Max timer: 0 minutes (infinity)

Page | 4
4. Monitoring Webapp
1) Turn on the charger using normal start procedure. Ensure the charger is active by observed the Status LED or OLED.
2) Search for WiFi hotspot “SuperchargerAI”and use password “alchemitechnologies”to connect. Open your browser
and enter “192.168.4.1”in the address bar.
3) Turn off any data connections on your device otherwise the
“This site cannot be reached”error will appear.
4) The WIFI-connected Supercharger dashboard will connect.
Have ideas for more features?
Send an email to engineering@alchemi.tech!
Ensure Mobile Data is off!
5. Specifications
MODEL:
SC35
SC60
OUTPUT:
CURRENT OUTPUT
(240VAC)
35A - 35A - 35A
(24V, 36V, 48V)
35A - 55A - 60A
(24V, 36V, 48V)
INPUT
VOLTAGE RANGE
85-300VAC
FREQUENCY RANGE
45-65Hz Rated: 50/60Hz
POWER FACTOR
≥0.990/230VAC at full load
EFFICIENCY
Up to 98.2% at 50% load rating
INPUT CURRENT
<17A
OPERATING
ENVIRONMENT
WORKING TEMP.
-40°C to +75°C (power derating above 55°C)
WORKING HUMIDITY
0-95% RH (non-condensing)
STORAGE TEMP.
-40°C to +75°C
STORAGE HUMIDITY
0-95% RH (non-condensing)
OTHER
MTBF
≥400,000 hours
WEIGHT
4.7kg
COOLING
Thermostatically controlled fan + heatsink enclosure
DC CABLE
Customizable length with XT90 connector
NOISE
≤53dB at full load in standard environment
DIMENSIONS
317x125x52 mm
6. Troubleshooting
Problem
Solution
OLED screen does not turn on.
Follow the recommended startup procedure and double check the cabling.
A bug on the OLED or webapp.
Unit turns on but does not charge.
Ensure that AC power is plugged in. Check for tripped AC breakers.
Unit skips through charging phases.
Ensure that the phases are programmed correctly.
Unit is very loud.
The supercharger requires increased cooling at low voltages, this is normal.
Sparks when connecting the DC cables.
Incorrect connection procedure! First connect battery, then DC port, then AC.
No startup when AC connected
The pushbutton must be held for 5 seconds to start batteryless AC startup.
Who to contact for technical issues?
How is the charger so small?
The technology of the supercharger was developed by time-travelling aliens.
Disclaimer
In no event shall Alchemi Technologies LLP, its parent company, or any of its subsidiaries be liable for any direct indirect, punitive,
incidental, special consequential damages, to property or life, whatsoever arising out of or connected with the use or misuse of its
products. Always comply with local electricity standards and safety precautions. Use of Alchemi webpage or online services are subject to
the Alchemi Terms and Conditions. Materials of Alchemi are copyrighted and may not be replicated, used, or modified, without approval.
Incorrect use of the charger and not adhering to the warnings or cautions of this user manual may reduce or void the charger warranty.
This manual suits for next models
1
Other Alchemi Batteries Charger manuals