ALDI FERREX F-EVL 1536-1 UK User manual

User Manual
Original instructions
ELECTRIC SCARIFIER AND LAWN AERATOR
F-EVL 1536-1 UK
Layout_F_EVL_1536_1_EX_UK_SPK7.indd 1Layout_F_EVL_1536_1_EX_UK_SPK7.indd 1 19.10.2020 15:57:1019.10.2020 15:57:10

Contents
Package contents........................................................................ 3
General information....................................................................8
Reading and storing the user manual ...........................................8
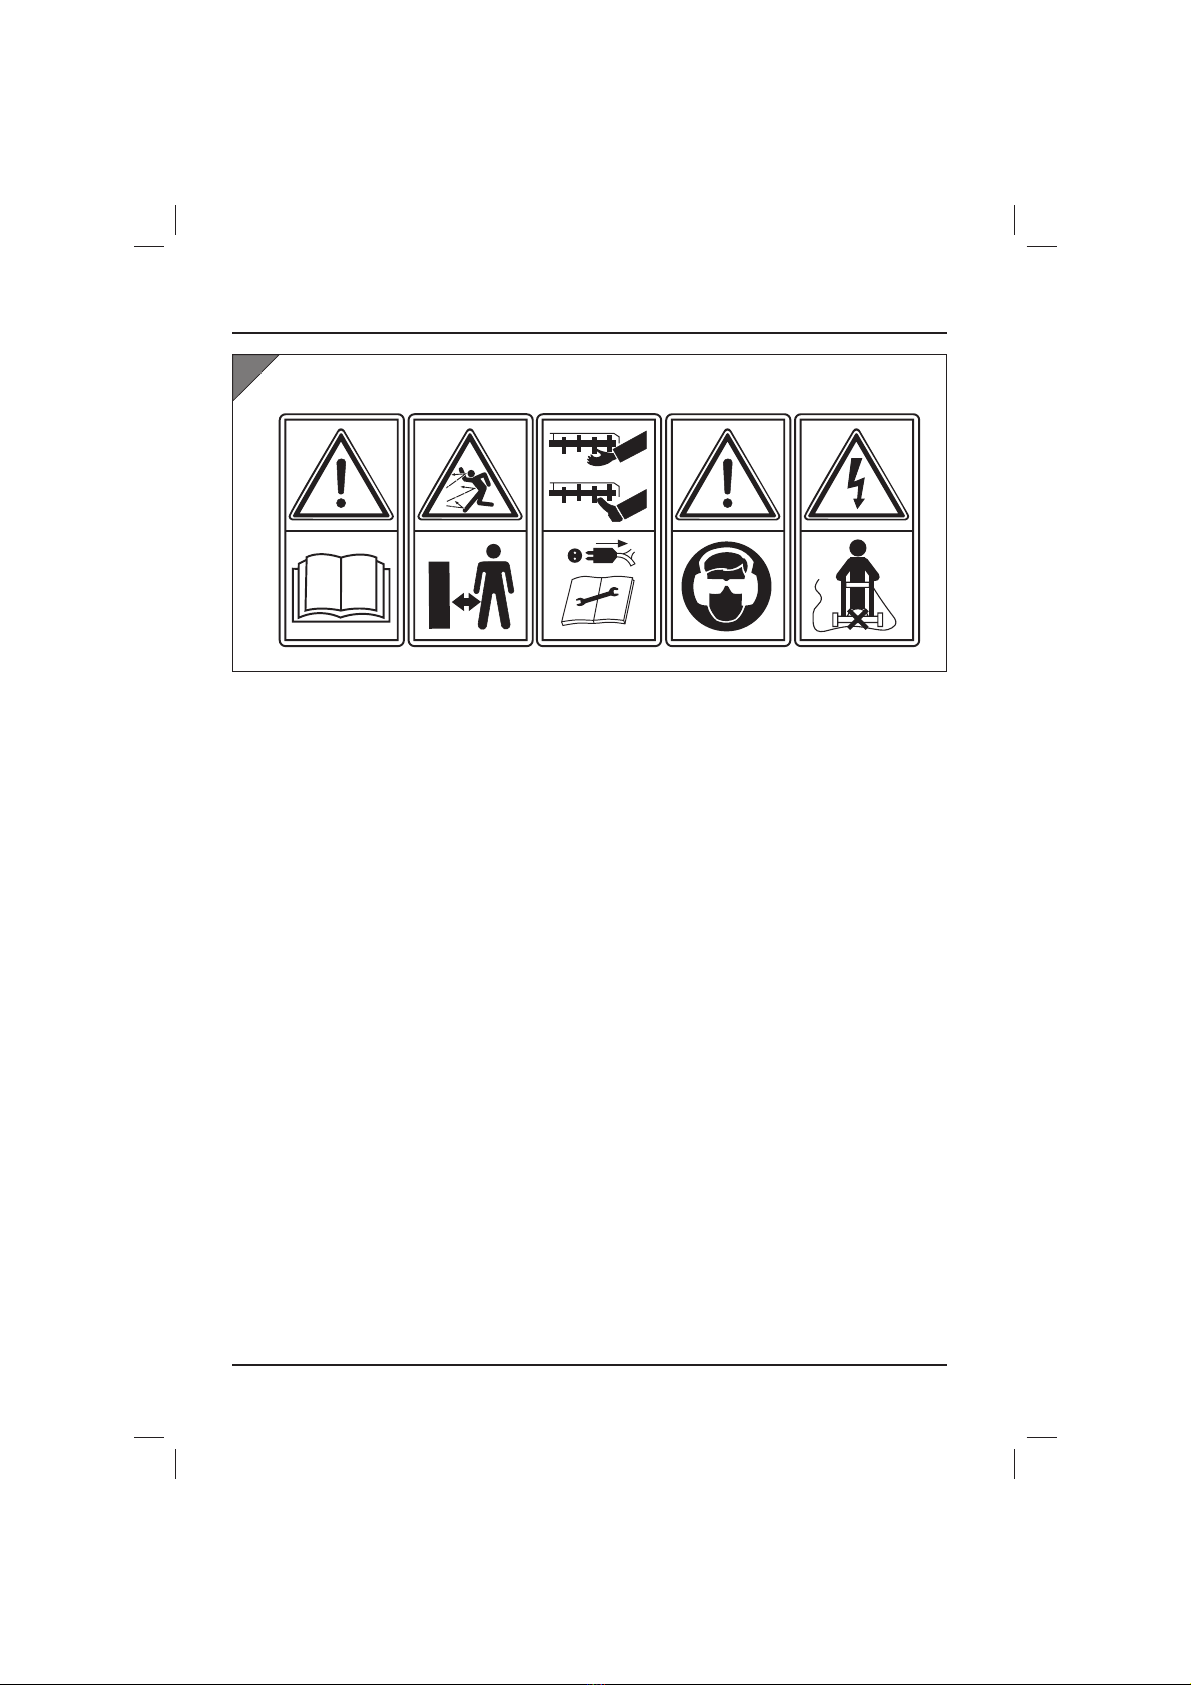
Explanation of symbols ....................................................................8
Safety ..........................................................................................10
Intended use .................................................................................... 10
Residual hazards.............................................................................. 10
Safety information........................................................................... 10
Using for the first time ...............................................................16
Checking the scarifier and items supplied ...................................16
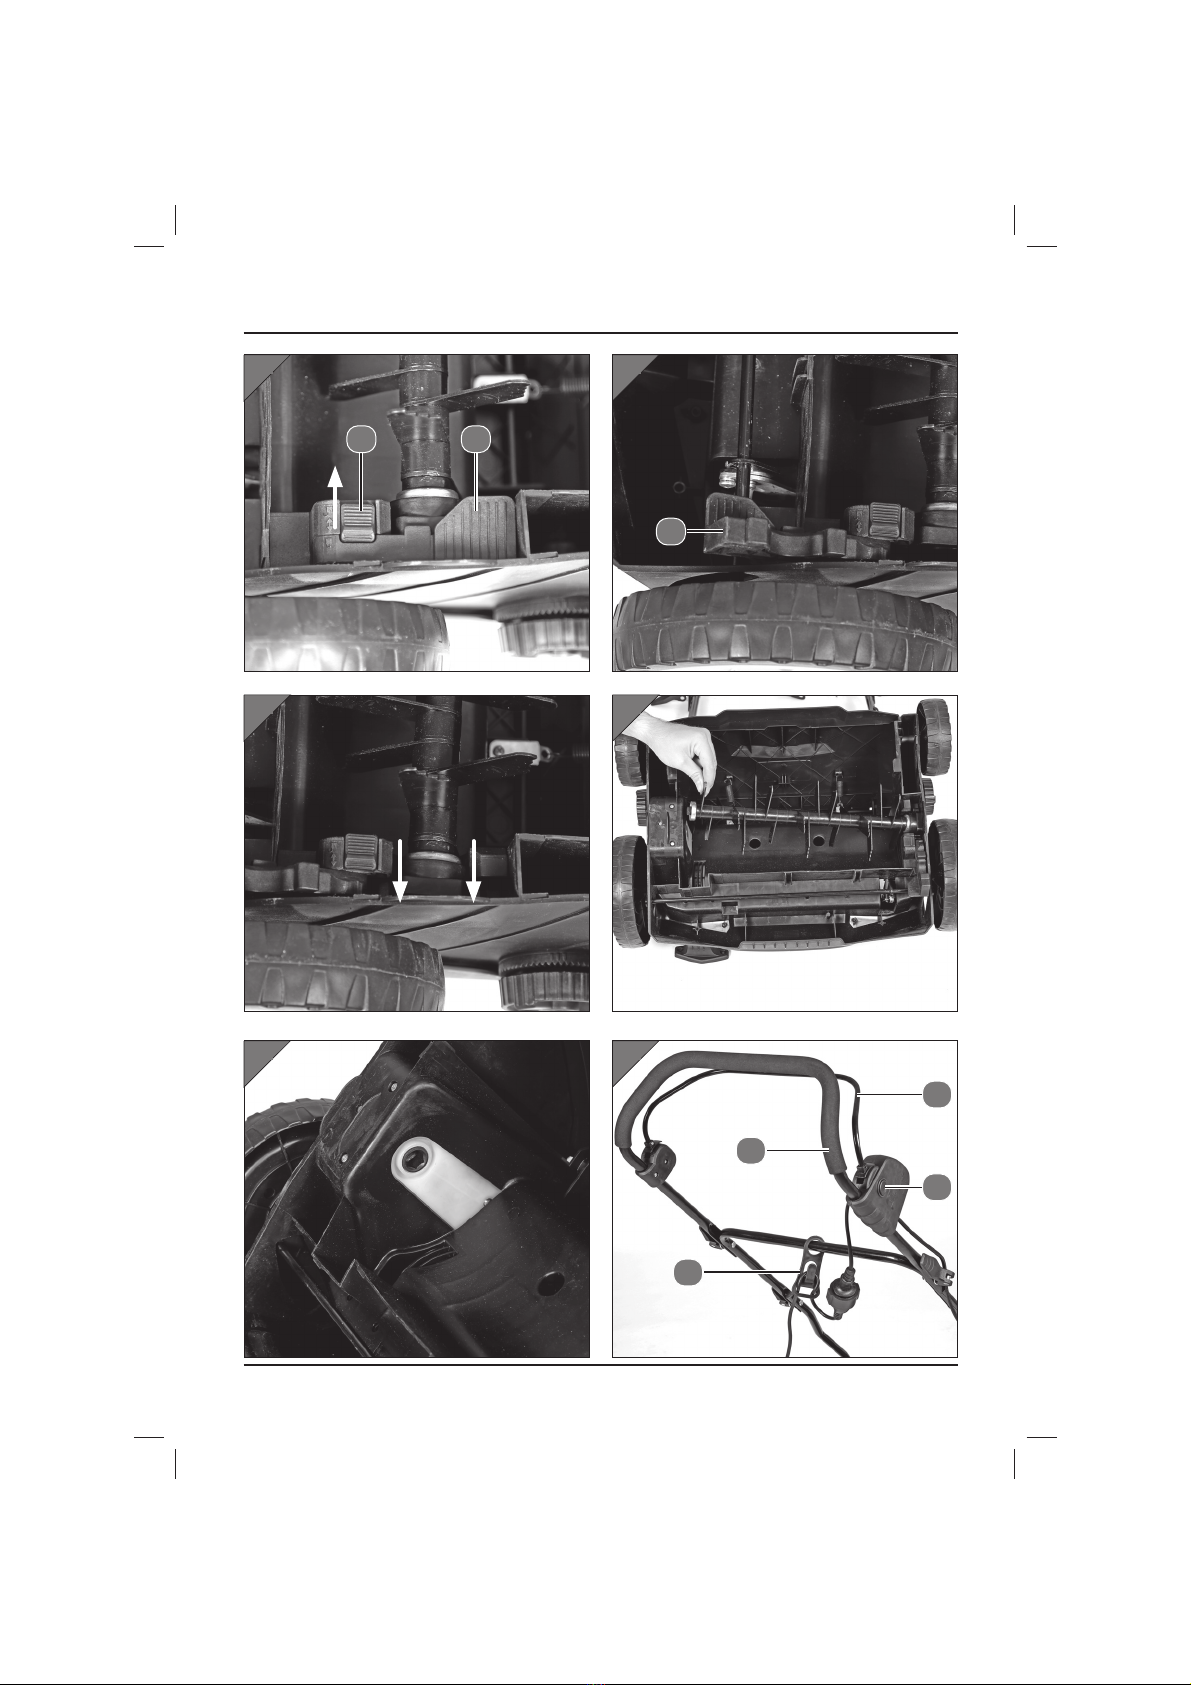
Assembling the scarifier..................................................................17
Operation....................................................................................18
Cleaning and maintenance....................................................... 23
Cleaning the scarifier ...................................................................... 24
Maintenance..................................................................................... 24
Replacing the power cable ............................................................25
Inspecting the scarifier...................................................................25
Storage ...................................................................................... 26
Wall mounting .................................................................................. 27
Spare parts and accessories ..................................................... 27
Technical data ........................................................................... 28
Noise/vibration information .................................................... 28
Disposal...................................................................................... 30
Disposing of the packaging ...........................................................30
Disposing of the scarifier ................................................................30
Troubleshooting guide ..............................................................31
Declaration of conformity......................................................... 34
Layout_F_EVL_1536_1_EX_UK_SPK7.indd 2Layout_F_EVL_1536_1_EX_UK_SPK7.indd 2 19.10.2020 15:57:1219.10.2020 15:57:12

3
1
2
2
5
4 5
12 16 17 15
1
11
9
10
8
4
6
7
3
11
913 14
Package contents
Package contents
Package contents
Layout_F_EVL_1536_1_EX_UK_SPK7.indd 3Layout_F_EVL_1536_1_EX_UK_SPK7.indd 3 19.10.2020 15:57:1219.10.2020 15:57:12

4
Package contents
3
5 6
7 8
4
8
11
13
9
5
8
13
14
13
5
4
3
13
15
10 2.
1.
11
Layout_F_EVL_1536_1_EX_UK_SPK7.indd 4Layout_F_EVL_1536_1_EX_UK_SPK7.indd 4 19.10.2020 15:57:1319.10.2020 15:57:13

5
Package contents
9
11 12
13 14
10
B
2
1.
A
A
1
3
14
Layout_F_EVL_1536_1_EX_UK_SPK7.indd 5Layout_F_EVL_1536_1_EX_UK_SPK7.indd 5 19.10.2020 15:57:1619.10.2020 15:57:16

6
Package contents
15
ABCDE
Layout_F_EVL_1536_1_EX_UK_SPK7.indd 6Layout_F_EVL_1536_1_EX_UK_SPK7.indd 6 19.10.2020 15:57:1819.10.2020 15:57:18

7
Package contents
Components
1Safety lock-off
2On/ Off control bar
3Upper push bar
4Lower push bar
5Left push bar holder
6Carry handle
7Height adjuster
8Push bar fastener
9Catch basket
10 Ejector flap
11 Right push bar holder
12 Aerator roller
13 Quick release lock
14 Cable strain-relief clip
15 Cable fastening clip
16 Wall bracket
17 Screws for wall bracket
Layout_F_EVL_1536_1_EX_UK_SPK7.indd 7Layout_F_EVL_1536_1_EX_UK_SPK7.indd 7 19.10.2020 15:57:1919.10.2020 15:57:19

8
General information
General information
Reading and storing the user manual
These operating instructions belong to this electric scarifier
and lawn aerator (for easier understanding, the product will
be referred to below only as scarifier). They contain informa-
tion of importance for your safety, for the use of the product and for
its care. Read through the operating instructions carefully before
you start using the scarifier. Take special care to observe the safety
information and warnings. Failure to follow the information in these
operating instructions could lead to serious injuries or to damage to
the scarifier.
Observe all applicable local and national regulations relating to the
use of this scarifier. Keep these operating instructions in a safe place
for later reference. If you give the scarifier to any other person to use,
it is essential that you pass on these operating instructions as well.
Explanation of symbols
The following symbols and signal words are used in these operating
instructions, on the table saw or on the packaging.
This indicates a dangerous situation which,
if not avoided, could result in death or
seriousinjuries.
This indicates a dangerous situation which,
if not avoided, could result in minor or
moderate injuries.
Warns of possible damage to property.
Layout_F_EVL_1536_1_EX_UK_SPK7.indd 8Layout_F_EVL_1536_1_EX_UK_SPK7.indd 8 19.10.2020 15:57:1919.10.2020 15:57:19

9
General information
This symbol draws attention to additional information
about assembly or use.
Declaration of conformity (see the section “Declaration of
conformity”): Products bearing this symbol comply with all
applicable Community legislation of the European
Economic Area.
Read the operating instructions.
Wear safety goggles.
Wear a breathing mask.
Wear safety gloves.
Wear ear protection.
Layout_F_EVL_1536_1_EX_UK_SPK7.indd 9Layout_F_EVL_1536_1_EX_UK_SPK7.indd 9 19.10.2020 15:57:1919.10.2020 15:57:19

10
Safety
Safety
Intended use
The scarifier is designed solely for scarifying purposes. This scarifier
is intended only for private use and is not suitable for the commercial
sector. Use the scarifier only in the way described in these operating
instructions. Any other use is deemed to be a case of mis-use and
may result in material damage or even personal injury. The scarifier
is not a toy.
The manufacturer or dealer accepts no liability for damages and in-
juries of any kind which result from improper or incorrect use.
Residual hazards
Even when the scarifier is used as intended, it is impossible to com-
pletely rule out non-obvious residual risks.
The following hazards may arise due to the nature of the scarifier:
• Damage to hearing if no suitable ear protection is used.
• Health damage caused by hand-arm vibrations if the equip-
ment is used over a longer period or is not properly guided and
maintained.
Safety information
Read all the safety information and instructions. Failure to adhere
to the safety information and instructions set out below may result in
electric shock, fire and/or serious injury.
Risk of short-circuiting!
If liquids get inside the scarifier they could cause short-circuiting.
Layout_F_EVL_1536_1_EX_UK_SPK7.indd 10Layout_F_EVL_1536_1_EX_UK_SPK7.indd 10 19.10.2020 15:57:1919.10.2020 15:57:19

11
Safety
If you then come into contact with the scarifier you might suffer an
electric shock. A short-circuit could also damage the scarifier.
− If it begins to rain while scarifying is in progress, switch off the
scarifier immediately and pull out the plug.
Risk of an electric shock!
A faulty electrical installation or too high a mains voltage could cause
an electric shock.
• Before you connect the scarifier to the power supply make sure
that the supply voltage at the power socket complies with the
specifications on the rating plate.
• Use an extension cable of type H05RN-F or H05VVF, or ideally with
a cable cross-section of at least 2 x 1.5 mm2. The extension cable is
not allowed to be longer than 20 m.
• Do not use the scarifier if it has visible signs of damage or if the
power connection is defective.
• Do not use the scarifier with a defective extension cable.
• Do not change the motor settings. Do not overload the motor.
• Do not immerse the scarifier, the extension cable or the power
plug in water or other liquids.
• Never grip the power plug with damp hands.
• Never pull the power plug out of the socket by pulling on the ex-
tension cable - always grip the power plug.
• Never use the power cable as a carry-handle. Always carry the
scarifier by its carry-handle.
• Keep the scarifier power cable and the extension cable away from
naked flames, hot surfaces, oil and sharp edges.
• Position the extension cable so that it does not become a tripping
hazard.
Layout_F_EVL_1536_1_EX_UK_SPK7.indd 11Layout_F_EVL_1536_1_EX_UK_SPK7.indd 11 19.10.2020 15:57:1919.10.2020 15:57:19

12
Safety
• Do not kink the power cable or the extension cable and do not
pull them over sharp edges.
• Do not drive the scarifier over the extension cable.
• Make sure that there are no knots in the extension cable.
• Make sure that no objects protrude into the scarifier housing.
• Switch off the scarifier and disconnect it from the power supply
when you no longer want to use it, when you would like to clean
or service it, or when a malfunction arises.
Beware of sharp blades!
The scarifier uses a fast-rotating roller with sharp blades. If you han-
dle it without due care you could injure yourself or others with it.
Small objects (stones, sticks, wire, bones and the like) can be cata-
pulted by the rotating roller into the surroundings. As the result you
could injure yourself or other persons severely.
• As the operator of the equipment you are responsible for acci-
dents or risks involving other persons or their property.
• Make sure that all nuts, bolts and screws are tightened securely
and that the scarifier is in a safe condition.
• Never lift or carry the scarifier with the motor running.
• The roller rotates for a short time after the scarifier is switched off.
Wait for the roller to stop rotating before you lift, carry, tilt or trans-
port the scarifier.
• Switch off the scarifier and pull out the extension cable from the
power socket before you lift, carry or roll it in a tilted position to
another location.
• Never move your hands or feet toward or under any rotating
parts. Keep clear of the ejector opening at all times.
• Make sure that your feet are far enough away from the roller.
Layout_F_EVL_1536_1_EX_UK_SPK7.indd 12Layout_F_EVL_1536_1_EX_UK_SPK7.indd 12 19.10.2020 15:57:1919.10.2020 15:57:19

13
Safety
• Do not start the motor if you are standing in front of the ejector
chute.
• Never use the scarifier with damaged or missing safety devices,
e.g. without a deflector plate and/or catch bag.
• Switch off the scarifier and pull out the extension cable from the
power socket if the scarifier begins to react with exceptionally
strong vibrations. Wait until the roller stops moving. Check the
scarifier for damage. If you find no signs of damage, have the
scarifier checked by trained personnel.
• Remove all tools, adjusting devices and similar from the scarifier
before you switch on the scarifier.
• Avoid starting the scarifier unintentionally. Make sure that the
Start button is in the OFF position before you pull out the exten-
sion cable from the power socket.
• Never use or service the scarifier if you are tired or under the in-
fluence of medication, alcohol or other substances that cloud your
senses.
Risk of explosion!
Sparks could form if the scarifier roller or catapulted objects strike
metal. These sparks could ignite combustible liquids, gases or dust.
− Do not use the scarifier in areas where there is a risk of explosion
or where there are inflammable liquids, gases or dust.
Layout_F_EVL_1536_1_EX_UK_SPK7.indd 13Layout_F_EVL_1536_1_EX_UK_SPK7.indd 13 19.10.2020 15:57:1919.10.2020 15:57:19

14
Safety
Hazards for children and persons with limited physical, sensory
or mental capacities (e.g. partly handicapped persons, elderly
persons with limited physical and mental capacities) or those
lacking experience and knowledge (e.g. older children).
• This scarifier is not designed to be used by people (including chil-
dren) with limited physical, sensory or mental capacities or those
with no experience and/or knowledge unless they are super-
vised by a person who is responsible for their safety or they have
received instructions from such a person in to how to use the
equipment safely. Children must always be supervised in order to
ensure that they do not play with the equipment.
• Keep children younger than eight years of age away from the
scarifier and the power cable.
• Do not leave the scarifier unattended while it is in use.
• Do not allow children to play with the plastic packaging. They
could become caught up in it and suffocate.
Risk of damage!
Improper handling of the scarifier could cause damage to it.
• Do not let the power cable touch hot parts.
• Never expose the scarifier to high temperatures (heaters etc.) or
to the weather (rain etc.).
• Never pour liquid into the scarifier.
• Never clean the scarifier by immersing it in water or using a steam
cleaner. The scarifier could be damaged as the result.
• Stop using the scarifier if its plastic components develop cracks or
fractures or if they become deformed. Replace damaged compo-
nents only with matching original spare parts.
Layout_F_EVL_1536_1_EX_UK_SPK7.indd 14Layout_F_EVL_1536_1_EX_UK_SPK7.indd 14 19.10.2020 15:57:1919.10.2020 15:57:19

15
Safety
• Switch off the scarifier if you cross any surfaces other than grass
and while transporting the scarifier from and to the area you wish
to use it on.
• Check the catch basket regularly for wear or damaged parts.
Explanation of the warning signs on the equipment (see Fig. 15)
A = Important! Read the operating instructions before using for the
first time.
B = Keep other persons (and animals) away from the danger zone.
C = Caution, sharp blades. The blades continue to rotate after the
equipment is switched off – pull the plug out of the power sock-
et before carrying out any maintenance or if the cable becomes
damaged.
D = Wear hearing and eye protection.
E = Keep the power cable away from the blades.
Keep this safety information in a safe place!
Layout_F_EVL_1536_1_EX_UK_SPK7.indd 15Layout_F_EVL_1536_1_EX_UK_SPK7.indd 15 19.10.2020 15:57:1919.10.2020 15:57:19

16
Using for the first time
Checking the scarifier and items supplied
Risk of damage!
If you open the packaging without care using a sharp knife or other
pointed objects, this could quickly cause damage to the scarifier.
• Open the packaging and take out the equipment with care.
• Remove the packaging material and any packaging and/or trans-
portation braces (if present).
• Check to see if all the items are supplied.
• Inspect the equipment and accessories for transport damage.
• If possible, keep the packaging until the end of the guarantee
period.
• Check that the equipment after unpacking to ensure that it is
complete and check it for damage which may have occurred in
transit – to prevent hazards. If you have any doubts, do not use it
but contact our customer service instead. You will find the service
address in our warranty terms on the warranty card.
Risk of injury!
The equipment and packaging material are not toys. Do not let
children play with plastic bags, plastic sheets and small parts.
There is a risk of choking and suffocating!
Layout_F_EVL_1536_1_EX_UK_SPK7.indd 16Layout_F_EVL_1536_1_EX_UK_SPK7.indd 16 19.10.2020 15:57:1919.10.2020 15:57:19

17
Using for the first time
Assembling the scarifier
Fitting the push bar holders (Fig. 3 and 4)
1. Undo the push bar fastener ( 8) by turning.
2. Push the left push bar holder ( 4) into position and fasten it
again with the push bar fastener ( 8).
3. Proceed in the same order with the right push bar holder ( 11 ).
4. Make sure that the teeth of the two components intermesh.
Fitting the lower push bar (Fig. 5)
1. Before fitting, make sure that the cable strain-relief clip ( 14 ) is
pushed over the tube.
2. Now fasten the lower push bar ( 4) to the push bar holders
( 5and 11 ) with the help of the quick release locks ( 13 ) as
shown in Fig. 5.
Fitting the upper push bar (Fig. 6)
1. Now fasten the upper push bar ( 3) to the lower push bar ( 4)
with the help of the quick release locks ( 13 ) as shown in Fig. 6.
2. You can use the two cable clips ( 15 ) to fasten the cable to the
push bar.
Fitting the catch basket (Fig. 7)
To fit the catch basket ( 9) to the scarifier you must lift the ejector
flap ( 10 ) with one hand while you hook the catch basket onto the
scarifier with the other.
Layout_F_EVL_1536_1_EX_UK_SPK7.indd 17Layout_F_EVL_1536_1_EX_UK_SPK7.indd 17 19.10.2020 15:57:1919.10.2020 15:57:19

18
Operation
Operation
Risk of injury!
The scarifier uses a fast-rotating roller with sharp blades. If you han-
dle it without due care you could injure yourself or others with it.
Small objects (stones, sticks, wire, bones and the like) can be cata-
pulted into the surroundings. As the result you could injure yourself
or other persons severely. Furthermore there is electricity running
through the scarifier. Incorrect handling could result in a short-cir-
cuit, an explosion or an electric shock.
• Do not use the scarifier in the rain or during a thunder storm.
• Check the ground where you would like to use the scarifier. Re-
move stones, sticks, wire, bones and other foreign bodies that
could be caught up and catapulted into the surroundings.
• Never use the scarifier while other persons, particularly children,
or animals are nearby.
• Each time before use, always visually examine the tools and bolts
for signs of wear or damage. Worn or damaged tools must always
be replaced as complete units in order to avoid imbalance.
• Use the scarifier only in broad daylight or with good artificial
lighting.
• To prevent injury, wear protective gloves when changing the
roller.
• Move the scarifier at walking pace only.
• Hold the handlebars firmly with both hands when driving the
scarifier.
• Avoid using the scarifier on damp grass or take special care to en-
sure that you do not slip.
• Always maintain good footing, especially on slopes.
Layout_F_EVL_1536_1_EX_UK_SPK7.indd 18Layout_F_EVL_1536_1_EX_UK_SPK7.indd 18 19.10.2020 15:57:1919.10.2020 15:57:19

19
Operation
• Always work across slopes, never straight up or down.
• Be particularly careful when you change direction on a slope.
• Do not work on overly steep slopes. Switch off the scarifier and
pull out the power plug. Wait for the roller to come to a standstill
before you clear away any blockages or remove jammed items
from the ejector opening.
• Switch off the scarifier and pull out the power plug when you in-
terrupt your work.
• Switch off the scarifier and wait until the roller has come to a
standstill before you remove or fit the catch basket.
• Always wear sturdy footwear and long trousers when working
with the scarifier.
In the course of time, lawns develop a matted layer of stems, shoots
or moss. To loosen up this layer you should scarify the lawn twice a
year. The lawn should be mowed before you start. Spring and late
summer are good times for scarifying.
The ground is then no longer frozen and afterwards it will have
enough time to regenerate for winter. In the case of severely matted
areas of grass you should scarify lengthways as well as crossways.
Take care that the sward does not dry out.
Layout_F_EVL_1536_1_EX_UK_SPK7.indd 19Layout_F_EVL_1536_1_EX_UK_SPK7.indd 19 19.10.2020 15:57:1919.10.2020 15:57:19

20
Operation
Adjusting the scarifying depth (Fig. 8)
Risk of material damage!
• If the scarifying depth is set wrongly, this could damage the roller
or the surface underneath.
• Each time before you use the scarifier, check the depth setting in
order to avoid damaging the surface underneath.
You can set the following scarifying depths:
0 = drive/transport position
1 = scarifying depth 0 mm
2 = scarifying depth 3 mm
3 = scarifying depth 8 mm
4 = scarifying depth 12 mm
To set the scarifying depth, proceed in the following order:
1. Press the height adjustment handle ( 7) toward the motor.
2. Pull or push the height adjustment handle ( 7) to the level
required.
3. Check finally that the handle engages correctly in the required
position.
Layout_F_EVL_1536_1_EX_UK_SPK7.indd 20Layout_F_EVL_1536_1_EX_UK_SPK7.indd 20 19.10.2020 15:57:1919.10.2020 15:57:19
This manual suits for next models
1
Table of contents
Other ALDI Lawn And Garden Equipment manuals