Alert-it Rhythm 24 User manual

LESS STRESS CARING
HANDBOOK

Your product has been manufactured
by a team of industry experts with
more than 20 years of experience
designing, manufacturing and
distributing care alarms.
With a commitment to quality and innovation we
are able to bring you a robust and reliable system
to aid carers with the detection of seizures and the
safeguarding of individuals. Please read this guide
carefully to ensure the correct set up, use, and
maintenance of your new product for years to come.
If you have any questions or require assistance
in regards to the Pulse Companion or any other
Alert-iT product, our experienced team are on hand
to help. Please nd contact details below. Don’t
forget you can also join us on Facebook, Twitter and
LinkedIn where you’ll nd even more information
and advice.
Call: +44 (0) 1530 239 900
Social:
AlertitCareAlarms
Alert_iT_Care
Alert-iT
or join our supportive Epilepsy Forum
Congratulations on your Alert-iT purchase 2

Disclaimers 5
Product Information 6
Warranty Information 6
In The Box 7
Product Usage 8
Quickstart 9
Armband 9
Pulse Companion 9
Pager 10
Configuration app and Smart Phone Compatibility 10
How to use the App 11
Scanning 11
Setting the Thresholds 12
Settings 13
Advanced Settings 14
Pairing armbands 15
Using the Pulse Companion 16
Armband Placement 16
Changing the Armband due to low battery 17
Changing the Armband 17
Turning the armband off 17
Turning the Pulse Companion off 19
Device Positioning 19
Wall Mounting 20
Removing the Pulse Companion from Service 20
Contents
Continued Overleaf
3

Common Fault Conditions 21
RF Fail: Radio Fail Alarm 21
Pulse Companion Battery Low / Battery End 21
Fault 28: Armband Battery Low 21
Fault 26 22
Fault 18: Armband Lockup 22
Pulse Companion ‘Status’ Light 23
Armband LED 23
Maintenance Instructions 24
Routine Testing 24
How to Clean the Devices 24
Changing Batteries in the Pulse Companion 24
Pager Function 25
Disclaimers Continued 26
Important Information 27
Pulse Companion Specification 28
Certification 28
Pager Specification 29
Certification 29
Routine Testing Sheet 30
Notes 31
Contents 4

The Rhythm 24 armband provided is not intended to diagnose, treat, cure or
prevent any disease. Even though it intends to give an accurate BPM reading,
it is not a calibrated piece of equipment and should not be used to provide a
measuring function.
The detected heart rate is used for reference purposes only when setting the alerting levels. The alerting thresholds
chosen should be based around the detected min and max values observed when using the device under normal
(Seizure free) conditions.
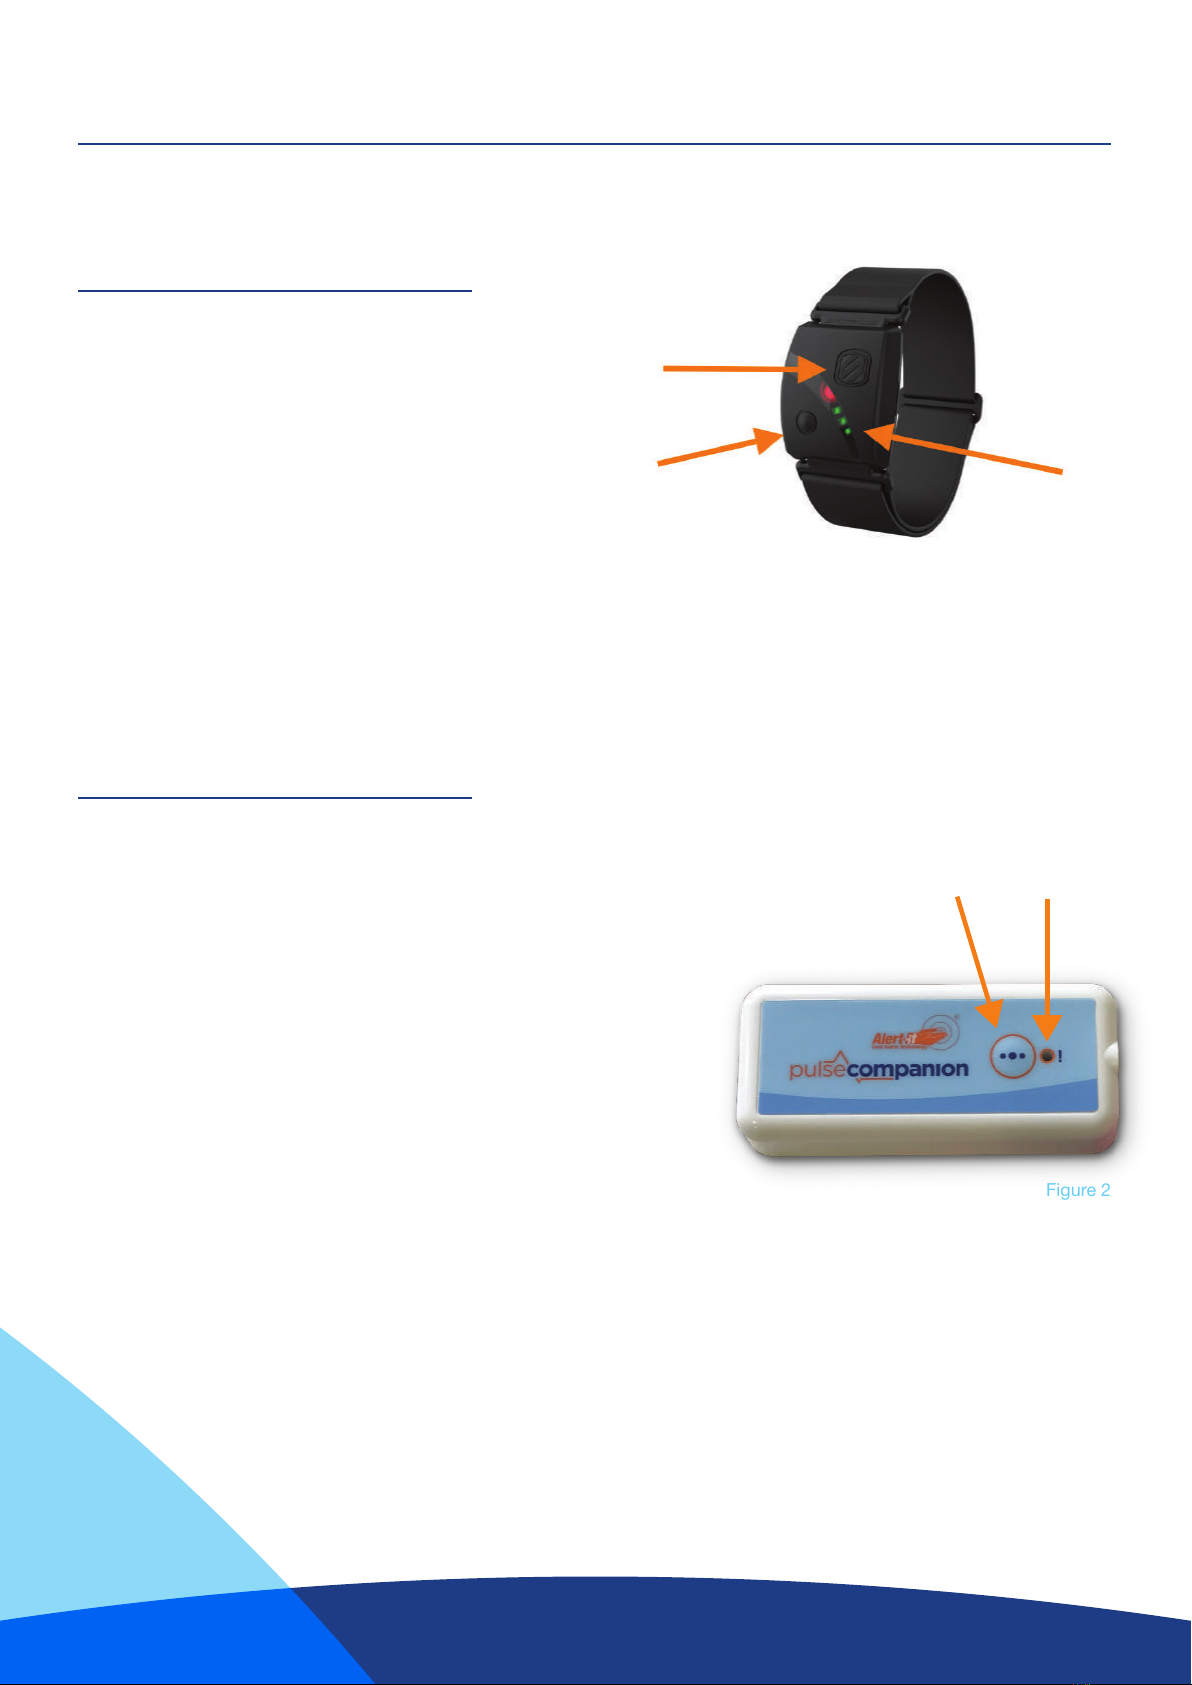
The armband’s optical sensor detects changes in the optical translucence of the skin tissue
[photoplethysmography (PPG)] . The variations it detects can be used to infer the approximate heart-rate of the
patient. The BPM (Beats per minute) reading that it generates can be affected by ambient lighting, skin colour, skin
temperature and motions of the limb the sensor is connected to, therefore the BPM reading shown cannot be used
as an accurate measurement of the users heart-rate. The devices intended application is to detect gross changes
in this heart-rate reading that could indicate a distress condition is present.
Due to the sensor being affected by normal movements, daytime use is less consistent and likely to give a higher
false alarm rate if the thresholds are set close to the observed min and max values.
Limitations
`The device is not proven to predict seizure onset.
`The device is not intended to be used during physical activity.
`The device is not intended to be used to guide medical therapy decisions.
`The device is not intended to be used as a stand-alone monitoring device.
`The armband can give false readings when not worn (See page 26 for more details).
Important safety information and risks
Alert-iT cannot guarantee that the Pulse Companion will detect every single seizure and deliver alerts accordingly.
The system is not meant to substitute your current seizure monitoring practices, but rather to serve as a
supplement in expediting rst-response time. It is important to not alter current seizure management practices
when using the Pulse Companion.
The main risk associated with the Pulse Companion is the
device failing to detect a seizure. If the user or caregiver
changes their seizure management practices and relies
solely on the Pulse Companion, this may lead to less
than adequate supervision. Users should discuss
the risks, benets and safe thresholds levels
of the Pulse Companion with their health
professional.
Disclaimers 5
WARNING:
Scosche “Rhythm24” (Manufacturer of armband
sensor) state:
Rhythm 24 heart monitor has a heart rate tracking
feature that may pose risks to users with certain
health conditions. See page 26 for details

The Pulse Companion provides peace of mind for carers and individuals who
have epilepsy.
This product has been designed to discreetly monitor the user with an armband sensor which identies variations in
heart-rate that could indicate a seizure.
The monitor can help to indicate seizures where there is a known heart rate variant.
The Pulse Companion is typically paired with Alert-iT’s failsafe “Safelink®” Pager or the Connect-iT when alerting
through a third party alarm system. Upon detection of a heart-rate reading that is above or below the thresholds set
by the user/carer, an alarm condition is raised and sent to the pager.
The Pulse Companion is a battery powered unit with a 6 months battery life. The armband’s battery life is typically
12 to 16 hours between charges.
Product Information 6
PLEASE NOTE:
Liquid ingress voids warranty (excluding armband).
For those requiring support outside of Alert-iT’s
ofce hours, please contact our sales team and
ask about our Premium support packages.
For 3 years from the date of purchase of the initial equipment, Alert-iT will offer you
[for the Pager + Pulse Companion (Armband = 1 year)];
`Access to support between the hours of 9.00am and 5.00pm each weekday (excluding Public Holidays) via the
telephone help-line for the purposes of fault diagnosis and the provision of advice.
`Repair (or if this is not possible; replacement) of faulty equipment free of charge, however, the equipment must
be returned to Alert-iT at your own expense.
`After inspection by Alert-iT engineers, any equipment that is deemed to have been damaged, rather than failing
due to a technical fault will only be repaired after you have agreed to being invoiced for the cost of repairs and
delivery.
`This agreement will terminate 3 years after the initial date of purchase, regardless of any new equipment being
issued in the interim period.
`Batteries are not included in warranty.
Warranty Information [Where equipment has been provided directly from Alert-iT]

In The Box 7
The Pulse Companion Pack Contains:
A 1x Armband Sensor - P195A
B 1 x Sensor Charging Cradle
C 1 x Mains USB Charger for Sensor
D 1 x Pulse Companion Includes 2 x AAA Non-rechargeable Batteries (fitted)
2 x spare Batteries
E 1 x Advancer pager Includes 2 x AA Ni-MH Rechargeable Batteries
F 1 x 9v Pager Power Supply
1 x Wall Mounting Kit (Not Shown) 2 x Sticky pads / Wall screws / Wall plugs
C
FE
B
D
A

The Pulse Companion provides a method of detecting seizure activity that typically only
presents its-self in a change of heart rate.
The armband used does not contain an accelerometer and will not detect shaking movements, it only provides
reference heart rate readings. For Tonic-clonic (Shaking) style seizures our Companion Mini, Companion or
Guardian monitor may be more suitable.
Please note that the heart rate reading provided by the wearable sensor can struggle to accurately track the heart
rate when the user is moving around. As such, the sensor performs best when the user is in bed or sat down. If the
sensor is to be used while moving around, the alarm thresholds can be widened to accommodate the more varied
heart rate readings that are given by the sensor.
Product Usage 8

Quickstart 9
`Unpack box and turn on the armband sensor by
pressing and holding its big button for 5 seconds,
indication lights will appear.
`Adjust the sensor strap and t it to the upper arm
ensuring the sensor is not too tight and will be
comfortable to wear for extended periods
(see page 16).
`For turning off the Armband see page 17.
`Turn on the Pulse Companion by pressing and
holding the ••• button for 3 seconds.
`The pulse companion will automatically pair to the
armband. The LED will ash green every second
while scanning for the band, then ash green rapidly
when it is detected and paired.
`The light on the Pulse companion will blink green
every 4 seconds when monitoring (See page 23 for
more information).
`For unpaired armband please see page 15.
Pulse Companion
Armband
Figure 1
Figure 2
On / Off
Battery Level
(Press “On / Off”
for 1 sec)
••• button Status LED
Not used

Quickstart 10
Configuration app and Smart Phone Compatibility
The Pulse Companions settings can only be adjusted via the Smart Device App.
Proceed to Page 11 for instructions on installing and using the smart device app.
The Alert-iT app is compatible with the following iOS and Android devices:
IOS: We support devices running iOS 10 or higher.
Android: Devices running Android version 4.3 (Jelly Bean) or higher, as long as they support Bluetooth Low Energy
(BLE / 4.0 / Bluetooth Smart). We do not guarantee full compatibility with custom or unofcial versions of Android
running on phones or tablets.
Other mobile platforms: We do not support Windows and Blackberry phones.
PLEASE NOTE:
Not all devices that list Bluetooth 4.0 in the
specications, actually support Bluetooth Low
Energy. We suggest contacting the manufacturer
directly for complete information.
Pager
Figure 3
`Turn on the Advanced Pager by pressing and holding
the “Down/Menu” arrow for 3 seconds.
`You should now see the monitor name appear on
the pager every 8 seconds.
`To snooze any active alarm / fault tunes press the
“Up” arrow, this will snooze any active alarm calls for
5 minutes.

How to use the App 11
Scanning
After opening the app you will be presented with a big “Scan” button.
In order for the app to be able to nd the device while scanning, the Pulse Companion needs to be “Advertising”.
The Pulse Companion will advertise for 1 minute (by default) each time the ••• button is pressed on the Pulse
Companion.
Note: We only advertise for 1 minute as a security feature to prevent anyone connecting to the device without rst
pressing the button. This 1 minute restriction can be removed if desired (See page 14).
Briey press the ••• button on the Pulse Companion then click “Scan” in the app. The device will appear after a few
seconds, ensure that the serial number/nickname matches that printed on the side of your Pulse Companion click to
select the device. You can assign a more memorable nickname for your device once connected (See page 13).
“Disconnect after 30 minutes”: This forces the app to automatically disconnect from the Pulse Companion
after 30 minutes. If you wish to continuously see the BPM reading for longer periods, you should un-tick this box.
(Please note: This will reduce battery life.)
For Trouble Shooting Press
Figure 4 Figure 5
The “Alert-iT” configuration app is available on both iOS and android for free.
Search for “Alert-iT” in either the “Google Play Store” or “Apple App Store” to nd the app and
install it.
Note: After you have installed the app you may be prompted to allow the app to access your
devices location. This is a new security feature added by android that restricts the use of Bluetooth
from app’s that do not require it. Our app does not store or track anything to do with your location,
but it does need access to the Bluetooth so you will need to accept this permission to proceed.
?

How to use the App 12
Setting the Thresholds
The black line moves up and down as the BPM reading changes.
The area in green shows the highest and lowest BPM readings that have been seen by the monitor
(Since the last reset of the High & Low).
The two orange circles slide up and down allowing the thresholds to be adjusted.
Tapping either orange circle will bring up a box that will allow the exact threshold value to be entered manually.
Please Note: The lowest possible limit that can be set is 30, the highest is 199.
The green area can be reset by pressing the “Reset High & Low” button found on the “Settings”
page (Page 13).
Current status will be represented by the icons in the table above, press “Status” for more details.
For Trouble Shooting Press
Figure 6
Max Threshold
Current
BPM
Status
icon
Save changes
Min Threshold
Settings
Status
Highest BPM Seen
Lowest BPM Seen
?
= Monitoring
Status Icons:
= monitoring but low
battery condition
= Disarmed
= in fault condition
= In alarm

How to use the App 13
Settings
After clicking the “Settings” button you will see the following information;
“Nickname”: This changes the name that is advertised when scanning for the device.
“Armband Battery %”: Displays the current battery level in the armband.
“Pulse Companion Battery %”: Displays the current % battery level in the Pulse Companion.
“Reset High & Low”: This resets the highest and lowest BPM readings seen by the Pulse Companion.
“Advanced Settings”: Contains additional conguration settings (see page 14).
“Test”: Sends out a test alarm to the pager for 3 seconds.
For Trouble Shooting Press ?

How to use the App 14
Advanced Settings
After clicking the “Advanced Settings” button you will see the
following information;
Please Note: If a password is enabled, any changes here will require it
to be entered
“Radio Address” changes the address the pulse companion transmits.
“Radio Type”: (Cannot be modied) Shows the radio type of the
Pulse Companion.
“Serial #”: (Cannot be modied) Shows the devices serial number.
“Alarm Period”: Is the amount of time that the heart rate reading needs
to be outside of the thresholds before the alarm is raised
(This is set to 5 seconds by default).
“Alarm Timeout”: If enabled, when an alarm is triggered and left active,
the alarm will automatically disarm its-self if ignored for 30 minutes.
“Disarm Time”: When an alarm is triggered then disarmed by pressing
the ••• button (or the Alarm Timeout timer has expired), the pulse
companion will re-arm automatically after this period.
“Always Adverising”: This allows you to pair to the device at any time,
without needing to press the ••• button rst.
“Enable Password”: If you wish to protect the min and max thresholds
from being modied you can protect them with a 4 digit pin code.
“Pair Armbands”: This will open the paired armbands screen.
“Device Info”: Displays information about the Pulse Companion
hardware.
“Save”: Pressing this will save any changes that are made to the pulse
companion.
“Quick Disconnect”: Allows a quicker disconnect cycle for domestic
settings (this is set to off by default).
For Trouble Shooting Press
Figure 7a
Figure 7b
?

How to use the App 15
Pairing Armbands
The Pulse companion will seek out and connect to armbands that
are chosen in its “Paired Armbands” list.
Please note: Alert-iT pre-pairs any armbands purchased with the
Pulse Companion for you before shipment.
If however you have purchased additional armbands since shipment
OR an armband needs replacement you can do so here.
In this “Pair Armbands” screen;
– An armband highlighted in green is currently in use and monitoring.
– Armbands highlighted in orange are already known to the Pulse
Companion and will be paired when the green one is turned off.
– Armbands shown in black are turned on but as they are un-ticked
they will not be paired to automatically.
To add a new armband;
Turn it on and t to your arm, then press the “Refresh” button. The
new armband will appear in black. Tick the box next to its name then
click “Save”.
Additional Info: We have limited the Pulse Companion to a maximun
of three armbands. (Only one armband can be used at a time).
If the Pulse Companion nds two or more armbands are turned on
when scanning that are pre selected in its list, it will connect to the
one that was used last.
For Trouble Shooting Press
Figure 8
?

Using the Pulse Companion 16
Armband Placement
For the most accurate readings, wear
the armband on the upper forearm,
biceps or triceps snug enough to not
move on your arm, but NOT so tight
that it restricts circulation.
Figure 9
You should now have the armband fitted on the user and the Pulse Companion paired
correctly and configured with suitable thresholds. The light on the Pulse Companion will
be blinking green every 4 seconds and the monitor name will appear on the pager screen
every 8 seconds.
If the armband now sends out a heart rate reading that is above or below the congured thresholds the
Pulse Companion will raise an alarm, indicated by the status LED ashing red every second, the pager will
alarm “Urgent”.
When you attend to the user, press the ••• button to “Disarm” the alarm for the “Disarm Time”
(default = 10 minutes), this will temporarily reset the pager alarm.
To resume monitoring, press the ••• button again, ensuring that the Pulse Companion LED is flashing
green every 4 seconds.
PLEASE NOTE:
As a safety feature, after the “Disarm Time” period
has expired, monitoring will resume automatically.
If, when the monitoring resumes the heart rate
reading is still outside of the thresholds, the alarm
will be resent to the pager.
3Bicep
2Tricep
1Upper Forearm
(recommended placement)
Alarm Code Description
Urgent 00 BPM = 0 / invalid
Urgent 01 BPM below threshold
Urgent 02 BPM above threshold

Using the Pulse Companion 17
Changing the Armband due to low battery
Turning the armband off
Charging the Armband
The battery in the armband should last 12 to 16 hours.
When the battery in the armband gets low, “Fault 28” will be shown on the pager screen.
1. Turn off the armband whilst still tted by holding its big button for 5 seconds.
2. Remove the armband
3. Turn on and t the new charged armband by holding its big button for 5 seconds.
4. Press the ••• button on the Pulse Companion to reconnect it to the new armband.
The fault should now clear from the pager.
5. Ensure Pulse Companion is monitoring by observing the LED ashing green
every 4 seconds.
If monitoring is not required for the rest of the day;
1. Ensure user is still wearing armband.
2. Turn the armband off by holding its big button for 5 seconds, remove when convenient.
3. “Fault 26” will now appear on the pager screen, press the “Up” arrow to silence the fault
tune for 5 minutes.
4. Hold the ••• button for three seconds on the
Pulse Companion to acknowledge the fault alarm.
The “Fault 26” on the pager will now clear
after 6 minutes.
Pressing the big button on the armband for 1 second will display the current charge level (three green bars).
The armband is charged by placing it into the cradle and plugging it into the mains USB charger.
The main LED ashes red while charging. When the armband is fully charged the LED turns blue.
The charge time is approximately 2 hours.
PLEASE NOTE:
where no safety concerns around detecting
Armbands being removed by user. For quick
disconnect see page 14.

Reccomended operation 18
Disconnecting armband
The armband should be turned off before removing it from the arm. (Removing the armband rst will trigger an
Urgent alarm and will require further steps to return the monitor to standby mode).
After turning the armband off, hold the ••• button for 3 seconds, then wait 6 minutes for the fault to clear.
Monitoring
Press the mute (SEL) button on pager Pager silenced for 5 minutes
5 minutes Later
Turn off Armband Fault 26 shown on pager
Hold the •••button for 3 seconds Fault 26 will clear in 6 minutes
Pager will re alarm
Pager will then clear after 1 minute
Status LED flashes red, green, green...
Status LED flashes red every 4 seconds
Press the mute (SEL) button on pager
PLEASE NOTE:
where no safety concerns around detecting
Armbands being removed by user. For quick
disconnect see page 14.

Using the Pulse Companion 19
Turning the Pulse Companion off
Device Positioning
The Pulse Companion should be left in standby mode (LED ashing red every 4 seconds) when not in use
E.g. If not used during the day. See page 20 for permanent removal from service.
The Pulse Companion needs to stay within 10 meters of the armband so it should typically be carried on your
person or left on a bedside table.
The pager needs to be kept within 450 meters of the pulse companion. This range can be extended using repeaters
if required (contact your equipment provider for more details). The pager will display “RF Fail” when the device is
out of range or switched off.
The ••• button on the Pulse Companion needs to be pressed when attending alarms and when changing
armbands, so the Pulse Companion will need to be kept accessible (e.g. not hidden in a locked draw).
The device can be left on a bedside table or mounted on the wall next to the bed. Or be carried on a person.
The Armbands battery typically lasts in excess of 12 hours, so one band is usually sufcient for overnight use,
where it is charged again during the day. A second band can be used if round the clock care is required.
PLEASE NOTE:
The power consumption in both devices
will increase very slightly the further they
are apart, so keeping both devices within
a few meters of each other is preferable
where possible to increase battery life.

Using the Pulse Companion 20
Wall Mounting
Removing the Pulse Companion from Service
Remove the base by inserting a at-headed screwdriver
into the slot, apply gentle pressure and turn the
screwdriver, the base will then pop away from the top.
The two holes in the base can then be used to attach the
device to a wall or surface.
A wall mounting kit consisting of sticky pads, and two
countersunk screws with wall plugs is included in the box.
The device can be turned off by holding the ••• button for 8 seconds, the light will ash red rapidly when shutting
down. Upon shutting down it will send out an “Alarm Off” call to the pager (This will stay on the pager permanently
until the device is turned back on).
IMPORTANT:
The pulse companion can be deactivated or
removed from the pagers memory if required.
Please contact support for assistance if needed.
Figure 10
This manual suits for next models
1
Table of contents
Other Alert-it Personal Care Product manuals