Alert-it Plesio Pager User manual

www.alert-it.co.uk
Plesio Pager
Quickstart

V2.1 UQ1399A P168A Quickstart for standard systems.doc Page 2 of 8

V2.1 UQ1399A P168A Quickstart for standard systems.doc Page 3 of 8
The Alert-iT Plesio Pager can be used to provide a monitoring system for
domestic, and similar environments where it can replace the more complex
professional P137 and P138 pagers.
Turning on the Plesio Pager
Please note: While the pager is shipped with some charge in the batteries, it
is recommended that the pager is charged before use. (See overleaf).
To turn the Pager on, press and hold the ON/OFF button for 3 seconds. The
pager will beep and all three LEDs will flash. The green Pager LED will blip
every 8 seconds to show that the pager is awake and listening for alarm
signals.
If the Pager is turned on and paired with a Safelink Monitor, the red
“Monitor”LED on the pager will blip every 8 seconds.
Turning off the Pager
To turn the pager off, press and hold the ON/OFF button for 3 seconds. The
pager will bleep and all three LEDs will flash 3 times.
Figure 2.
Pair / Mute
Monitor LED
Alarm LED
Pager LED
On / Off

V2.1 UQ1399A P168A Quickstart for standard systems.doc Page 4 of 8
System Operation
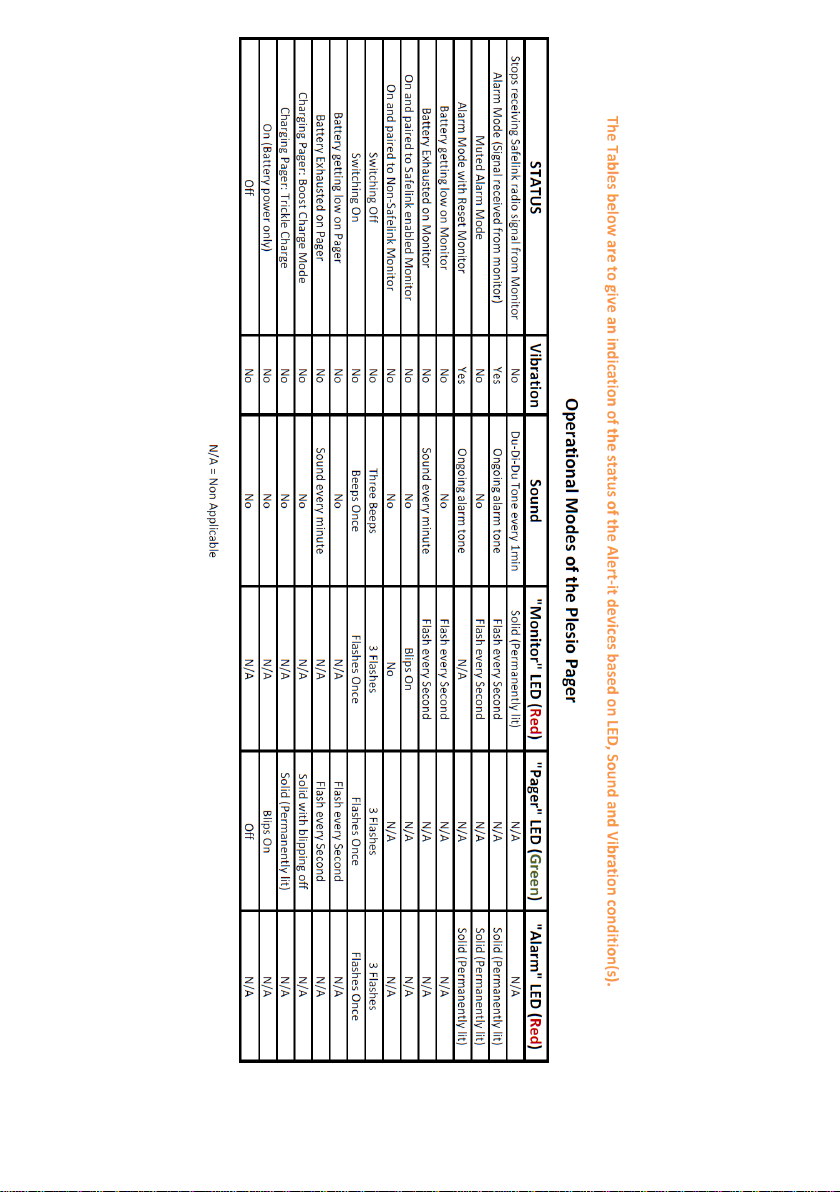
The system uses the Alert-iT Safelink® Radio Protocol. This offers a failsafe
detection of radio integrity using a Class 2 radio receiver. If the pager stops
receiving a failsafe radio signal from a paired monitor, the pager’s Monitor
LED will be permanently lit and an intermittent alarm tone will sound.
Safety Notice: The carer must respond to the radio fail alarm as the user will
be unprotected until solved.
Alarm Mode
The Alarm LED on the pager will light up, it will make an audible alarm and
will vibrate.
Pressing the Pair/Mute button will temporarily mute the alarm tone and stop
the pager vibrating for 2 minutes.
Once an all clear is sent by the monitor, the pager will resume the alarm
state, pressing the Pair/Mute button again will fully clear the pager (If
previously muted, this will be the second press).
Safety Notice: Always check the user even if the alarm has cleared.
Pager Charging
The pager’s battery should last approximately 3 days depending on how
many alarm cycles it goes through during this period.
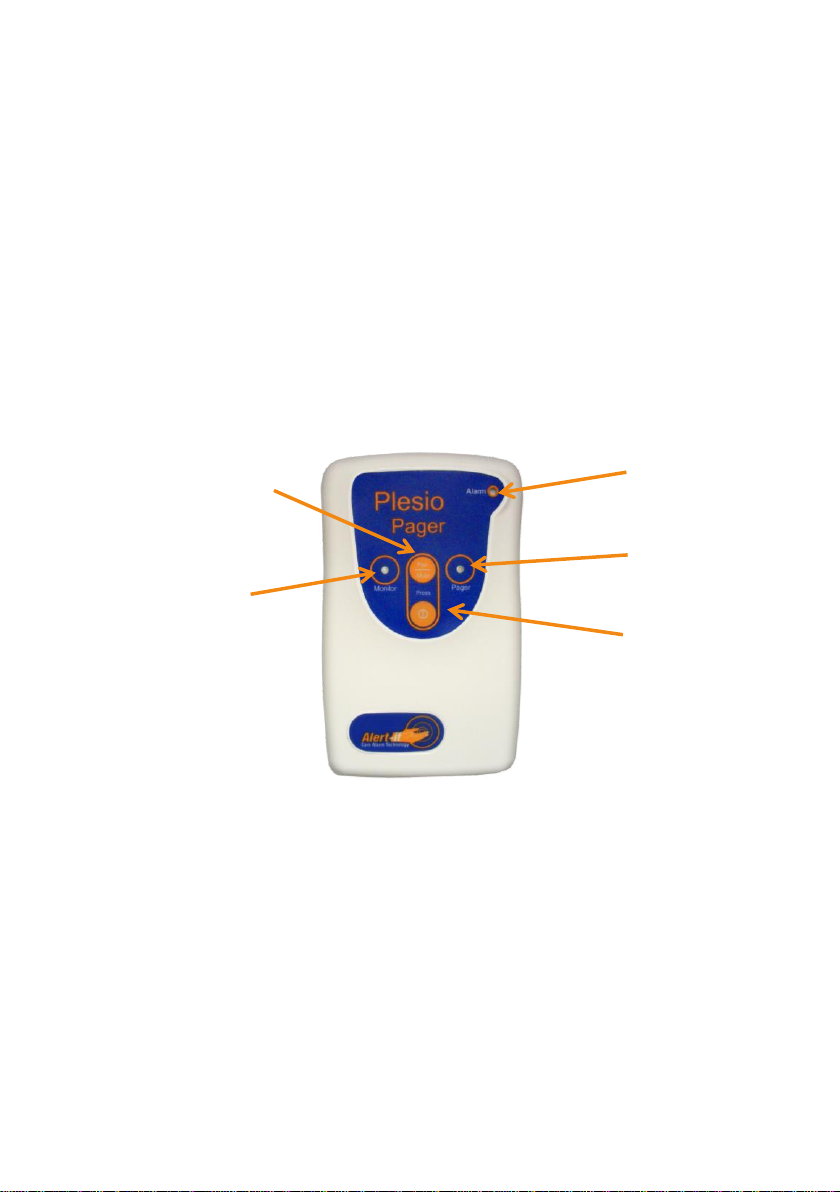
When the pager’s battery starts to get low the green Pager LED (Figure 2) will
start to flash every second indicating the pager should be plugged into the
provided charger. When the battery is very low, the pager will sound every
minute.
The Pager LED will blip off every 8 seconds during boost charge and will be
solid green when the battery is approaching full charge. Charge for at least 12
hours.

V2.1 UQ1399A P168A Quickstart for standard systems.doc Page 5 of 8
Pairing and Maintenance Instructions
The monitor will usually be paired to the pager before it is shipped to you. If
this is not the case, the instructions below will show you how to pair them
together.
Pairing the Monitor to the Pager
Ensure the monitor is turned on. Pairing is only possible within 30 seconds of
powering up the pager. To pair the Monitor to the Page; place the monitor
close to the pager and press and hold the Pair button on the pager. Stimulate
any radio transmission from the monitor. e.g. Pressing a reset button or
triggering an alarm. Or you could wait for the 8 second Safelink® signal. If
successful you will hear a beep and see the red Monitor LED blip when
pairing is successful, you can then release the pair button. A lower burp with
no red light indicates the monitor is too far away to pair. This protects against
falsely pairing with another, distant, monitor
To clear all paired monitors from the pager memory, press and hold both the
ON/OFF button and the Mute/ Pair button together within the first 30
seconds after power-up, until the ensuing tone sequence has finished
sounding and the green Pager LED lights, then release both buttons.
Routine Testing
It is recommended to test the system weekly by simulating an alarm state
and ensuring the alarm call is sent to the pager.

V2.1 UQ1399A P168A Quickstart for standard systems.doc Page 6 of 8
*also general faults eg Monitor turned off or faulty
*

V2.1 UQ1399A P168A Quickstart for standard systems.doc Page 7 of 8
Plesio Pager Specification
Power: 1.3mm 9V DC
Weight: 144g
Material: White ABS Anti-microbial
Dimensions (mm): 120 x 70 x 20 (HxWxD)
Batteries: 2x AA (HR6) Ni-MH Rechargeable 2500mAh
Battery Life: 80 hours (100 typical)
Charging time: 12 hours
The system complies with 93/42/EEC as a Class 1 Medical Device for use in a Home Heathcare
environment
The system complies with EN60601 for Class 2 Electrical Safety and does not need a protective earth
and Group 1 Class B for EMC in a Home Healthcare environment
The system has a Class 2 radio receiver compliant to EN300-220 operating at 434.075MHz wideband
Safety info
This symbol indicates there are warnings and precautions associated with
the use of this equipment. This instruction manual should be carefully read
and understood before using the equipment.
1. Only the recommended power supply shall be used as it is certified to provide two
means of patient protection to EN60601-1
2. Ensure the power cable is routed to avoid a trip hazard
3. Regularly check the power supplies for damage and potential shock risks
4. Clean and disinfect each item regularly in accordance with information on page 7
5. Ensure, by testing, that the alarm is annunciated at the carer's location(s)
6. Use only the power supply and batteries recommended
7. Operate power supply and charge pager away from direct heat and uncovered.
8. As with all medical electronic equipment there is potential for the equipment to
interfere with or be effected by interference from other electrical or electronic
devices. For this reason avoid placing the monitor, sensor or connecting cable in
close proximity to sensitive electronic devices or devices which produce strong
electromagnetic fields such as radio transmitters, mobile phones or power cables.
9. Only use the monitor with accessories approved for use with this product and only
in accordance with instructions.
10. If the equipment is modified in any way, appropriate inspection and testing must
be conducted to ensure continued safe use of the equipment.
11. The carer must conduct a risk assessment to determine if the level of reliability
offered by the monitor is sufficient or if additional monitoring is needed. Contact
the manufacture for assistance with Risk Evaluation Tools.
Table of contents
Other Alert-it Personal Care Product manuals