Alert-it P163 MKIII User manual

P163 MKIII
General Alarm Interface
Instructions for Use
This document applies to;
P163 MKIII [Product version 1]
Alert-iT and the Alert-iT logo are either registered
trademarks or trademarks of iTs Designs Ltd.
Copyright @ 2023 iTs Designs Ltd.
All rights reserved.

www.alert-it.co.uk
2
Thank you for choosing an Alert-iT care alarm system
Your product has been manufactured by a team of industry experts with more than 20 years of experience
designing, manufacturing and distributing care alarms.
With a commitment to quality and innovation we are able to bring you a robust and reliable system to aid
caregivers with the safeguard of individuals. Please read this guide carefully to ensure the correct set up, use, and
maintenance of your new product for years to come.
If you have any questions or require assistance in regards to this product or any other Alert-iT product, our
experienced team are on hand to help. Please find contact details below. Don’t forget you can also join us on
Facebook, Twitter and LinkedIn where you’ll find even more information and advice.
Email: [email protected]
Tel: +44 (0) 1530 239 900

Table of Contents
IMPORTANT SAFETY PRECAUTIONS.........................................................................................................................................................4
Important information and limitations for use. Read before use..............................................................................................................................................4
Unintended adjustment of settings............................................................................................................................................................................................5
PACKAGE CONTENTS...............................................................................................................................................................................5
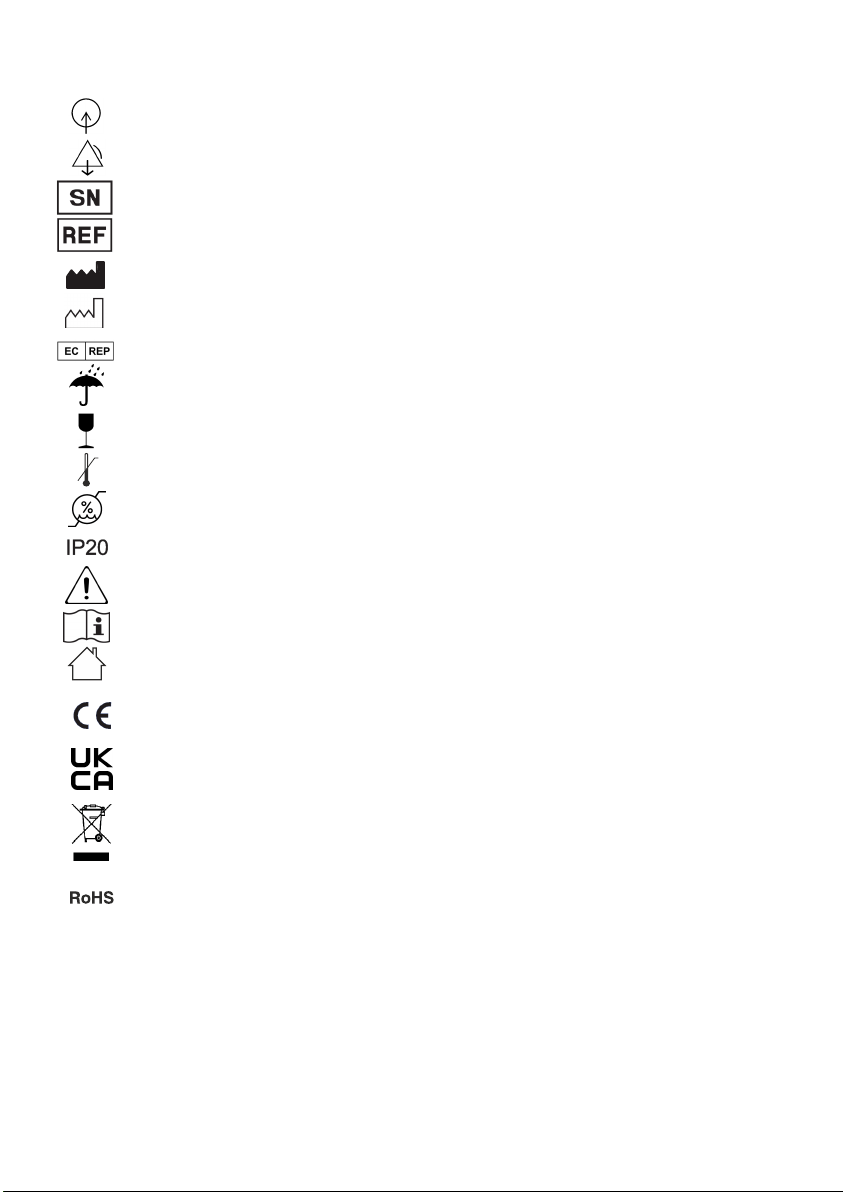
GUIDE TO SYMBOLS.................................................................................................................................................................................6
COMPATIBLE EQUIPMENT.......................................................................................................................................................................7
INTRODUCTION.......................................................................................................................................................................................8
Product Description....................................................................................................................................................................................................................8
Intended Use...............................................................................................................................................................................................................................8
Intended operator.......................................................................................................................................................................................................................9
Liability of the manufacturer......................................................................................................................................................................................................9
About these instructions for use................................................................................................................................................................................................9
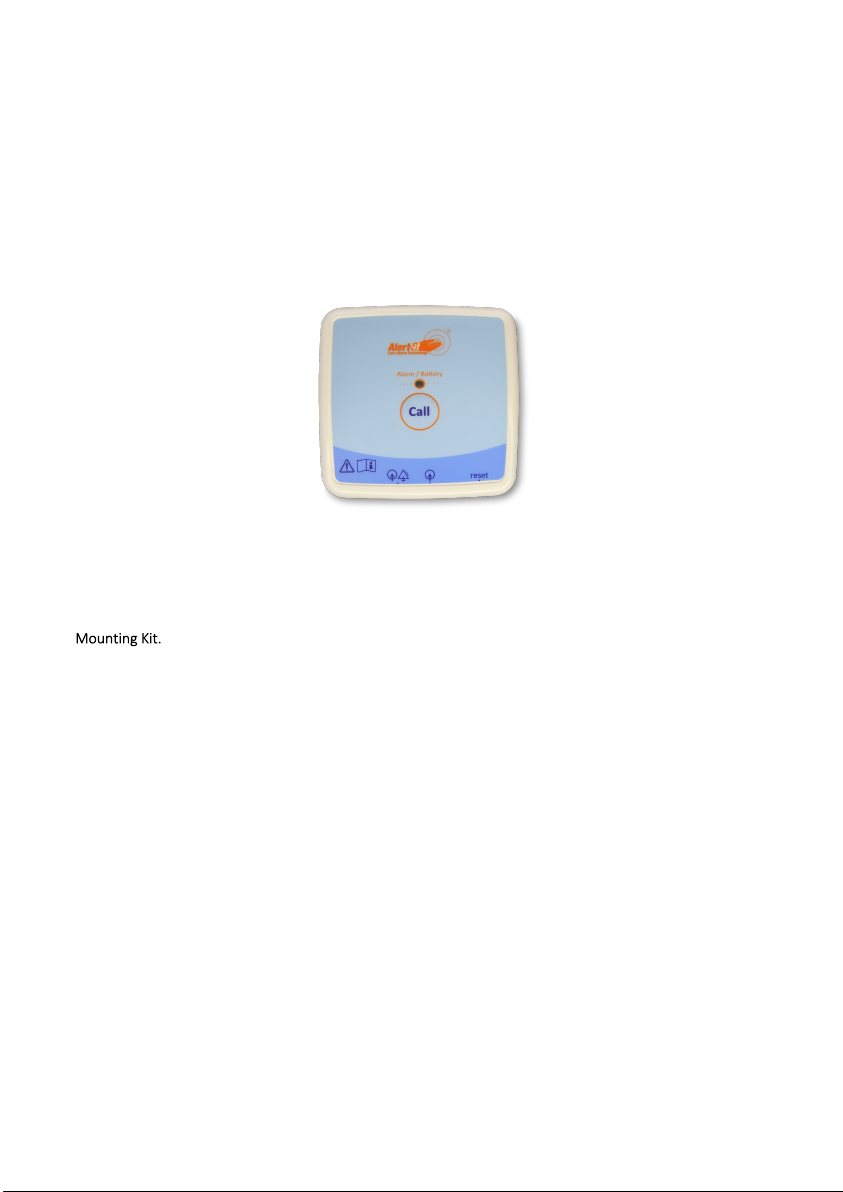
CONTROL UNIT OVERVIEW....................................................................................................................................................................10
BASIC FUNCTIONS..................................................................................................................................................................................11
Turning the device on...............................................................................................................................................................................................................11
Resetting Alarms.......................................................................................................................................................................................................................11
Turning the device off...............................................................................................................................................................................................................11
ADJUSTMENT OF DELAYS.......................................................................................................................................................................11
Connection to Nurse Call Systems............................................................................................................................................................................................12
Connection to Radio Systems...................................................................................................................................................................................................12
INSTALLATION OF CONTROL UNIT.........................................................................................................................................................12
Position of Control Unit............................................................................................................................................................................................................12
Sensor Positioning.....................................................................................................................................................................................................................13
INSTALLATION OF SENSORS...................................................................................................................................................................13
OCCUPANCY ALARMS............................................................................................................................................................................14
Configuration: C0 / C1 - Instant................................................................................................................................................................................................14
Configuration: C2 - Delayed......................................................................................................................................................................................................14
Testing.......................................................................................................................................................................................................................................14
DEVICE SETTINGS...................................................................................................................................................................................15
INSERTING BATTERIES AND BATTERY SERVICE LIFE................................................................................................................................16
INPUT AND OUTPUT CONNECTORS........................................................................................................................................................17
All Models..................................................................................................................................................................................................................................17
“Radio Only” models (P163A and P163D)................................................................................................................................................................................17
“Wired” model (P163B)............................................................................................................................................................................................................17
CHECKS..................................................................................................................................................................................................18
Weekly Checks..........................................................................................................................................................................................................................18
ALERT-IT LIMITED WARRANTY STATEMENT...........................................................................................................................................19
TECHNICAL SPECIFICATIONS..................................................................................................................................................................21
Control Unit...............................................................................................................................................................................................................................21
Ambient Conditions..................................................................................................................................................................................................................21
Product Conformity...................................................................................................................................................................................................................21
CLEANING..............................................................................................................................................................................................22
DISPOSAL OF THE DEVICE AFTER USE.....................................................................................................................................................22
DECLARATIONS OF CONFORMITY..........................................................................................................................................................22
ALARM AND FAULT CODE LOOKUP........................................................................................................................................................23
Faults.........................................................................................................................................................................................................................................23
Alarms.......................................................................................................................................................................................................................................23
www.alert-it.co.uk
3

www.alert-it.co.uk
4
1 IMPORTANT SAFETY PRECAUTIONS
1.1 Important information and limitations for use. Read before use.
This Alert-iT product has been designed with due regard to reliability and integrity. While it offers a highly vigilant
alerting method, it is always possible that a distress condition can go undetected for a variety of reasons (including
malfunction) and in life threatening situations it is advisable to use the Alert-iT system in conjunction with
additional techniques. Neither the manufacturer nor its agent can accept legal responsibility to provide a system
that is infallible. The caregiver is responsible for assessing the risks of using this equipment and any settings
pertaining to it.
●This device is designed only to be used as an aid for a caregiver.
●Do not use this device for any purpose other than that specified by the manufacturer.
●Only use the monitor with accessories approved for use with this product and only in accordance with
instructions.
●Do not try to repair the device yourself.
●No maintenance of the product is allowed during use.
●Do not move or transport the device during use. If the bed equipped with the device needs to be moved
remember to unplug all cables.
●Do not let the device get wet.
●This product is for indoor use only in a dry environment.
●Do not install this device near or on top of another device. However, if this cannot be avoided, the user must
ensure that the device functions in the normal manner.
●Do not use the input / output connectors for any purpose other than that specified by the manufacturer. For
example do not connect the connectors to telecommunications or local area networks.
●Equipment is not suitable for use in the presence of a flammable anaesthetic mixture with air or with oxygen
or nitrous oxide.
●Remove the batteries when the device is not in use or when it is stored for an extended period. Alkaline
batteries may become self-discharged, start leaking and contaminate the device.
●Do not use any rechargeable batteries or lithium-ion batteries! Rechargeable or lithium-ion batteries carry the
risk of over heating, ruining the device and causing possible danger to the user.
●Ensure that the sensor leads are routed and secured to avoid the risk of trips, entanglement or strangulation.
●Ensure, by testing, that the alarm notifications are received at the caregivers location(s).
●Clean and disinfect each item regularly in accordance with information on page 22.
●Regularly test the device as described in these instructions for use.
●As with all electronic equipment there is potential for the equipment to interfere with or be effected by
interference from other electrical or electronic devices. For this reason avoid placing the device, sensor or
connecting cable(s) in close proximity to sensitive electronic devices or devices which produce strong electro-
magnetic fields such as radio transmitters, mobile phones or power cables.
●If the equipment is modified in any way, appropriate inspection and testing must be conducted to ensure
continued safe use of the equipment.
●A risk assessment must be conducted to determine if the level of reliability offered by the device is sufficient
or if additional equipment is needed. Consideration shall be given to the users likelihood of tampering with the
system.
●The caregiver must never clear an alarm without checking the user’s condition.
●Some accessories are fitted with small screws and have plastic bags. Ensure these do not come into the
possession of vulnerable people who may choke on them.

www.alert-it.co.uk
5
1.2 Unintended adjustment of settings
●Incorrect alarm parameters may lead to false notifications OR may lead to the alarm notification not becoming
activated when needed.
●To ensure correct operation of the device, position sensors in accordance with their instructions.
●Radio Models: Changing the radio address (without also changing it on the receiving equipment) will result in
alarm notifications no longer being received.
2 PACKAGE CONTENTS
1x General Alarm Interface [P163 MKIII]
2x 1.5V AA Alkaline Batteries (Not fitted) [P160D] (Not Shown)
1x [Inc. screws, wall plugs & sticky pads] (Not shown)

www.alert-it.co.uk
6
3 GUIDE TO SYMBOLS
Sensor Input
Wired Alarm Output
Serial Number.
Catalogue Number
Manufacturer.
Date of Manufacture.
Authorized representative in the European Community.
Keep Dry.
Fragile.
Temperature Limitation.
Humidity Limitation.
Protected against solid objects over 12.5 mm (e.g. a finger) and no protection against liquids.
Caution - Refer to instructions for use.
Consult instructions for use.
Product is for indoor use only.
CE Mark. (the product conforms with the relevant EU regulatory requirements.)
UKCA Mark. (the product conforms with the relevant UK regulatory requirements.)
Symbol of the European Waste Electrical and Electronic Equipment Directive (WEEE Directive)
2002/96/EC on waste electrical and electronic equipment.
Indicates that the product is in compliance with the European directive 2002/95/EC on the restriction
of the use of certain hazardous substances in electrical and electronic equipment (commonly referred
to as the Restriction of Hazardous Substances Directive or RoHS).

www.alert-it.co.uk
7
4 COMPATIBLE EQUIPMENT
●Bed Occupancy Mat (Large) - [P143CAB]
●Bed Occupancy Mat (Small) - [P143CBB]
●Bed Occupancy Ribbon (Long) - [P143GDB]
●Bed Occupancy Wedge - [P144B]
●Chair Mat - [P149AD]
●Wired output / Bed input Splitter - [P133H]
●Mounting Hook - [P159D]
●Nurse Call Interface Lead - [P145*]
*Many Nurse Call Leads are available, please enquire for more information.
●Plesio pager - [P168]
Simple pager designed for one to one care with up to 3 devices.
●Advanced Pager - [P137]
Pager designed for larger care installations with up to 128 devices.
●Connect-iT - [P155B]
Radio receiver with outputs designed for interfacing Alert-iT’s radio devices with wired systems or
other telecare providers systems.
●Repeater - [P164]
Radio repeater used to boost the radio signals around larger installations.
Note: For additional information on any accessories please contact your equipment provider.

www.alert-it.co.uk
8
5 INTRODUCTION
These ‘instructions for use’ describe the use of the Alert-iT “General Alarm Monitor”.
The “ ” these instructions apply to are shown on the front page of this document. This should be
referred to and compared against the “ ” number shown on the product information sticker found
on the top of your device. If this document is not suitable for your product please refer to the “support” section
of our website for alternative instructions.
●Follow all instructions provided in this document concerning the installation, use and cleaning of the device.
5.1 Product Description
This “device” is capable of using a range of input sensing components to detect the movement of individuals. It
can be used to notify caregivers of the following;
●Immediate Bed Vacation. E.g. To reduce the risk of falls.
●Delayed Bed Vacation. E.g. To alert if the user has not returned from the bathroom and may have fallen.
●Door Exit. E.g. To alert it the user is wandering.
The product consists of a range of different sensors and a control unit where the sensors are connected to. The
control unit should be placed on a table, hooked on a bed or mounted on a wall.
Caregivers are notified by visual and audible alerts (if enabled) and/or a notification via external system e.g. a
wireless pager or wired call system.
Operating environment is typically a bedroom at a family home or care facility.
5.2 Intended Use
The product is intended to assist in monitoring and can notify the caregiver of;
●the presence of a person in a bed/chair and if they leave the bed/chair.
●The presence of a person on a floor mat.
●Entry / Exit through a door.
The device may either be used;
●Solely for each of the tasks described above individually.
●For all the tasks described above simultaneously or any combination thereof.

www.alert-it.co.uk
9
5.3 Intended operator
The intended operator is the caregiver of the user. The operator needs to be an adult who fully understands the
instructions and limitations of use mentioned in these instructions for use. Otherwise no special skills or knowl-
edge is needed for the operator.
5.4 Liability of the manufacturer
ITs Designs Ltd. (T/A Alert-iT Care Alarms) is liable to ensure the safety, reliability and performance of the device,
provided that:
●the device is installed, used and cleaned in accordance with the instructions in these instructions for use.
●any changes to the device, maintenance and repairs are conducted by a person trained by iTs Designs Ltd. or
its representatives.
●any spare parts or accessories used have been approved by iTs Designs Ltd.
●any accessories are replaced as recommended by the manufacturer.
5.5 About these instructions for use
Read all warnings and reminders in these instructions for use with care to avoid hazardous situations and damage.
If assistance is needed in setting up, using, or maintaining the equipment contact your equipment supplier.
Please report any unexpected operation or events to your your equipment supplier.

www.alert-it.co.uk
10
6 CONTROL UNIT OVERVIEW
USB Connection
On / Off Connector
(For use with Red Key)
Sold separately.
Input 1
“Reset” button /
Turn off
Alarm Light
Audible Sounder
(Hidden)
Call Button /
Turn on
Input 2 /
Wired Output

www.alert-it.co.uk
11
7 BASIC FUNCTIONS
7.1 Turning the device on
●Press the central “ ” button to wake the device up.
●On power-up the “ ” LED will flash three times.
●Radio models will send an all clear alarm notification.
7.2 Resetting Alarms
●Hold the “ “ button for 2 seconds.
●The Device will beep twice to confirm the alarm has reset.
Note: The reset sound can be disabled if required.
7.3 Turning the device off
●Ensure no alarms are active. Reset them if required.
●Hold the “ ” button for 3 seconds until the Alarm Light illuminates.
●Release the button.
●The Alarm Light will flash 3 times then the device will turn off.
Note: The device can be configured to send an “ ” fault code over radio and/or activate the wired output
for 2 seconds when shutting down if you are concerned about unwanted shutdowns. See device settings.
8 ADJUSTMENT OF DELAYS
There are various delay times that can be configured on a PC using the “ ” (Windows only).
These are the default delay times;
Bed Vacation (Instant) = 1.5 seconds.
Escalation of bed vacation alarm = 6 minutes.
Bed Vacation (Delayed) = 15 minutes.
Floor / Switch / Door = 0.5 seconds.
Call button (Assistance) = 0 seconds.
Call button (Urgent) = 2 seconds.

www.alert-it.co.uk
12
9 INSTALLATION OF CONTROL UNIT
Remember: The device will need to be within arms reach of the caregiver in order to access the “ ” button.
9.1 Position of Control Unit
Option 1: Mounting to a wall
1. Plug in all required cables, and ensure they reach the desired mounting location. (Typically within 2 meters
of the bed). Ensure the “ ” button is easily accessible.
2. A wall mounting kit containing sticky pads and screws has been provided to attach the rear mounting plate
to a wall.
3. Using your preferred method attach the rear mounting plate to the wall.
4. Slide the control unit onto the mounting plate until you hear a ‘ ’.
Option 2: Mounting with hook (Sold Separately).
1. Attach the hook to the back of the control unit.
2. The control unit can now be hooked onto a bed frame.
9.2 Connection to Radio Systems
Radio models (P163A and P163D), will require pairing to any radio equipment.
On the top product label you will see the unique “ ” and “ ” for this device.
Use these details to pair the device to the receiving equipment.
9.3 Connection to Nurse Call Systems
Wired models (P163B), will require connecting to a wired nurse call system.
Alert-iT offer a wide range of “nurse call cables” to interface this device with various different nurse call systems.
Important Note: In order for the nurse call system to detect if the wired output lead has been disconnected, it is
essential to use the normally - closed (NC) connection pins.
The wired output will be activated for ~2 seconds upon any alarm or critical fault condition and reactivated every
2 minutes until the alarm is reset or the fault condition resolved. The wired output will also activate for ~2 seconds
if the unit is turned off.

www.alert-it.co.uk
13
10 INSTALLATION OF SENSORS
10.1 Sensor Positioning
Position bed occupancy mat on top of mattress.
Bed Mat
Position of a floor mat near a door
Position the floor mat next to the bed.
Position of Chair Mat
Position the bed ribbon under the mattress.
Bed Ribbon
Floor Mat
Bed Weight Sensor
Position bed weight sensor beneath a bed leg
Chair Mat
Floor Mat

www.alert-it.co.uk
14
11 OCCUPANCY ALARMS
All Alert-iT occupancy sensors use pin 2 on an RJ12 connector.
11.1 Configuration: C0 / C1 - Instant
By default, pin 2 on each P163 input is configured to behave as follows.
When the sensor is activated (e.g. the user gets into bed), the device will “ ” to inform you the sensor is
working and the user has been detected.
When the user leaves the bed/chair, an “ ” / low priority “ ” alarm will be raised after 1.5 seconds.
If the alarm has not been reset after 6 minutes, the alarm will escalate to a “ ” / medium priority “
” alarm.
If the alarm has not been reset after 30 minutes, the alarm will automatically reset and an “ ” fault
notification will be raised.
When the sensor is activated (e.g. the user gets into bed), the device will “ ” to inform you the sensor is
working and the user has been detected.
When the user leaves the bed/chair, the wired output will activate for 2 seconds. The wired output will continue
to trigger for 2 seconds every 2 minutes until the alarm is reset.
If the alarm has not been reset after 30 minutes, the alarm will automatically reset.
11.2 Configuration: C2 - Delayed
In this configuration, the device behaves as above, apart from there being a 15 minute delay (default) after the
user leaves the bed / chair before the “ ” / low priority “ ” alarm is raised. This is typically used
to allow them to use the bathroom unattended, but to alarm if they do not return.
In this configuration ,the alarm does not escalate to a “ ” / medium priority “ ” alarm.
11.3 Testing
To test the occupancy feature is functioning correctly;
1. Ensure the bed / chair is vacant.
2. Sit on the bed / chair. You should hear a “ ” sound.
If no sound is heard;
●Check the device is turned on - Briefly press the reset button, you should see the alarm LED flash once.
●Check the sensor is plugged in correctly.
●Check the cables are free from kinks or damage.

www.alert-it.co.uk
15
12 DEVICE SETTINGS
There are various settings that can be configure on a PC using the “ ” (Windows only).
Radio Address
If multiple devices are used at the same location, each device needs to use a unique radio address setting between
1 and 127. The device is supplied with a random address, we recommended only adjusting if duplication on site
occurs.
Alarm Light
This setting enables the flashing alarm light. [Default: On]
Audible Alarm
This setting enables the internal alarm tunes. [Default: Off]
Reset Sound
This setting enables the sound played when alarms are reset. [Default: On]
Battery Monitoring
This setting enables the continuous battery monitoring. [Default: On (Recommended)]
Safelink
This setting enables the failsafe radio heartbeat signal. [Default: Off]
Beep
This setting enables the beep sound heard when the user gets into bed. [Default: On]
Send Alarm Off on Powerdown
This setting enables the fault notification when the unit is turned off. [Default: Off]
Send Alarm Off on Alarm Timeout
This setting enables the fault notification when an alarm times out. [Default: On]
Sleep on Powerup
This setting makes the device enter a sleep state when batteries are inserted. [Default: On]
Allow Powerdown
This setting allows the device to be turned off by holding the reset button when no alarms are active. [Default: On]
Alarm Timeout
This setting makes the device automatically reset if an alarm is left active. [Default: 30 minutes]
Clear Delay
This setting delays the all clear radio signal when an alarm is reset. [Default: Off]

www.alert-it.co.uk
16
13 INSERTING BATTERIES AND BATTERY SERVICE LIFE
Unplug all cables before removing the back plate.
Device operates with 2 high quality AA size 1.5 V alkaline batteries (operating voltage: 2x 1.5V = 3V).
Install and remove the batteries as follows:
1. Slide the back-plate off by lifting the latch at the bottom of the unit then sliding the back-plate downwards.
Note: If the device has been wall mounted, the latch is located at the bottom rear edge of the device, it should be
pushed towards the wall and the device slid upwards.
2. Insert two high quality AA size 1.5V alkaline batteries into the device following the polarity symbols in the
battery compartment. Slide the back-plate back on until it clicks into place.
3. Press and hold the ••• button for 3 seconds to turn the device on.
Battery life will vary between 1 and 3 years dependant on the frequency of alarms, how quickly alarms are
responded to and if Safelink is enabled.
When batteries are low, the “Alarm” light will flash every 6 seconds. On radio models, the device will start to
transmit a low battery notification. On wired models, the wired output will activate every 2 minutes.
NOTE! All alkaline batteries start to leak when empty, and a leak will contaminate the device. Remember to
remove the batteries when the device is not being used or when it is being stored for an extended periods.
Device is tested and safe to use with the following alkaline batteries;
NX-Power AA 1.5V PCA9010
Duracell AA 1.5V MN1500 LR6
Energizer AA 1.5V E91 LR6 AM3
Do not use any rechargeable batteries or lithium-ion batteries! Rechargeable or lithium-ion batteries carry
the risk of over heating, ruining the device and causing possible danger to the user.

www.alert-it.co.uk
17
14 INPUT AND OUTPUT CONNECTORS
●Connector 1 is always an input.
●Connector 2 has two configurations. See below.
14.1 All Models
14.1.1 Connector 1 (Right) [Input 1 Only]
Connector: RJ12
Pin 1 = Not connected.
Pin 2 = Input. Bed Occupancy Signal.
Pin 3 = Input. Floor Mat / Switch Input Signal.
Pin 4 = Input 0v.
Pin 5 = Input 0v.
Pin 6 = Not connected.
14.2 “Radio Only” models (P163A and P163D)
14.2.1 Connector 2 (Left) [Input 2 Only]
Connector: RJ12
Pin 1 = Not connected.
Pin 2 = Input. Bed Occupancy Signal.
Pin 3 = Input. Floor Mat / Switch Input Signal.
Pin 4 = Input 0v.
Pin 5 = Input 0v.
Pin 6 = Not connected.
14.3 “Wired” model (P163B)
14.3.1 Connector 2 (Left) [Input 2 and Wired Output]
Connector: RJ12
Pin 1 = Output. Alarm Normally Closed.
Pin 2 = Input. Bed Occupancy Signal.
Pin 3 = Output. Alarm Normally Open.
Pin 4 = Output. Alarm Common.
Pin 5 = Input 0v.
Pin 6 = Not connected.
In this configuration the connector is configured as a wired output but can also still be used as a second bed
occupancy input using a splitter. The floor input pin is unavailable.

www.alert-it.co.uk
18
15 CHECKS
15.1 Weekly Checks
15.1.1 Condition of the cables
Check the condition of the cables.
15.1.2 Position of the sensors
Check the position and condition of the sensors.
15.1.3 Alarm Activation
Ensure the alarm notifications are being received by the caregiver(s). Manually trigger an alarm if required.

www.alert-it.co.uk
19
16 ALERT-IT LIMITED WARRANTY STATEMENT
In the unlikely event that your product needs guarantee service, please contact your provider, distributor or
manufacturer. To avoid any unnecessary inconvenience on your part, we recommend you read these instructions
for use carefully before seeking guarantee service.
By this Guarantee, Alert-iT guarantees the product to be free from defects in materials and workmanship at the
date of original purchase for a period of three (3) years from that date.
If within the guarantee period the product is determined to be defective (at the date of original purchase) due to
improper materials or workmanship, Alert-iT will, without charge for labour or parts, repair or (at Alert-iT’s
discretion) replace the product or its defective parts subject to the terms and limitations below. Alert-iT may
replace defective products or parts with new or refurbished products or parts. All retained products and parts
replaced become the property of Alert-iT.
Guarantee services will be provided only if the original invoice or sales receipt (indicating the date of purchase,
model name and dealer’s name) is presented with the defective product within the guarantee period. Alert-iT may
refuse free-of-charge guarantee service if these documents are not presented or if they are incomplete or illegible.
This Guarantee will not apply if the model name or serial number on the product has been altered, deleted,
removed or made illegible.
This Guarantee does not cover transport costs and risks associated with transport of your product to and from
Alert-iT.
This Guarantee does not cover:
a. occupancy sensors or moisture sensors (see individual products for their guarantees).
b. periodic maintenance and repair or parts replacement due to wear and tear.
c. consumables (components that are expected to require periodic replacement during the lifetime of a product
such as batteries).
d. damage or defects caused by use, operation or treatment of the product inconsistent with normal use.
e. damage or changes to the product as a result of:
i. misuse, including:
- treatment resulting in physical, cosmetic or surface damage or changes to the product.
- failure to install or use the product for its normal purpose or in accordance with Alert-iT’s instructions on
installation or use.
- failure to maintain the product in accordance with Alert-iT’s instructions on proper maintenance.
- installation or use of the product in a manner inconsistent with the technical or safety laws or standards in the
country where it is installed or used.
ii. the condition of or defects in systems with which the product is used or incorporated except other Alert-iT’s
products designed to be used with the product.
iii. use of the product with accessories, peripheral equipment and other products of a type, condition and standard
other than prescribed by Alert-iT.
iv. repair or attempted repair by persons who are not authorised by Alert-iT.

v. adjustments or adaptations without Alert-iT’s prior written consent, including:
- upgrading the product beyond specifications or features described in the instructions for use, or modifications to
the product to conform it to national or local technical or safety standards in countries other than those for which
the product was specifically designed and manufactured.
vi. neglect
vii. accidents, fire, liquids, chemicals, other substances, flooding, vibrations, excessive heat, improper ventilation,
excess or incorrect supply or input voltage, radiation, electrostatic discharges including lighting, other external
forces and impacts.
This guarantee covers only hardware components of the product.
Except as stated above, Alert-iT makes no warranties (express, implied, statutory or otherwise) regarding product
or accompanying or constituent software quality, performance, accuracy, reliability, fitness for a particular pur-
pose, or otherwise. If this exclusion is not permitted or fully permitted by applicable law, Alert-iT excludes or limits
its warranties only to the maximum extent permitted by applicable law. Any warranty that cannot be fully excluded
will be limited (as far as permitted by applicable law) to the duration of this Guarantee.
Alert-iT’s only obligation under this Guarantee is to repair or replace products subject to these Guarantee terms
and conditions. Alert-iT is not liable for any loss or damage relating to products, service, this Guarantee or
otherwise, including - economic or intangible losses - the price paid for the product - loss of profits, revenue, data,
enjoyment or use of the product or any associated products - indirect, incidental or consequential loss or damage.
This applies whether that loss or damage relates to: impaired or non-operation of the product or associated
products through defects or unavailability while with Alert-iT, which caused downtime, loss of user time or
business interruption inaccuracy of output from the product or associated products.
This applies to loss and damages under any legal theory, including negligence and other torts, breach of contract,
express or implied warranty, and strict liability (even where Alert-iT has been advised of the possibility of such
damages).
Where applicable law prohibits or limits these liability exclusions, Alert-iT excludes or limits its liability only to the
maximum extent permitted by applicable law. For example, some countries prohibit the exclusion or limitation of
damages resulting from negligence, gross negligence, wilful misconduct, deceit and similar acts. Alert-iT’s liability
under this guarantee will in no case exceed the price paid for the product, but if applicable law permits only higher
liability limitations, the higher limitations apply.
Consumers have legal (statutory) rights under applicable national laws relating to the sale of consumer products.
This guarantee does not affect statutory rights you may have, nor those rights that cannot be excluded or limited,
nor rights against the person from whom you purchased the product. You may assert any rights you have at your
sole discretion.
Table of contents
Popular Recording Equipment manuals by other brands

Emcotec
Emcotec RC Electronic DPSI RV Mini Series operating instructions

Rane
Rane AD 22 Operator's manual

Avid Technology
Avid Technology Pro Tools S6 Master Post Module Assembling/disassembling

Lenoxx
Lenoxx BCD120 instruction manual

TREBING + HIMSTEDT
TREBING + HIMSTEDT SPI 3 manual

Aion Electronics
Aion Electronics Convex manual