ALFRA 41100.A User manual

ALFRA TMA 600A
BEDIENUNGSANLEITUNG
OPERATION MANUAL | MODE D‘EMPLOI | MANUAL DE INSTRUCCIONES | BRUKSANVISNING
de VARIABLER SCHWEIßWINKEL
ADJUSTABLE WELDING ANGLE
ANGLE AJUSTABLE DE SOUDAGE
eN
FR
ÁNGULO DE SOLDADURA VARIABLE
eS
JUSTERBAR SVEISEVINKEL
NO
ALFRA TMA 600A #41100.A
ALFRA TMA 600A
#41100.A
US Patent Nr. 8350663B1

10
Always...
•activatethemagnetic clamp completely
•activate the magnetic clamp on metallic,
ferromagnetic materials
•clean the magnetic surface and keep it clear
of dirt, chips and welding spatter
•set the magnet clamp down gently to prevent
damage to the magnetic surface
•respect the stated maximum breakaway force
•inspect the magnetic surface and the entire
magnetic clamp for damage
•follow the instructions in this operating manual
•instruct new operators in the safe use of
switchable magnetic clamps
•respect local and country-specificguidelines
on handling magnetic tools
•keep and use in a dry environment
!
Dear customer,
Thank you for purchasing an ALFRA product. Please read these operation instructions closely before using
your device for the first time and keep them along with the enclosed Product Control Card for later reference.
SAFETY INSTRUCTIONS
Danger can occur when using extremely strong magnetic clamps due to improper handling and/or poor
maintenance, which may cause serious accidents with fatal physical injuries. Please observe all safety
instructions of this operation manual and contact the manufacturer if you have any questions.
Never...
•exceed the stated maximum load
•use the magnet to position objects above
people or walking paths without using
additional safeguards
•use the magnetic clamp to lift or transport loads
•use the magnetic clamp to support, lift or
transport persons
•switch the magnetic clamp o before setting
down all work pieces in a safe end position
•modify the magnetic clamp or remove
operating labels
•use the magnetic clamp if damaged or
missing parts
•strain the underside of the magnet through
heavy impact or blows
•use the magnetic clamp without having been
properly instructed
•use if you have not read and understood these
operating instructions completely
•place fingers or any other body part between
the magnetic surface and the work piece
because there is a risk of injury
•operate in temperatures higher than 60°C (140°F)
•expose to corrosive substances
!
People using pacemakers or other medical devices should not use this magnetic clamp
until they have consulted with their physician.
Important:
•stability and safe hold do not occur on round or arched surfaces
•use the magnetic clamp preferably on plane surfaces
•full performance is only reached when using the entire magnetic surface
•cavities or drilled holes underneath the surface reduce the magnetic holding force
•fixing several work pieces on top of each other decreases the holding force significantly
•ensure that the lever springs back strongly during work on thin materials
!
eN

11
PROPER USE
The adjustable welding angle with TMC 300 magnetic clamp is a unit equipped with two switchable magnetic
clamps, which is designed to position and to align dierent ferromagnetic, metallic work pieces to each
other. It may only be used according to its technical data and determination. Proper use includes adherence
to the start-up, operating, environment and maintenance conditions specified by the manufacturer. The user
bears sole responsibility for understanding the operating manual as well as for proper use and maintenance
of the adjustable welding angle with magnetic clamp TMC 300.
DEVICE DESCRIPTION
The adjustable welding angle consists of two TMC 300 magnetic clamps (B), whose angle to each other can
be modified according to desire and application. Any angle between 0° and 90° can be adjusted exactly at
the read- out point (E) and fixed by means of the angle scale (F). All 3 clamping levers (C) must be opened
and/or tightened to adjust and fix the angle. For use in small, cramped installation spaces the clamping
levers can be replaced by the enclosed mild steel screws and fixed with the insertable Allen key (I).
The TMC (Thin Material Clamper) is a switchable magnetic clamp with manual actuation for attachment
to ferromagnetic materials. The magnet can be activated by pushing the activation lever (A) into the ON
position until it audibly latches into place. The installed permanent magnet generates a magnetic field
in the lower magnetic plate area (D). Owing to the special design of the TMC 300, this magnetic field is
very compact and develops excellent adhesive force especially on thin materials of less than 10 mm.
The activation lever must be lifted slightly at its end and returned by 60° into the OFF position in order
to deactivate the magnet.Care must be taken that the lever springs backstrongly when working on
thin materials.
A) Activationleverformagnet
B) TMC 300 Magneticclamp
C) Clampingleverforrotation
D)Magneticsurface
E) Read-out point for angle scale
F) Angle scale
G)90° end stop
H)Clampingwasher
I) Allen key 5mm

12
MARKINGS ON THE MAGNETIC CLAMP
Detailed descriptions for handling and operating conditions of the TMC 300 can be found on
the upper side of the magnetic clamp. This labeling must not be modified, damaged or removed.
New labels must be ordered from the manufacturer if necessary.
Laser marking incl. serial number
on the upper side of the cap
Prod.-No.: 189414246
Sticker “Safety instructions”
TECHNICAL DATA
Prod.-No. 41100.A
Designation Adjustable welding angle
Breakaway force:
(at 0° inclination to the load)
per TMC >300 kg on 6 mm
S235 >660 lbs on 0.25" AISI CRS 1020
Max. load-bearing capacity:
(at 90° inclination of the load) 30% of the breakaway force 30% of the breakaway force
Max. load-bearing capacity:
(at 90° inclination of the load) per TMC 100 kg on 6 mm
S235 220 lbs on 0.25“ AISI CRS 1020
Dead weight of the unit 2.75 kg 6.1 lbs
Storage temperature -30°C to +60°C -22°F to +140°F
Operating temperature -30°C to +60°C -22°F to +140°F

13
STARTUP
You have received a pre-assembled adjustable welding angle and a detailed operating manual.
Please check the condition of the goods upon receipt for any damage incurred during transport, and make
sure the delivery is complete. If you have any problems, please contactthemanufacturerimmediately.
1. Follow the safety instructions. Clean the workpiece and the lower magnetic plate of the
switchable magnetic clamp.
2. Release all three clamping levers. Adjust the angle of the magnets to each other according to the desired
application. Now tighten the three levers again with ca. 5-6 Nm to fix the assemblies in place.
3. Place the magnetic clamp into the desired position or put the work piece onto the magnetic surface.
The magnetic clamp is slightly magnetized in order toassist positioning the magnet and the work piece.
4. Align the work piece and the magnet according to the desired application.
5. Turn the activation lever by 60° into the ON position until it audibly latches into place (with a slight tilting).
6. Check the secure and strong hold of the magnet and the work piece depending on application.
7. After the load has been set down completely and safely, you can deactivate the magnetic clamp.
To do this, push the activation lever at its far end upwards (1.) and move it into the OFF position (2.).
During each application, watch for any deformation of the work piece that might occur. If a small distance
(air gap) forms between the magnetic surface and the work piece, the magnetic clamp will not reach the
stated holding force and could detach itself. Please check for any air gap developing at the edges of the
TiN-coated magnetic surface if necessary (e.g. with a sheet of paper; 80g/m2).
Immediately stop the application if there is any
excessive deformation of the work piece or if an
air gap occurs.
!
Never exceed the dimensions and/or the
load-bearing capacity of the values given in
table 2 (page 16).
!

14
MOUNTING OPTIONS WITH CLAMPING LEVERS AND
WITH CLAMPING SCREWS
MAINTENANCE AND INSPECTION OF THE MAGNETIC CLAMP
Regular maintenance and inspections are necessary to ensure the safe use of the switchable
magnetic clamp. Furthermore, country-specific standards and regulations must be observed
depending on application.
The maintenance intervals are classified according to the recommended schedule.
Before every use...
•visually inspect the magnet for damage
•clean the surface of the workpiece and the underside of the magnet
•free the underside of the magnet of rust, chips or unevenness
Weekly...
•inspect the magnetic clamp for deformation, cracks or other defects
•make sure the activation lever is working properly and latches correctly into place
•inspect the bottom of the magnet for scratches, pressure points or cracks and have the magnet
repaired by the manufacturer if necessary
Monthly...
•check the markings and labelling on the magnet for legibility and damage and replace them if necessary
Annually...
•have the load-bearing capacity of the magnet checked by the supplier or an authorized workshop,
should the application so require
Unauthorized repairs or modification to the magnetic clamp are not permitted.
If you have any questions, contact the manufacturer.
!

15
BASIC INFORMATION CONCERNING THE HANDLING OF MAGNETIC
LIFTING GEAR IN PARTICULAR TML / TMH / TMC
The magnetic surface is located on the underside of the magnet incorporating multiple magnetic poles
which generate the magnetic holding force when activated. The maximum holding force that can be achieved
depends on dierent factors which are explained below:
Material thickness
The magnetic flux of the permanent magnet requires a minimum material thickness to flow completely into the
load. Below this minimum thickness of material, the maximum holding force is reduced depending on material
thickness. Conventional switchable permanent magnets have a deep penetrating magnetic field similar to
the tap root of a tree, and require a large material thickness to achieve maximum holding force. The compact
magnetic field of TML, TMH and TMC magnets is similar to a shallow root and achieves maximum holding force
even when used on thin materials (see performance data in table 2, page 16).
Material
Every material reacts in a dierent way to penetration of the magnetic field lines. The breakaway force of the
magnet is determined using a low carbon material. Steels with high carbon content or whose structure has
been changed by heat treatment have a lower holding force. Foamed or porous cast components also have a
lower holding force, so that the given load-bearing capacity of the magnet can be downgraded on the basis
of the following table 1.
Table 1
Surface quality
The maximum holding force of a permanent magnet can be achieved in case of a closed magnetic circuit in
which the magnetic field lines can connect up freely between the poles, thus creating a high magnetic flux.
In contrast to iron, for example, air has very high resistance to magnetic flux. If an air gap is formed between
the work piece and the magnet, the holding force will be reduced. In the same way, paint, rust, scale, surface
coatings, grease or similar substances all constitute a space (i.e. an air gap), between work piece and magnet.
Furthermore, an increase in surface roughness or unevenness has an adverse eect on the magnetic holding
force. Reference values for your TMC 300 can be found in table 2 (page 16).
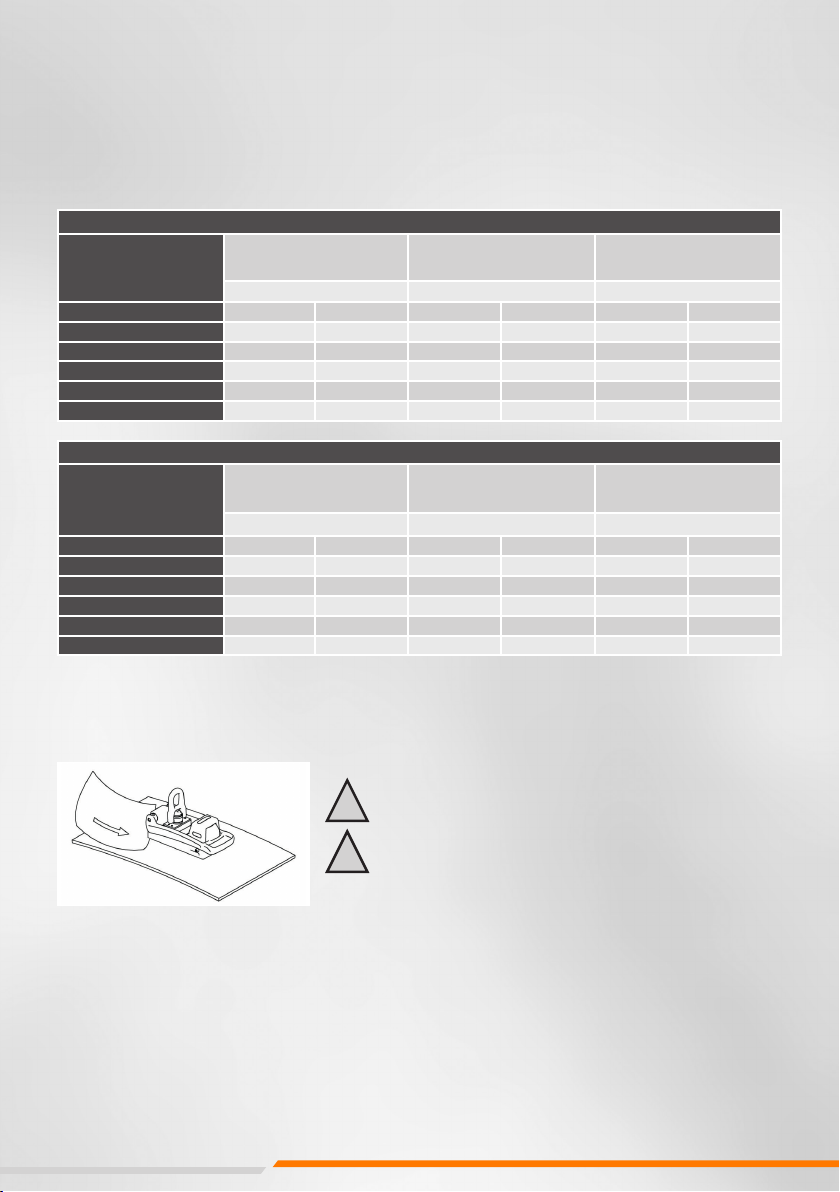
Load dimensions
When working with large workpieces such as girders or plates, the load can deform during the application.
A large steel plate would bend downwards at the outer edges and create a curved surface which no longer
has full contact with the bottom of the magnet. The resulting air gap reduces the maximum load-bearing
capacity of the magnetic clamp. Hollow objects or those smaller than the magnetic surface will also result
in less holding power being available.
Load alignment
During lateral load (‘shear’ mode), the holding force of the magnetic clamp decreases dependent upon
the coecient of friction between the two materials.
Temperature
The high-power permanent magnets installed in the magnetic clampwill begin to lose their magnetic properties
irreversibly from a temperature of more than 80°C (180°F), so that the full load-bearing capacity is never
reached again even after the magnet has cooled down. Please note the specifications on your product and in
the operating manual.
Material Magneticforce in %
Non-alloyed steel (0.1-0.3% C content) 100
Non-alloyed steel (0.3-0.5% C content) 90-95
Cast steel 90
Grey castiron 45
Nickel 11
Most stainless steels, aluminium, brass 0

16
DETAILED PERFORMANCE DATA FOR THE SWITCHABLE MAGNETIC
CLAMP TMC
Values shown for the performance of the TMC 300 are based on measurements made on material S235 JR,
comparable to AISI 1020 Cold Rolled Steel, for the maximum, vertical breakaway force at 0° deviation from
the load axis and additionally under a 90° inclined load. These values do not include any safety factor. The
magnetic clamp will detach itself abruptly when the load exceeds values given in table 2.
Table 2
During each application, watch for any deformation of the work piece that might occur. If an air gap forms
between the magnetic surface and the work piece, the magnetic clamp will not reach the stated holding
force and could detach itself. Please check for any air gap developing at the edges of the TiN-coated
magnetic surface if necessary (e.g. with a sheet of paper; 80g/m2).
Immediately stop the operation if there is any excessive
deformation of the work piece or if an air gap occurs.
!
Never exceed the dimensions and/or the load-bearing
capacity of the material thickness given In table 2.
!
Breakaway force in kg
Thickness of material
Clean, flat,
ground surface Rusty, slightly scratched
surface Irregular, rusty or rough
surface
Air gap <0.1 mm Air gap = 0.25 mm Air gap = 0.5 mm
mm 0° 90° 0° 90° 0° 90°
290 30 75 25 66 22
3150 50 120 40 105 35
4240 80 180 60 135 45
5285 95 210 70 150 50
>6 300 100 210 70 150 50
Breakaway force in lbs
Thickness of material
Clean, flat,
ground surface Rusty, slightly scratched
surface Irregular, rusty or rough
surface
Air gap <0.004 inches Air gap = 0.01 inches Air gap = 0.02 inches
Inches 0° 90° 0° 90° 0° 90°
0,08 198 66 165 55 150 50
0,12 330 110 270 90 225 75
0,16 540 180 390 130 300 100
0,20 630 210 465 155 330 110
>0,25 660 220 465 155 330 110
Other manuals for 41100.A
1
This manual suits for next models
1
Table of contents
Popular Welding System manuals by other brands

Elettro C.F.
Elettro C.F. TIG 1680 instruction manual

FRONIUS
FRONIUS TransTig 800 operating instructions

FRONIUS
FRONIUS RC Panel Pro operating instructions

FRONIUS
FRONIUS TransPocket 150 quick guide

Elite
Elite ARC 220 S user manual

FRONIUS
FRONIUS T.I.M.E. SYNERGIC Operating instructions/spare parts list

Elektron
Elektron MULTISPOT MI-100control operating manual

Uni-Mig
Uni-Mig KUMJRRW200DC operating manual

FRONIUS
FRONIUS TRANS STEEL 3500 C0MPACT Operating instructions and spare parts list

FRONIUS
FRONIUS CMT drive installation instructions

Alfain
Alfain PEGAS 160 E Smart operating manual

Uni-Mig
Uni-Mig RAZOR ARC140 operating manual