Alien 20787 User manual
CAUTION: ELECTRICALLY OPERATED PRODUCT
NOT RECOMMENED FOR CHILDREN UNDER 14 YEARS OF AGE.
AS WITH ALL ELECTRIC PRODUCTS, PRECAUTIONS SHOULD BE OBSERVED DURING
HANDLING AND USE TO PREVENT ELECTRIC SHOCK.
TRANSFORMER IS NOT A TOY.
THIS TOY CONTAINS FAST MOVING PARTS.
AC CHARGER USED BY ADULTONLY
INPUT: AC100V - 40V 50/60Hz
OUTPUT: DC14V/300mA
PRODUCT MUST BE PERIODICALLY EXAMINED FOR CONDITIONS THAT MAY RESULT
IN THE RISK OF FIRE, ELECTRIC SHOCK, OR INJURY TO PERSONS, IN AN EVENT OF
SUCH CONDITIONS, THE PRODUCT SHOULD NOT BE USED UNTIL PROPERLY REPAIRED.
Instruction Manual
14+

1. Product Safety
A. General
This Jump Jet is only for use by children over 14 years old.
Do not fly the Jump Jet without any adult supervision.
Always keep face eyes fingers or other body parts clear of the propellers when flying.
Always fly with at least 3 meters of open space.
Always fly away from people pets and any obstacles.
This Jump Jet is only for indoors use.
Do not fly the Jump Jet in dark areas.
Do not attempt to lift objects with the Jump Jet.
Do not expose the Jump Jet to rain moisture or dust.
Always switch off both the aircraft and the handset when not in use.
B. Important Information
This instruction manual contains important information and must be retained.
Adult assembly maybe required.
Only use the AC adaptor & charger provided in the package.
The AC adaptor & charger is for Indoors use only. Make sure it is dry before plugging in.
The AC adaptor & charger must be examined regularly by adult.
Do not use the AC adaptor & charger if any damage occurs to the power cord or other parts.
Do not fly the Jump Jet if damage occurs to the propellers guard rings or other parts.
C. Battery Safety
(Lithium Polymer batteries are used please read the safety instructions carefully)
Charged only with the AC adaptor & charger provided in the package.
Do not leave the Jump Jet unattended during charging.
Do not attempt to disassemble the rechargeable batteries.
Do not allow the batteries to get wet or dispose of in fire.
Do not short circuit.
D. Important Information about Infrared Remote Control.
The Jump Jet uses Infrared remote control. Performance can be affected by interference like
o TV Remote Control
o Infrared RC Car
o Electric Lighting especially fluorescent lights and direct sunlight
Interference can cause sudden unexpected aircraft movements and a reduction in remote
control range. When the aircraft goes out of control range it will switch off automatically.
Infrared Remote Control works by direct line of sight transmission between the aircraft and
the handset. In a domestic environment performance is greatly enhanced by reflections from
the walls floor and ceiling. In a larger space these reflections will be less effective and
reception will be more easily affected by interruptions to the Infrared beams. Try to keep the
handset pointing directly at the aircraft and remember that control range maybe reduced.
ongratulations on purchasing the Jump Jet.
The Jump Jet is designed to be incredibly easy
to fly with maximum stability. Before
experiencing the flying excitement, please read this
manual to learn how to operate it properly and safely.
C
OFFON
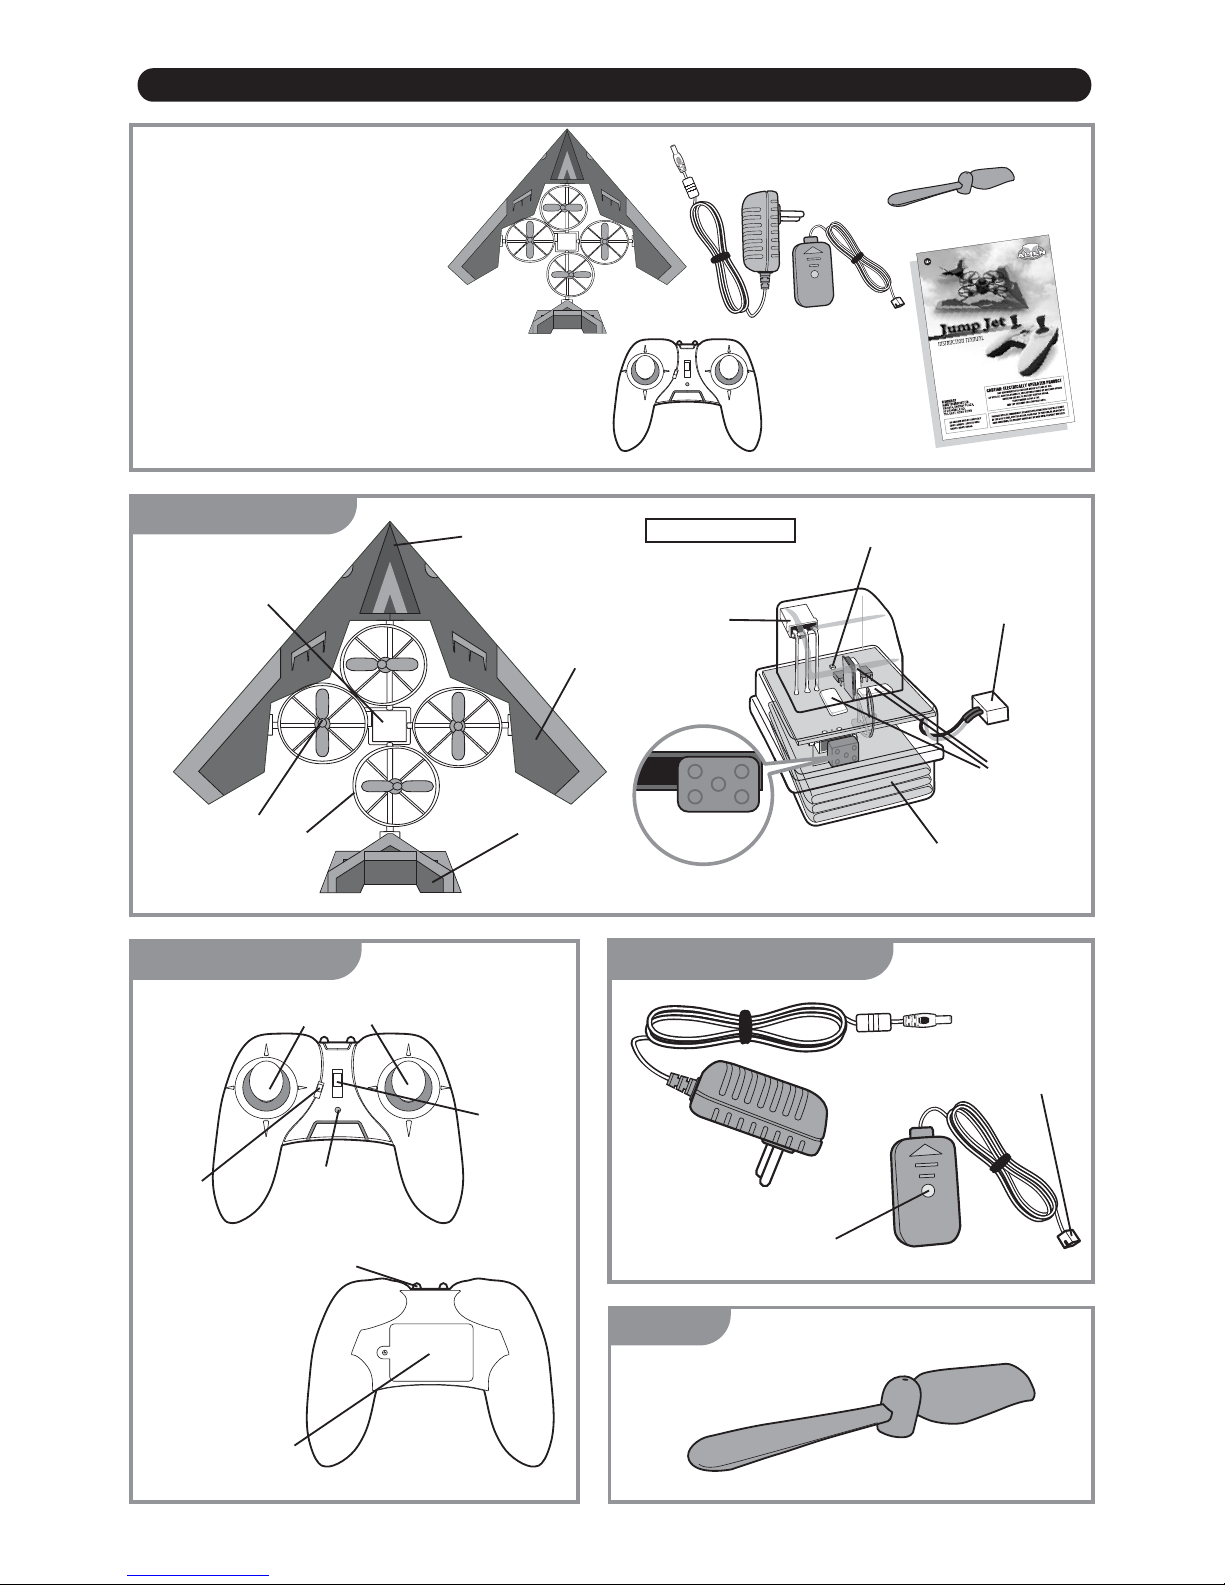
2. Packing Checklist & Product Descriptions
Jump Jet Aircraft x 1 et
Jump Jet Hand et x 1 et
AC Adaptor & Charger x 1 et
Spare Propeller x 1 pc
In truction Manual x 1
Jump Jet Aircraft
Jump Jet Hand et
Joysticks
ON/OFF
Switch
Infrared Transmitter
Indicator
Light
Battery
Compartment
(AAA alkaline
battery x 3pcs)
AC Adaptor & Charger
Indicator Light
Charging Plug
Spare
Spare Propeller
Nose
Propellers &
Guard Rings
Charging
Socket
PCBA Module
Wing
Tail
PCBA Module
ON/OFF Switch
Infrared
Receiver
Indicator Light
Rechargeable
Battery Pack
Gyro
Sensors
Flight
Mode
Switch
*Replacement batteries are sold separately.

3. Principles of Operation
The Jump Jet uses a unique combination of advanced gyro sensors intelligent computer control
and aerodynamic stabilization to create an aircraft which is both highly maneuverable and easy to
fly. The aircraft can take off and land vertically hover and fly in any direction. To achieve this the
handset has four controls operated by moving the two joysticks either up and down or side to side
(See Fig. 1 for Mode 1 handset and Fig. 2 for Mode 2 handset).
Fig. 1 Jump Jet Hand et Control (Mode 1 Configuration) Fig. 2 Jump Jet Hand et Control (Mode 2 Configuration)
Moving one of the joysticks causes the aircrafts propellers to change speed in the correct combinations
to move the aircraft in the appropriate direction. For example raising the Collective control (throttle)
causes all four propellers to speed up simultaneously so as to lift the aircraft vertically upward.
Pushing the Elevator stick forwards causes the front propeller to slow down and the rear one to
speed up. This makes the aircraft tilt forwards as if to dive.
All of the controls except for the Collective cause the aircraft to rotate about a particular axis altering
its orientation in the air. The Jump Jet has three such rotational or attitude controls corresponding
to the three primary axes of motion called pitch (tilting the nose up and down) roll (raising and
lowering the wingtips) and yaw (horizontal steering like a car). In order to make the aircraft fly in a
particular direction the pilot must tilt the aircraft correspondingly; for example to fly forwards the
pilot needs to pitch the aircraft forwards (nose down).
The Collective control adjusts the rate of climb or descent. The pilot has to use this control to get
the aircraft to the desired height. Frequent adjustments are needed because the other controls tend
to alter overall lift slightly and the Collective control has to be gradually increased to maintain flight
as the battery runs down. The joysticks for the three attitude controls are all self-centring in other
words they have springs inside which cause the joysticks to return to their neutral positions. It is very
important to understand that the aircraft will not immediately return to the horizontal state and stop
moving when the joysticks are centred. The neutral positions simply mean leave the aircraft attitude
the way it is now. If a rapid stop is needed the pilot must actively apply control in the opposite
direction. Fortunately however the Jump Jet is designed to right itself fairly quickly so that its natural
tendency is to hover drifting about only quite slowly.
In order to help stabilise the aircraft the propellers receive speed adjustments from the three on-
board motion sensors (gyros). Each gyro sensor detects movement in one of the axes of pitch roll
or yaw. When a movement is detected the gyro drives the propellers so as to try to counteract the
motion as it occurs. This makes the aircraft much easier to fly than it would be otherwise. The gyros
are very sensitive and they need to self-calibrate before flight by setting their zero movement
references whilst the aircraft is stationary on the ground. This happens during the first second after
switching on the handset and it is important not to move the aircraft during this time.
Noted: It i very important to know the configuration of the hand et you u ing (Mode 1 or Mode 2).
RUDDER
(Yaw)
ELEVATOR
(Pitch)
AILERON
(Roll)
Pitch forward Hover Pitch ack
THROTTLE
(Collective)
Clim
Descend
Yaw left Hover Yaw right
Roll left Hover Roll right
Rear View
RUDDER
(Yaw)
ELEVATOR
(Pitch)
AILERON
(Roll)
Pitch forward Hover Pitch ack
THROTTLE
(Collective)
Clim
Descend
Yaw left Hover Yaw right
Roll left Hover Roll right
Rear View

4. Preparing for the light
A. Unpack and A embly
a. With the help of the checklist carefully remove all the parts from the packing.
b. The Jump Jet is pre-assembled and tested before it is packed. No assembly is required.
c. Carefully check the parts on the aircraft are intact and nothing is damaged during transit.
d. Be familiar with aircraft orientation. The ON/OFF switch is facing the nose of the aircraft.
B. Charging
a. Make sure both the aircraft and the handset are switched off. On the aircraft slide the
switch to the left to power off.
b. Carefully connect the Charger to the charging socket on the aircraft.
c. Connect the AC Adaptor to the Charger.
d. Plug the AC Adaptor into an AC power outlet. Charging will start immediately.
e. The indicator light on the Charger will illuminate while charging is in progress. The
indicator light will turn off once it is completed. The charging usually takes 30 minutes.
f. For best result wait 5 more minutes before unplugging the AC adaptor & charger. This
extra 5 minutes will help top-off the batteries. The Charger is designed that will not
over-charge the batteries. Having said that do not leave the AC adaptor & charger
connected for extended period as this will gradually discharge the batteries.
g. Carefully unplug the AC Adaptor from the AC power outlet and then disconnect the
Charger from the aircraft. The Jump Jet is now charged and ready to fly.
h. The handset requires 3 x AAA alkaline battery. Unscrew the battery cover to put in the
batteries. Make sure the battery door is tightened up after installing the batteries.
Note:
Lithium batteries must not be stored for long periods in the fully discharged state,
otherwise they will be permanently damaged. If you will not be using the aircraft for
more than a few days, recharge the battery before pac ing away.
Do not leave the Jump Jet unattended when charging.
Always ma e sure the battery pac and the charger are not overheated.
The use of charger should be supervised by an adult and examined regularly.
Use only fresh batteries of the required size and recommended type.
Do not mix old and new batteries and batteries of different types.
Do not use rechargeable battery. Use only al aline battery.
Please respect the correct polarity, (+) and (-).
a
b
c
d
e
1
2
OFF
a
ON
OFFON
h

5. light
The Jump Jet takes off vertically like a helicopter. Once airborne it can hover in one place
and the key to flying it successfully is in mastering this simple mode of flight. Once a pilot
can hover the aircraft other manoeuvres such as forward flight and turns come quite easily.
The Jump Jet will hover in one place if:
The Collective control is set to the right speed so that upward thrust from the propellers
matches the aircrafts weight. This allows the aircraft to maintain constant height.
The aircraft is exactly horizontal so that the propellers thrust is vertical. This allows
the aircraft to remain stationary with no horizontal movement.
If the aircraft tilts in any direction then it will also start to move horizontally in that direction
because a small portion of the propellers thrust will be pushing it that way. A tilt can arise
because of a disturbance such as a draft because the aircraft is not perfectly balanced
or because of a joystick control input. Having said that the Jump Jet is designed so that
tilts are quickly corrected automatically once the aircraft starts to move horizontally so its
natural tendency is to remain fairly still only drifting about quite slowly.
Before flying the Jump Jet please read Principle of Operation more carefully making
sure you know controller configuration you are using (Mode 1 or Mode 2) and be familiar
with the configuration. At any time when you lose control of the aircraft reduce the throttle
and allow it to land.
To maximise infrared transmission reliability, always point the controller
towards the Jump Jet when flying. Do not point the controller
downwards, especially if there are furnishings etc. between you and
the aircraft.
A. Taking Off
a. Check that the handset is switched OFF.
b. Switch on the aircraft by sliding the switch to the right (looking from the top). Keep
your fingers clear of the propellers. The motors should not start if they do switch off
the aircraft. Make sure the handset is off and no other Infrared source around before
switching it on again.
c. Place the aircraft on the floor. You need a room with at least 3 x 3m of open space;
place it in the middle of the open area. Choose a room free from drafts (close doors
and windows) and avoid direct sunlight and strong lighting as these can interfere
with the Infrared control.
d. Whilst standing about a metre behind the aircraft switch on the handset. The aircrafts
gyro sensors will then self-calibrate and it is very important not to move the Jump
Jet during this period. Once calibration is complete the indicator light on the PCBA
module will illuminate. ALWAYS SWITCH ON THE AIRCRA T BE ORE THE
HANDSET.
e. When you are ready gradually raise the collective control on the handset. The
propellers should all start to run but please note that the motors will not start unless
the collective stick has first been lowered to minimum; if it is partially raised then you
must lower it first.
f. The propellers should all start at roughly the same moment. If they dont you should
switch off the handset and follow the step to re-calibrate the gyros.
g. As the propellers approach take-off speed the Jump Jet will start to appear light
on the ground. At this stage give a decisive burst of power to lift the aircraft into the
air rather than letting it slide around on the floor.
h. Once in the air experiment with the collective control to find the setting where the
aircraft hovers. Do not fly too high at first! Remember that the controls work in relation
to the aircraft itself so if it turns to face you the controls will seem reversed.
i. New pilots should set the handset Flight Mode switch to 1. This will make the direction
controls easier to use. Once experience has been gained set the switch to 2 for
maximum manoeuvrability.

B. Flying About
Once the Jump Jet is hovering stably in the air it is very easy to manoeuvre its flight. Make sure
you fully understand the handset controls in Throttle Rudder Elevator and Aileron. Please refer
to Fig. 1 (Mode 1 configuration) or Fig. 2 (Mode 2 configuration) for details.
a. Flying higher and de cend (Throttle)
To climb push the throttle control forward.
To descend pull the throttle control backward.
b. Moving forward and backward (Elevator)
To move forward push the pitch control forward. The aircraft nose will tip down.
To move back push the pitch control backward. The aircraft tail will tilt down.
When flying forward or backward it may be necessary to increase the throttle slightly
to maintain the height.
To increase forward flight speed in larger rooms slide off the horizontal fin from the
aircraft's tail leaving the "V" tail in place. The fin can be replaced at any time.
c. Moving left and right (Aileron)
To move left bring the roll control left. The left wing tip will tilt down.
To move right bring the roll control right. The right wing tip will tilt down.
d. Making turn (Rudder)
To make a left turn slide the yaw control left. The aircraft nose will steer left.
To make a right turn slide the yaw control right. The aircraft nose will steer right.
When making turns the aircraft will also tend to bank to one side. It will right itself when
the turn is complete.
Note:
Alway keep an eye on the aircraft o that you can actively control the flight.
The control work in relation to the aircraft body. Therefore if the aircraft turn to face
you, the control will appear rever ed. Try to keep the aircraft facing away from you to
tart with.
C. Landing
a. To land the Jump Jet reduce the throttle slightly so that the aircraft sinks slowly. As it
reaches the floor cut the throttle completely to prevent bouncing.
b. When the Jump Jets battery runs down it will no longer be possible to climb even with
maximum throttle and the aircraft will shortly start to sink. At this stage it is safest to land
while there is still enough power to control the descent speed.
c. Remember to switch off the aircraft and the handset after use. If the Jump Jet remains
switched on after the batteries have run down the power will cut off automatically to prevent
damaging the batteries. Be sure to land before this happens!
D. Flying Tip
Do not fly the Jump Jet too close to walls or ceilings which tends to suck towards flat surface.
When taking off do not move the throttle stick too slow. Try to get it in the air smoothly and
fairly quickly. Yet this does not mean that you should jam the throttle stick to full power.
To avoid unwanted oscillation avoid sudden control stick movements. Always make your
control inputs smooth
During your first few flights try to keep the aircraft close to the ground so that you can safely
cut the throttle and land it quickly. Avoid damaging the aircraft.
If the Jump Jet goes out of trim so that it moves or turns by itself, simply reset it by landing,
and switching the controller off and on again. This will re-calibrate all controls.
6. Aircraft Trimming
When the Jump Jet hovers it should ideally remain stationary in the air without any adjustments
from the pilot (assuming no drafts). However small aerodynamic imbalances can cause the
aircraft to drift in one particular direction in the air. This trim offset can be corrected.
If the Jump Jet drifts in one particular direction then this can be corrected by adding a small
amount of weight to the opposite side of the aircraft. Adhesive putty is ideal for this. The weight
should be positioned as close as possible to the aircrafts extremity to maximise the balancing
effect so that the smallest possible amount of weight can be used. or safety purpose, make
sure the aircraft and the handset are switched off when applying the weight.
For example if the Jump Jet always seems to drift to the right then try adding a small weight
to the left hand wingtip. It will rarely be necessary to use more than about half a gram try a ball
of adhesive putty 4 5mm in diameter and then experiment as necessary.
7. Troubleshooting Guide
Aircraft will not run
Replace batteries in controller
Charge aircraft
Switch on aircraft then controller
Some motors do not start
Aircraft out of trim. Switch off controller and
switch on again taking care not to move Jump
Jet until aircraft indicator light illuminates
Aircraft moves or
turns by itself Out of trim. See above
Aircraft falls to the floor
Infrared signal lost: Point controller towards
Aircraft when flying
Replace controller batteries
Move closer to aircraft
Fly somewhere with less interference especially
fluorescent lighting and direct sunlight
Replacing broken propeller
Switch off aircraft. Grasp motor housing firmly
in one hand and pull off broken propeller. Push
new one on leaving a small gap underneath to
allow free rotation.
Aircraft makes
unexpected moves Outside interference: See above
Made In China
Table of contents


