manuals.online logo
Brands
  1. Home
  2. •
  3. Brands
  4. •
  5. Aliyiqi
  6. •
  7. Test Equipment
  8. •
  9. Aliyiqi ADT Series User manual

Aliyiqi ADT Series User manual

This manual suits for next models

12

Other Aliyiqi Test Equipment manuals

Aliyiqi ANS-0.5 User manual

Aliyiqi

Aliyiqi ANS-0.5 User manual

Aliyiqi HF-2 User manual

Aliyiqi

Aliyiqi HF-2 User manual

Popular Test Equipment manuals by other brands

Ambit P.F. Series instruction manual

Ambit

Ambit P.F. Series instruction manual

Megger BMM500 Series user guide

Megger

Megger BMM500 Series user guide

RJG Lynx Sensor Tester operating instructions

RJG

RJG Lynx Sensor Tester operating instructions

Mark-10 TT02 Series user guide

Mark-10

Mark-10 TT02 Series user guide

Martel 3001 Operator's manual

Martel

Martel 3001 Operator's manual

ElproSys DiagProg4 instruction manual

ElproSys

ElproSys DiagProg4 instruction manual

Redtech TRAILERteck T05 user manual

Redtech

Redtech TRAILERteck T05 user manual

Venmar AVS Constructo 1.0 HRV user guide

Venmar

Venmar AVS Constructo 1.0 HRV user guide

Test Instrument Solutions SafetyPAT operating manual

Test Instrument Solutions

Test Instrument Solutions SafetyPAT operating manual

Hanna Instruments HI 38078 instruction manual

Hanna Instruments

Hanna Instruments HI 38078 instruction manual

Kistler 5495C Series instruction manual

Kistler

Kistler 5495C Series instruction manual

Waygate Technologies DM5E Basic quick start guide

Waygate Technologies

Waygate Technologies DM5E Basic quick start guide

StoneL DeviceNet CK464002A manual

StoneL

StoneL DeviceNet CK464002A manual

Seica RAPID 220 Site preparation guide

Seica

Seica RAPID 220 Site preparation guide

Kingfisher KI7400 Series Training manual

Kingfisher

Kingfisher KI7400 Series Training manual

Kurth Electronic CCTS-03 operating manual

Kurth Electronic

Kurth Electronic CCTS-03 operating manual

SMART KANAAD SBT XTREME 3G Series user manual

SMART

SMART KANAAD SBT XTREME 3G Series user manual

Agilent Technologies BERT Serial Getting started

Agilent Technologies

Agilent Technologies BERT Serial Getting started

manuals.online logo
manuals.online logoBrands
  • About & Mission
  • Contact us
  • Privacy Policy
  • Terms and Conditions

Copyright 2025 Manuals.Online. All Rights Reserved.

ADT series
horizontal
torsion
spring
testing
machine
1. Features:
ADT horizontal torsion spring testing machine is an intelligent multifunctional
measuring instrument designed and manufactured for testing and testing various
torsion springs. It can be used for torque testing of various shapes of torsion
springs, scroll springs and other elastic torsion pieces. It has the characteristics
of simple operation, high precision, full function and convenient portability. It is
widely used in various electrical, light industry, machinery manufacturing,
scientific research Institutions and other industries.
2. Main features:
1. High precision, high resolution, fast sampling speed, large screen display.
2. The upper and lower limits can be set, with sound and light alarm function
3. Three parameters display (torque value, rotation angle, spring stiffness).
4. The three units N · m, kgf · cm and Ibf · in are mutually converted.
5. The three modes of real-time, peak and auto-peak can be switched at will.
6. Peak hold, automatic release function, free setting of release time.
7. Automatic shutdown function without operation, time can be set freely.
8. Large storage capacity, can save 99 sets of test data.
9. Automatic shutdown function without operation, time can be set freely.
10. Built-in micro printer (optional).
11. The USB interface communicates with the PC and can be connected to the
computer for synchronous testing.
Three, specifications:
1. Measurement parameters:
Parameter
model
Maximum test
torque
Measuring range
Minimum reading value (N
﹒mm)
ADT-500A
500 mN﹒m
5 ~500 (mN﹒m)
0.01 mN﹒m
ADT-1000A
1000 mN﹒m
10 ~1000 (mN﹒
m)
0.1 mN﹒m
ADT-2000A
2000 mN﹒m
20 ~2000 (mN﹒
m)
0.1 mN﹒m
ADT-3000A
3000 mN﹒m
30 ~2000 (mN﹒
m)
0.1 mN﹒m
ADT-5000A
5000 mN﹒m
50 ~5000 (mN﹒
m)
0.1 mN﹒m
ADT-1
1 N﹒m
0.01 ~1 (N﹒m)
0.0001 N﹒m
ADT-2
2 N﹒m
0.02 ~2 (N﹒m)
0.0001 N﹒m
ADT-5
5 N﹒m
0.05 ~5 (N﹒m)
0.0001 N﹒m
ADT-10
10 N﹒m
0.1 ~10 (N﹒m)
0.001 N﹒m
ADT-20
20 N﹒m
0.2 ~20 (N﹒m)
0.001 N﹒m
ADT-30
30 N﹒m
0.3 ~30 (N﹒m)
0.001 N﹒m
ADT-50
50 N﹒m
0.5 ~50 (N﹒m)
0.001 N﹒m
2. Angle resolution: 0.1 °
3. Range of measurement angle: 0 ~ ± 9999.9 °
4. Rotation diameter of test piece: φ100mm
5. Length of test piece: 150mm
6. Loading method: manual
7. Accuracy: ± 1%
8. Power supply: AC220V 50Hz
9. Overall dimensions: 710 × 320 × 290 (mm)
10. Weight: about 37.5Kg
Fourth, the product schematic
1. LCD screen 2. Setting parameter name column 3. Function buttons
4. Special test head 5. USB interface 6. Power socket
Five: display panel
Six: Key description
1. ON / OFF key: can be used to turn on and off.
2. Angle reset key: during real-time measurement, press this key to correct the
angle zero point.
3. View key: This key can be used to view the stored measurement data during
the measurement interface.
4. Clear key: during real-time measurement, press this key to correct the torque
zero point. During peak and auto peak, press this key to clear the peak and
return to zero; when viewing the interface, press this key to clear the current
stored measurement value, long press this key to clear all stored measurement
values. In the user setting interface, press this key to return to the previous
interface without saving data.
5. Peak key: It is used to switch between the three measurement modes of real-
time, peak and auto-peak in the measurement interface, and has an up-shift
function in the setting interface. In the view interface, press this key to view the
previous data.
6. Save key: It is used to save the measured data in the measurement interface,
and has the function of moving down in the setting interface.
In the view interface, press this key to view the next data.
7. Print key: On the measurement interface, press this key to print the stored
measurement value (except for those without a print function). It has a left-shift
function in the setting interface.
8. Unit key: Used to switch between N · m, kgf · cm and Ib · in three units during
the measurement interface. It has a right shift function in the setting interface.
9. Setting key: users can enter the setting menu through this key in the
measurement interface, and press this key to save data when setting data.
Seven: User operation instructions
1. Boot display
Startup display welcome and manufacturer information
Display product name, model and version information
2. The main user interface display
3. User setting interface
Press the setting key once, the display is as follows:
Use the up or down key to select the setting item. When the user's setting item is
selected, press the setting key to enter the parameter setting interface.
4. Parameter setting interface
In the user setting interface, press the setting key to enter the parameter setting
interface and display as follows:
Description of setting parameters: (Take the maximum torque value as an
example)
Use the up and down keys to shift and modify the data. At this time, press the set
key to confirm and save the set data, (if you press the zero key to return, the data
will not be modified). The set data cannot exceed the maximum load value.
(1) Maximum torque value: The user sets the upper limit value of the torque,
which can be freely set as required. When the upper limit value is reached, the
number above the parameter name \"torque upper limit value \" flashes and the
buzzer alarms. The upper limit value is not higher than full scale.
(2) Minimum torque value: The user sets the lower limit value of torque, which
can be freely set as required. When the lower limit value is reached, the number
above the parameter name \"torque lower limit value \" flashes. The lower limit
value shall not be higher than the set upper limit value.
(3), minimum storage value setting: the user sets the minimum storage value
according to storage needs, data less than this value will not be stored.
8. Other function description
1. Description of printing function: print data through micro printer.
2. Communication: communicate with the host computer via USB. The
communication protocol adopts MODBUS-RTU protocol.
3. Save data: save the data during measurement through the save key.
4. View stored data: View the stored data through the view button.
5. Alarm description: when the measured value exceeds the upper limit, the
upper limit indicator will be displayed, and the buzzer will also give an alarm;
when the measured value is lower than the lower limit, the lower limit indicator
will be displayed. When the measured value exceeds 120% of the maximum
load, the sensor may be damaged. When the \"Overload \" warning prompt
appears, the machine enters the automatic protection state, you must press the
reset button or restart, if you can not measure, please long press the set button,
enter the password: up, down, press the set button Restore the factory settings
interface, choose to restore the factory settings, press the setting button to
restore (if you can not restore, please contact the manufacturer).
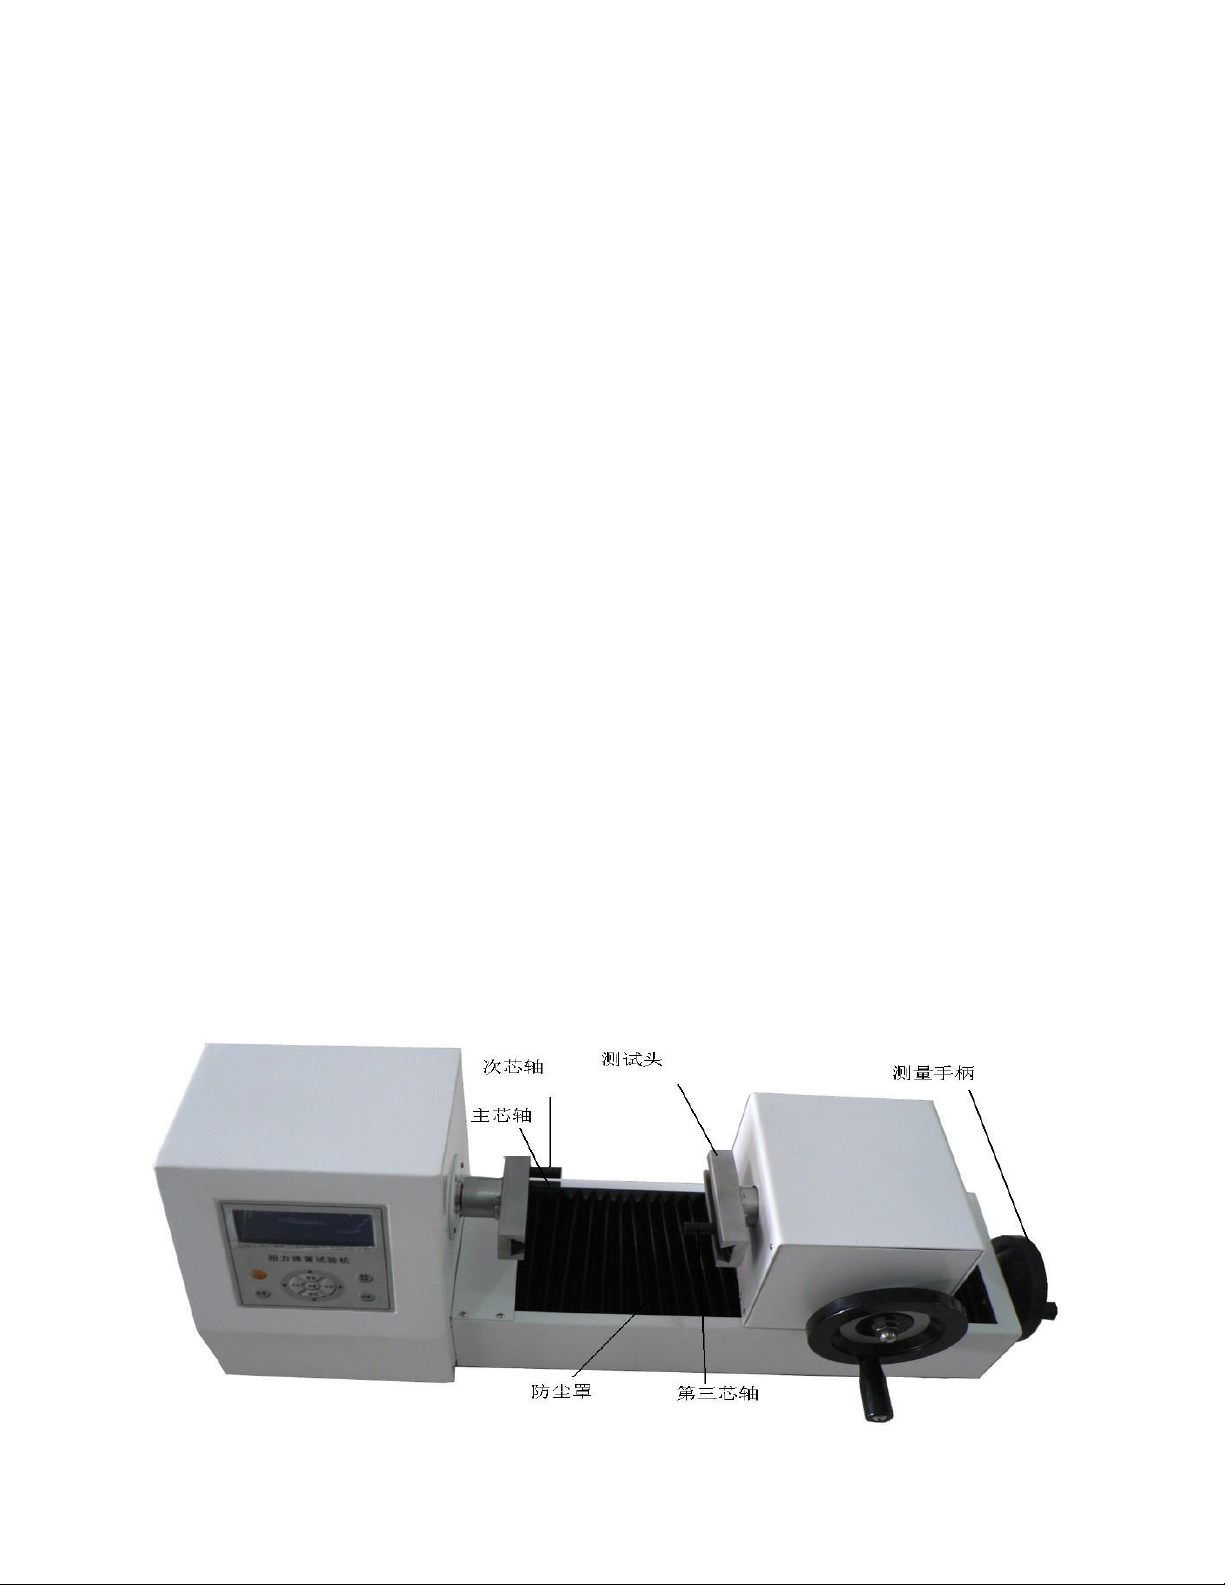
Nine, operating environment
1. Operating temperature: -10 ℃~40 ℃.
2. Operating humidity: ≤90% RH.
3. There is no vibration source and no corrosive environment around.
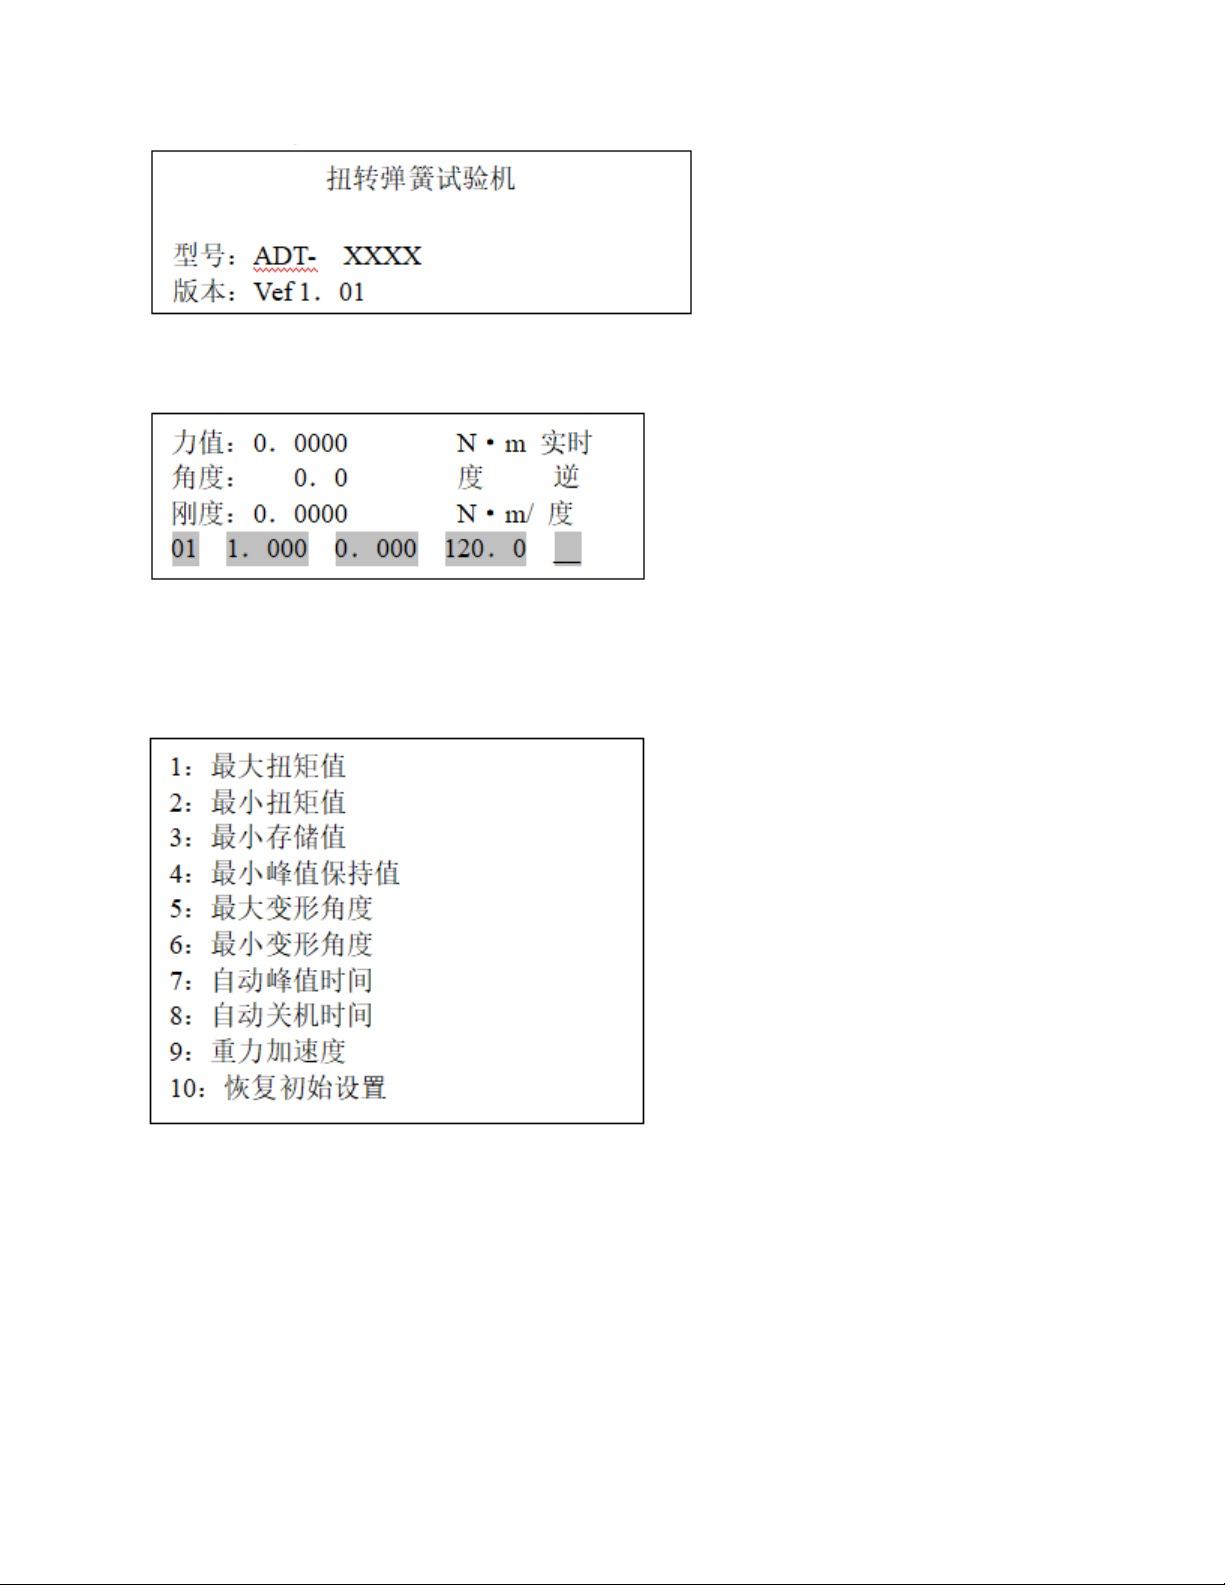
4. Minimum peak hold value setting: the user needs to set freely according to the
peak value, automatic peak measurement, data less than this value will not be
saved by the peak value.
5. Maximum deformation angle setting: The user sets the maximum value of the
angle, which can be freely set as required. When the upper limit value is
reached, the number above the parameter name \"angle maximum value \"
flashes.
6. Minimum deformation angle setting: the user sets the minimum angle, and can
freely set it as required.
7. Automatic peak time setting: the user can set the time from 1 second to 99
seconds freely according to the peak time required for automatic peak
measurement.
8. Automatic shutdown time setting: under no operation state, the automatic
shutdown time can be freely set from 1 minute to 99 minutes.
9. Gravity acceleration setting: The user can set the gravity acceleration value
according to the location of the region. The machine defaults to 9.794.
10. Restore the initial setting: improper user operation or chaos when changing
the data multiple times, you can use this setting to restore the data of 1 ~ 9 to the
factory state.
10. Operation steps
1. Under normal circumstances, plug in the power cord, turn on the power switch,
and after the display is stable, if the display data is not zero, please press the\"\"
Zero\"\" key to clear and clear the torque value.
2. According to the test needs, press the moment unit conversion key to select
the required unit.
3. Set up before the test, the specific steps such as parameter setting interface.
Twelve, torsion spring torque test procedure
1. According to the test requirements, select the appropriate mandrel and install
the mandrel to the mounting holes of the test heads on both sides.
Then install the spring under test on the main test mandrel, one end of which is
fixed by the secondary mandrel.
2. Shake the handle to make the third mandrel contact with the other end of the
torsion spring, and the force value and angle will be cleared at the same time just
after contact.
3. The torque value and angle value displayed on the LCD screen are zero.
4. According to the torsion spring measurement requirements, rotate the
measuring handle smoothly and evenly to display the technical parameters of the
torsion spring being tested.
5. Repeat the above operation to verify the technical parameters of the torsion
spring.