manuals.online logo
Brands
  1. Home
  2. •
  3. Brands
  4. •
  5. Allen Sports
  6. •
  7. Automobile Accessories
  8. •
  9. Allen Sports QR525 User manual

Allen Sports QR525 User manual

WARNING: Bikes or rack falling in road can cause serious accidents resulting in bodily injury—do not use rack on any
vehicle on which it can not be properly mounted as described in this instruction sheet.
• Rack should only be used on vehicles with Class I or II 1 1/4” or Class III or IV 2” receiver hitches.
• NEVER use on trailer or front of vehicles.
• Bikes must be tied to rack using tie-downs, or additional straps if necessary.
• Check periodically during use taht all bolts and pins are tight, and that rack and bicycles are secure.
• Never carry more than 2 bicycles (MAX CAPACITY: 70 LB) - no tandems, mopeds, or recumbents. Car tail lights
must remain visible. Bikes must be securely tied to rack. Use bike tie-downs, or additional straps if necessary.
• Drive conservatively, especially over bumps. Never use off-road.
• Do not use if any part of the rack is damaged, worn, or missing. Contact R. A. Allen Co., Inc. for replacement parts..
CAUTION: Use Allen QR-525 only in accordance with local motor
vehicle and traffic regulations.
• Install rack and load bicycles only at a safe distance away from
moving traffic.
• Make sure that all of rack and bicycles are kept at a safe distance
from road and hot exhaust.
• Only operate vehicle with rack in an upright, locked position.
• Bicycles should never extend beyond sides of vehicle.
• Remove rack from car, or fold carry arms down when not in use.
• INSERT LOWER PORTION OF RR POST INTO
HITCH INSERT SO THAT THE HOLES AT THE
BOTTOM OF EACH PART LINE UP.
• INSERT THE 3/8” X 3” BOLT THROUGH THE HOLE,
AND THREAD 1—3/8” LOCK NUT ONTO THE END
OF THE BOLT.
• PIVOT THE RR POST INTO THE UPRIGHT
POSITION, SO THAT THE SECURING LATCH
SNAPS INTO PLACE.
• TIGHTEN NUT AND BOLT FIRMLY USING TWO
WRENCHES.
• INSERT CARRY ARM ASSEMBLY
INTO UPPER PORTION OF RR
POST, LINING UP THE HOLES IN
EACH PART.
•INSERT THE 3/8” X 2 1/2” BOLTS
THROUGH EACH HOLE, AND
THREAD 1—3/8” LOCK NUT ONTO
THE END OF THE BOLTS.
• TIGHTEN EACH NUT AND BOLT
FIRMLY USING TWO WRENCHES.
NOTE: UPON COMPLETION, BOTH
PARTS SHOULD BE FIRMLY
JOINED TOGETHER.
.
IMPORTANT:
WHEN RACK IS IN AN
UPRIGHT POSITION,
SECURING LATCH MUST
BE FULLY ENGAGED FOR
RACK TO FUNCTION
PROPERLY.
CARRY ARM ASSEMBLY
TOOLS REQUIRED: 2—9/16” WRENCH & 2—3/4” WRENCH;
or 2 ADJUSTABLE WRENCHES
PARTS
HITCH INSERT W/
FILLER PLATE
FILLER
PLATE
QR-525 BOX SHOULD CONTAIN THE
FOLLOWING ITEMS:
1- CARRY ARM ASSEMBLY
1-
1—HARDWARE KIT,
CONTAINING:
2 - 3/8” X 2 1/2“ BOLT
1 - 3/8” X 3” BOLT
3 - 3/8” LOCK NUT
1 - KEYCHAIN
2 - KEYS
1 - 70” SURE STRAP
RR POST
1- 1- SPINE SHIELD
A. ASSEMBLING RACK:
B.
STEP 1 STEP 2
STEP 3
3/8”
LOCK
NUT
3/8”x 2 1/2”
BOLT
RR POST
HITCH INSERT
3/8” X 3”
BOLT
SECURING LATCH
3/8”
LOCK NUT INSTALLING SPINE PAD
WITH “ALLEN SPORTS” IN THE UPPER
POSITION, LINE UP THE RECESSES
FOR THE NUT AND BOLT HEADS, AND
SNAP THE SPINE PAD INTO PLACE
ONTO THE RECEIVER RACK’S
VERTICAL POST.
MODEL QR525
INSTRUCTIONS
ENGLISH - PAGE 1
PRODUCT REGISTRATION:
MAKE SURE TO REGISTER YOUR PURCHASE AT
http://allensportsusa.com/about/product-registration
TO QUALIFY FOR PRODUCT WARRANTY AND TO
RECEIVE IMPORTANT PRODUCT NOTIFICATIONS
INSTALLING RACK ONTO VEHICLE:
C.
D.
LOADING BICYCLES ON RACK:
E.
THIS RACK SHOULD ONLY BE USED ON CLASS II 1 1/4” OR CLASS III OR IV 2”
RECEIVER HITCHES PROFESSIONALLY INSTALLED ON AUTOMOBILES.
NEVER USE THIS RACK ON A TRAILER OF ANY KIND.
FOLDING UP CARRY ARMS:
• REMOVE ALL LOOSE ITEMS FROM BICYCLES (PUMPS, BAGS, ETC.), AND CHECK THAT ALL QUICK RELEASE HUBS ARE TIGHT.
•
•
•
LOAD FIRST BICYCLE WITH ITS CHAIN AND GEARS FACING AWAY FROM RACK. MAKE SURE THAT BICYCLES DO NOT COME IN
CONTACT WITH VEHICLE.
LOAD SUBSEQUENT BICYCLES IN ALTERNATING DIRECTIONS. FOR BEST WEIGHT DISTRIBUTION, LOAD HEAVIEST BICYCLES
FIRST, WITH LIGHTER BICYCLES ON THE OUTSIDE. ADD PADDING BETWEEN BICYCLE CONTACT POINTS, IF NECESSARY.
AFTER BICYCLES ARE LOADED, CHECK THAT ENTIRE RACK IS SECURE AND TIGHT, AND THAT THE RACK IS STILL FIRMLY IN
PLACE. VISION OUT OF REAR WINDOW MAY BE RESTRICTED—USE SIDE MIRRORS ACCORDINGLY WHEN BACKING UP.
SPECIAL NOTE ON INSTALLING WOMEN’S STYLE FRAMES:
PLACE ONE CARRY ARM UNDER FRONT TOP TUBE. WITH THE OTHER CARRY ARM, ROTATE TIE-DOWN CRADLE, AND
PLACE CARRY IN SPACE BEHIND SEAT TUBE AND BELOW REAR DOWN-STAY. THE ALLEN 900B ADAPTOR BAR IS ALSO
RECOMMENDED FOR THIS APPLICATION.
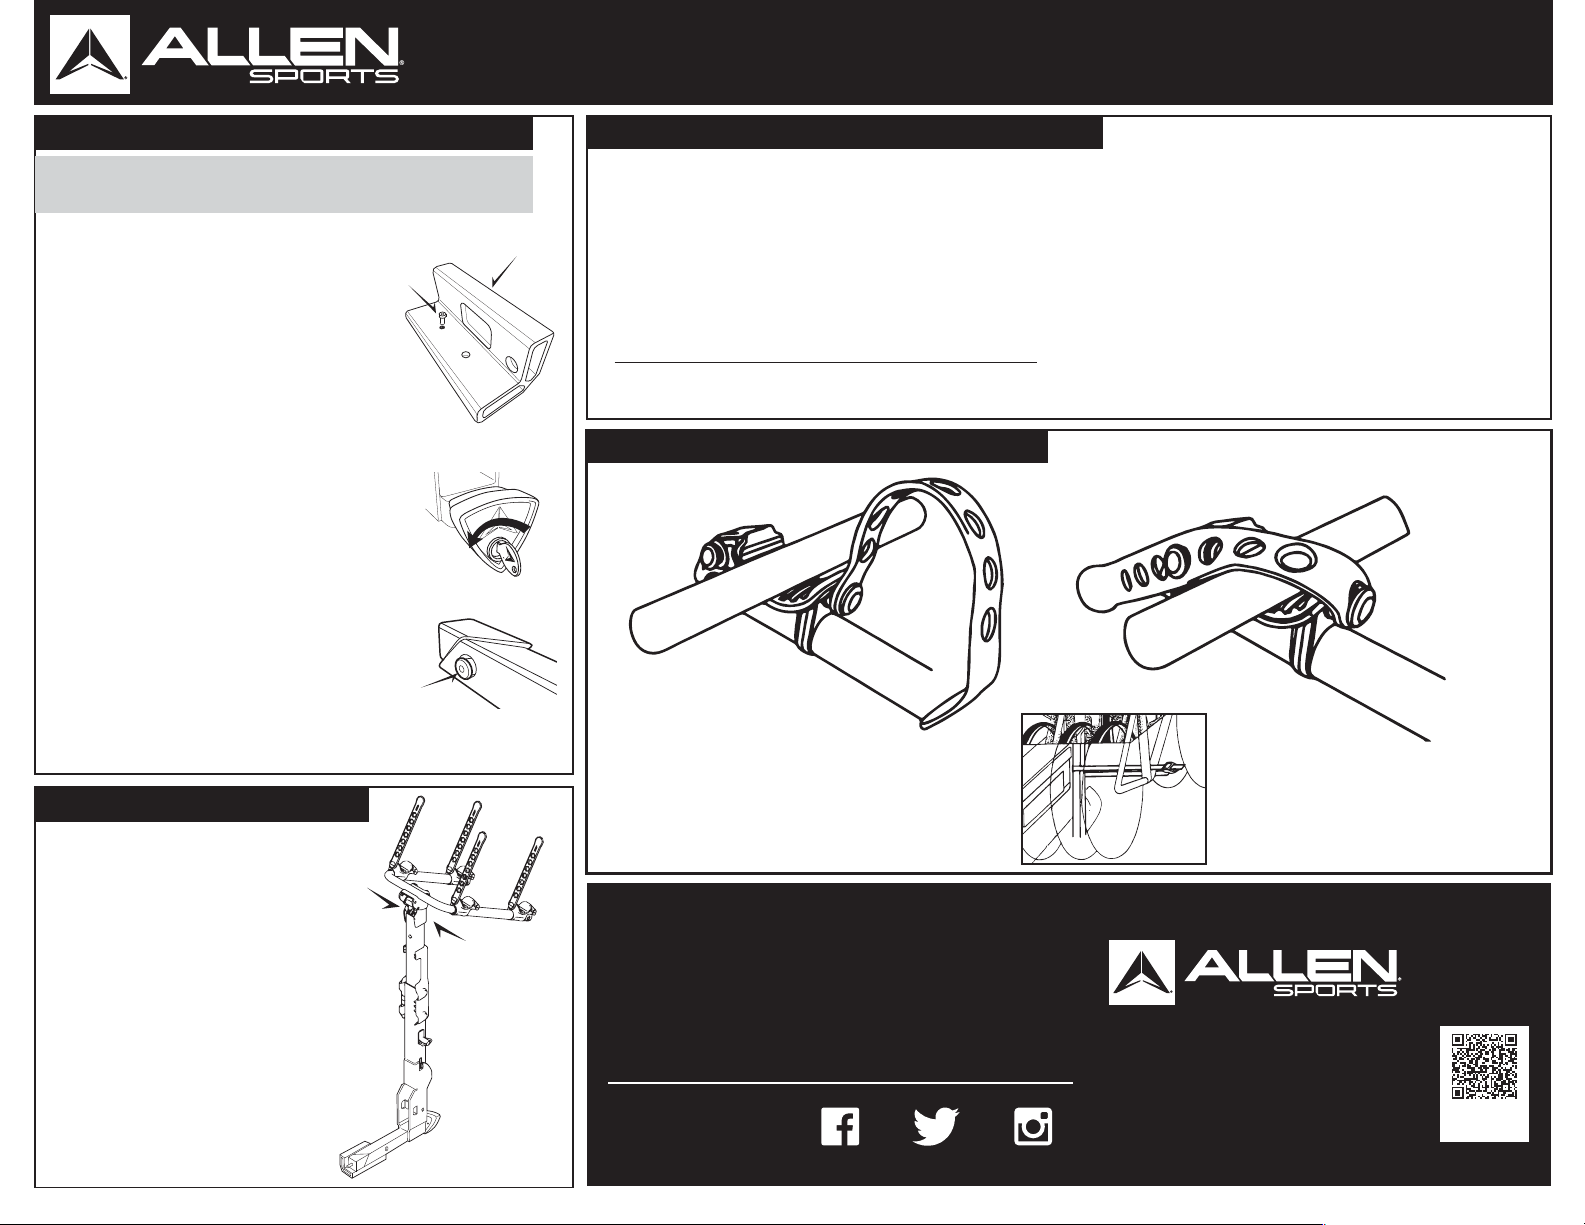
SECURING BIKES TO RACK:
F. ALL BIKES MUST BE SECURELY TIED TO RACK. USE INDIVIDUAL TIE-DOWN STRAPS, OR
ADDITIONAL STRAPS IF NECESSARY.
3. USE 70” STRAP TO PULL
ALL BICYCLES TOGETHER
AROUND BOTTOM BRACK-
ETS. STRAP SHOULD ALSO
SECURE WHEELS.
1.PLACE BICYCLE IN CRADLE. 2. LOCK DOWN TIE-DOWN STRAP.
• TO FOLD UP CARRY ARMS,
SQUEEZE TOGETHER THE
TWO RED TABS ON THE BACK
OF THE CARRY ARM ASSEMBLY,
AND SWING CARRY ARMS INTO
UPRIGHT POSITION.
• THE PINS CONNECTED TO THESE
TABS SHOULD “SNAP” INTO PLACE
TO HOLD THE CARRY ARMS IN AN
UPRIGHT POSITION.
• REVERSING THIS PROCESS WILL
KEEP THE CARRY ARMS LOCKED
IN A DOWN POSITION.
• IF BOTH PINS ON YOUR RACK
DO NOT PROPERLY ENGAGE
THE CARRY ARMS IN THE
UPRIGHT POSITION, DO NOT
USE YOUR RACK, AND CONTACT
R. A. ALLEN CO..
1. SQUEEZE
RED TABS 2.
ROTATE ARMS
INTO UPRIGHT
POSITION
ALLEN LIFETIME WARRANTY:
IF AN ALLEN BIKE RACK IS FOUND TO HAVE A DEFECT IN
WORKMANSHIP OR MATERIAL OVER THE LIFETIME OF THE
ORIGINAL PURCHASER, ALLEN WILL REPAIR OR REPLACE
THE RACK FREE OF CHARGE. THE WARRANTY DOES NOT
COVER DAMAGE OR WEAR WHICH OCCURS AS A RESULT OF
DAY TO DAY USE OR GENERAL WEAR AND TEAR.
Get the lastest news, info,
give-a-ways and pics on
our social media sites! @AllenSportsUSA
@AllenSportsUSA
/AllenSportsUSA
R. A. ALLEN CO., INC.—ALLEN SPORTS USA 36
MAPLEWOOD AVE
PORTSMOUTH, NH 03801, USA
[email protected]
WWW.ALLENSPORTSUSA.COM
©2018 R. A. ALLEN CO., INC., ALL RIGHTS RESERVED V.2.18
For More
Product Info &
List of Dealers
Scan Our QR Code
MODEL QR525
INSTRUCTIONS
ENGLISH - PAGE 2
HITCH INSERT SHOULD BE ADJUSTED FOR THE
CORRECT HITCH SIZE DEPENDING ON YOUR VEHICLE.
FOR 2” HITCHES THE FILLER PLATE SHOULD BE
INSTALLED WITH FILLER PLATE SCREW BEFORE
INSTALLING THE RACK ONTO YOUR VEHICLE
FOR 1 1/4” HITCHES REMOVE THE FILLER PLATE AND
SCREW. NOTE THAT THERE IS A HOLE ON THE FILLER
PLATE WHERE THE SCREW CAN BE STORED. SAVE
THESE PARTS FOR FUTURE USE.
STEP 1: INSERT KEY INTO LOCK AND TURN KEY
COUNTER-CLOCKWISE SO THAT LOCKING KNOB CAN
TIGHTEN/ LOOSEN THE HITCH INSERT WEDGE.
STEP 2: ROTATE LOCKING KNOB COUNTER CLOCKWISE
TO LOOSEN THE HITCH INSERT WEDGE.
STEP 3: DEPRESS HITCH SPRING PIN AND INSERT RACK
INTO RECEIVER HITCH UNTIL HITCH SPRING PIN
ENGAGES HOLE IN VEHICLE RECEIVER HITCH
STEP 4: TURN THE LOCKING KNOB CLOCKWISE TO
TIGHTEN THE RACK INSIDE OF THE RECEIVER HITCH. BE
CAREFUL NOT TO OVER TIGHTEN; A PROPERLY SECURED
RACK SHOULD BE FREE OF ANY MOVEMENT INSIDE OF
THE RECEIVER HITCH.
STEP 5 (OPTIONAL): INSERT KEY AND ROTATE
CLOCKWISE TO THAT LOCKING KNOB CAN SPIN FREELY.
THIS WILL LOCK YOUR RACK TO YOUR VEHICLE.
TO REMOVE RACK FROM VEHICLE, FOLLOW STEPS 1
THROUGH 3 ABOVE
FILLER PLATE
SCREW
ROTATE KEY TO LOCK/
UNLOCK KNOB
HITCH
INSERT WEDGE
SPRING
PIN
CLOCKWISE TO LOCK
COUNTER CLOCKWISE
TO UNLOCK

Other Allen Sports Automobile Accessories manuals

Allen Sports AR200 User manual

Allen Sports

Allen Sports AR200 User manual

Allen Sports AR100 User manual

Allen Sports

Allen Sports AR100 User manual

Allen Sports ZN103 User manual

Allen Sports

Allen Sports ZN103 User manual

Allen Sports S645 User manual

Allen Sports

Allen Sports S645 User manual

Allen Sports MT-1 User manual

Allen Sports

Allen Sports MT-1 User manual

Allen Sports S103 User manual

Allen Sports

Allen Sports S103 User manual

Allen Sports MT2 User manual

Allen Sports

Allen Sports MT2 User manual

Allen Sports ZN542Q User manual

Allen Sports

Allen Sports ZN542Q User manual

Allen Sports 104DB User manual

Allen Sports

Allen Sports 104DB User manual

Allen Sports 522RR User manual

Allen Sports

Allen Sports 522RR User manual

Allen Sports 302DN User manual

Allen Sports

Allen Sports 302DN User manual

Allen Sports 542RR-R User manual

Allen Sports

Allen Sports 542RR-R User manual

Allen Sports C645 User manual

Allen Sports

Allen Sports C645 User manual

Allen Sports QR520-EB User manual

Allen Sports

Allen Sports QR520-EB User manual

Allen Sports 830QR User manual

Allen Sports

Allen Sports 830QR User manual

Allen Sports 820QR User manual

Allen Sports

Allen Sports 820QR User manual

Allen Sports 552RR User manual

Allen Sports

Allen Sports 552RR User manual

Allen Sports 542QR User manual

Allen Sports

Allen Sports 542QR User manual

Allen Sports QR555 User manual

Allen Sports

Allen Sports QR555 User manual

Allen Sports 102DN User manual

Allen Sports

Allen Sports 102DN User manual

Allen Sports S555 User manual

Allen Sports

Allen Sports S555 User manual

Allen Sports S525 User manual

Allen Sports

Allen Sports S525 User manual

Allen Sports S545 User manual

Allen Sports

Allen Sports S545 User manual

Allen Sports 400QR User manual

Allen Sports

Allen Sports 400QR User manual

Popular Automobile Accessories manuals by other brands

Hella Flying Clutch II Mounting instructions

Hella

Hella Flying Clutch II Mounting instructions

CALIMA 46066 operating instructions

CALIMA

CALIMA 46066 operating instructions

Cruz Evo Rack Alu A17-126 Assembly instructions

Cruz

Cruz Evo Rack Alu A17-126 Assembly instructions

RUD RUDmatic Classic FITTING INSTRUCTION

RUD

RUD RUDmatic Classic FITTING INSTRUCTION

Jabra CRUISER2 HSF002 Technical specifications

Jabra

Jabra CRUISER2 HSF002 Technical specifications

PNEUMATIC KU-VW-JT00-00 Installation instruction

PNEUMATIC

PNEUMATIC KU-VW-JT00-00 Installation instruction

Monster iCruze MPC FX IC-AUD1 Installation & user guide

Monster

Monster iCruze MPC FX IC-AUD1 Installation & user guide

Broadfeet DCKI-395-32-40S installation instructions

Broadfeet

Broadfeet DCKI-395-32-40S installation instructions

AGRI-COVER Access installation instructions

AGRI-COVER

AGRI-COVER Access installation instructions

Menabo 0001103NR000 Fitting instructions

Menabo

Menabo 0001103NR000 Fitting instructions

Wallbox ONYX installation guide

Wallbox

Wallbox ONYX installation guide

Thule Railing Foot Half Pack 4152 installation instructions

Thule

Thule Railing Foot Half Pack 4152 installation instructions

Kuda-Phonebase 012005 Installation instruction

Kuda-Phonebase

Kuda-Phonebase 012005 Installation instruction

RODMOUNTS ROD-UP RUPC installation instructions

RODMOUNTS

RODMOUNTS ROD-UP RUPC installation instructions

AMP Research 75135-01A installation guide

AMP Research

AMP Research 75135-01A installation guide

LSD-Doors 50020020 installation instructions

LSD-Doors

LSD-Doors 50020020 installation instructions

Prorack K446W Fitting Instructions for Basic Carrier

Prorack

Prorack K446W Fitting Instructions for Basic Carrier

Gentili G2000 HARRIER Installation instruction

Gentili

Gentili G2000 HARRIER Installation instruction

manuals.online logo
manuals.online logoBrands
  • About & Mission
  • Contact us
  • Privacy Policy
  • Terms and Conditions

Copyright 2025 Manuals.Online. All Rights Reserved.