Alphatech BlueGate Analog Brave 4G VoLTE Assembly instructions

G SM G AT E
Blue Gate A Brave 4G-VoLTE
Installation and programming manual V 1. 2

1
Basic features:
BlueGate Analog Brave 4G VoLTE is a GSM gateway with Telit
LE910C1 module, equipped with a large number of functions,
that increase operator comfort. The gateway is designed for
European 2G and 4G LTE networks.
•by connecting to your PBX, it allows all branches to make
calls over the GSM network, incoming calls can use the
DISA dialing;
•changing the polarity of the telephone line during a call
allows the PBX to detect precisely the connection and
termination of the connection.
•CLIP supporting the most wide-used standard;
•pseudotarification makes it possible to monitor the actual
length of the call (1. tariff impulse up to the call collection
by the counterparty);
•the signal at minute intervals in the call allows to distinguish
the GSM connection from the normal call;
•USB 2.0 full speed interface for use as an LTE modem
•Simultaneous data transfer and voice connection on the
LTE network
•Direct Call –automatically dial a number stored on the SIM
as soon as the handset is picked up on the phone
connected to the gateway
•SMS DTMF - possibility of sending DTMF codes via SMS
(for setting up connected devices)
Add-ons:
•USB port with supplied SMS-mail software allows sending
SMS as e-mails, internet connection, etc.;
•Backup battery for up to 10 h of operation in the event of a
power failure;

2
INSTALATION
USB option
Power
phone
line
Antenna
Sim
phone line
USB for programming
(MiniUSB cable)
phone
line
USB 2.0 for
data/ internet
USB 2.0 Data

3
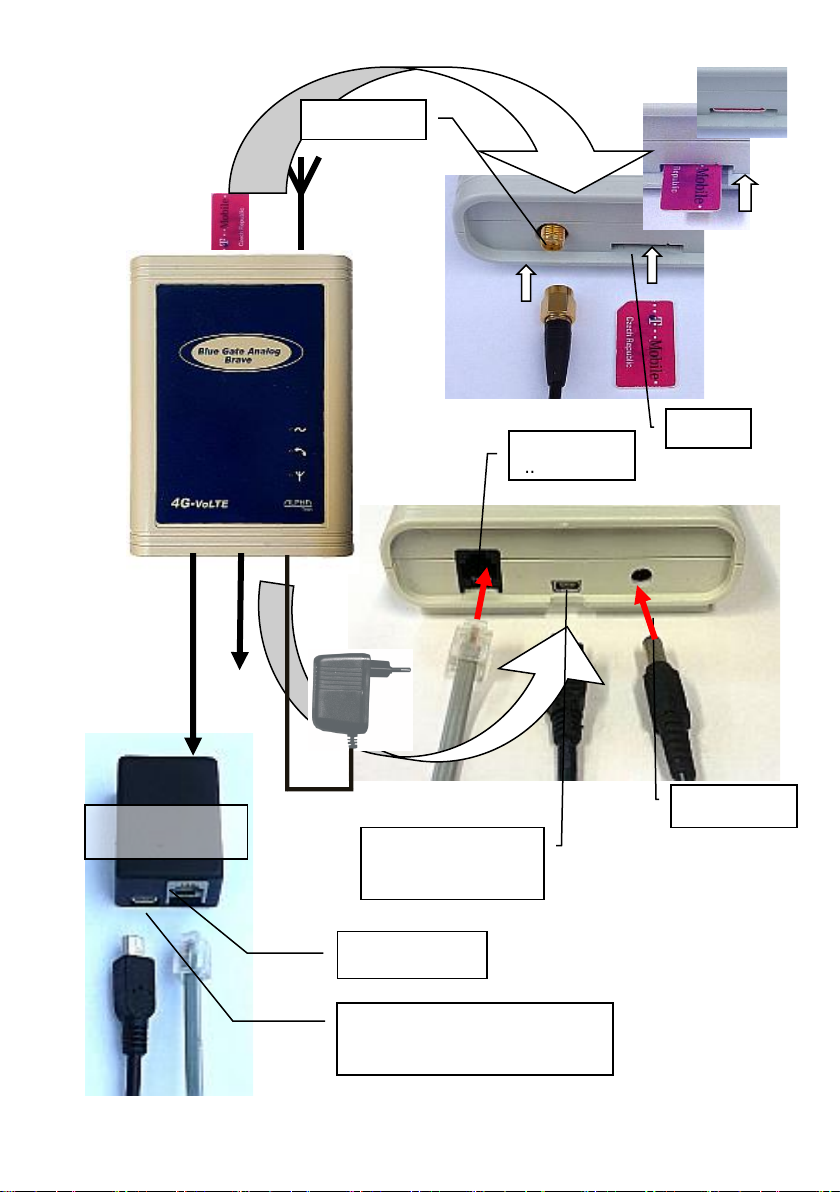
Insert the SIM card orientedas shown on the previous page and
press to secure it in the working position. We recommend that
you check its status on any GSM phone before inserting the
SIM card (switching on with PIN, or without PIN, PIN, etc.)
and set them on without PIN. If you want to use PIN on, you
must set this PIN when programming the gateway (see
programming table). Without this setting, the gateway will
not be in operation!
DON'T FORGET TO CONNECT THE ANTENNA! Attach the
gate to a suitable location. A suitable place for the gate should
be selected according to several aspects:
•distance from the PBX –possibility of interference of other
lines on the PBX by GSM radiation, but also the maximum
possible length of the line from GSM gate to PBX (approx.
200 m)
•230 V network availability to power GSM gateway
•GSM signal quality at the gate location (see below)
GSM signal quality required
The sound quality of the connection depends very much on the
BTS settings to which you are connected with your GSM
gateway and on the phase shifts of the signal on the antenna,
resulting from reflections from the surroundings. This
phenomenon is known from the normal use of mobile phones,
and especially from traffic in cars. It is recommended to try a
different antenna location (due to the very small wavelength can
help according to practice experience and displacement by only
a decimeter). Since the device does not have a display with a
signal strength indicator, you can use a mobile phone, flashing
yellow LED on the panel (see table at the end of the instructions)
or a computer connected to USB gateways and setting sw (see
program manual). When searching for a suitable place, the
strength of the signal does not matter so much as its "quality"
(similar to "ghosts" in TV antennas). In case of failure, we
recommend using a directional antenna for GSM, which largely
eliminates reflections. The signal strength to function reliably is

4
usually sufficient yellow LED on the gate flashes at least 3 (see
table at the end of the manual). But even here it depends on the
BTS settings to which you are connected. We also encountered
places where, with this signal strength, incoming calls were
connected without any problem, but outgoing calls were
rejected by BTS –BTS apparently "chose" requests with a
stronger signal during busier traffic.
Connection of the "magnetic" (antennas with magnetic
foot)
When connecting the "magnetic" antenna to the gate, make
sure that it is placed on a larger iron object. That object creates
a so-called counterweight, the size of which depends, in
particular, on the size of the radiant power.
If you have a SIM card inserted and all cables are connected
(remember that the GSM gateway connects at the PBX to the
state line entrance and not to the branch office), connect the
device to the network. The blue „power“ LED lights up (see LED
table) and the yellow GSM LED flashes in the beat of the busy
tone. After about 30 sec. yellow LED starts flashing according
to the strength of the GSM signal (see LED table again) - the
device is ready for operation. When you lift the headphone on
the connected analog phone or call the GSM gate from the PBX,
the analog line light (green LED)lights up and you hear the GSM
gateway dial tone in the headset. You can make phone calls.
Possible commissioning defects
•None of the lights are on. Error in the power supply. Check
the mains connection and the connection of the mains
adapter to the gateway.
•The "power" LED account lights up, when the phone
connected to the GSM gateway is picked up, the green LED
lights up and there is a busy tone in the handset.

5
Malfunctioning communication between the module and the
system processor —a faulty fixed communication speed for
the GSM module may have been set when working with
USB.
•The yellow LED flashes in the rhythm "cannot read the SIM",
after calling the GSM gate, a busy tone is heard. The card
requires a PIN, that is not programmed or is programmed
another.
•The "GSM communication" light blinks briefly every two
seconds, and when you call the GSM gate, a busy tone is
heard. The gateway is not logged into the GSM network -
there is not enough signal.
•The yellow LED flashes according to the signal strength, the
green LED does not light up after picked up phone on GSM
gate, there is silence in the hand set. Broken analog line
supply or too much resistance in the loop (e.g. too long cable
between the PBX and the gate).
•The yellow LED flashes according to the signal strength, but
the green LED is on. The PBX holds the "picked up" GSM
gate line. By calling this line, you will usually be able to fix
the fault. Otherwise, follow the instructions for your PBX.
•The device is working, but the call is tinged with a growl.
Improper placement of the antenna against one of the
telephone lines into which the GSM broadcast is induced
(e.g. car radios). It is necessary to test the mutual position
or completely relocate.
•The device is working, but you canhear an "echo" inthe call.
The sound effect arises when the BTS channel to which you
are connected is not completely correct impedance.
Notes.
To set all gateway parameters to factory, command 99 in
programming mode (see table on page 11).
All variants of LEDs light and tones are in the appropriate
tables at the end of the manual.

6
Voice connection on 4G - VoLTE
In 4G networks, voice connection (telephony) is only possible
with VoLTE (Voice over LTE) technology. The gateway
automatically uses the highest possible available network, ie
also VoLTE, if the operator allows it access. Some operators
allow access automatically, for some it is unfortunately
necessary to set access manually. In the case of manual
settings, it is necessary to set the correct access point (APN)
according to your network provider (for more details, see
parameter programming). Settings are possible with GGset or
remotely via SMS.
In which type of GSM network (2G / 4G) the gateway is
registered is indicated by a change in character of flashing the
yellow LED (at the antenna symbol) - see. table on page 26.

7
USB
BlueGate A Brave 4G VoLTE can have up to 2(3) independent
USB ports.
1) Built-in USB port is independent of other gateway activities.
It is designed primarily for use as a USB LTE modem for data
transmission, internet or SMS messaging. It can also be used
for GGset, for setting up the gateway
To install an LTE modem for Windows 10:
a) Connect the turned on gateway (logged into the GSM
network) with the PC using a MiniUSB cable. Your PC
must be connected to the Internet. Windows detects the
connection of the new USB device and automatically
installs the basic drivers.
b) Install TelitModuleDriversx64 or TelitModuleDriversx86
(64bit or 32bit depending on your system) from the
packaged CD or alphatech.cz pages. Windows creates
(Settings, Network, and Internet) a mobile network to
connect to the Internet (if SIM allows). In Device
Manager, you can find 3 new serial ports in the Ports
(COM and LPT) section: Telit Serial Diagnostics
Interface, Telit NMEA Interface and Telit Serial SAP
Interface. In the Modems section, 2 important Telit LE
Family USB modem ports are added.
c) If you need to set up serial ports for GGset or SMS
messaging, go to one of the newly created modems in
the Modems section of device manager, double-click to
select it, and then set the com port and communication
speed of 19200 Bd in the Properties.
d) If you want to use the LTE gateway for your Internet
connection, in Settings, Network and Internet, select
Mobile Network and set up an access point (APN)
according to your GSM connection provider.

8
2) The gateway can be equipped with a USB port, which is
connected from the outside by a special cable to the path of the
telephone line (see fig.). It is then possible to control directly the
GSM module via the virtual COM port and monitor the operation
of the gateway (log files for possible detection of problems). The
gateway can thus be used as a regular GSM modem for data
transmission, internet connection or SMS messages. This port
is designed primarily for setting gateway parameters by GGset.
It can also be used for sending SMS, checking the activity of the
gateway (e.g., CLIP recording, incoming call times, signal
strength ...), etc.
If the PC is operating with this port (after connecting to the
computer), the gateway voice functions are blocked (unlike the
USB ports from point1) during data transfers. After picking up
the line, a busy tone is heard. The data transfers may not be
continuous, so the gateway remains in data mode for 10 sec
after the data flow ends.
On the other hand, the data connection is not blocked
during telephony. The utility software must deal with this
situation to avoid a collision between voice connection control
and data.
It is therefore advisable to use the kind of utility software
that copes with these rules (some types of software, for
example, are still trying to communicate with the GSM module,
thus completely preventing telephony). In such cases, it is
preferable to use USB ports from point 1).

9
PROGRAMMING parameters
There are 3 ways to program a gateway. From the connected
phone, GGset setup program and via SMS messages.
Programming with your phone:
The programming mode is set after dialing the confirmation
character itself into the GSM gateway. There is a waiting tone
in the handset. When you enter a password, the tone changes
to the programming tone. Then you can program the individual
parameters of the GSM gateway (see table on page 11)
Programming procedure:
•Enter the two-digit number of the programmed parameter.
•Enter one to four digits of the parameter value.
•Wait for the tone of the confirmation request (3 short tons).
•Confirm the parameter by inserting a confirmation
character.
•Wait for the confirmation tone.
•The programming tone will be heard again.
•Hang up to exit programming mode.
For example, program the next allowed prefix (02) into
memory 9:
Dial the confirmation character (if you have factory-set
parameters, look in the programming table to see that the
character is"#"). In the handset you will hear
Enter the password (factory set 0000). The tone in the handset
changes to (.Dial 1902. Wait for the tone of the
confirmation request (3 short tons). Confirm the parameter by
entering a confirmation character (#). Wait for the confirmation
tone (one long tone). Hang up to exit programming mode.

10
Notes on individual parameters:
11-19 If you have a prefix set, the GSM gateway will only
release numbers starting with those digits. For others,
you will receive a busy tone. In this way, you can limit
calls only to the necessary networks or directions and
disable calls e.g., to the local telephone network (if you
then have only one prefix set, and this does not exist -
e.g. 0000 - all outgoing calls will actually be blocked and
the gateway accepts only incoming calls). If all memory
is empty, the numbers passing through the GSM
gateway will not be limited in any way (factory preset).
Prefix memories may not contain the full number of digits.
If you enter only one digit (minimum), wait for the
confirmation request, and confirm, the GSM gateway will
check only that first digit. Others in the order can no
longer be arbitrary.
Overwriting memory: Saving a new number to
memory erases the old prefix.
Delete memory: Delete memory by saving "nothing".
Enter only the memory number you want to delete,
wait for the confirmation request, and confirm.
22 An important function is to set the confirmation character (the
character that confirms the specified parameter speeds
up the choice, switches to prog. mode...). From the
factory, this character is preset to „#". If the PBX uses
this character in conjunction with its functions, you can
change this character to "*" (you may need to make a
change without the PBX, with the phone connected
directly to the gateway input).
32, 35 GSM phones require a command to connect to the
inserted number. The GSM gateway sends this
command either immediately after entering the
confirmation character ("#") after the dialed number, or
after the time set by parameter 32 (this is actually the
time that the gateway waits for the next digit to dial). You
can also set the number of digits (parameter 35) after

11
which the command is sent immediately. However, even
in this case, you can call a shorter number (both the
confirmation sign and the time limit are still in effect).
33 Direct Call - If 01 (the shortest time to wait for an option)
is set, the "Baby Call" function is activated. You do not
need to dial a phone number after collection. The phone
number stored on the SIM card under the name DCALL
is automatically dialed. You can save the number on the
SIM either by directly entering the SIM into any mobile
phone, by the GGset program (the "Phone Book list" tab)
or remotely by SMS "WRITE DCALL xxxxxxxx" (xxxxxx
is a phone number) –see table
37 This parameter can be inserted (if necessary)
immediately after switching on the gateway (Go to the
programming mode in the capture tone –see note 3
below). Without programming it, a SIM card (PIN) might
not be available.
Note:
1. The inserted parameter change is applied only after the
suspension (end of programming mode). This is
especially important for changing the confirmation
character –until the confirmation is suspended, the old
confirmation character must be used, not the newly set
one.
2. After dialing the digits, you must always wait for the tone
of the confirmation request, enter a confirmation
character, and wait for the confirmation tone. If you enter
a confirmation character earlier, it will not be accepted.
When you then re-enter it on the tone of the confirmation
request, the parameter will not be programmed.
3. You can also switch to programming mode in the cast
tone (see parameter 37)
4. some parameters can only be programmed using the
setting software on PC

12
Programming table
0
0
n
n
n
n
password nnnn to access programming
0
0
0
0
1
1
n
n
n
n
memory x for enabled nnnn prefix (1 to 4 digits)
1
2
n
n
n
n
1
3
n
n
n
n
1
4
n
n
n
n
1
5
n
n
n
n
1
6
n
n
n
n
1
7
n
n
n
n
1
8
n
n
n
n
1
9
n
n
n
n
2
1
n
Change the polarity of a phone line when you make and end a call
n = 0 - off function
n = 1 - function on
0
2
2
n
setting the "confirmation character"
n = 0 - ""
n = 1 - "*"
0
2
3
n
dial tone type n
n = 0 - continuous tone
n = 1 - dial tone according to tone table ("R")
n = 2 - JTS dial tone ("A")
n = 3 Silence
0
2
5
n
call signaling - short tone in minute interval
n = 0 - tone off
n = 1 - tone on
0
2
6
n
limiting call time
n = 0 - no call time limit
n = 1 - talk time limited to 10 minutes
0
2
8
n
Outgoing DTMF INBAND/OUTBAND
n = 0 - INBAND DTMF
n = 1 - OUTBAND DTMF
0
3
2
n
n
waiting for the last number of nn seconds (01 to 15)
(at the end of the choice with the confirmation sign is broadcast immediately)
0
6
3
3
n
n
waiting for the choice after picking up nn seconds (01 to 99)
(at 00 unlimited wait)
(at 01 Direct Call)
0
0
3
5
n
n
number of digits dialed nn, after which immediately without waiting the
option is sent to the module (length of phone number)
nn = 00 - function disabled
nn = 01-19 - number of digits phone number
0
0
3
7
n
n
n
n
writing a PIN
3
8
n
amplifying the call in the out-of-walk direction (1 to 4)
1
3
9
n
CLIR –turn off phone number identification on an out-of-call call
n = 0 - identification enabled
n = 1 - identification disabled
0
7
1
x
x
y
y
xx = 00 no tarification
xx = 12 tariff pulses 12 kHz
xx = 16 tariff pulses 16 kHz
0
0
0
0

13
yy = 00 only 1 pulse after connection
yy = 01 - 99 - pulses every 01 to 99 seconds
7
2
n
amplifying the call in the incoming direction (1 to 4)
1
7
3
n
n = 0 CLIP is off
n = 1 FSK CLIP Bell
1
7
4
n
Call Progress Ton
n = 0 nozzles off
n = 1 trill on
0
7
5
n
Roaming
n = 0 roaming disabled
n = 1 roaming allowed
1
9
9
overwriting the current setting with preset values

14
Programming with GGset:
Connect the gateway to your PC using a MiniUSB cable. The
gateway must be logged into the GSM network (flashing yellow
LED - see table). Download Ggset.exe program from the
attached CD or alphatech.cz pages to a separate directory and
.ini file with the appropriate language mutation. The program is
of type "portable" - it does not need
to be installed.
After you start the program, select
the appropriate COM port (see USB
installation). GGset starts with the
start page, connects to the
connected gateway within about 30
seconds, according to the detected variant of gsm gateway
adjusts display or availability of individual setting elements and
retrieves the parameters stored in the gateway (no need to use
„Load “- see next).
Context-sensitive help
explains each setting
When the program is connected to the gateway, the signal
strength, operator name, fw version in the gateway, number
of places on the SIM and other data appear.

15
Access Point (APN) settings for VoLTE
The figure shows an
example of inserting an
APN for Vodafone.
To save to the gateway,
see the "CALL" tab.
At the top of the program there are tabs ("tabs") to access
individual pages of parameters and functions.
The setting of parameters for calls is on the "CALL" tab
To operate, follow the program manual or contexment.
Event tab "Events"
Save the set parameters
to the gateway.
Retrieve parameters
from the gateway.
Mark subfolders it set dialing
parameters and calls inbound and
outbound directions.

16
"Events" tab
allows you to set up SMS sending with a report of
•lowering the power to below the set level for longer than
the set time (convenient when using a backup battery
and power failure) –"Voltage" tab
•logging the device into the GSM network (e.g. after a
power failure reporting re-functionality) - tab "LogIn"
•not picked up when ringing after a set number of rings
(connected device or operator does not respond - "does
not answer the phone") - tab "Ring"
Clicking the switch switches it
Top position - event is activated
Bottom Position - The event is inactive
Save and retrieve parameters from the selected file
on your PC

17
"PHONE book" tab
Load and store phone numbers on the SIM inserted in the
gateway. With this list it is possible to save the DCALL number
for "baby call" or telephone numbers for remote programming
via SMS (with any name –suitable to use e.g. ADMINx, etc.)
Save and retrieve a phone book from a selected file
on your PC
Save and retrieve a phone book from a SIM

18
Tab for monitoring the gateway system "MONITOR of system".
In the event of any problems or confusion in operation, it is used
to record the log file to identify the problem by the manufacturer
or vendor.
Warning:
If you use one of the gateway's internal USB ports for
programming, you must restart the gateway after programming.
Otherwise, the programmed parameters will not be used.
Save traffic to a selected file on your PC

19
Programming via SMS:
Only SMS sent from the numbers stored on the SIM card of the
device are accepted. SMSs from other numbers are received,
but they are ignored and deleted immediately. You can save the
first phone number on the SIM with the INIT command (see the
table of commands and examples) or with the GGset program
(phonebook folder) or by writing directly to the SIM after
inserting the SIM into the mobile phone. If you program the
gateway parameters via SMS, in conclusion you need to restart
the gateway using SMS "RESET BGB".
Attention! If you use SMS to delete phone numbers, you
must have at least 1 remote programming phone number
left in the system –otherwise it can no longer be
programmed remotely –you will need to reuse GGset to
write the number (see above).
SMS are ALWAYS WRITTEN IN CAPITAL LETTERS.
The SMS body is composed of words separated by spaces.
The first word always expresses what will be done. E.g.:
READ - read (name/phone number or parameter)
WRITE - write (name/phone number or parameter)
In addition to parameters, it is also possible to program
telephone numbers for DCALL or other numbers for remote
programming.
Programming a connected device via SMS with DTMF
If a device that is programmable using DTMF is connected to
the gateway, it can also be programmed by SMS. You can use
this option with the advantage of:
•If the GSM operator does not support compliant and
listen transmission of DTMF codes in the voice channel
•If you need to make a remote bulk change of a parameter
(e.g. dial-up number), send a DTMF SMS at once to
multiple phone numbers –a list (depending on the mobile
phone used orthe device from which you send theSMS).
Table of contents
Other Alphatech Gateway manuals
Popular Gateway manuals by other brands

Smartworks
Smartworks Smart-Net Installation and user manual

Multitech
Multitech Conduit AP MTCAP-L4E1 user guide

Planet
Planet HAC-1000 Quick installation guide

Watchguard
Watchguard Firebox X1250E quick start guide

Bin Master
Bin Master BINCLOUD BCGW LLC Series Quick setup guide

HySecurity
HySecurity HYNET SFP 4/1 installation manual