Alpinestars A-Connect User manual

www.alpinestars.com/A-connect User’s Guide For Firmware v1.0

alpinestars.com/A-connect
2
© 1998-2015 Sena Technologies, Inc. All rights reserved.
Sena Technologies, Inc reserves the right to make any changes and improvements to its product without providing prior notice.
Sena™ is a trademark of Sena Technologies, Inc. or its subsidiaries in the USA and other countries.
The Bluetooth® word mark and logos are owned by the Bluetooth SIG, Inc. and any use of such marks by Sena is under license. iPhone, iPod touch are registered trademarks of
Apple Inc. Zumo™ is a trademark of Garmin Ltd. or its subsidiaries. TomTom™ is the trademark or registered trademark owned by TomTom International B.V. Other trademarks and
tradenames are those of their respective owners.

1. INTRODUCTION .............................................................................................................4
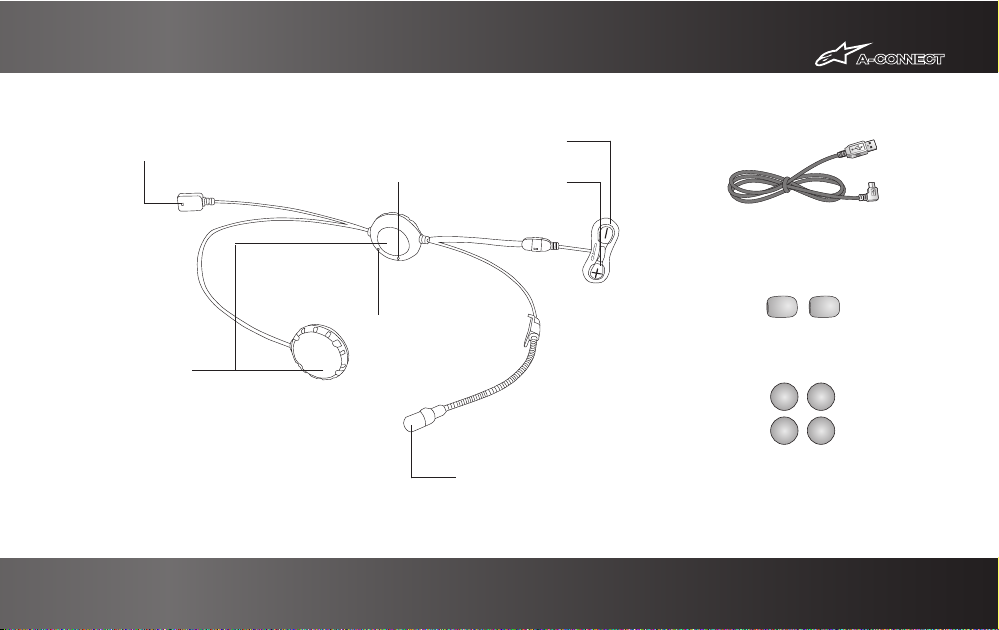
2. PACKAGE CONTENTS ...................................................................................................5
3. GETTING STARTED .........................................................................................................6
Powering On.......................................................................................................................6
Powering Off ......................................................................................................................6
Charging the A-Connect.....................................................................................................6
Checking Battery Level.......................................................................................................7
Adjusting the Volume Level ...............................................................................................7
Function Priority .................................................................................................................7
Fault Reset .........................................................................................................................7
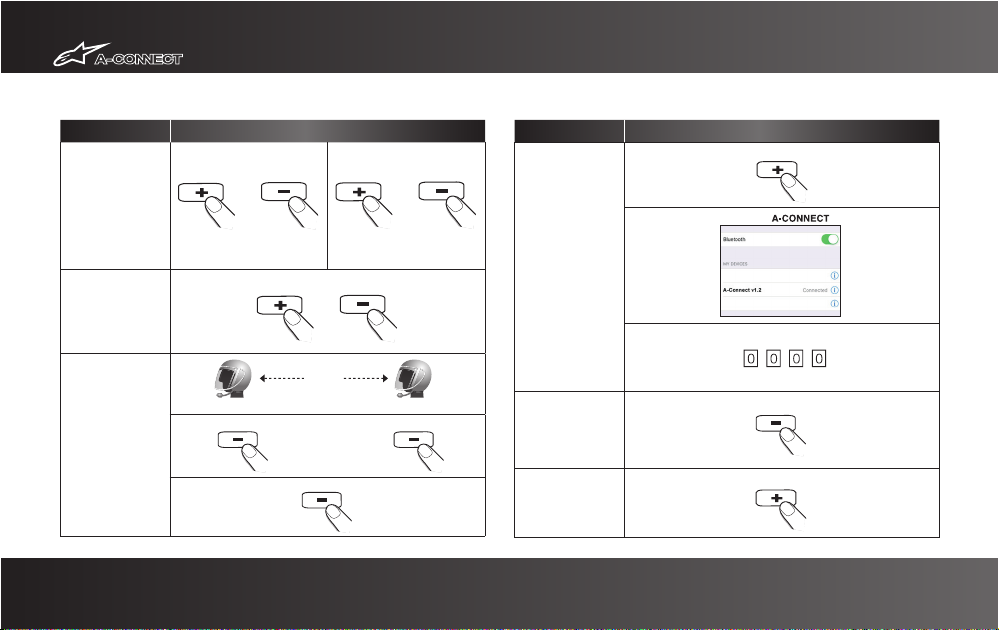
4. OPERATION QUICK REFERENCE ..................................................................................8
5. PAIRING AND USING THE A-CONNECT WITH BLUETOOTH DEVICES ...............10
Mobile Phone Pairing.......................................................................................................10
Multipoint Mobile Phones Pairing...................................................................................10
Bluetooth Stereo Device Pairing......................................................................................11
Bluetooth GPS Navigation Pairing...................................................................................11
Mobile Phone Call Making and Answering.....................................................................14
Stereo Music....................................................................................................................14
6. INTERCOM CONVERSATION .....................................................................................15
Pairing with Other A-Connect Headsets for Intercom Conversation...............................15
Starting and Ending Intercom Conversation....................................................................15
Intercom and Mobile Phone Call......................................................................................15
Intercom Failure ...............................................................................................................16
Intercom Reconnection ....................................................................................................16
7. ALPINESTARS A-CONNECT CONFIGURATION SETTING .....................................16
Enabling/Disabling Voice Activated Phone Answering...................................................17
Enabling/Disabling Voice Prompts...................................................................................17
Delete All Bluetooth Pairing Information.........................................................................17
Reset to Factory Default Setting......................................................................................18
Exit Voice Configuration Menu ........................................................................................18
8. FIRMWARE UPGRADE ................................................................................................19
CERTIFICATION AND SAFETY APPROVALS.......................................................................20
• FCC Compliance Statement .......................................................................................20
• FCC RF Exposure Statement ......................................................................................20
• FCC Caution................................................................................................................20
• CE Declaration of Conformity ....................................................................................20
• Industry Canada Statement .......................................................................................21
• Bluetooth License.......................................................................................................21
• WEEE (Waste Electrical and Electronic Equipment)..................................................21
SAFETY INFORMATION .........................................................................................................22
• Product Storage and Management............................................................................22
• Product Use................................................................................................................22
• Battery........................................................................................................................23
PRODUCT WARRANTY AND DISCLAIMER ........................................................................24
• Limited Warranty .......................................................................................................24
• Warranty Exclusions ..................................................................................................25
• Warranty Service .......................................................................................................26
• Return for Full Refund................................................................................................26
alpinestars.com/A-connect

alpinestars.com/A-connect
4
1. INTRODUCTION
Thank you for choosing the Alpinestars A-Connect, Bluetooth Headset and Intercom
for Scooters and Motorcycles. With the Alpinestars A-Connect, you can call
handsfree on your Bluetooth mobile phone, listen to stereo music or GPS navigation
voice instructions via Bluetooth, and have intercom conversations in full duplex with
a passenger or other riders.
The Alpinestars A-Connect is compliant with the Bluetooth specification 3.0
supporting the following profiles: Headset Profile, Hands-Free Profile (HFP),
Advanced Audio Distribution Profile (A2DP), and Audio Video Remote Control Profile
(AVRCP). Please confirm compatibility with other devices with the manufacturers.
Please read this user guide carefully before using the headset.
Also visit www.alpinestars.com/A-connect for the latest version of the user guide
and for additional information related to Alpinestars A-Connect products.
The Alpinestars A-Connect includes the following features:
• Bluetooth handsfree for Bluetooth mobile phones
• Bluetooth stereo headset for Bluetooth stereo devices such as MP3 players
• Bluetooth stereo headset for Bluetooth GPS navigations
• Bluetooth intercom up to 200 meters (220 yards)*
• Easy two-button operation
• Installation friendly unibody design
• Firmware upgradeable
• Key Specifications:
• Bluetooth 3.0
• Supporting profiles: Headset Profile, Hands-Free Profile (HFP), Advanced
Audio Distribution Profile (A2DP), Audio Video Remote Control Profile
(AVRCP)
*in open terrain
Speakers

alpinestars.com/A-connect 5
2. PACKAGE CONTENTS
USB Power & Data Cable
Microphone Sponges
Hook and Loop Fasteners for Speakers
DC Power Charging & Firmware Upgrade Port
Status LED
Boom Microphone Type
Pin-hole Reset Button
Wired Boom Microphone
(+) Button
(-) Button
Speakers

alpinestars.com/A-connect
6
3. GETTING STARTED
For installation, please refer to your helmet user manual
Powering On
Press and hold the (+) Button and the (–) Button at the same time for 1 second to
power on. The blue LED turns on and you will hear ascending beeps and “Hello”.
Powering Off
Press the (+) Button and the (–) Button at the same time. The red LED turns on for
about 2 seconds until it turns off completely and you will hear “Goodbye” and
descending beeps.
Charging the Alpinestars A-Connect
You can charge the Alpinestars A-Connect by connecting the supplied USB power &
data cable into a computer USB port or USB wall charger. You can use any standard
micro-USB cable to charge the A-Connect. The LED turns red while charging, and
turns blue when the headset is fully charged. It takes about 2.5 hours to fully
charge.
Note:
Please make sure to take off your
A-Connect-installed helmet while
charging.
1. The USB power & data cable is also
used for firmware upgrade of the
A-Connect.
2. The USB wall charger is not included
in the package. Any 3rd party USB
charger can be used with Alpinestars
products if the charger is approved by
either FCC, CE, IC.

alpinestars.com/A-connect 7
Checking Battery Level
You can check the battery level in two different ways when the headset is powering
on.
LED Indicator
When the headset is powering on, the red LED flashes rapidly indicating the battery
level.
Voice Prompt Indicator
When you power on the headset, keep pressing and holding the (+) Button and (–)
Button simultaneously for about 3 seconds until you hear three high tone beeps.
Then you will hear a voice prompt indicating the battery level. However, if you
release the buttons as soon as the headset turns on, you will not hear the voice
prompt for the battery level.
Low Battery Warning
When the battery is low, the blinking blue LED in stand-by mode turns to red and
you will hear mid-tone triple beeps and a voice prompt saying “Low battery”.
Adjusting the Volume Level
You can easily adjust the volume by pressing the (+) Button or the (–) Button. You
will hear a beep when the volume reaches maximum or minimum level. The volume
is set and maintained independently at different levels for each audio source even
when you turn off and on the headset. For example, once you set the volume for
mobile phone handsfree, it will not change even if you adjust the volume when you
hear Bluetooth MP3 music. So you can always maintain the preferred optimum
volume level for each audio source.
Function Priority
The Alpinestars A-Connect operates in the following order of priority:
(Highest) Mobile Phone
Intercom
(Lowest) Bluetooth Stereo Music
A lower priority function is always interrupted by a higher priority function. For
example, stereo music is interrupted by an intercom call, and intercom conversation
is interrupted by an incoming mobile phone call.
Fault Reset
When the Alpinestars A-Connect is not working properly or is in faulty status for any
reason, you may reset by pushing the pin-hole reset button on the left speaker unit.
Insert a paper clip into the reset pin-hole and press and hold the reset button for a
second with light pressure. The A-Connect will be switched off. Turn the system
back on and try again. However, this will not restore the headset to factory default
settings.
LED Status
4 flashes High, 70~100%
3 flashes Medium, 30~70%
2 flashes Low, 0~30%

alpinestars.com/A-connect
8
4. OPERATION QUICK REFERENCE
Function Operations
Power
On/Off
1 sec. 1 sec.
+
Power On
1 press 1 press
+
Power Off
Volume
Adjustment
1 press 1 press
or
Intercom Pairing
pairing
AB
5 sec. 5 sec.
1 sec.
Function Operations
Bluetooth
Pairing
(Phone, MP3,
GPS)
Start & End
Intercom
Conversation
1 sec.
Configuration
5 sec.
Sena 3S v1.1
Enter PIN
5 sec.
Select
Device B
Device A

alpinestars.com/A-connect 9
Function Operations
Mobile
Phone
Function Operations
Music
Answer
End
Voice Dial
*
Reject
*
*
3 sec. 2 sec.
2 sec.
1 sec.
or
1 press
3 sec.
2 sec.
2 sec.
* You can use “Voice Dial” and “Redial” only in stand-by mode.

alpinestars.com/A-connect
10
5. PAIRING AND USING THE A-CONNECT WITH BLUETOOTH
DEVICES
Mobile Phone Pairing
1. Turn on the Alpinestars A-Connect and press and hold the (+) Button for 5 seconds
until the LED flashes red and blue alternately and you hear multiple beeps. You will
hear a voice prompt saying “Phone pairing”.
2. Search for Bluetooth devices on your mobile phone. Select the Alpinestars
A-Connect in the list of the devices detected on the mobile phone.
3. Enter 0000 for the PIN. Some mobile phones may not ask for the PIN.
4. The mobile phone confirms that pairing has completed and the A-Connect is
ready to use. You will hear a voice prompt from the A-Connect saying “Your
headset is paired”.
5. If the pairing process is not completed within three minutes, the Alpinestars
A-Connect will return to stand-by mode.
Multipoint Mobile Phones Pairing
You can simultaneously use two mobile phones which use the mobile phone profile.
1. You can pair the first mobile phone to the A-Connect by following the simple
procedures in “Mobile Phone Pairing”.
2. To pair the second mobile phone, press and hold the (–) Button for 5 seconds until
the red LED is rapidly flashing and you hear multiple beeps.
3. Within 2 seconds, press and hold the (+) Button for 1 second, then the LED turns
to blue flashing and the beeps turn to high tone double beeps. You will hear a voice
prompt saying “Multipoint pairing”.
4. Search for Bluetooth devices on your mobile phone. Select the Alpinestars
A-Connect in the list of the devices detected on the mobile phone.
5. Enter 0000 for the PIN. Some mobile phones may not ask for the PIN.
6. The mobile phone confirms that pairing has completed and the A-Connect is
ready to use. You will hear a voice prompt from the Alpinestars A-Connect saying
“Your headset is paired”.

alpinestars.com/A-connect 11
A-Connect
Multipoint Mobile Phones Pairing
1st Mobile Phone 2nd Mobile Phone
Mobile Phone
Pairing
HFP
+
A2DP HFP
Multipoint
Pairing
Bluetooth Stereo Device Pairing
1. If the Bluetooth stereo device is integrated with the mobile phone such as
smartphones, you don’t need to pair the A-Connect with it separately. When the
Alpinestars A-Connect is paired with the mobile phone, it is also paired as a stereo
music device.
2. If you have a stand alone Bluetooth stereo device, follow the pairing procedure
separately. The procedure is the same as the procedure of “Mobile Phone Pairing”.
Note:
1. If Bluetooth connection between the headset and a mobile phone is disconnected, press
and hold the (+) Button for 3 seconds to recover the Bluetooth connection immediately.
2. If Bluetooth connection between the headset and a media player is disconnected, press
and hold the (+) Button for 1 second to recover the Bluetooth connection and play.
Bluetooth GPS Navigation Pairing
You can listen to voice instruction from Bluetooth GPS navigation. Some GPS
systems use mobile phone profile (HFP, Hands-Free Profile) and others use stereo
music profile (A2DP, Advanced Audio Distribution Profile). Most motorcycle specific
GPS systems use mobile phone profile for turn-by-turn voice instruction. You can
simultaneously use a mobile phone and a GPS which uses mobile phone profile by
one of the following procedures.

alpinestars.com/A-connect
12
Multipoint GPS Pairing
If you use GPS only for turn-by-turn voice instructions, not for Bluetooth stereo
music streaming, multipoint pairing is recommended for the GPS connection.
Multipoint Bluetooth pairing allows the A-Connect to connect two HFP devices at
the same time: mobile phone and GPS navigation. Follow the steps below to pair
the GPS using the multipoint pairing.
1. Turn on the headset and press and hold the (–) Button for 5 seconds until the red
LED is rapidly flashing and you hear multiple beeps.
2. Within 2 seconds, press and hold the (+) Button for 1 second, then the LED turns
to blue flashing and the beeps turn to high tone double beeps. You will hear a voice
prompt saying “Multipoint pairing”.
3. Search for Bluetooth devices on the GPS navigation screen. Select the Alpinestars
A-Connect in the list of the devices detected on the GPS.
4. Enter 0000 for the PIN.
5. The GPS confirms that pairing has completed and the Alpinestars A-Connect is
ready to use. You will hear a voice prompt from the A-Connect saying “Your
headset is paired”.
6. If the pairing process is not completed within three minutes, the A-Connect will
return to stand-by mode.
You can simultaneously use two mobile phones which use the mobile phone profile.
GPS Navigation
A-Connect
Multipoint GPS Pairing
Mobile Phone
Mobile Phone
Pairing
HFP
+
A2DP HFP
Multipoint
Pairing

alpinestars.com/A-connect 13
GPS Pairing as Mobile Phone
If GPS is not only used for turn-by-turn voice instructions but also is your preferred
Bluetooth stereo music source, you can pair the GPS to the A-Connect by following
the simple procedures in “Mobile Phone Pairing”. When you do this, the A-Connect
thinks the GPS is a mobile phone. But the A-Connect can directly pair an additional
mobile phone.
Note:
You have to use a motorcycle specific GPS which transmits turn-by-turn voice instruction to
the headset by Bluetooth. Most automotive GPS systems don’t have this feature.
GPS Navigation Mobile Phone
A-Connect
GPS Pairing as Mobile Phone
HFP
HFP
+
A2DP
Multipoint Pairing
Mobile Phone
Pairing

alpinestars.com/A-connect
14
Mobile Phone Call Making and Answering
1. When you have an incoming call, simply press the (+) Button to answer the call.
2. You can also answer the incoming call by loudly speaking any word of your choice
if Voice Activated Phone Answering, VOX phone is enabled. (Refer to
“Enabling/Disabling Voice Activated Phone Answering” for details.)
3. To end a call, press and hold the (+) Button for 2 seconds until you hear a mid-tone
single beep, or wait for the called person to end the call.
4. To reject a call, press and hold the (–) Button for 2 seconds until you hear a beep
while the phone is ringing.
5. There are several ways to make a phone call:
• Enter numbers on your mobile phone keypad and make a call. Then the call
is automatically transferred to the headset.
• Press and hold the (+) Button for 3 seconds in stand-by mode until you hear
a high tone single beep to activate the voice dialing of your mobile phone.
For this, the voice dialing feature must be available on the mobile phone.
Refer to your mobile phone manual for further instruction.
• To redial the last number, press and hold the (–) Button for 3 seconds in
stand-by mode until you hear a high tone single beep. You will hear a voice
prompt saying “Last number redial”.
Note:
1. If you are using multipoint mobile phone connection and you have an incoming call from
the second phone during the call of the first phone, then you may still receive the call from
second phone. In this case, the call from the first phone is on waiting mode. If you end a
call, then it will automatically guide you to the first phone call.
2. If you are using multipoint connection of mobile phone and GPS, you may not listen to the
GPS voice instruction during the phone call.
Stereo Music
You can listen to stereo music by Bluetooth wireless stereo. The Bluetooth audio
device must be paired with the Alpinestars A-Connect by following the “Bluetooth
Stereo Device Pairing” instructions. The A-Connect supports the Audio/Video
Remote Control Profile (AVRCP), so if your Bluetooth audio device also supports the
AVRCP, you can use the A-Connect to remotely control music playback. So, you can
not only adjust the volume but also use the functions such as play, pause, track
forward and track backward.
• To adjust the volume, press the (+) Button or the (–) Button.
• To play or pause music, press and hold the (+) Button for 1 second until you
hear a double beep.
• To track forward or track back, press and hold the (+) Button or the (–) Button
for 2 seconds until you hear a double beep.

alpinestars.com/A-connect 15
6. INTERCOM CONVERSATION
Pairing with Other A-Connect Headsets for Intercom Conversation
The Alpinestars A-Connect can be paired with another headset for Bluetooth
intercom conversation.
1. Turn on the two A-Connect headsets (A and B) that you would like to pair with
each other.
2. Press and hold the (–) Button of the headset A and B for 5 seconds until the red
LEDs of both units start to flash rapidly. You will hear a voice prompt saying
“Intercom pairing”.
3. Simply press the (–) Button of either of the two headsets A or B (It doesn’t matter
that you choose A or B) and wait until the LEDs of both headsets turn to blue and
intercom connection is automatically established. The two A-Connect headsets A
and B are paired with each other for intercom conversation. If the pairing process is
not completed within one minute, the A-Connect will return to stand-by mode.
Starting and Ending Intercom Conversation
1. You can start an intercom conversation with your intercom friend by pressing and
holding the (–) Button for 1 second.
2. To terminate an intercom conversation, press and hold the (–) Button for 1 second
again.
Intercom and Mobile Phone Call
1. When you have an incoming mobile phone call during an intercom conversation,
you will hear a ring tone. You can choose whether to 1) answer the mobile phone
call and stop the intercom conversation, or 2) reject the phone call and stay on the
intercom conversation.
• To answer the phone call and stop the intercom conversation, press the (+)
Button. When you hang up the phone call, the intercom will automatically be
recovered.
• To reject the phone call and stay on the intercom conversation, press and
hold the (–) Button for 2 seconds until you hear a beep.
Unlike other motorcycle Bluetooth headsets, this prevents a user from being
dropped out of an intercom conversation by an incoming mobile call.
2. When you have an incoming intercom call during a mobile phone call, you will
hear 4 high tone beeps, alerting you that there is an incoming intercom call. You will
also hear a voice prompt saying “Intercom requested”. In this case, the intercom
call does not override the mobile phone call because intercom has lower priority
than mobile call. You have to hang up the mobile phone call to make or receive an
intercom call.

alpinestars.com/A-connect
16
Intercom Failure
When you try to start an intercom conversation with an intercom friend who is
already having a mobile phone call with another person, you will hear a low tone
double beep signifying a busy signal. You will also hear a voice prompt saying
“Intercom failed, try again later”. In this case, you have to try again later. On the
other hand, the intercom friend will hear 4 high tone beeps alerting them that there
is an incoming intercom call.
Intercom Reconnection
If your intercom friend goes out of range while having an intercom conversation, you
may hear static noise and eventually the intercom will be disconnected. In this case,
the Alpinestars A-Connect automatically tries to reconnect the intercom every 8
seconds. You will hear high tone double beeps until the intercom is reestablished.
If you don’t want to make a reconnection, press and hold the (–) Button for 1 second
to stop the attempt.
7. ALPINESTARS A-CONNECT CONFIGURATION SETTING
You can set the configuration of the A-Connect by the voice menu instruction as
below.
1. To enter into voice configuration menu, press and hold the (+) Button for 10
seconds until the LED shows solid blue and you hear high tone double beeps. You
will hear a voice prompt saying “Configuration menu”.
2. Press the (+) Button to navigate between menus. You will hear voice prompts for
each menu items as below.
3. You can enable or disable the feature or execute the command by pressing the (–)
Button.
4. If any button is not pressed within 10 seconds, the A-Connect will exit the
configuration and goes back to standby.
5. If you want to exit the configuration immediately, press and hold the (+) Button
until you hear a voice prompt, “Exit configuration”, and press the (–) Button.
The voice prompts for each menu item are as below:
(1) VOX phone
(2) Voice prompt
(3) Delete all pairings
(4) Factory reset
(5) Exit configuration

alpinestars.com/A-connect 17
Enabling/Disabling Voice Activated Phone Answering
If this feature is enabled, you can answer incoming calls by simply saying a word
loudly enough, unless you are connected to intercom. For example, when you hear
a series of beeps for an incoming call, you can answer the phone by saying “Hello”
or any other word loudly. However, the phone VOX feature does not work if you are
connected to intercom. This is enabled from the factory but you can disable this. If
this mode is disabled, you have to press the (+) Button to answer an incoming call.
To delete all Bluetooth pairing information of the Alpinestars A-Connect, press the
(+) Button until you hear a voice prompt, “Delete all pairings”, and press the (–)
Button to confirm.
You can disable voice prompts by configuration setting, but the following voice
prompts are always on.
- Voice prompts for configuration setting menu
- Voice prompts for battery level Indicator
- Voice prompts for factory reset
Enabling/Disabling Voice Prompts
Voice Prompt “VOX phone”
Factory Default Enable
Enable / Disable Press the (–) Button
Voice Prompt “Delete all pairings”
Factory Default N/A
Execute Press the (–) Button
Voice Prompt “Voice prompt”
Factory Default Enable
Enable / Disable Press the (–) Button
Delete All Bluetooth Pairing Information

alpinestars.com/A-connect
18
Reset to Factory Default Setting
To restore factory default settings on the Alpinestars A-Connect, press the (+)
Button until you hear a voice prompt, “Factory reset”. Press the (–) Button to
confirm. The A-Connect powers off with a voice prompt, “Headset reset,
goodbye”.
To exit voice configuration menu and get back to stand-by mode, press the (+) Button
until you hear a voice prompt, “Exit configuration”. Press the (–) Button to confirm.
Exit Voice Configuration Menu
Voice Configuration Menu & Button Operations
Voice Prompt “Factory reset”
Factory Default N/A
Execute Press the (–) Button
Press (+) Button Press (–) Button
“Vox phone” Enable / disable
“Voice prompt” Enable / disable
“Delete all pairings” Execute
“Factory reset” Execute
“Exit configuration” Execute
Voice Prompt “Exit configuration”
Factory Default N/A
Enable / Disable Press the (–) Button

alpinestars.com/A-connect 19
8. FIRMWARE UPGRADE
The Alpinestars A-Connect supports firmware upgrade function.
Please visit www.alpinestars.com/A-Connect to check the latest software
downloads.
Boom Microphone Type

alpinestars.com/A-connect
20
CERTIFICATION AND SAFETY APPROVALS
Sena Technologies Inc. (Sena) advises:
FCC Compliance Statement
This device complies with part 15 of the FCC rules.
Operation is subject to the following two conditions:
(1) This device may not cause harmful interference, and
(2) This device must accept any interference received, including interference that
may cause undesired operation.
This equipment has been tested and found to comply with the limits for a Class B
digital device pursuant to part 15 of the FCC rules. These limits are designed to
provide reasonable protection against harmful interference in a residential
installation. This equipment generates, uses and can radiate radio frequency energy
and, if not installed and used in accordance with the instructions, may cause
harmful interference to radio communications. However, there is no guarantee that
interference will not occur in a particular installation. If this equipment does cause
harmful interference to radio or television reception, which can be determined by
turning the equipment on and off, the user is encouraged to try to correct the
interference by one or more of the following measures:
• Reorient or relocate the receiving antennae
• Increase the separation between the equipment and the receiver
• Connect the equipment into an outlet on a circuit different from that to which
the receiver is connected.
• Consult the dealer or an experienced radio/TV technician for help.
FCC RF Exposure Statement
This equipment complies with FCC radiation exposure limits set forth for an
uncontrolled environment. End users must follow the specific operating instructions
for satisfying RF exposure compliance. The antenna used for this transmitter must
not transmit simultaneously with any other antenna or transmitter, except in
accordance with FCC multi-transmitter product procedures.
FCC Caution
Any changes or modifications to the equipment not expressly approved by the party
responsible for compliance could void user’s authority to operate the equipment.
CE Declaration of Conformity
This product is CE marked according to the provisions of the R&TTE Directive (99/5/
EC). Hereby, Sena declares that this product is in compliance with the essential
requirements and other relevant provisions of Directive 1999/5/EC. For further
information, please consult www.sena.com. Please note that this product uses
radio frequency bands not harmonized within EU. Within the EU this product is
intended to be used in Austria, Belgium, Denmark, Finland, France, Germany,
Greece, Ireland, Italy, Luxembourg, The Netherlands, Portugal, Spain, Sweden,
United Kingdom and within EFTA in Iceland, Norway and Switzerland.
Other manuals for A-Connect
1
Table of contents
Other Alpinestars Headset manuals