Alpinestars Tech-Air 10 System User manual

USER GUIDE
IMPORTANT - READ THIS MANUAL
CRITICAL SAFETY INFORMATION INSIDE
v. 1.0

Please read the following important WARNING and
LIMITATION of use notice carefully:
Motorcycling is an inherently dangerous activity and an ultra-hazardous
sport, which may result in serious personal injury, including death. Each
individual motorcycle rider must be familiar with motorcycling, recognize
the wide range of foreseeable hazards and decide whether to assume
the risks inherent in such an activity with the knowledge of the dangers
involved and accept any and all risks of injury, including death. While all
motorcycle riders should utilize appropriate protective equipment, each
rider should exercise extreme care for safety while riding and understand
that no product can offer complete protection from injury including death
or damage to individuals and property in case of fall, collision, impact,
loss of control or otherwise. Riders should ensure that safety products
are correctly fitted and used. DO NOT use any product that is worn out,
modified or damaged.
Alpinestars makes no guarantees or representations, express or
implied, regarding the fitness of its products for any particular purpose.
Alpinestars makes no guarantees or representations, express or
implied, regarding the extent to which its products protect individuals
or property from injury, death or damage.
ALPINESTARS DISCLAIMS ANY RESPONSIBILITY FOR INJURIES INCURRED
WHILE WEARING ANY OF ITS PRODUCTS.

7EN6EN
0. Preliminary Notes 5
1. Introduction 5
2. Principles of Operation 7
3. Tech-Air® Envelope of Protection 8
4. Limitations of Use 15
5. System Overview 18
6. Sizing 21
7. Health and Age Restrictions 21
8. Compatible Outer Garment 22
9. System Installation and Fitting 24
10. Transportation of Objects Inside the Outer Garment 25
11. Battery Charging 26
12. System Operation 28
13. LED Display Indications 32
14. Cleaning, Storage and Transportation 34
15. Maintenance, Servicing and Disposal 39
16. Actions in the Event of an Accident 41
17. Tech-Air® App 43
18. Troubleshooting 48
19. Tech-Air® Support 49
20. Certification Information 49
21. Important Information for Users WARNING! 56
Table of Contents 0. Preliminary Notes
In this manual the following four presentation styles are used to provide information:
Provides critical information which, if not followed, may cause injury,
death, System malfunction or non-function, and/or an exaggerated
expectation of the Tech-Air® 10 System’s abilities.
WARNING!
Provides useful advice regarding the Tech-Air® 10 System.
IMPORTANT! Provides important information regarding the limitations of the System.
Tip:
Provides information related to Tech-Air® App optional functionalities.
1. Introduction
Dear User, thank you for choosing an Alpinestars Product!
The Tech-Air® 10 System (hereinafter referred to as “System” and/or “Tech-Air® 10 System”)
is an active safety system for sport and recreational motorcycling, which offers protection
to a motorcycle user. In the event of an accident or other triggering event, the System
provides protection to the upper body and hips areas as it covers the user’s shoulders, chest,
full back and hips.
The Tech-Air® 10 System is specifically designed and dedicated to be used on
a closed race track within the conditions and limitations delineated in this user
manual. The Tech-Air® 10 System is supplied with a Race Mode to be used only
when riding on a closed race track. The System can also be switched to a Street
Mode with the Tech-Air® App when the System is used on public street roads.
The Tech-Air® 10 System consists of a standalone airbag system contained within a base
layer which is designed to provide additional protection, from impacts occurring during
a motorcycle accident, to motorcycle users. The System does not provide any protection
against possible abrasion during an accident, therefore, the System must be always used
in combination with an outer protective garment, compatible with the System (for further
information see Section 8).

9EN8EN
The Tech-Air® 10 System does not offer the Dual Charge Concept.
Once the airbag has deployed there is no additional airbag charge.
This means that the User of the System is without further airbag
protection until the System is serviced, and the airbag canisters are
replaced.
The System, including its components, are technologically advanced
pieces of motorcycling safety equipment and should not be treated
like a normal motorcycle garment. Similar to one’s motorcycle,
the System and its components must be cared for, serviced and
maintained, so that they may function correctly.
The System MUST be used in combination with an outer protective
garment, compatible with the System (see Section 8).
WARNING!
WARNING!
WARNING!
It is essential to read this user manual carefully, to understand it
completely and to follow the advice and warnings illustrated in this
user manual. If you have any questions regarding the equipment,
contact Tech-Air® Support (see Section 19).
WARNING!
IMPORTANT!
IMPORTANT!
IMPORTANT!
The Tech-Air® 10 System is an active safety system which can be used by a
motorcycle user, both as a rider or passenger.
When the Street Mode is selected, the System can be used for road riding
and light off-road riding situations (subject to the Off-Road limitations
indicated in Section 3 below).
Without any additional notice, Alpinestars reserves all rights to, from time
to time, update the software and/or the electronic components of the Tech-
Air® 10 System.
2. Principles of Operation
The System consists of an Airbag Electronic Control Unit (with built-in sensors) integrated
into the back protector, and two external sensors positioned on the shoulders (Figure 1). The
cluster of sensors consists of 3 triaxial accelerometers (1 positioned on the back protector
and 2 positioned on the shoulders) and 1 triaxial gyroscope (positioned on the back
protector). These sensors monitor the user’s body for shocks or unexpected movements. In
the event the user’s body is subject to a high and/or sudden amount of energy, the System
will deploy. This may occur when the motorcycle is involved in an accident, such as when
the motorcycle collides with another vehicle or with an object, when the rider loses control
or when the rider falls off the motorcycle.
The System is equipped with a Bluetooth Low Energy (BLE) device located in the Electronic
Control Unit (ECU). The BLE allows the System to connect directly to a mobile phone in
order to receive important information from the System, while also permitting the users to
access a number of other functions (for further information see “Tech-Air® App” in Section
17). The System does NOT need to be connected to the Tech-Air® App for the System to
work, it functions independently of the Tech-Air® App.
Figure 1 – Sensor Location
To connect the System to the mobile phone via Bluetooth, remember to
activate the Bluetooth module within your phone and to download the Tech-
Air® App available at the Android Play Store or at the Apple Store.
Sensors
(Front) (Back)

11 EN10 EN
The Tech-Air® 10 System comes with two different riding modes that permit the use of
the System on both closed race tracks (the “Race Mode”) and on streets, as well as on light
off-road paths (the “Street Mode”). Users can easily switch between these two riding modes
by using the Tech-Air® App.
User must always ensure via the App that the System is running the most up
to date software release.
Figure 2: Area of Airbag coverage
No product can provide complete protection from injury (or death),
or damage to persons or property in the event of a fall, accident,
collision, impact, loss of control or other event.
WARNING!
The System provides impact protection, for those areas where airbag coverage is shown in
Figure 2, to the user (both as rider and as a passenger) wearing the System in the event of
an accident or other triggering events. To note there are limitations to the protection it can
provide as explained in this user manual.
(Front) (Back)
3. Tech-Air® Envelope of Protection
The “Envelope of Protection” is a term used to generally describe situations and/or
circumstances where the System may provide protection, denoted as “inside the Envelope”,
and those where it will not, denoted as “outside the Envelope”.
Area of airbag
coverage
For the Tech-Air® 10 System the Envelope of Protection includes, for both Race and Street
Modes, crashes against obstacles and loss of control crashes (commonly referred to as ‘low-
side’ and ‘high-side’ crashes).
Only in Street Mode does the Envelope of Protection also include situations in which the
rider’s motorcycle whilst stationary is hit by another vehicle.
Table 1 summarizes the Envelope of Protection for Race and Street Modes.
The System provides only limited impact protection against forces in
the areas of airbag coverage as depicted in Figure 2. No guarantee is
given that the System will prevent injuries (including severe or fatal
injuries) inside and/or outside the areas of airbag coverage or the
Envelope of Protection.
The System cannot prevent accidents or injuries to the user.
No protective device, including the System, can provide protection
against all possible sources of injury and therefore cannot provide
complete protection against injuries.
Wearing the System is not a substitute for wearing other protective
motorcycling clothing and gear. To provide full potential protection,
the System must always be worn in conjunction with suitable
motorcycling gear and apparel that covers the rider from head to toe,
including a helmet, protectors, boots, gloves, and other appropriate
protective equipment.
WARNING!
WARNING!
WARNING!
WARNING!

13 EN12 EN
Table 1: Summary of the Envelope of Protection for Race and Street Modes.
CrashesLoss Of Control
Incident Type Race Mode Street Mode
Crashes
against
Obstacles
✔ ✔
Stationary
Crashes ✔
Low-Side
Crashes ✔ ✔
High-Side
Crashes ✔ ✔
3.1 Envelope of Protection for STREET MODE
3.1.1 STREET MODE: Envelope of Protection for Crashes against Obstacles
In Street Mode, the Tech-Air® 10 System is active only when the System Check is passed (see
chapter 12) and after having started riding for approximately 10 seconds. Once activated,
the System remains active even if the rider stops, and until the System is manually switched
off, to offer protection also in a stationary condition when the motorcycle is hit by a vehicle
as described in the Envelope of Protection conditions (see Section 3.1.2).
As summarized in Table 1, in Street Mode the Envelope of Protection includes:
- Crashes against Obstacles
- Stationary Crashes
- Low-Side Crashes
- High-Side Crashes
Tech-Air® 10 System is expected to inflate and protect before the user’s body contacts an
obstacle, in Crashes Where a Motorcycle Strikes a Vehicle or Obstacle (Figure 3) in these
conditions:
Table 2: crash conditions
Relative Arrival Speed From 25km/h (15mph)
to 50km/h (31mph)
Impact Angle (Fig 3) From 45° to 135°
The above parameters are valid for both the rider and passenger.
50km/h
45°
45°
Figure 3

15 EN14 EN
Vehicle Arrival Speed From 25km/h (15mph)
Impact Angle From 45° to 135°, rear/front
3.1.2 STREET MODE: Envelope of Protection for Stationary Crashes
Only in Street Mode, the Tech-Air® 10 System is tested to activate in Crashes Where a
Vehicle Strikes a Stationary Motorcycle (Figure 4) in these conditions:
The above parameters are valid for both the rider and passenger.
Outside the conditions of Table 2, the System may not deploy before
the first impact, but may deploy if the rider suddenly falls from the
motorcycle after the impact, regardless of the impact angle.
WARNING!
IMPORTANT! Figure 3 outlines the Envelope of Protection where the Tech-Air® 10 System
is expected to inflate before the user’s body contacts an obstacle. At speeds
above 50km/h (31 mph) or outside the declared angle, the System is
expected to deploy as well, however, outside the Envelope of Protection
the System may not be fully inflated before there is contact between the
obstacle and the user.
Figure 4
50km/h
45°
45°
During Loss of Control Crashes, and in particular in Low-Side Crashes,
the System may not deploy before the first impact with the ground,
but may deploy during the following sliding phase, if present.
Depending on the type of motorcycle, when the System is in Race
Mode, the activation speed may vary, up to 100km/h. If the User
stops or reduces the speed under this limit of 100km/h, for an
extended period of time, the System will not activate in the case of
an accident.
WARNING!
WARNING!
IMPORTANT! If the (relative) speed between the Motorcycle and the vehicle or obstacle
during the impact is less than 25km/h (15 mph), the System may not deploy
at the time of the collision/crash, but may deploy if the rider or passenger
suddenly falls from the motorcycle after the impact.
3.1.3 STREET MODE: Envelope of Protection for Loss of Control Crashes
3.2 Envelope of Protection: RACE MODE
A Loss of Control Crash (Low-Side and High-Side Crashes) often results in the motorcycle
falling over during riding, without necessarily being involved in a crash with other vehicles
or obstacles. This commonly happens when tire grip on the roadway is lost during a turn
or heavy braking.
In Race Mode, the Tech-Air® 10 System is active only while riding above approximately 60
km/h (37mph) for at least 10 seconds. Before this activation or when the rider’s speed drops
steadily below such speed for at least 10 seconds, the System deactivates.
As summarized in Table 1, in Race Mode the envelope of protection includes:
- Crashes against Obstacles
- Low-Side Crashes
- High-Side Crashes
In Race Mode the Envelope of Protection does not include situations in which the rider’s
motorcycle whilst stationary is hit by another vehicle.

17 EN16 EN
When Race Mode is selected, the System may not deploy before the
first impact even inside the conditions of Table 2, but may deploy
if the rider suddenly falls from the motorcycle after the impact,
regardless of the impact angle.
!If the crash conditions are outside the Envelope of Protection
described above, the System may not deploy if the acceleration and
angular speed measured by the System are not sufficient to activate
the Tech-Air® 10 System.
WARNING!
WARNING!
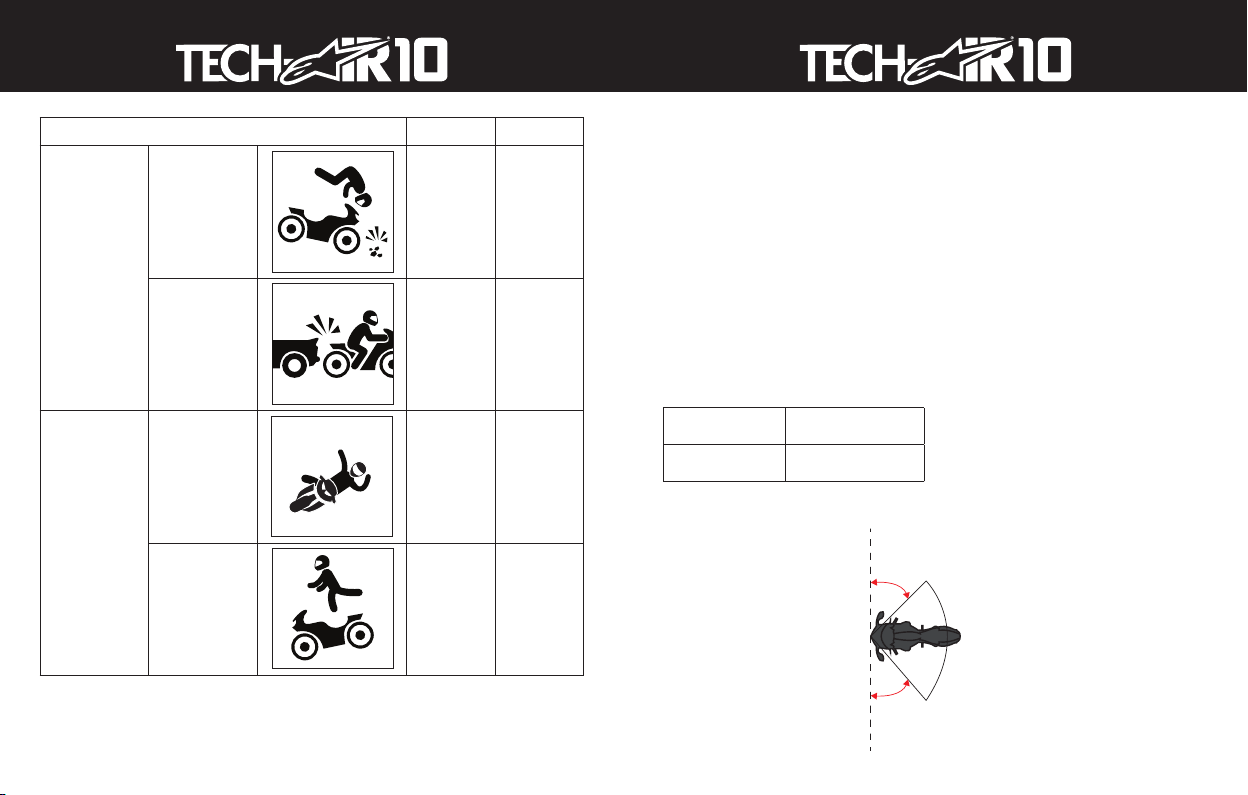
3.2.1 RACE MODE: Envelope of Protection for Crashes against Obstacles
3.2.2 RACE MODE: Envelope of Protection for Loss of Control Crashes
3.3 Envelopes of Protection: Limitation of use
In Race mode, Tech-Air® 10 System is expected to inflate and protect in Crashes where a
Motorcycle Strikes a Vehicle or Obstacle in the same conditions as outlined in chapter 3.1.1
for the Street Mode.
In Race mode, Tech-Air® 10 System is expected to inflate and protect in the same situations
as outlined in chapter 3.1.3 for Street Mode
There are some limitations to the deployment of Tech-Air® 10 System even inside the
Envelopes of Protection, when, in general, the environmental conditions prevent the System
from measuring acceleration and/or angular speed sufficiently to activate the System.
Always make sure to select the Street Mode when riding on roads.
Use Race Mode only for closed race tracks.
The user does not need to be involved in a crash for the System to
deploy. For example, the System will deploy if the user falls while
wearing the System, such as when dismounting from the motorcycle.
These types of “non-riding” deployments are not failures of the
System.
WARNING!
WARNING!
Motorcycle Type
The Tech-Air® 10 System can be utilized by riders or passengers on any type of motorcycle,
including electric motorcycles.
IMPORTANT! The chances of falling off a motorcycle are notably higher when riding off-
road, particularly when a rider is inexperienced. Even when stopped, a fall
may cause the System to deploy, leaving the user without protection until
the System is returned and recharged (see Section 16).
Light Off-Road Riding
Only when Street Mode is selected, can the Tech-Air® 10 System be used off-road IN A
LIMITED CAPACITY riding on gravel roads only. For the purpose of using the System off-road,
the definition of a gravel road is:
• An unpaved road surfaced with gravel.
• Has a minimum width of 4m (13ft).
• Has no gradients +/-30%.
• Has no ruts, steps or holes greater than 50cm (19.5”) in depth.
The Tech-Air® App permits the user to temporarily disable the System
protection if, for instance, the user is undertaking heavy off-road riding.
The System cannot be turned on again with the App, but only by means of
opening and closing again the Activation Belt.
Since the System is sensitive to sudden body movements and shocks,
the System is to be used ONLY for motorcycling within the conditions
and limitations delineated above. The System is NOT for use in:
a. Any racing or competitive events, unless the Race Mode is selected;
b. Enduro, Motocross, or Supermoto events;
c. Motorcycle stunts; or
d. Side skidding, wheelies, etc.;
e. ANY non-motorcycling activities.
WARNING!
4. Limitations of Use
Due to shocks, movement and/or other input detected and/or
received by the System while in use, although unlikely, the System
may deploy even though there is no crash event.
WARNING!

19 EN18 EN
Depending on the motorcycle type for example a scooter or trials
bike, it cannot be guaranteed that the System will inflate before the
user collides with parts of the motorcycle, or other objects.
Wearing the System is not a substitute for wearing other protective
motorcycling clothing and gear. To offer full potential protection
the System must always be worn in conjunction with suitable
motorcycling gear and apparel that covers the rider from head to
toe, including a helmet, protectors, boots, gloves, jacket, and other
appropriate protective equipment.
WARNING!
WARNING!
The System’s working temperature is between -20° and +50° (-4°F
to 122°F).
Do not use the System 4000 meters above sea level as low pressure
may not guarantee a correct level of protection for the System.
WARNING!
WARNING!

21 EN20 EN
5. System Overview
The diagrams below illustrate the different parts of the Tech-Air® 10 System. The numbered
parts are used to guide you through this user manual.
TECH-AIR® 10 SYSTEM
1
3a
3b
3c
2
5
10
7
4
3
6
9
8
11
1. Base Layer
2. Closure Zip
3. Wireless LED
Display
4. Activation Belt
5. Airbag
6. Canister Housing
7. Back Protector
8. Back Protector
Zip Connections
9. Magnetic
Recharge Docking
Area for LED
Display
10. Type C USB
Recharge Port
11. Peripheral
Sensors
Figure 5
AIRBAG ELECTRONIC CONTROL UNIT
Figure 6
INSERT LATCH
INTO NOTCH
NOTCH FOR
LATCH
PUSH TO
RELEASE
14
10 12 13
12. Type C USB Adapter
13. Magnetic Charging Cable
14. USB Charger

23 EN22 EN
Wireless LED Display
The Tech-Air® 10 System is supplied with an LED Display (3) with wireless technology
capable of communicating with the Airbag’s Electronic Control Unit (ECU). The LED Display
(3) indicates the System power on and the running operating mode. It also provides
indication on the battery level of the Tech-Air® 10 System, as well as its own battery level.
The Wireless LED Display (3) can be removed from its Docking Area (9) on the Activation
Belt (4), and placed on the suit (where predisposed) or anywhere the rider prefers within a
radius of approximately 1 meter. See Section 13, for the meaning of the LED light indications
provided by the LED Display (3). To recharge, place the LED Display (3) on the Docking
Area (9) present on the Activation Belt (4). Charging is carried out via magnetic recharge
connection that activates when the LED Display (3) is paired with the Activation Belt (4).
After the pairing, the LED Display (3) will show its battery level for 3 seconds and then will
continue to function normally while in the charging state. The LED Display (3) recharges
even when the Tech-Air® 10 System is not charging.
When fully charged, and removed from the Docking Area (9) on the Activation Belt (4), the
battery duration of the LED Display (4) is approximately 20 hours. The condition of low
battery of the LED Display (3) is indicated by blinking LEDs every 2 minutes (see Section 13).
IMPORTANT! The System is active even if the LED Display (3) is out of battery or not
present on the System.
Figure 7
3
4
9
6. Sizing
The System is available in sizes ranging from XS to 3XL. Each size is
characterized by a specific waist-to-shoulder length of the user (Figure 8).
Table 1 below lists the sizes of the System, the waist-to-shoulder length
and a suggested person height to assist with the selection.
Table 1
Figure 8
Vest Size Int. Size User’s Waist to Shoulder length Suggested Height Range
XS 38-40 38 (14.9’’) to 43cm (16.9”) Up to 164cm (65.6’’)
S 42-44 41 (16.1’’) to 46cm (18.1”) Up to 175cm (68.9’’)
M 46-48 44 (17.3’’) to 48cm (18.9’’) Up to 182cm (71.8’’)
L 50-52 46 (18.1’’) to 50cm (19.7’’) Up to 190cm (74.8’’)
XL 54-56 46 (18.1’’) to 50cm (19.7’’) Up to 190cm (74.8’’)
2XL 58-60 48 (18.9’’) to 53cm (20.9’’) Up to 202cm (79.3’’)
3XL 62 48 (18.9’’) to 53cm (20.9’’) Up to 202cm (79.3’’)
The height range suggested is only for reference. Always check the
correct waist-to-shoulder length before choosing the size of the
System.
WARNING!
7. Health and Age Restrictions
The System must not be handled by children at any time.
In the event of a crash, inflation of the System will cause sudden
pressure across the back and torso. This can cause discomfort and/or
pain and/or complications to users in poor health.
WARNING!
WARNING!
IMPORTANT! In Europe the Pyrotechnic Directive EU 2013/29 prohibits the sale of
pyrotechnic articles to anyone under the age of 18.
The System must not be used by persons with a history of heart
problems, or other diseases, conditions, afflictions or illnesses which
may weaken the heart.
WARNING!

25 EN24 EN
Any body piercings which coincide with the airbag coverage area
should be removed before electing to use the System, as inflation of
the airbag into and against the body piercings may cause discomfort
and/or injury.
The System must not be used by persons with neck or back problems.
The System must not be used by women during pregnancy.
The System must not be used by women with artificial breast
implants.
The System must not be used by persons fitted with a pacemaker or
other implanted electronic medical devices.
WARNING!
WARNING!
WARNING!
WARNING!
WARNING!
Allergy Advice
Persons with certain skin allergies to synthetic, rubber or plastic materials, should carefully
monitor their skin each time the System is worn. If any irritation of the skin occurs,
immediately stop wearing the System and seek medical advice and/or attention.
8. Compatible Outer Garment
The Tech-Air® 10 System must be used with a protective outer garment, as the System is
not abrasion resistant. It is recommended that the user chooses a protective outer garment
that, when worn over the Tech-Air® 10 System, does not cause discomfort and does not
prevent the functioning or inflation of the System.
The System can be used with any protective garment that covers the upper body and the
hips and that is designed for a motorcycle, provided that the garment has sufficient space
to allow for the expansion of the airbag after the deployment.
Alpinestars offers many Tech-Air® compatible outer garments (Tech-Air® Compatible 1 and
2 piece suits, and the new generation of Tech-Air® Ready garments), specifically designed
with stretch panels to accommodate the volume of the inflated airbag after deployment.
Even if Tech-Air® Compatible and Tech-Air® Ready Garments are
specifically designed according to certain standard sizing criteria
to be used with Tech-Air® Systems, always try the outer garment
together with the System in order to correctly select the appropriate
fit accordingly to your body size. This will ensure that the outer
garment has the necessary space to accommodate the System in
its inflated state and that the System does not cause discomfort or
prevent the correct functioning of the System when it expands.
WARNING!
Body measure Garment measure
Compatibility with any outer garment
If your outer garment is not Tech-Air® Compatible or Tech-Air® Ready, or in case of any
doubts, follow the procedure described below to check if your outer garment is compatible
with the System. Remember to ensure that you select an outer garment that has the
proper fit and should any protectors be present on such outer garment, that the protectors
are correctly positioned. If the outer garment you have chosen is made of leather or any
different not-stretchable material, it must have stretch panels to accommodate the inflated
airbag after deployment.
Upon inflation, the Tech-Air® 10 System’s airbag covers shoulders, chest, hips and fullback
area, accordingly, the System must not be used inside a leather suit or a 2-piece leather
suit, if such leather suit or 2-piece leather suit has insufficient space to accommodate the
inflation of the airbag or if too tight in the crotch area, in order to prevent discomfort in
case of deployment. From a sizing guidelines perspective, it is important that you wear an
outer garment that will accommodate for the inflation of the airbag.
Here are some guidelines on how to check if your outer garment is compatible with the
Tech-Air® 10 System: C C
AA1
BB1
Figure 9

27 EN26 EN
The Tech-Air® 10 System must ALWAYS be used with a properly
fitting outer garment to the user’s appropriate body size. Use of the
System inside an incorrectly sized outer garment, or with an outer
garment that is not compliant with the size check recommendations
above, may result in the System malfunctioning or failure and injury,
including severe injury and/or death.
WARNING!
1. For the chest area, measure the circumference of the chest (A) and the garment width
on the chest region (A1). The garment is compatible with Tech-Air® 10 System if A1 > 0.5
X A + 12
2. For the hips area, be sure to have 2 cm of space all around the hips area (B).
3. For the Shoulders area (C), be sure that the suit can be raised up 4cm without creating
any discomfort.
9. System Installation and Fitting
To use the Tech-Air® 10 System with an outer garment the user must go through the
following steps:
1. Put on the System, close the Closure Zip (2) from bottom to the top.
2. Close the Activation Belt (4) taking care to correctly attach the hook-and-loop patches, as
shown in Figure 10; the System automatically turns on as soon as the belt is attached with
the hook-and-loop patches.
3. Once the Activation Belt (4) has been correctly closed, check the LED Display (3) to verify
that the System has turned on and that has started correctly (see “Display Indications” in
Section 13). In particular, the user must verify that, after the System starts-up, no system
fault is present.
Activation Area
Activation sensor
Figure 10
4. Once the regular functioning of the System is verified as indicated by the green (3a) or
the yellow (3b) and green (3c) LEDs, the user may proceed to put on the outer garment
taking care to ensure that the System remains well fitted underneath the outer garment,
and that the System and the outer garment all fit perfectly in place. Particular care must be
taken to the shoulder areas of the System which must be correctly positioned within the
sleeves of the outer garment.
5. Once the System has been correctly installed, fasten the outer garment.
6. Once the Tech-Air® 10 System is switched on (see “Display Indications” in Section 13), the
System is ready to deploy under the conditions explained in Section 3 above.
It is imperative that the System is fitted correctly in order to provide
the maximum potential protection in the event of an accident. Outer
garments which are too small will cause severe discomfort when the
System is inflated, and outer garments which are too large may not
hold the System in place during a fall or accident. In case of doubt or
questions regarding proper fit, please seek advice from an authorized
Alpinestars’ Dealer.
Always ensure that the Activation Belt (4) is open when the Tech-
Air® 10 System is not worn by the user; check the LED Display (3) to
verify that the System is not turned on.
WARNING!
WARNING!
10. Transportation of Objects Inside the Outer Garment
When using an outer garment, particular consideration needs to be given to the objects
which may be placed inside the pockets. For example:
- Sharp or pointed objects placed in pockets may pierce the airbag and will compromise the
inflation of the airbag.
- Bulky objects may limit the airbag expansion after deployment, potentially reducing the
effectiveness of the airbag and/or making the System feel much tighter when inflated,
thereby increasing discomfort or causing distraction or injury.
IMPORTANT! Particular attention should also be paid to the contents of the outer
garment’s internal breast pocket. ONLY flat objects such as a wallet or a
mobile phone should be stored within the outer garment’s internal breast
pocket.

29 EN28 EN
11. Battery Charging
The Tech-Air® 10 System is supplied with a wall USB Charger (13), a Magnetic Charging
Cable (12) and a Type C USB Adapter (11), for an easy and fast plug-in to the Type C USB
Recharge Port (10).
The wall USB Charger (13) is supplied with 4 different plugs to adapt to the most common
power sources.
Provided that they fit comfortably inside the pockets, only blunt
objects should be transported in an outer garment’s pockets. Under
NO circumstances should a user attempt to transport objects of ANY
size or shape, including sharp or pointed objects, that will be tightly
stuffed inside an outer garment’s pockets, as such objects will cause
injury to the user and/ or damage to the airbag when the System
becomes inflated.
WARNING!
Users should note that the System has been tested to be safe when used
in combination with backpacks (worn over the outer garment) loaded up
to a maximum of 6kg (approximately 13 pounds) in weight.
Tip:
IMPORTANT!
IMPORTANT!
Always connect the proper plug to the USB Charger (13), correctly fitting the
power source available; always check that the plug is properly connected to
the USB Charger (13) before connecting to the power source.
While charging, always be sure that the USB Charger (13) is connected to a
power source sufficiently near to Tech-Air® 10 System, and be sure that the
power source is always easily accessible.
Fully charge the System before the first use. To do this, connect the supplied Magnetic
Charging Cable (12), or a standard Type C USB charging cable, to the Type C USB Port (10)
present on the upper part of the Back Protector (7). Once on charge, the LED display (3)
will display a different combination of solid and blinking LEDs, according to the description
provided in “LED Indications” (See Section 13).
Do not leave the System unattended while charging the battery.
Charge only in a dry location with a temperature range of 0°C to
40°C (32°F – 104°F).
WARNING!
IMPORTANT!
IMPORTANT!
The battery will only recharge when the ambient temperature is between
0°C and 40°C (32°F – 104°F).
If the battery is not periodically charged, it may take longer to fully charge
it.
In the case of a user using a charger different from that supplied
with the System, for a safe operation always ensure that the used
USB charger is compliant to EN 62368-1 as a class 1 (ES1) and class
1 (PS1) or 2 (PS2) power source, with a maximum output current of
2 Amperes.
The System should be recharged as soon as possible when the red
Battery Level LED light (3c) flashes, as this indicates a low battery
level.
WARNING!
WARNING!
The System may be charged by connecting it to a computer, or to an
alternative Micro USB Charger. However, if the current output is under 1
Ampere, the charging times will be longer than those stated above.
Tip:
Charging and Use Times
Approximately 4 hours are required to recharge a discharged battery with the supplied
USB Charger (13), with exception of the first battery charge which may require a longer
time (approx. 12 hours). A fully charged battery will provide approximately 24 hours of
use. If limited time is available, charging the battery for approximately 1 hour will provide
approximately 6 hours of use.
LED Display Charging
To charge the LED Display (3), position it on the Docking Area (9) present on the Activation
Belt (4), taking care to ensure that the LED Display is well attached to the support. If
properly connected, the LED Display (3) will show the indication of its battery level (see
Section 13) in the first 3 seconds following the connection.
A fully charged LED Display (3) operates for at least 20 hours.

31 EN30 EN
12. System Operation
a) Turning On “Race Mode” and “Street Mode”
To turn on the System, zip up the Zip Closure (2) and close the Activation Belt (4) taking care
that the hook-and-loop patches are correctly attached. An internal sensor detects that the
Activation Belt (4) is closed and the System will turn on. At this point, the user MUST check
the LED Display (3) to verify that the System starts correctly. See “Display Indications” in
Section 13 below for the meaning of the LED indicator lights.
In order to activate the Tech-Air® 10 System, the Activation Belt (4)
must be correctly closed taking care that the hook-and-loop patches
are correctly attached.
Always check that the appropriate Riding Mode is selected either by
means of the Tech-Air® App and/or by checking the LED Display (3)
Indications during the System start up.
WARNING!
WARNING!
If the System does not power on (no LED Indications illuminate) check
that the Activation Belt (4) has been correctly closed. In addition, check
that the Tech-Air® 10 battery has charge and that the LED Display (3) is
correctly positioned on the Docking Area (9). In case the LED Display (3) is
not connected to the Activation Belt (4), be sure that its battery is charged
by positioning it on the Docking Area (9). If the problem persists, contact
Tech-Air® Support (see Section 19 “Tech-Air® Support”).
Tip:
The status of the Tech-Air® System can be checked by connecting the System
using the Tech-Air® App. When the System Check has been successfully
passed and the System is active, the Tech-Air® App will display the indication
“System On.”
System inactivation can also be “forced” directly using the App. This
functionality can be useful in case the user wants to turn off the airbag
protection, for instance before undertaking some heavy off-road riding
[please note that the System cannot be turned on again by means of the App.
To turn on the System, open and close the Activation Belt (4)].
In Race Mode, the Tech-Air® 10 System is active only while riding
above approximately 60 km/h (37mph) for at least 10 seconds. Before
this activation or when the rider’s speed drops steadily below such
speed for at least 10 seconds, the System deactivates.
Depending on the type of motorcycle, when the System is in Race
Mode, the activation speed may vary, up to 100km/h. If the User
stops or reduces the speed under this limit of 100km/h, for an
extended period of time, the System will not activate in the case of
an accident.
WARNING!
WARNING!
b) System Check and activation for “Race Mode”
When Race Mode is selected, after the completion of the System start up, the LED Display
(3) will show solid green and yellow LED lights, meaning that the system will not deploy
and is checking to see a valid riding speed. The yellow light will turn off only when the rider
reaches 60 km/h (37 mph) and only then, the System will be ready to deploy. If the rider
stops or the speed drops under the 60 km/h (37 mph) for an extended period of time, the
System will return in the System Check phase (indicated by the solid yellow and green LEDs
– see Section 13 below).
c) System Check and activation for “Street Mode”
After the System is correctly turned on, if the Street Mode is selected, the System starts
performing the System Check as in the Race Mode. This operation is indicated by the solid
yellow (3b) and green (3a) LED indicator lights. However, for Street Mode the System doesn’t
look to the riding speed, but checks if the System is correctly worn, since in this mode the
System must be active even if the speed is null. As in Race Mode, during the System Check,
the System will not deploy. This phase may take several seconds.
Whilst the System Check is being performed, the System is looking for the user’s body
movements to conduct one or all of the following activities:
• Walking (including up and down stairs)
• Mounting the motorcycle
• Riding the motorcycle.

33 EN32 EN
Note that the following activities are unlikely to pass the System Check:
• Zipping up the jacket without wearing it
• Standing still
• Sitting down – INCLUDING sitting on the motorcycle with the engine at idle.
If the System Check is passed, a solid green (3a) LED indicator light will illuminate.
In Street Mode, the Tech-Air® 10 System is active only after having
started riding for approximately 10 seconds. Once activated, the
System remains active even if the rider stops, and until the System
is manually switched off, to offer protection also in a stationary
condition when the motorcycle is hit by a vehicle as described in the
Envelope of Protection conditions (see Section 3).
In Street Mode, you MUST ALWAYS check the LED Display (3) after
the System Check to confirm you have the solid green (3a) LED
illuminated before starting to ride/use the Tech-Air® 10 System. The
System will not deploy if a solid green LED (3a) is not present on the
LED Display (3).
WARNING!
WARNING!
d) Turning Off
Turn the System off by opening the Activation Belt (4). The System will shut down after
approximately 1 second. Confirm that the System is off by checking that the LED Display
(3) is recharging or off.
To keep the System turned off, keep the Activation Belt (4) open as shown in Figure 11.
Always keep the System in this condition while stored, transported or shipped.
ALWAYS turn the System off [by opening the Activation Belt (4)]
when you are not riding a motorcycle, even if you continue to wear
the System. Although the System has been evaluated for a number
of non-riding activities, keeping the System turned on and/or active
increases the possibility of an unwanted deployment and drains the
battery. So as a rule, when not riding, always open the Activation
Belt.
WARNING!
When not in use and being stored, transported or shipped, the System
must be turned off by leaving the Activation Belt (4) open. This
prevents the System from accidentally turning on and inadvertently
deploying, and it will preserve battery and battery life.
WARNING!
IMPORTANT! Even when the System Check has successfully been completed, the System
will automatically turn off should the System detect:
- a rider position incompatible with the normal wearing of the System or
- no movements
for more than 10 minutes. When either of the above situations occur, open
and close the Activation Belt (4) to restart the System and perform a new
System Check.
Figure 11

35 EN34 EN
13. LED Display Indications
The LED Display (3) has three coloured LEDs which are used to indicate the status of the System.
LED Indications During Normal Use
TTuurrnnoonn
SSyysstteemmFFaauulltt
LED Check
Battery Level Indication
System Check
SSyysstteemmAAccttiivvee
4 to 8 hours Over 8 hoursUnder 4 hours
SSyysstteemmOOFFFF
3s
1s
3s
1s
In case of
Low Battery
Min 10s
Max 60s
BlinkOff On
G
G
l
l
o
o
s
s
s
s
a
a
r
r
y
y
Duration
System
Start Up
System
Check
Standard
Operating
Mode
SSyysstteemmOONN
12
1
2
System Fault: Operating Mode that verifies in case of “Empty
Gas Canister” or “System Error” (see Section 18,
“Troubleshooting”)
System Active: Operating Mode that verifies in case the System
Check is successfully passed (see Section 12, “System
Operation”)
In case of
Low Battery
B
B
a
a
t
t
t
t
e
e
r
r
y
y
R
R
e
e
c
c
h
h
a
a
r
r
g
g
e
e
Fully charged
Under 8 hours
8to 18 hours
18 to 30 hours
BlinkOff On
GGlloossssaarryy
BBaatttteerryyRReecchhaarrggee
Fully charged
Under 8 hours
8to 18 hours
18 to 30 hours
BlinkOff On
G
G
l
l
o
o
s
s
s
s
a
a
r
r
y
y
LED Indications During Recharge
Any LED indication different from the solid green LED (3a) indicates
that the System is not active and accordingly will NOT deploy in a
crash.
WARNING!
IMPORTANT! The solid green LED (3a) indicates that the System is on.
Indications during battery charging
When the Tech-Air® 10 is charging and the LED Display is correctly placed in the Docking
Area (9) of the Activation Belt (4), the LED Display (3) will show a continuous blinking as
indicated in the above diagram LED Indications during Recharge. When the battery is fully
charged, all 3 LEDs will remain illuminated.
In the case the LED Display (3) is removed from the Docking Area (9), LED Display (3) will
show the blinking as indicated above only for 5 seconds and then it will automatically switch
off in order to save the battery.
When the Tech-Air® 10 is charging, the LED Display (3) indicates the battery level of the
System, disregarding the status of charge of the LED Display (3), with LED lights blinking
as indicated above.
8 to 16 hours
16 to 24 hours

37 EN36 EN
BBaatttteerryyRReecchhaarrggee
Fully charged
Under 8 hours
8to 18 hours
18 to 30 hours
BlinkOff On
GGlloossssaarryy
Less than 4 hours
Between 8 and 12 hours
More than 12 hours
LED Display low battery status (1 second every 2 minutes)
LED Display Battery Level Indication
The LED Display (3) is powered by an internal battery. Every time it is positioned on the
Docking Area (9), the internal battery is recharged, disregarding the fact that the entire
System is recharging through the Recharge Port (10) or not.
After the connection of the LED Display (3) to the Docking Area (9), the Display will show its
battery level for 3 seconds, by blinking the LED light according to the figure below:
When the LED Display (3) battery is low (less than 4 hours) the LED Display (3) will indicate
the low battery status by blinking all the three LED lights (3a), (3b) and (3c) for 1 second,
every 2 minutes.
14. Cleaning, Storage and Transportation
Back Protector and Airbag
Use only a cloth dampened with water to clean the Back Protector (7) and the Airbag (5)
(fabric and plastic parts). Solvents or chemical cleaners must not be used, as they may
compromise the integrity of the System.
Under NO circumstances should the back protector and the airbag be
washed in a washing machine, submerged in water, tumble dried or
ironed. This may cause permanent damage to the System and cause
malfunction.
WARNING!
Base Layer Cleaning
The Base Layer (1) can be washed according to the instructions reported on the care label.
Before washing, remove the Back Protector (7) and the Airbag (5) from the Base Layer
(1), unzip the Back Protector Zip Connections (8) and detach the hook-and-loop patches
on the neck. Remove the Peripheral Sensors (11) positioned on the back of the shoulders
by opening the hook-and-loop pocket and removing the component from its seat. Before
removing the Airbag (5) from the Base Layer’s (1) pockets, detach the clips inside each
pocket as detailed in Figure 12.
Detach the Airbag (5) only to wash the Base Layer (1). The Airbag
(5) is a very critical safety part of Tech-Air® 10 System. Always use
extreme caution when handling the Airbag (5). Any scratches, holes,
or damage to the Airbag (5) will lead to the System’s malfunction,
accordingly if there is any such damage to the Airbag (5) do not use
the System and send the System to Alpinestars or an authorized
Alpinestars Tech-Air® Service Centre for service.
WARNING!
After cleaning the Base Layer (1), proceed with the correct reassembly of the Airbag (5) on
the Base Layer (1) following the instructions below and Figure 12:
1. Attach the hook-and-loop patch present at the upper part of the Airbag (5) with the
corresponding patch present on the Base Layer (1)
2. Close both the Back Protector Zip Connections (8)
3. Reposition the Peripheral Sensors (11) on the back of the shoulders. To do this, access the
sensor pocket through the appropriate opening, open the hook-and-loop pocket, place the
sensor in its seat and close the hook-and-loop pocket so that the sensor is fixed. Note: the
direction in which the sensor is positioned at the point of its seat is not important, but it
is essential that the sensors coming out on the right and left side of the Back Protector (7)
are placed, respectively, on the right and left shoulder, and not vice versa.
4. Insert each protective area of the Airbag (5) inside the corresponding pocket taking care
to position the Airbag (5) correctly (avoiding twisting or folds) and to anchor the Airbag (5)
using all the clips available on the Base Layer (1). There are 9 clips in total and are divided as
follows: 3 clips on the Left Shoulder (LS) area, 2 clips on the Right Shoulder (RS) area, 2 clips
for the Chest (C) area, 1 clip for the Left Hip (LH) area and 1 clip for the Right Hip (RH) area.

39 EN38 EN
IMPORTANT! Particular attention must be paid during the insertion of the region of
the Airbag (5) that protect the chest area to avoid twisting the narrower
region passing on the right shoulder. The obstruction of the canal could
compromise the correct inflation and therefore the protection of the Airbag
(5) in the chest area (see Figure 13).
Figure 12
C1
C2
LS1
LS2 RS1
RS2
LS3
LH1 RH1
Chest (C)
Peripheral
sensors
Left
Shoulder
(LS)
Left Hip
(LH)
Right Hip
(RH)
Hook-
and-loop
patch
Back
Protector
Zip
Connections
Right
Shoulder
(RS)
Peripheral
sensors pockets
Peripheral
sensors pockets
RS1
RH1
LS2
LH1 RH1
LS3 RS1
RS2
LH1
LS2
LS1
C1 C2
Always check that all the connection clips are properly closed after
the reassembly of the Airbag (5) on the Base Layer (1).
WARNING!
IMPORTANT! If the battery becomes fully drained, the System may require a longer
time to recharge. It is thus recommended that the System be periodically
recharged as indicated.
Storage
When not in use, it is recommended that users store the System in its original packaging.
It may be stored flat provided that no heavy or sharp objects are placed on top of it. The
System can also be stored hung up on a hanger. The System should always be stored in a
cool, dry place, out of direct sunlight.
The battery of the System slowly self-discharges, even if the System is not turned on,
especially if the System is stored in a warm environment. It is thus recommended that even
whilst in storage, the System be periodically recharged (at least once every 18 months) to
prevent battery drainage and shortening of the battery life.
Figure 13
CORRECT
FRONT
BACK
INCORRECT

41 EN40 EN
Do NOT leave the System in direct sunlight inside a closed car, or
otherwise exposed to high temperatures. High temperatures will
damage the battery and possibly the electronic components of the
unit.
The System’s storage temperature must be between -20°C and +60°C
(-4°F to 140°F). Exposure to a temperature lower than -20°C (-4°F)
may cause permanent damage to the battery.
Zipping up the Base Layer (1) and closing the Activation Belt (4) will
cause the System to turn on. To prevent this, it is essential that
the Activation Belt (4) is opened, in order to prevent accidental
activations of the System. Failure to do so will cause the System
to turn on, which will cause the battery to drain. When storing the
System remember to keep the Activation Belt (4) open and check
that there are no indicator lights illuminated on the LED Display (3).
WARNING!
WARNING!
WARNING!
Transportation
Users should be aware that the Tech-Air® 10 is classified as a Life-Saving, self-inflating
Jacket, UN class 2990; Under the European pyrotechnic Directive (2013/29/EC) the Tech-
Air® 10 System is certified safe for transportation, including by air. Detailed instructions for
the transportation can be found in the Safety Data Sheet (SDS) related to the Tech-Air® 10
System available in the Documentation Section of the TechAir® App.
When transporting the System by air, users are strongly recommended to download and
print a copy of the Safety Data Sheet (SDS) in case they are questioned by airport staff. See
also Section 17 for the PIS download from the Tech-Air® App.
Note: Not all countries worldwide permit the import of pyrotechnic devices. Prior to
traveling, users should check with the appropriate authorities of countries through which
and to which they will be traveling to determine if the System will be permitted entry or not.
The Safety Data Sheet (SDS) can be downloaded using the Tech-Air® App and
found in the Documentation section.
15. Maintenance, Servicing, Lifespan and Disposal
Garments with electronically activated airbags are critical safety systems which must be
maintained in good working order to ensure their correct function. If not, they may not
function properly or at all.
Maintenance
Prior to each use, the user should conduct a check of the System, looking for any signs of
wear (loose threads, holes, marks) or damage. If any signs of wear are found, the System
should be inspected further by an authorized Alpinestars Tech-Air® Service Centre.
Servicing
Alpinestars recommends that the System be routinely inspected at least every 2 years
or after 500 hours of functioning by Alpinestars or an authorized Alpinestars Tech-Air®
Service Centre. During the inspection service, the airbag and the unit’s components will
be examined. Inspection can be requested directly at an Alpinestars Tech-Air® Dealer. The
following work is undertaken as part of the routine service:
• All components are removed from the System and the Base Layer is washed.
• The diagnostics of the electronic unit are checked (and firmware upgraded, if applicable).
• The airbag is inspected for any sign of wear and/or damage.
• The System is reassembled into the base layer and checked functionally.
Two years or 500 hours of functioning is the maximum recommended
period between inspections.
Tip:
If no service or recharge operation has been conducted after two
years or 500 hours of functioning from the purchase date, there is
the possibility that the System will not function inside the Envelope
of Protection.
There are NO user serviceable parts inside the System. Under no
circumstances should users attempt to open, service, disassemble or
modify the System. Do not remove or change the internal battery. Any
and all work performed on the System must be done by Alpinestars
or an authorized Alpinestars’ Tech-Air® Service Centre. Severe injury
or damage may result otherwise.
WARNING!
WARNING!
Other manuals for Tech-Air 10 System
1
Table of contents
Languages:
Other Alpinestars Motorcycle Accessories manuals