R&G CR0081 User manual

Page 1of 14 CR0081
R&G Racing
Unit 1, Shelley’s Lane, East Worldham, Alton, Hampshire, GU34 3AQ
Tel: +44 (0)1420 89007 Fax: +44 (0)1420 87301 www.rg-racing.com Email: info@rg-racing.com
FITTING INSTRUCTIONS FOR CR0081
OFFSET COTTON REEL
ZERO DSR 2019-
THIS KIT CONTAINS THE ITEMS PICTURED AND LABELLED OVER PAGE.
SOME PARTS MAY BE SHOWN FOR CLARITY OF INSTRUCTIONS ONLY.
DO NOT PROCEED UNTIL YOU ARE SURE ALL PARTS ARE PRESENT.
PLEASE READ ALL INSTRUCTIONS BEFORE PROCEEDING.
IF IN ANY DOUBT WHEN FITTING OUR PRODUCTS, CONSULT ONE OF OUR DEALERS
OR HAVE FITTED BY A QUALIFIED TECHNICIAN.
PLEASE NOTE THAT THE WAY THE KIT IS PACKED DOES NOT NECESSARILY REPRESENT THE WAY OF
MOUNTING TO THE BIKE.
IN THE EVENT OF RUBBER WASHERS BEING USED TO HOLD COMPONENTS ONTO BOLTS,
THESE RUBBER WASHERS CAN BE THROWN AWAY.
DIGITAL COPIES OF THESE INSTRUCTIONS ARE AVAILABLE FROM:
WWW.RG-RACING.COM

Page 2of 14 CR0081
R&G Racing
Unit 1, Shelley’s Lane, East Worldham, Alton, Hampshire, GU34 3AQ
Tel: +44 (0)1420 89007 Fax: +44 (0)1420 87301 www.rg-racing.com Email: info@rg-racing.com
TOOLS REQUIRED
•27MM SOCKET + RATCHET
•8MM ALLEN KEY
•SUITABLE BIKE LIFTING STAND
GENERAL TORQUE SETTINGS
M4 BOLT = 8Nm
M5 BOLT = 12Nm
M6 BOLT = 15Nm
M8 BOLT = 20Nm
M10 BOLT = 40Nm
M12 BOLT = 40Nm
LEGEND
ITEM NO.
DESCRIPTION
QTY
ITEM 1
M0599 LHS REPLACEMENT CHAIN ADJUSTER
1
ITEM 2
M0600 RHS REPLACEMENT CHAIN ADJUSTER
1
ITEM 3
S1017 SPACER (6.5mm)
2
ITEM 4
B0443 10mm COTTON REEL
2
ITEM 5
M10 16mm O/D WASHER
2
ITEM 6
M10 x 1.25 x 50mm LONG CAP HEAD BOLT
2
ITEM 7
NC0010 M10 NUT CAPS
1

Page 5of 14 CR0081
R&G Racing
Unit 1, Shelley’s Lane, East Worldham, Alton, Hampshire, GU34 3AQ
Tel: +44 (0)1420 89007 Fax: +44 (0)1420 87301 www.rg-racing.com Email: info@rg-racing.com
FITTING INSTRUCTIONS
•Staring from the RHS of the bike, use a 27mm socket to loosen the axle nut as
shown in picture 1. This will be easiest when the rear wheel is on the ground,
do not fully remove the nut at this stage.
•You will need to lift the rear wheel off the ground by lifting the swingarm and
supporting the rear wheel with wooden blocks, as shown in picture 2, to stop
the wheel dropping when the spindle is removed in the following steps.
•Fully remove the axle nut and remove the spindle as shown in picture 3. You
may wish to use a soft mallet and a suitable drift in order to aid removal.
•Remove the OEM adjuster blocks.
•Referring to LHS Assembly diagram, replace the OEM adjuster block with the
LHS metal block (item 1), ensuring the recessed section is pointing away from
the bike.
•Referring to RHS Assembly diagram, replace the OEM adjuster block with the
LHS metal block (item 2) as shown in picture 4, ensuring the adjuster markings
are facing upwards.
•Replace the spindle in the original orientation ensuring the head of the spindle
sits into the recess of the LHS adjuster block.
•Refit the spindle nut and tighten to the manufacturers suggested torque (you
may wish to torque the nut once the rear wheel is on the ground)
•For each side, refer to the relevant assembly diagram and proceed with the
following steps:
oPlace one M10 washer (item 5) over one M10 x 50mm cap head bolt (item
6).
oPass the threaded section of the bolt through either cotton reel (item 4)
so the washer sits into the counterbore.
oSlide one spacer (S1017 –6.5mm –item 3) over the bolt.
oFit the bolt and cotton reel assembly into the threaded boss of the chain
adjuster blocks using an 8mm allen key and tighten to the recommended
torque.
oFit one nut cap (item 7) into each bolt head as shown in picture 5.
•You can now lower the bike and re-check all bolts are tight before riding.
•Re-check tightness of all bolts regularly to ensure correct operation.
ISSUE 1 05/03/2020 (DM)

Page 6of 14 CR0081
R&G Racing
Unit 1, Shelley’s Lane, East Worldham, Alton, Hampshire, GU34 3AQ
Tel: +44 (0)1420 89007 Fax: +44 (0)1420 87301 www.rg-racing.com Email: info@rg-racing.com
CONSUMER NOTICE
The catalogue description and any exhibition of samples are only broad indications of the Products and
R&G may make design changes which do not diminish their performance or visual appeal and supplying
them in such state shall conform to the order. The Buyer acknowledges no representation or warranty
(other than as to title) has been given or will apply to the Products other than those in R&G’s order or
confirmation and the Buyer confirms it has chosen the Products as being of merchantable quality and
suitable for its particular purposes. Where R&G fits the Products or undertakes other services it shall
exercise reasonable skill and care and rectify any fault free of charge unless the workmanship has been
disturbed. The Buyer is responsible for ensuring that the warranty on the motorcycle is not affected by
the fitting of the Products. On return of any defective Products R&G shall at its option either supply a
replacement or refund the purchase money but shall not be liable if the Products have been modified or
used or maintained otherwise than in accordance with R&G’s or manufacturer’s instructions and good
engineering practice or if the defect arises from accident or neglect. Other than identified above and
subject to R&G not limiting its liability for causing death and personal injury, it shall not be liable for
indirect or consequential loss and otherwise its liability shall be limited to the amounts paid by the
Buyer for the Products or the fitting or service concerned. These terms do not affect the Buyer’s
statutory rights.
R&G RACING RETURNS POLICY (NON-FAULTY GOODS)
Returns must be pre-authorised (if not pre-authorised the return will be rejected). Goods may only be
returned direct to us if they were purchased direct from us (customer must prove if necessary).
Otherwise to be returned to original vendor. Goods must be in re-sellable condition, in the opinion of
R&G Racing. All returns are subject to a 25% restocking and handling fee (25% of the gross value exc.
P&P –at the prevailing price at time of purchase). The customer must pay any and all carriage
charges. No returns of discontinued products, unless within 14 days of purchase. This policy does not
affect your statutory rights and does not refer to faulty goods.

Page 7of 14 CR0081
R&G Racing
Unit 1, Shelley’s Lane, East Worldham, Alton, Hampshire, GU34 3AQ
Tel: +44 (0)1420 89007 Fax: +44 (0)1420 87301 www.rg-racing.com Email: info@rg-racing.com
NOTICE DE MONTAGE POUR CR0081
PROTECTION BRAS OSCILLANT
ZERO DSR 2019-
LE KIT CONTIENT LES ARTICLES EN PHOTO ET ETIQUETTES SUR LA PAGE.
LES PARTIES PRESENTÉES PEUVENT ETRE UNIQUEMENT REPRESENTATIVES POUR LA CLARTE DES
INSTRUCTIONS.
NE PAS PROCEDER AU MONTAGE AVANT DE VOUS ETRES ASSURE QUE TOUTES LES PIECES SOIENT PRESENTES.
SVP, LIRE L’ENSEMBLE DE LA NOTICE AVANT DE PROCEDER AU MONTAGE.
EN CAS DE DOUTE LORS DU MONTAGE, CONSULTEZ UN DE NOS REVENDEURS, OU
FAITES EFFECTUER LE MONTAGE PAR UN TECHNHICIEN QUALIFIE.
LA FAÇON DONT LE KIT EST EMBALLE NE CORRESPOND PAS FORCEMENT A LA FAÇON DE MONTER LES
PIECES SUR LA MOTO.
NOTEZ QUE SI LES KITS SONT EMBALLES AVEC DES RONDELLES EN CAOUTCHOUC SERVANT A TENIR LES
COMPOSANTS,CES RONDELLES DOIVENT ETRE JETEES.
NOTICE DISPONIBLE AU TELECHARGEMENT SUR :
WWW.RG-RACING.COM

Page 8of 14 CR0081
R&G Racing
Unit 1, Shelley’s Lane, East Worldham, Alton, Hampshire, GU34 3AQ
Tel: +44 (0)1420 89007 Fax: +44 (0)1420 87301 www.rg-racing.com Email: info@rg-racing.com
OUTILS REQUIS
•CLE A CLIQUET + DOUILLE DE 27MM
•CLE ALLEN 8MM
•BEQUILLE DE STAND ADAPTEE
VALEURS DE SERRAGE
M4 BOULON = 8Nm
M5 BOULON = 12Nm
M6 BOULON = 15Nm
M8 BOULON = 20Nm
M10 BOULON = 40Nm
M12 BOULON = 40Nm
LEGENDE
ARTICLE NO.
DESCRIPTION
QTE
ARTICLE 1
M0599 AJUSTEUR DE CHAINE CÖTE GAUCHE
1
ARTICLE 2
M0600 AJUSTEUR DE CHAINE CÖTE DROIT
1
ARTICLE 3
S1017 ENTRETOISE (6.5mm)
2
ARTICLE 4
B0443 10mm BOBINE
2
ARTICLE 5
M10 16mm O/D RONDELLE
2
ARTICLE 6
M10 x 1.25 x 50mm BOULON
2
ARTICLE 7
NC0010 M10 CACHE ECROU
1

Page 10 of 14 CR0081
R&G Racing
Unit 1, Shelley’s Lane, East Worldham, Alton, Hampshire, GU34 3AQ
Tel: +44 (0)1420 89007 Fax: +44 (0)1420 87301 www.rg-racing.com Email: info@rg-racing.com
NOTICE DE MONTAGE
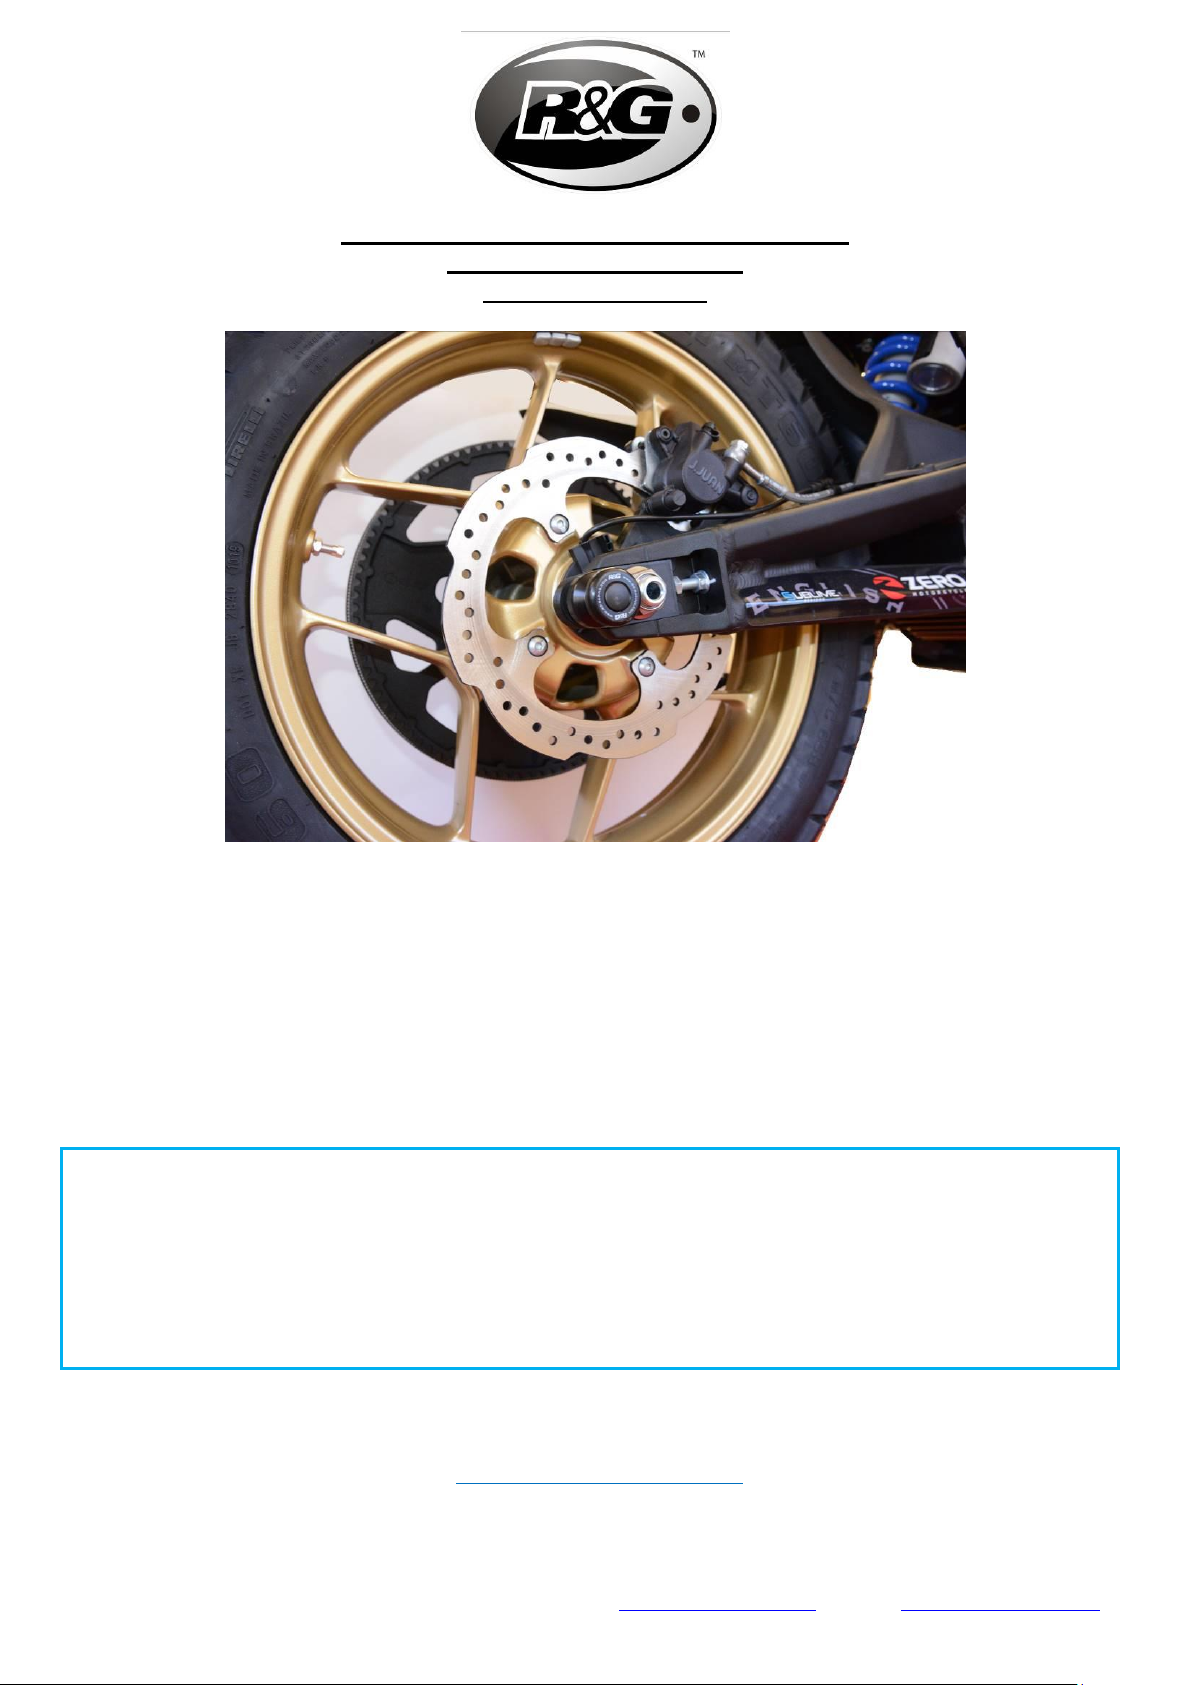
•En partant du côté droit de la moto, utilisez une douille de 27 mm pour
desserrer l'écrou d'essieu comme indiqué sur la photo 1. Ce sera plus facile
lorsque la roue arrière sera au sol, ne retirez pas complètement l'écrou à ce
stade.
•Vous devrez soulever la roue arrière du sol en soulevant le bras oscillant et en
soutenant la roue arrière avec des cales en bois, comme indiqué sur la photo 2,
pour éviter la chute de la roue lorsque l'axe sera retiré dans les étapes
suivantes.
•Retirez complètement l'écrou d'axe et retirez l’axe comme indiqué sur la photo
3. Vous pouvez utiliser un maillet doux et une dérive appropriée pour faciliter le
retrait.
•Retirez les blocs de réglage d’origine.
•En vous référant au schéma d'assemblage côté gauche, remplacez le bloc de
réglage d’origine par le bloc métallique côté gauche (article 1), en vous
assurant que la section en retrait soit orientée vers l’extérieur de la moto.
•En vous référant au schéma d'assemblage côté droit, remplacez le bloc de
réglage d’origine par le bloc métallique côté gauche (article 2) comme indiqué
sur la photo 4, en vous assurant que les repères de réglage soient orientés vers
le haut.
•Remettez la broche dans son orientation d'origine en vous assurant que la tête
de l’axe se trouve dans l'évidement du bloc de réglage côté gauche.
•Remontez l'écrou d’axe et serrez au couple suggéré par le fabricant (vous
pouvez souhaiter serrer l'écrou une fois que la roue arrière est au sol)
•Pour chaque côté, reportez-vous au schéma de montage correspondant et
procédez comme suit :
oPlacer une rondelle M10 (article 5) sur un boulon à tête cylindrique M10 x
50 mm (article 6).
oPasser la section filetée du boulon à travers l'une ou l'autre des bobines
de protection (article 4) pour que la rondelle se place dans le contre-
alésage.
oGlissez une entretoise (S1017 - 6,5 mm - article 3) sur le boulon.
oInsérer le boulon et la bobine de protection dans le bossage fileté des
blocs de réglage de chaîne à l'aide d'une clé Allen de 8 mm et serrer au
couple recommandé.
oPlacer un capuchon d'écrou (article 7) dans chaque tête de boulon comme
indiqué sur la photo 5.
•Vous pouvez maintenant abaisser la moto et revérifier que tous les boulons
soient bien serrés avant de rouler.
•Revérifiez régulièrement le serrage de tous les boulons pour garantir un
fonctionnement correct.
.
ISSUE 1 05/03/2020 (DM)

Page 11 of 14 CR0081
R&G Racing
Unit 1, Shelley’s Lane, East Worldham, Alton, Hampshire, GU34 3AQ
Tel: +44 (0)1420 89007 Fax: +44 (0)1420 87301 www.rg-racing.com Email: info@rg-racing.com
MONTAGEANLEITUNG FÜR CR0081 MONTAGESTÄNDER-AUFNAHMEN
FÜR ZERO DSR 2019-
ALLE KIT-TEILE SIND AUF DEN FOLGENDEN SEITEN ABGEBILDET &GEKENNZEICHNET
DIE ABGEBILDETEN TEILE DIENEN LEDIGLICH ZUR ERKLÄRUNG.
ÜBERPRÜFEN SIE ZUERST,DASS ALLE TEILE VORHANDEN SIND.
LESEN SIE DIE MONTAGEANLEITUNG KOMPLETT DURCH,BEVOR SIE ANFANGEN.
WENN SIE BEI DER MONTAGE DIESES PRODUKTES UNSICHER SIND, BITTE EINEN
UNSERER HÄNDLER KONTAKTIEREN ODER DAS KIT VON EINEM QUALIFIZIERTEN
ZWEIRAD-MECHANIKER MONTIEREN LASSEN.
DIE VERPACKUNG DER TEILE STELLT NICHT DIE REIHENFOLGE DER MONTAGE DAR.
HINWEIS FÜR KITS MIT PLASTIKUNTERLEGSCHEIBEN AN DEN SCHRAUBEN –DIESE PLASTIK-
UNTERLEGSCHEIBEN WERDEN NICHT FÜR DEN EINBAU BENÖTIGT!
EINE DIGITALE VERSION DIESER MONTAGEANLEITUNG KANN AUF
FOLGENDER SEITE HERUNTERGELADEN WERDEN:
WWW.RG-RACING.COM

Page 12 of 14 CR0081
R&G Racing
Unit 1, Shelley’s Lane, East Worldham, Alton, Hampshire, GU34 3AQ
Tel: +44 (0)1420 89007 Fax: +44 (0)1420 87301 www.rg-racing.com Email: info@rg-racing.com
SIE BENÖTIGEN FOLGENDES WERKZEUG
•27MM STECKSCHLÜSSEL
•8MM INBUSSCHLÜSSEL
•PASSENDES MOTORRADHEBER
ALLGEM. ANZUGSDREHMOMENT
M4 SCHRAUBE = 8Nm
M5 SCHRAUBE = 12Nm
M6 SCHRAUBE = 15Nm
M8 SCHRAUBE = 20Nm
M10 SCHRAUBE = 40Nm
M12 SCHRAUBE = 40Nm
LIEFERUMFANG
ARTIKEL
NR.
BESCHREIBUNG
MENGE
ARTIKEL 1
M0599 ERSATZ VERSTELLBARE HALTEPLATTE /
KETTENSPANNER LINKE SEITE
1
ARTIKEL 2
M0600 ERSATZ VERSTELLBARE HALTEPLATTE /
KETTENSPANNER RECHTE SEITE
1
ARTIKEL 3
S1017 DISTANZHALTER (6,5mm)
2
ARTIKEL 4
B0443 10mm MONTAGESTÄNDERAUFNAHMEN
2
ARTIKEL 5
M10 16mm O/D UNTERLEGSCHEIBE
2
ARTIKEL 6
M10 x 1.25 x 50mm INBUSSCHRAUBE
2
ARTIKEL 7
NC0010 M10 SCHRAUBEN-ABDECKUNG
1

Page 14 of 14 CR0081
R&G Racing
Unit 1, Shelley’s Lane, East Worldham, Alton, Hampshire, GU34 3AQ
Tel: +44 (0)1420 89007 Fax: +44 (0)1420 87301 www.rg-racing.com Email: info@rg-racing.com
MONTAGEANLEITUNG
•Beginnen Sie an der rechten Seite des Motorrades, und benutzen Sie einen
27mm Steckschlüssel, um die Achsmutter zu lösen wie in Abbildung 1
abgebildet. Dies geht am einfachsten, wenn das Hinterrad nicht angehoben ist –
zu diesem Zeitpunkt die Mutter nicht komplett entfernen.
•Das Hinterrad muss dann aufgebockt werden, indem die Schwinge angehoben
wird und das Hinterrad mit Holzblöcken gestützt wird, wie in Abbildung 2
abgebildet Somit wird verhindert, dass das Rad herunterfällt, wenn die
Verbindungsstange in den nachstehenden Schritten entfernt wird.
•Die Achsmutter komplett entfernen und die Verbindungsstange entfernen wie in
Abbildung 3 abgebildet. Die Verwendung einen Schonhammers kann die
Entfernung erleichtern.
•Entfernen Sie die original verstellbare Halteplatten.
•Entsprechend der Abbildung Zusammenbau linke Seite, ersetzen Sie die original
verstellbare Halteplatte mit der Metallplatte für die linke Seite (Artikel 1) –
achten Sie dabei darauf, dass der ausgefräste Ausschnitt vom Motorrad
weggerichtet ist.
•Entsprechend der Abbildung Zusammenbau rechte Seite, die original
verstellbare Halteplatte mit der Metallplatte für die rechte Seite (Artikel 2)
ersetzen wie in Abbildung abgebildet –achten Sie dabei darauf, dass die
Einstellmarkierungen nach oben gerichtet sind.
•Die Verbindungsstange wieder wie ursprünglich einsetzen. Stellen Sie sicher,
dass die Verbindungsstange in die Vertiefung des Einstellblocks für die linke
Seite passt.
•Die Achsmutter wieder montieren und mit dem empfohlenen
Anzugsdrehmoment des Herstellers befestigen (dies können Sie auch
wiederholen, wenn das Hinterrad wieder auf dem Boden ist).
•Entsprechend der jeweiligen Zeichnung (Zusammenbau) für jede Seite, mit den
nachstehenden Schritten den Einbau fortsetzen:
oEine M10 Unterlegscheibe (Artikel 5) an einer M10 x 50mm
Inbusschraube (Artikel 6) anbringen.
oDas Schraubengewinde in eine Montageaufnahme (Artikel 4) einführen,
sodass die Unterlegscheibe in die Senkung passt.
oEinen Distanzhalter (S1017 –6.5mm –Artikel 3) an der Schraube montieren.
oDie Schraube und die Montageständeraufnahme in die Gewindebohrung
im neuen Montageblock einführen und mittels eines 8mm Inbusschlüssels
mit dem empfohlenen Anzugsdrehmoment befestigen.
oMontieren Sie eine Schrauben-Abdeckung (Artikel 7) an jedem
Schraubenkopf wie in Abbildung abgebildet.
•Das Motorrad absenken und überprüfen, dass alle Schrauben sicher befestigt
sind, bevor Sie mit dem Motorrad fahren.
•Überprüfen Sie in regelmäßigen Abständen, dass alle Schrauben sicher befestigt
sind.
AUSGABE 1 05/03/2020 (DM)
Table of contents
Other R&G Motorcycle Accessories manuals
Popular Motorcycle Accessories manuals by other brands

Suzuki
Suzuki 45550-23810 Series installation instructions

Athena
Athena KAWASAKI KX 450 F 2016 Assembly instructions

hepco & becker
hepco & becker 650795 00 01 Assembling instructions

SUOMY
SUOMY MX SPEED manual

Arai Helmet
Arai Helmet Penta-Pro Instructions for use

Petzl
Petzl Elios 1 White quick start guide