Alpler RDM-A 30 User manual

ROTARY DRUM MOWER
USER GUIDE

ATTENTION

INDEX
1. INTRODUCTION
2. SAFETY RULES
2.1. GENERAL SAFETY INFORMATION
2.2. SAFETY TRAINING
2.3. WORKING SAFETY
3. SETTINGS
3.1. INTRODUCING THE MACHINE
3.2. TRANSPORTING
3.3. INTRODUCTION
3.4. PREPARING THE MACHINE FOR WORK
4. MAINTENANCE AND REPAIR
4.1. MAINTENANCE PERIODS
5. WARRANTY
3
4-5
4
5
5
6-10
6
7
8
9-12
13-14
14
15

WARNING SIGNS & MEANINGS
CAUTION
CAUTION
This sign warms that the operations descri-
bed could cause damage to machine, if they
are not carried out correctly.
WARNING
This sign warms that the operations descri-
bed could cause serious lesions or long term
health risks, if they are not carried out cor-
rectly.
READ MANUAL FIRST
Read the “Operating and Maintenance Ma-
nual” carefully before first start and keep the
manual nearest.
KEEP CHILDREN AWAY
This symbol expresses to keep the child-
ren away against any risk.
DO NOT STAND NEAR THE MAC-
HINE WHILE IT IS WORKING
This symbol expresses not to stand near the
machine while it is working to avoid any in-
jury.
ROTARY DRUM MOWER USER GUIDE
2www.alpler.uk
Be careful against danger
of entrapment.
Do not carry people or
loads on the plough.
REVOLVING DEVICE
Stay clear of mower knife area as long as
tractor engine is running
Do not open or remove safety shields while the
engine is running
Shut off engine and remove key before
performing maintenance or repair work.

1. INTRODUCTION
ROTARY DRUM MOWER USER GUIDE 3www.alpler.uk
Dear Farmer,
Firstly, we congratulate you for your correct preference on the way to efficiency by selecting the brand “ALPLER”. As your agricultural partner, we offer
you our product in which we combined high quality, low operational cost and effective after-sale service concept.
All of “ALPLER” products are designed for the most efficient and the safest use and tested accordingly in cooperation with the relevant university
departments, agricultural establishments and farmers. We request you to read the user manual before the first operation in order to use our product in
a more effective manner as well as for product and your own safety. The failures that may result from using the product beyond the instructions for use
specified in this manual are not covered by “ALPLER” warranty. “ALPLER” products are manufactured for agricultural utilization purposes only, and our
company does not assume any liability against the conditions arising from misuse. Maintenance, repair and operation of our products must be carried
out by those who were informed on the relevant and possible dangers.
Enjoy your new product and we wish you productive and fruitful years.
We hope to serve you for a long time...
CAUTION
If the product owner changes in the future, please submit this manual to the new owner of the product and inform on
safety measures.
CAUTION

2. SAFETY RULES
ROTARY DRUM MOWER USER GUIDE
4www.alpler.uk
2.1. GENERAL SAFETY INFORMATION
Note the use of the signal words Danger, Warning and Caution with the Safety messages.
The appropriate signal word each has been selected using the following guidelines:
DANGER!
Indicates an imminently hazardous situation that, if not avoided, will result in death or serious injury. This signal word is
to be limited to the most extreme situations typically for machine components, which, for functional purposes, cannot
be guarded.
WARNING
Indicates a potentially hazardous situation that, if not avoided, could result in death or serious injury, and includes hazards
that are exposed when guards are removed. It may also be used to alert against unsafe practices.
CAUTION
Indicates a potentially hazardous situation that, if not avoided, may result in minor or moderate injury. It may also be used
to alert against unsafe practices.
CAUTION
Safety of the operator is one of the main concerns when designing and developing a new piece of equipment. You, the operator, can avoid many
accidents by observing the following precautions in this section.
• Replace any CAUTION, WARNING, DANGER or instruction safety decal that is not readable or is missing.
• Do not attempt to operate this equipment under the influence of drugs or alcohol.
• Review the safety instructions with all users.
This equipment is dangerous to children and persons unfamiliar with its operation. The operator should be a responsible adult familiar with the
equipment and its operation. Do not allow persons to operate this unit until they have developed understanding of the safety precautions and of
how it works.

2. SAFETY RULES
ROTARY DRUM MOWER USER GUIDE 5www.alpler.uk
• To prevent injury or death, use a tractor equipped with a Roll Over Protective System (POPS). Do not paint over, remove or deface any safety signs
or warning decals on your equipment, Observe all safety signs and practice instructions on them.
• Never exceed the limits of a piece of machinery. If its ability to do a job, or to do so safely, is in question – Don’t try it.
• Remember - Your best assurance against accidents is a careful and responsible operator. If there is any portion of this manual or function you do
not understand, contact your local dealer or manufacturer.
• If you have questions not answered in this manual or require additional copies or the manual is damaged, please contact your dealer or ALPLER company.
2.2. SAFETY TRAINING
All machines have stickers glued on. In this stickers machine type, address of manufacturer, machine serial number, model of the machine is prescribed.
• Make sure you get familiar with all devices and elements for handling and with the functions before starting with the work.
• Avoid wearing loose-fitting clothes.
• Clohets should fit tight to the operators body.
• Implements should be connected acorring to the instructions, fastened to the prescribed devices and secured.
• Never left the driving seat during driving.
• Starting devices for remote control shoul be secured in a way that, they can not be unintentionally reliased during transport or work.
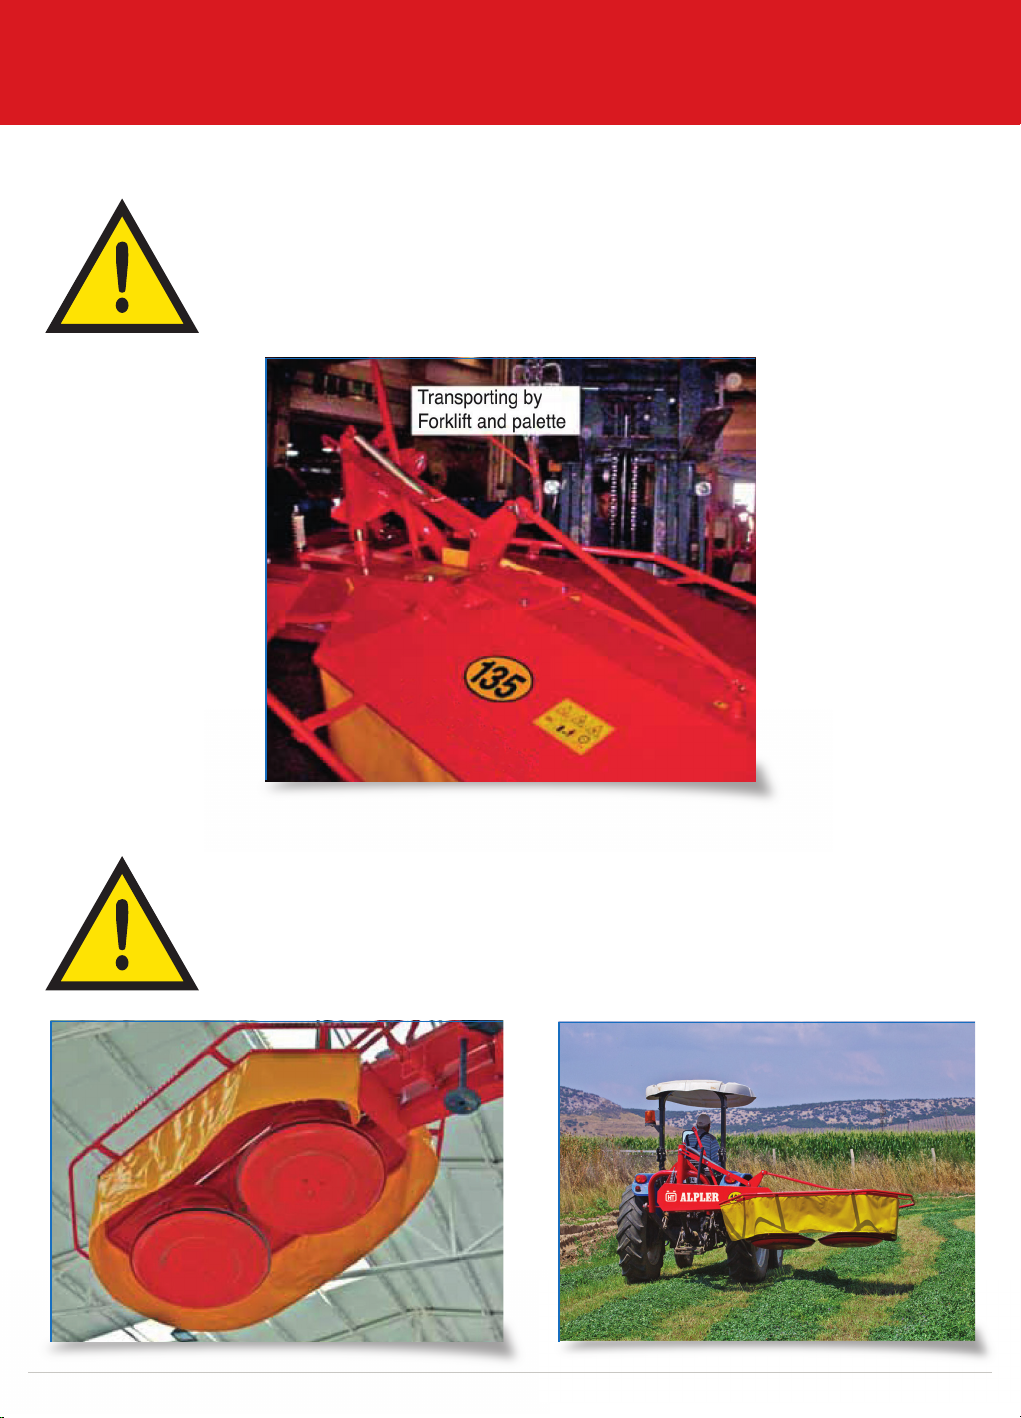
• When disconnecting the machine from the tractor, place it on the flat ground.
• Never jump, sit or climb on the machine while it is connected to the tractor.
• Stopping or operating the machine must be done by the driver.
• No one may drive the tractor exept the driver.
• Use protection for hearing and glasses while working with the machine if the tractor does not have a closed cabin.
2.3. WORKING SAFETY
Safety Decals:
There are three types of main safety decals. These are shown as,
Danger:
When you see this alert symbol and heading be alert to the danger of injury of death of men and animals.
Alert:
When you see this heading, be alert to the possibility of serious injuries because of using the machine out of the using rules.
Attention:
When you see this heading, be alert to the possibility of damage to aquipment, crop, building, etc. But to financial and / or juridical problems as well.
ATTENTION!
Rear operators manuel before starting to work with the machine

3. SETTINGS
ROTARY DRUM MOWER USER GUIDE
6www.alpler.uk
3.1. INTRODUCING THE MACHINE
Rotary Drum Mower has been designed from mowing of all kinds of grass and clover on clean surfaces. It consists of a cutter with 2 drums, where each
of them is eqipped with three knives. Drums are turnablly fastened to the cutter-bar housing. Protection coversi covering the cutter bar from the top,
are also fastened to the cuteer bar housing. The cutter bar is surrounded by protection curtain. Three point hitch for connection to the tractors of the I
or II category is made of round tube. Mower drive is led from the tractor over the P.T.O. Shaft to the connecting shaft of the mower, belt transmission,
gear-box transmission shaft to the gears in the gear-box and over them to the drums. Mower is equipped with a safety fuse which protectsit from
damages which may occur if the mower hits and obstacle.
1. Main Holder
2. Cutter-bar (gear box)
3. Three point hitch system
4. Belt drive
5. Drums
6. Support Leg
7. Knife holder
8. Strecher spring
9. Upper disc
10. Knife
11. Proction plate
12. Curtain

3. SETTINGS
ROTARY DRUM MOWER USER GUIDE 7www.alpler.uk
Alpler offers you the Rotary Drum Mower which is drived by the tractor tail spindle and connected to it with three point heatch system. It reaps, the feet
plants, grass, meadow grass as well as wild plantsand heath borderind the roads. It achieves high capacity with low power consunption and provides
propelland saving. The action is transmitted serially through its three fault belt pooley. The belt of the pooley mechanism is tightened with a spring. It
has an automatic security system. Reaping height can be adjusted. Adjustment is possible for road and work status. Besides the instructions from this
book taken to consideration all generally used safety and accident regulations before working with the machine.
ATTENTION!
While the machine is connected to the tractor and if the tractor is in working position.
3.2. TRANSPORTING
Never carry anyone or any animal on the machine.
Pay attention on the traffic rules on public roads.
Check out the lightening, warning decals, and protection guards before starting to work.
Pay attention to work with the machine in the daylight. Especially at nights in public roads take care to have safety decal (light decal apparatus) on
the machine.
Transporting the machine
1. Transporting with forklift:
You must choose a forklift according to the weight of the machine. Hold the machine from its weight center. Connect the forklift hook on the machine
from the weight center. Start transporting the machine.
2. Transporting with crane:
This method is same as transporting with forklift. Hold the machine from its weight center by crane. Pat attention if the security lock of the crene’s
hook is working safely.
3. Transporting with palette:
Choose palette according to the machine dimentions Transport the machine by forklift while it is on palette.
Figure 1 - Dimentions of Rotary Drum Mower

3. SETTINGS
ROTARY DRUM MOWER USER GUIDE
8www.alpler.uk
3.3. INTRODUCTION
ATTENTION!
Pay attention to be not under the machine while transporting
Figure 2 - Transporting the machine by Forklift and Palette
ATTENTION!
Take care of the hooks and iron ropes of the crane and forklift to be safety enough.

3. SETTINGS
ROTARY DRUM MOWER USER GUIDE 9www.alpler.uk
3.4. PREPARING THE MACHINE FOR WORK
Required Tractor Equipment;
• Mower may only be driven by a tractor shaft with max. 540 rpm.
• Three point connecting bars of the I or II category
Connecting to the Tractor;
Firstly connect the lower non adjustable arm then adjustable arm at the end connect upper connection arm. While disconnecting the machine do the
opposite. The machine should be positioned as near to the tractor as possible, for using the whole working width (Figure 4)
Figure 4 - Connection to the tractor
• The main holder on the machine can be connected to the three point hitch system while the tractor is parallel to the ground as shown in the (Figure 4).
• Connect the prescribed P.T.O shaft and secure the P.T.O shaft connection by a chain (Figure 4).
• Make sure that the P.T.O shaft is in proper position on both ends.
• If the load in front wheels is not enough put additional load.
Adjusment of the P.T.O Shaft;
The adjusment of the P.T.O shaft is necesarry for different tractors. To find out the right length.
• Connect the machine to the tractor
• Pull out the P.T.O shaft entirely an connect each separate half of the shaft to the tractor and than compare them with each other.
• In case you need to shorten the P.T.O shaft, make sure you shorten both shafts and protection tubes for exactly the same length.
• File the end of the tubei remove the remainings of filling and lubricate gliding spots well.
KT4 101 910 100 (covered, triangle piped 400 serial, machine side 1 3/8 Z6, tractor side 1 3/8 Z6-1000 mm. length) shaft is used in Rotary Drum
Mower.
• P.T.O shaft can only be connected when the P.T.O connection and engine are switced off and the ignition key is pulled down.
1- Upper hitch arm
2- Lower hitch arm
3- Right hanger arm
4- Left hanger arm
Figure 5 - Adjusting the length of the P.T.O shaft to the proper dimension for the tractor

3. SETTINGS
ROTARY DRUM MOWER USER GUIDE
10 www.alpler.uk
Preparation of the mower for transport position;
If the machine is connected to the tractor and the machine is in transport position, take the P.T.O shaft in safety by the chain. In working position connect
the P.T.O shaft to the tractor.
Figure 6 - Transport position Figure 7 - Disconnect the tension
spring (1)
Figure 8 - Connect the tension pin
and control (2)
Figure 9 - Lowering of the Mower
from the transport into the working
position (3)
In working position connect the P.T.O shaft to the tractor
Protection chain Figure 10 - Lowering of the Mower from the transport into the working position
Regulation of cutting height
Figure 11
Regulation of cutting height
Figure 12
Fastening of tractor bottom arm
Figure 13
Working abgle of the machine to
the ground
1
2
3
• The machine must be in horizontal position when it is connected to the tractor (2) (Figure 11).
• By turning the tractor upper arm regulate the cutting height (1) (Figure 11).
• Fasten the tractor bottom arm, so you can prevent the vibrations on the machine while it is working (3) (Figure 12).
For a regular cutting, the cutting unit of the machine should not be higher or lower from the ground.

3. SETTINGS
ROTARY DRUM MOWER USER GUIDE 11www.alpler.uk
Replacement of the protection curtain:
• Untighten the screws for fastening the protection curtain.
• Pull the curtain out of the noch.
• Install new curtain and fasten it by screws.
Protection of the Mower:
ATTENTION!
NEVER TOUCH THE MACHINE WITH HAND, FOOT WHILE IT IS WORKING
Drum Mower is equipped with a safety fuse, which gets released when the mower hits an obstacle. Mower
moves backwards. In this case stop immediately and pull backwards so that the safety fuse will get contact
again. Do not forget to remove the obstacle before starting to move again. The safety fues does function
when driving bacwards. In case the sfety fuse in released too fast at normal working, adjust in by a nut
(Figure 14).
Belt tightening:
The vee-belts are mostly streched in the first working hours. On the tightening device there is a spring
that enables the belts to remain tightened inspite of the streching. We advise you to control the level of
tightening from time to time (Figure 14).
Figure 14
Belt tightening working with
Drum Mower
Attention:
• If you tighten the elts more than necessary, there is a danger of damaging the bearings and shaft.
• Pay your best attention to proper mounting and securing of the P.T.O shaft.
1
2
Max.
Rpm.
540
ATTENTION!
Max. Input rotation speed of the machine is 540 rpm.

3. SETTINGS
ROTARY DRUM MOWER USER GUIDE
12 www.alpler.uk
• Make sure that nobody is in the area of danger of the implement before switching on the P.T.O shaft connection.
• When working with the P.T.O shaft connection nobody is allowed to be in the area of rotating connection on the P.T.O shaft.
• After switching off the P.T.O shaft connection the danger of rotating heavier parts remains. Do not get close to the implement during this period. You
can start to work only when the rotation is completely stopped.
• P.T.O shaft protection must be fitted on. And must be in perfect condition.
• Use only original P.T.O shafts prescribed by your manufacturer. Because the manufacturer will not tke any responsibility if another shaft is used.
Transporting the machine to the field to prepare for work:
• Start the engine of the tractor for a munite. Hold the machine with main hydraulic arm. Attach the security lock for not to damage to the hydraulic
system while driving. Strech the streching chains to prevent swinging. Transport the machine empty (without fertilizer) to the field. Fill the fertilizer to
the tank in the field.
• In transporting position, raise the machine up and lock the security pin to prevent the machine fall down.
• In turnings, take into consideration the load which is outside the centre of gravity and/or constant weight of the implement.
• Working with tractor in the tendency fields can give damage to the machine. But if you have to work in these tendency fields take care of working,
do not turn the road bend fastly and sharply. For working in tendency fields you must be careful about if the tractor is decked out with the additional
weights.
ATTENTION!
Stop the engine! Then adjust and prepare the machine for work

4. MAINTENANCE AND REPAIR
ROTARY DRUM MOWER USER GUIDE 13www.alpler.uk
ATTENTION!
Maintenance, repairs, cleaning may only be executed when the drive and the engine are
switched off and the ignition key is pulled out.
Drum Mower is produced by full of quality. So this machine will not need so much maintenance and repair after working with the machine.
Take care about the items that is written below for maintenance and repair:
• Turn engine off when adjustment, service and repair work is to be done.
• Do not work under the machine without safe support.
• Retighten all screws after the first hours of operation.
Cleaning of machine parts:
• Do not use high pressure water for the cleaning of bearing and hydraulic parts (Figure 15).
• Danger of rust.
• After cleaning, grease the machine according to the lubrication chart and carry out a short
test run.
• The knife has cutting edges at both sides. Therefore it is possible as soon as one edge is
blunt to take the knives and use it on the next drum (Figure 16).
Figure 15
Cleaning of machine
parts
Figure 16
Wearing of the knives
• Support the lever against the lower edge of the drum
and press the flexible holder on the lower end of which is
fixed the cutter on the pin.
Remove the damaged knives and apply a new one, at the
same time the rests of fodder around the pins of the knife
holders, eventually from the inner space of the discs.
Remove the lever and check whether the pin of the holder
has returned to the initial position and whether the knife
removes the knife revolves freely on the pin (Figure 17).
Figure 17
Replacing the knives
Replacing the knives:
• Check the wearness of the knives more frequantly on stony ground.
• Check normally every 100 hours.
• Check the mowing blade mountings more frequently when mowing on stony ground.
If mowing disc is worn through close to the mowing knives proceed as follows:
• Remove bottom disc.
• Undo nuts on knife mountings.
• Tighten bolts frimly and check aftersome hours operation. Figure 18
Changing of worn bottom disc

4. MAINTENANCE AND REPAIR
ROTARY DRUM MOWER USER GUIDE
14 www.alpler.uk
CONTROL (A)
Maintenance Period
Lubrication (Level control of gear box oil)
Variation of oil (BR000)
Oil leakage control
Wearness control of drums
Lubrication grease nipples
Tightness controll (bolt-nut)
Cleaning
4.1. MAINTENANCE PERIODS
MAINTENANCE (B) VARIATION (C)
Daily
A
A
A
B
Weekly
B
30 Hours
A
100 Hours 400 Hours
C
Lubrication:
• Lubricate with grease before starting work and every 8 hours worked.
• Before any extended period of non-use, clean and lubricate drive shafts.
• For winter working, grease the tube guards, to avoid them freezing together.
• Gear oils according to operating instructions-however at least once a year.
• Take out oil drain plug, let run out and duly dispose waste oil.
• Before garaging the machine (winter seaseon) an oil change and greasing of all lubricating points has to be done. Unprotected metal parts outside
(joints e.t.c.) have to be protected against corrosion.
The oil in the gear-box is 15-16 kg.
Figure 19
Lubrication chart

5. WARRANTY
ROTARY DRUM MOWER USER GUIDE 15www.alpler.uk
Use original spare parts in ALPLER branded products. The customer will be responsible for the problems that occur due to not using original spare
parts. The Rotary Drum Mower will not covered by the warranty when non-original parts are installed on the Rotary Drum Mower, additional equipment
is attached on the Rotary Drum Mower or it is used after removing standard parts.
While ordering spare parts, for the codes beginning with ‘0’, machine serial number together with the part code should be provided. For other codes,
it is not necessary to provide the Rotary Drum Mower serial number.
Label information are important for identifying the Rotary Drum Mower and for spare part orders. As a measure against the illegibility of the label due to
deformation or its loss, label information on the Rotary Drum Mower should be written literally in the corresponding fields of the following label picture,
and it should be retained.
Our Rotary Drum Mower are warranted for 2 years for faults that may occur due to material, workmanship and mounting errors.
Faults resulting from improper use are not covered by the warranty. The average lifetime is 10 years.
Rotary Drum Mower
production date
Rotary Drum Mower
Total weight
Rotary Drum Mower
serial number
Rotary Drum Mower type

Manufacturer: Alpler Agricultural Machinery Organize Sanayi Bölgesi, Umurlu - AYDIN / TURKEY
UK Quarter: Units 2, Poplars Farm Forshaw Heath Road, Earlswood Solihull, B94 5JX / UNITED KINGDOM
+44 121 740 0194 info@alpler.uk www.alpler.uk
This manual suits for next models
2
Table of contents
Other Alpler Farm Equipment manuals