manuals.online logo
Brands
  1. Home
  2. •
  3. Brands
  4. •
  5. ALSA
  6. •
  7. Medical Equipment
  8. •
  9. ALSA VORTEX/S AS-200 User manual

ALSA VORTEX/S AS-200 User manual

MN V/S AS 200 IN March 1998 pag. 1 di pag. 3
VORTEX/S AS-200 – INSTRUCTION MANUAL
(Edition 1
st
March 1998)
This unit is manufactured by ALSA APPARECCHI MEDICALI S.R.L.- CASTEL MAGGIORE - BOLOGNA - ITALY which
guarantees its safety, reliability and performances only if the installation, recalibrations and repairs are performed by personnel
authorized by ALSA and if the unit is used in compliance with given instructions in an area that meets all the applicable IEC
requirements.
The Manufacturer will supply, on demand, the electric diagrams and any further information needed.
This manual must be kept with the unit.
Please read this entire manual carefully to become familiar with each of the controls and features before making any attempt
to use the equipment clinically and ask for it again if it is missing.
If any questions arise regarding the information contained in this manual according to your specific needs, please contact the
Manufacturer directly or through the local distributor, before using the unit.
VERY IMPORTANT
In accordance with the requirements of the European directive for medical devices 93/42 CEE and with the procedures of
Company Quality System for the after-sale control of the production, the users are pleased to inform the Manufacturer about
every, however small, problem of this unit.
INDICATIONS AND GUIDELINES FOR POWER SETTINGS
According to the international rules EN 10079/1, this equipment is a transportable suction unit with high vacuum/low flow for
hospital and domicile use.
It is indicated:
- For out patients’ departments, first aid departments or to the bed of patients (not for drainage) starting from setting of 300
mmHg
- For pharyngeal suction (starting from setting of 300 mmHg)
- For O.R.L. suction (starting from setting of 400 mmHg)
- For neonatal mucous extraction (starting from setting of 100 mmHg)
- For every kind of need in gynaecological field (starting from setting of 500 mmHg)
- For endoscopic suction (starting from setting of 400 mmHg)
- For permanent tracheostomy suction (starting from setting of 400 mmHg)
- For extremely delicate suctions (starting from setting of 150 mmHg)
- For plastic surgery (starting from setting of 300 mmHg)
In any case this suction unit must be used under direct control of personnel thoroughly trained in the techniques and problems of
medical suction and it is advisable, before using the equipment, to check carefully its performance without trusting blindly to
previous experience with other similar units.
VERY IMPORTANT:
1. Use rigid suction tips (tube, curettes) only when the field is under direct visual control, otherwise use only soft catheter
tubes.
2. For suction on delicate tissues use only suction tips with finger vacuum regulation (this system grants more safety,
intermittent suction and, if necessary, the immediate reduction of suction power).
3. Emergency: if necessary you can obtain quick stop of suction power by disconnecting the handle (B) of the tubing
apparatus/bottle
CANNULAS
OR SUCTION TIPS:
use always cannulas or suction tips according to ISO 10993/1 Rules
PRELIMINARY INSTRUCTIONS (please see details on last page)
a. Check that power input corresponds to the technical data label on the back of the unit.
b. Put the bottle (bottles) on the unit checking the cap (should be well inserted and well pressed) and the relative over-fill device
(the floating must freely work).
c. Connect the unit to the bottle by using the relative intermediate tubing (for the model with 2 bottles, please see design no. 2),
then connect the “patient” tubing.
d. In order to use the pedal switch STOP/PN (an accessory on request) you have to insert in the tubing the ring nut “O” and the
gasket “N” (during the shipping screwed in the plastic part “M”) and so, without activating the pedal, you have to insert the
tubing and the gasket in the plastic part “M” tightening the threaded ring nut.
INSTRUCTIONS FOR USE
(the unit must be used in vertical position without obstructing the air cooling areas - not less of 20 cm from the walls)
1. Switch on the unit by the main switch “1”
2. Select with the switch (ASPIRATION - on the back of the apparatus) the type of working:
- position “CONT.” working without pedal switch
- position “INT.” working only activating the pedal switch
3. Set the vacuum power as indicated in the paragraph “Suction setting”
SUCTION SETTING
To set the desired suction power use the manual control “2” (rotary multi-turn, maximum vacuum clockwise) with the relative
vacuum gauge “3” and, according to the same way but with the patient tubing closed, you can preset the maximum vacuum not to be
exceeded, before using the unit.
OVERFILL DEVICE (the unit can be provided with a supplementary outside overfill device)
The bottle has a specific overfill device which prevents the aspiration of liquid into the pump without stopping the unit but
interrupting the connection between bottle and vacuum pump.
MN V/S AS 200 IN March 1998 pag. 2 di pag. 3
This overfill device must be in good condition, well cleaned and efficient, with floating freely working.
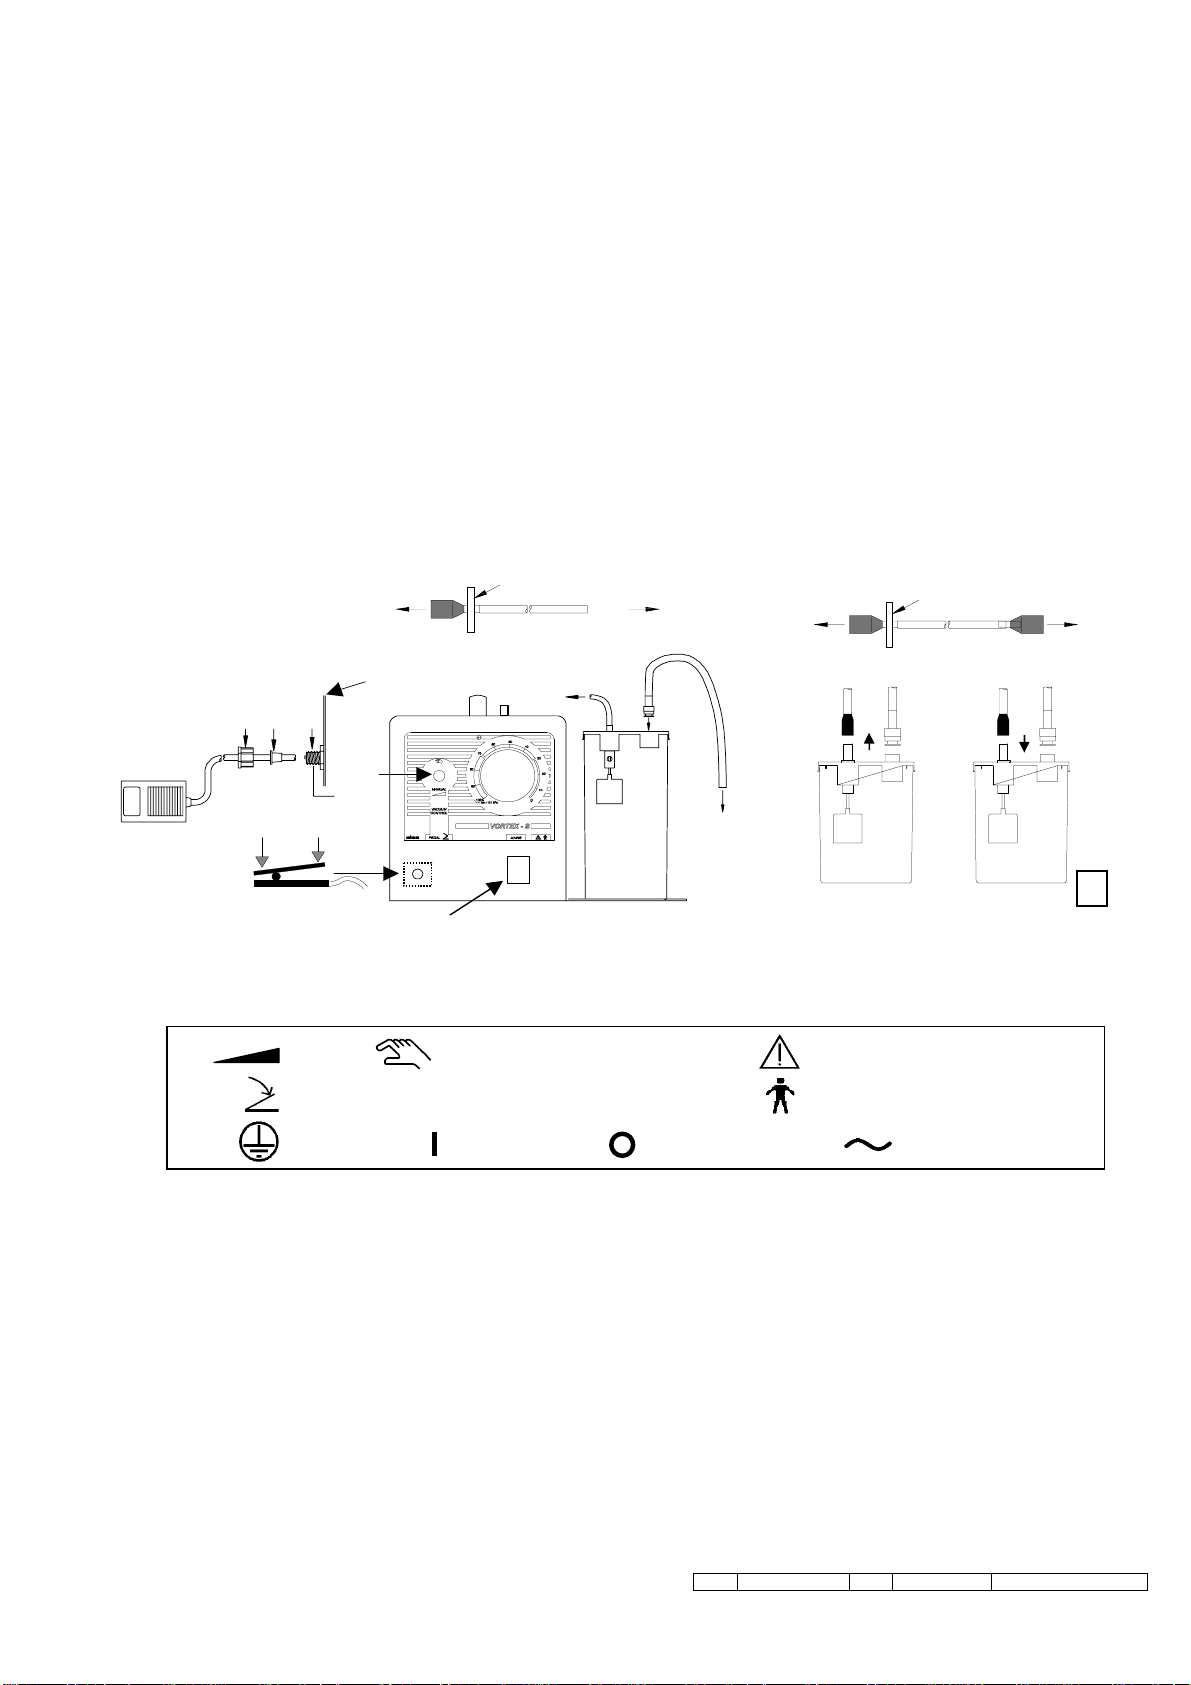
CHANGING OVER AND EMPTYING OF THE BOTTLES
To change the aspiration from a bottle to another one (when the apparatus is supplyed with 2 bottles – see design no. 2 in the last
page) you have to remove from the cap of the first bottle the blue part of the side A of the connection apparatus/bottle and the
connection of the tubing suction/patient (P), inserting them in the relative points of the cap of the other bottle. To empty the full
bottle you have to take it up in a vertical position (you have not to take it from the cap) and then start emptying the liquid through the
hole for the connection of patient tubing.
Take away the cap only at the end when the bottle is nearly empty.
BACTERIOLOGICAL FILTER WITH FUNCTION OF SUPPLEMENTARY OVERFILL
The bacteriological filter, able to stop even liquids and usable as a second safety overfill device, is a in-line filter device, reusable and
sterilizable (30 times by autoclave at 121°C for 20 min.) with retantion rating of 99,97% of all particules ≥0.3 micron.
The filter must be connected according to detail “F” and indications on the filter: it has a specific side to the vacuum, all the group
connections/tubing is made of silicon rubber, sterilizable, and so it can be assembled and disassembled very easily by means of a
simple pressure. During the cleaning the filter can’t be wet. Anyway, if the device works, the internal media filter must be dry
because otherwise stops completely the suction power.
When the filter is new (working at the maximum vacuum with the patient tubing opened) on the vacuum gauge you can see a vacuum
of 10-15 cmHg which raises while the media filter is getting obstructed (at the same time the suction power decreases). The filter
must be replaced after about 30 times (they can be more or less, according to the material aspirated, but in any case don’t exceed 50
times.
QUICK CHECKING OF TUBINGS, BOTTLES, GASKETS AND SO ON
To check tubing, bottles, caps, gaskets, pump and so on (not damaged or obstructed) it is advisable, each time you use the unit, to
switch it on reaching the maximum vacuum with patient tubing closed.
CLEANING, STERILIZATION, MAINTENANCE AND TRANSPORT
Attention: at the moment of sale the accessories (even reusable suction accessories – on request) are not sterile. Bottles with caps
(both unbreakable), tubing with connectors, gaskets, suction accessories, are sterilizable (by autoclave at 121°C for 20 min.) or by
means cold sterilizer solutions (i.e. Cydex). The bacteriological filter is sterilizable (by autoclave at 121°C for 20 min.) but can’t be
wet when cleaning. The overfill device can be sterilized by means cold sterilizer solutions (i.e. Cydex), obviously you have to
remove it first.
The unit may be cleaned with mild soap solution, but take great care that fluid does not enter the system. Wipe dry. When the unit is
not used keep it in a dry, dust-free area at room temperature and take care not to spill any liquid onto the system.
It is advisable to submit the unit for a periodic (annual) inspection, better to the manufacturer.
Move the equipment around the working area keeping it in vertical position.
Check overfill device
Before using the equipment you have to verify the overfill device with the floating freely working and the inside gasket (better if
changed after a working period of 500 hours) well cleaned and in good conditions (to perform this control you can unscrew the ring
nut floating holder).
Never operate on the pump: please, contact trained technical assistance.
DISPOSAL: all the materials, including consumer materials, must be disposed off according to the different
National Rules.
TECHNICAL FEATURES
- Unit meets Safety Rules CEI EN 60601-1 and CEI EN 10079-1.
- Classification CEI EN 10079-1: mobile unit for medical suction (high vacuum/low flow)
- Classification: I type B
- Input voltage, absorption, fuses: please see technical data label on the back of the unit
- Working mode: temporary - max 90 min. (15 sec. max vacuum/15 sec. no vacuum )
- Aspiration pump with thermal protection (max vacuum 650 mmHg ±5%, about -0.86 bar, -86 kPa)
- Vacuum setting: rotary regulator on front panel with vacuum gauge
- Pedal switch: pneumatic, water and explosion proof
- Working noise: less than 60 dB
- Casing protection against liquids: common, not protected
- Cooling: convention cooling with fan on vacuum pump
- Dimensions: cm 32x32x30 – Weight: kg 8
- Collection container (bottle) VMLT 2, capacity ml 1800: 1 or 2 pcs.
- Tubing (silicon rubber made):(patient: length m 2 - ∅7x12 mm), (intermediate: cm 30 - ∅6x11 mm)
- Power cord: section 3x0.75 mm
2
- lenght 2 m.
MN V/S AS 200 IN March 1998 pag. 3 di pag. 3
ATMOSPHERIC CONDITIONS
of use
Temperature (°C) +10 ÷ +35
Humidity 30% ÷ 75%
Pressure (hPA) 700 ÷ 1060
of transport and storage
Temperature (°C) -40 ÷ +70
Humidity 10% ÷ 95%
Pressure (hPA) 500 ÷ 1060
CONTROLS
1. Main switch
2. Working selector
3. Vacuum control
On the back: socket with fuse holders , socket for pedal switch and working selector
2
TO PATIENT
AL PAZIENTE
STOP/PN
ON M
REAR PANEL
PANNELLO
TO UNIT
ALL’APPARECCHIO
1
MAX
MIN
PEDAL VR
3
AP
AP
F
TO UNIT
ALL’APPARECCHIO
Ø 6x11 mm TO OVERFILL (JAR)
AL TROPPOPIENO (BOTTIGLIONE)
BA
2
F
TO UNIT
ALL’APPARECCHIO
Ø 6x11 mm TO OVERFILL (JAR)
AL TROPPOPIENO (BOTTIGLIONE)
BA
Pedal switch
Variability of vacuum regulation hand control Warning: see instruction manual
Class I - Type B
Ground protection Switching off Alternating current
Switching on

Other ALSA Medical Equipment manuals

ALSA Excell 400 MCDSe User manual

ALSA

ALSA Excell 400 MCDSe User manual

ALSA Excell 400 MCDSe User manual

ALSA

ALSA Excell 400 MCDSe User manual

ALSA EXCELL MCDSe Series User manual

ALSA

ALSA EXCELL MCDSe Series User manual

ALSA ALSATOM MB1 MC User manual

ALSA

ALSA ALSATOM MB1 MC User manual

ALSA Alsatom SU-MPC SU50 User manual

ALSA

ALSA Alsatom SU-MPC SU50 User manual

ALSA ALSATOM SU 100 MPC User manual

ALSA

ALSA ALSATOM SU 100 MPC User manual

ALSA POLIVAC B4/SLT30 2 User manual

ALSA

ALSA POLIVAC B4/SLT30 2 User manual

Popular Medical Equipment manuals by other brands

Karl Storz TELECAM SL II instruction manual

Karl Storz

Karl Storz TELECAM SL II instruction manual

argon audio BioPince instructions

argon audio

argon audio BioPince instructions

Quell Wearable Pain Relief Technology user manual

Quell

Quell Wearable Pain Relief Technology user manual

Planmeca ProMax user manual

Planmeca

Planmeca ProMax user manual

Quest Engineering MPS 3 troubleshooting guide

Quest Engineering

Quest Engineering MPS 3 troubleshooting guide

BVI IPure user guide

BVI

BVI IPure user guide

Avive AED owner's manual

Avive

Avive AED owner's manual

Olympus ORBEYE OME-V200 instructions

Olympus

Olympus ORBEYE OME-V200 instructions

Iridex OcuLight SL Operator's manual

Iridex

Iridex OcuLight SL Operator's manual

COOK Medical Quantum QID-1 manual

COOK Medical

COOK Medical Quantum QID-1 manual

Deltec CADD-Prizm PCS II 6101 Operator's manual

Deltec

Deltec CADD-Prizm PCS II 6101 Operator's manual

Roche Accu-Chek Tender Instructions for use

Roche

Roche Accu-Chek Tender Instructions for use

Ohio Medical Push-To-Set PC2SA Instructions for use

Ohio Medical

Ohio Medical Push-To-Set PC2SA Instructions for use

Ropox Mobilio 40-30404-5 user manual

Ropox

Ropox Mobilio 40-30404-5 user manual

Boscarol OB 2012 FA operating instructions

Boscarol

Boscarol OB 2012 FA operating instructions

BTL VANQUISH ME Operator's manual

BTL

BTL VANQUISH ME Operator's manual

Medical Freezer LOTA System operating manual

Medical Freezer

Medical Freezer LOTA System operating manual

HoMedics PX-100 user manual

HoMedics

HoMedics PX-100 user manual

manuals.online logo
manuals.online logoBrands
  • About & Mission
  • Contact us
  • Privacy Policy
  • Terms and Conditions

Copyright 2025 Manuals.Online. All Rights Reserved.