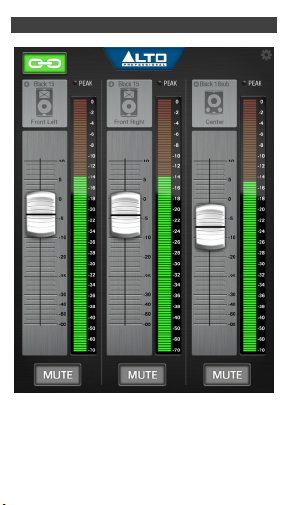
Alto Professional LIVE DRIVE User manual

User Guide
English
Manual Version 1.0

2
Table of Contents
(Tap a section below to jump to it.)
Introduction .....................................................3
Support ......................................................3
Important....................................................3
Bluetooth Pairing.............................................5
Using Live Drive...............................................7
Getting Started...........................................7
Home Page ................................................9
Global Setup Page ...................................12
DSP Page.................................................14
EQ Page ...................................................18
Advanced Page........................................20
Setup Page ..............................................22
Troubleshooting ............................................25
Trademarks and Licenses ............................27

3
Introduction
Support
For the latest information about this product
(system requirements, compatibility information,
etc.) and product registration, visit:
altoprofessional.com/livedrive
For support, visit:
altoprofessional.com/support
Important
Throughout this guide, iOS device refers to a
compatible Apple iPad, iPad mini, iPhone, or
iPod touch using the latest iOS.
The images in this guide are of the Live Drive
app for iPad. The app for iPad mini, iPhone, or
iPod touch may appear slightly differently due
to the screen size, but all the elements
described here will still be on their respective
pages.
The number of Black Series units you can
connect to your iOS device via Bluetooth is
determined by your iOS device (hardware) and
the iOS version (software). For information
about your specific iOS device, please visit
altoprofessional.com/livedrive.

4
Updating the firmware: If there is new
firmware available for any connected Black
Series loudspeakers or subwoofers, Live Drive
will notify you when you first open the app. Tap
the Update Firmware button(s) to update that
loudspeaker's or subwoofer's firmware. During
the process, we recommend not closing the
app and keeping your iOS device within 20 feet
(five meters) of the loudspeakers or subwoofers.

5
Bluetooth Pairing
About Range: Black Series loudspeakers and
subwoofers use an advanced, extended-range
Bluetooth antenna design, allowing for longer
ranges than traditional Bluetooth devices. The
typical range is approximately 100 feet (30
meters) with a clear line of sight. However, the
range may vary depending on your source
device and the environment.
To maximize the range:
Set your iOS device on a flat surface and
make sure there are no obstacles between
the loudspeaker or subwoofer and your
device (e.g., walls, furniture, etc.).
Turn off your iOS device’s Wi-Fi.
Turn off any unneeded 2.4 GHz devices in
the nearby vicinity (e.g., other Bluetooth
devices, baby monitors, Wi-Fi access points,
microwave ovens, etc.).
Try using a different iOS device. Bluetooth
signal strength varies between different
devices.
To pair your loudspeakers or subwoofers to
your iOS device:
1. With the loudspeakers and/or subwoofers
powered on, press and release their Pairing
Buttons. Their Pairing LEDs will flash.
2. In your iOS device’s Settings page, enable
Bluetooth.

6
3. In your iOS device's list of nearby Bluetooth
devices, select one Black Series device to
connect to it, and wait until it is fully
connected before selecting the next one
(if you are connecting multiple loudspeakers
and/or subwoofers). When that device is
paired successfully, the Pairing LED will light
continuously. (This process may take up to
30 seconds.)
4. Repeat Step 3 for any additional Black
Series loudspeakers or subwoofers.
Note: The number of Black Series units you
can connect to your iOS device via
Bluetooth is determined by your iOS device
(hardware) and the iOS version (software).
For information about your specific iOS
device, please visit:
altoprofessional.com/livedrive.
If you power-cycle a Black Series loudspeaker
or subwoofer, it will still "remember" the iOS
device and reconnect automatically.
If you power-cycle your iOS device, you must
go to its Bluetooth settings page and select the
Black Series device to reestablish the
connection.
To erase all previous pairing and linking settings
from your Black Series loudspeaker or
subwoofer, press and hold its Pairing Button
for 10 seconds. The LED will also flash to
confirm the pairing records are erased.

7
Using Live Drive
Getting Started
Before using Live Drive, make sure you have
done the following:
properly set up your Black Series
loudspeakers and/or subwoofers and
powered them on.
updated to the latest iOS version on your
iOS device.
downloaded the latest version of the
Live Drive app from the App Store.
connected your Black Series loudspeakers
and/or subwoofers to your iOS device via
Bluetooth.
After that, open the Live Drive app (or, when
prompted to launch the Live Drive app, select
Allow).
Live Drive has six main pages (two global pages
plus four subpages per connected Black Series
loudspeaker or subwoofer), which are described
in following sections.

8
Tap the page name to jump to that section of
this user guide.
Home Page: This is where you
control the volume levels. Tap
the icon of a loudspeaker or subwoofer to
access its four subpages (described below), or
tap the gear icon in the upper right to access
the Global Setup Page (also described below).
Global Setup Page: This page contains
setup-related features affecting all
connected Black Series loudspeakers
and/or subwoofers.
DSP Page: This page lets you select
the DSP setting for a loudspeaker or
subwoofer.
EQ Page: This page lets you set a
custom EQ curve for a loudspeaker or
subwoofer.
Advanced Page: This page contains
more advanced features (time delay,
custom high-pass filter, and polarity).
Setup Page: This page contains
setup-related features (password
protection, noise testing, and restoring
defaults).

9
Home Page
Tap and drag a fader to adjust its level. You will
see the signal output level in the LED meter.

10
Tap the chain-link icon to "link" the
levels of all connected loudspeakers
and subwoofers together. Their faders will
"snap" to match the level of the lowest one. You
can then tap and drag one fader to adjust
both/all of them simultaneously.
Important: Enabling this link feature resets all
loudspeakers' and subwoofers' DSP Modes (on
the DSP Page) to Flat and resets all Low, Mid,
and High faders (on the EQ Page) to 0 dB. Any
further adjustments to those settings for a
loudspeaker will be made for all other
connected Black Series loudspeakers. The
same goes for subwoofers.
If your connected Black Series loudspeakers or
subwoofers are in different mute states (e.g.,
two are muted while one is not), enabling the
link feature will not affect this. However, if all of
them are already in the same mute state, or if
you mute or unmute all of them, then their Mute
buttons will be linked until you disable the link
feature.
This link feature will not affect anything on the
Advanced Page or any polarity or password
settings.
The Peak indicator will light up
when the signal output level
reaches its maximum playback level. If this
indicator is lit continuously and if the
loudspeaker's or subwoofer's output sounds

11
distorted, (A) reduce the fader's level in the app,
(B) reduce the loudspeaker's or subwoofer's
volume control setting (on its rear panel), or (C)
reduce the output level from your mixer.
The Fault indicator will light up
when the loudspeaker's or
subwoofer's amplifier has stopped working. If
this happens, power-cycle the loudspeaker or
subwoofer (power it off then on again), and
ensure its AC line voltage is within the range of
90–264 VAC. If this indicator still lights up,
please contact Alto Professional support at
altoprofessional.com/support.
Tap a Mute button to mute or
unmute the loudspeaker or
subwoofer.
Tap the icon of a loudspeaker or
subwoofer to access its four
subpages: DSP, EQ, Advanced, or
Setup.
Tap the gear icon to access the Global
Setup Page (described in the next
section).

12
Global Setup Page
Tap a Locate button to play a
brief tone from that loudspeaker
or subwoofer. This is useful if you
need to determine which loudspeaker or
subwoofer is which in your setup. Tap and drag
the Volume of Locate Signal fader to adjust its
level.

13
Tap and drag the ≡symbol next to a
loudspeaker or subwoofer to reorder it,
which affects its placement on the Home Page.
Tap the Enable button to set a
password to "lock out" other iOS
devices from controlling the
loudspeakers and subwoofers. If you need to
use another iOS device to control them, you will
need to enter the password on that iOS device.
Tap the Hardware Password Enable button
again to disable it, or tap the Change
Password button to set a new password.
Note: Your iOS device will remember the
passwords of all previously connected
loudspeakers or subwoofers. If you reconnect
Live Drive to a loudspeaker or subwoofer whose
password you have already entered, you will not
need to re-enter the password.
Tap the iin the lower-right corner of the
screen to open your iOS device's web
browser where you can view the Live
Drive app user guide. (Your iOS device must be
able to access the Internet to do this.)

14
DSP Page
This page lets you select the DSP setting you
want to use on that particular loudspeaker or
subwoofer. The available settings differ between
loudspeakers and subwoofers.
You can use either this page or the hardware
DSP button on the rear panel of the
loudspeaker or subwoofer to select the setting
(unless the Lock Back Panel button is on).

15
Tap the button next to your desired setting:
Flat (loudspeakers only): There will
be no change to the audio.
Contour (loudspeakers only):
Boosted bass and treble with a
gradual cut of mid-range frequencies.
This may be a useful setting for program
material with less-than-desirable bass and high-
frequency levels.
80Hz HP (loudspeakers only):
Applies a high-pass filter. This is
useful when using a Black Series loudspeaker
as a crossover with a subwoofer that does not
have a high-pass output. This setting is also
useful for cutting all bass frequencies (e.g., for
applications with speech only, or when used as
a delay or fill loudspeaker where the extra bass
frequencies are not needed).
Ext LF (loudspeakers only): Extends
the low-frequency response of the
loudspeaker, providing increased output of bass
frequencies.

16
80 Hz, 100 Hz, 120 Hz, 140 Hz
(subwoofers only): Adjusts the low-
pass crossover setting. For most
applications, we recommend using the
80 Hz or 100 Hz setting. Use the 120 Hz or 140
Hz settings to increase mid-bass impact.
Custom: Applies your custom DSP
mode, set in Live Drive's EQ Page.
Polarity (subwoofers only):
Toggles the polarity of the
subwoofer's acoustic output. In some cases,
reversing the polarity can help reduce any
interference in the frequency overlap between a
subwoofer and loudspeaker. This can also be a
useful feature when time-aligning multiple
loudspeakers and/or subwoofers. When the
button is off, the subwoofer is set to its default
positive polarity (the recommended setting).
Important: When using multiple Black Series
subwoofers, make sure they are set to the same
polarity to avoid cancellation of the bass
frequencies.

17
Loop Through Crossover
Bypass (subwoofers only):
Toggles between Standard and Bypass Modes.
When the button is off, the subwoofer is in
Standard Mode (the default) where the XLR
outputs' signal is high-pass-filtered to be sent
to a full-range loudspeaker. When the button
illuminates green, the subwoofer is in Bypass
Mode where the XLR outputs' signal will be
unfiltered and full-range (the XLR outputs
effectively function as loop-through connectors
in this case).
Tap the Lock Back Panel button to
disable the hardware DSP button
on the rear panel of the loudspeaker
or subwoofer. When locked, only the app will
control this setting. Tap the button again to
unlock it and re-enable the rear panel DSP
button.

18
EQ Page
This page lets you set your own EQ curve,
which will be applied when the loudspeaker's or
subwoofer's DSP is set to Custom.
Tap and drag the Low, Mid, or High fader to
adjust the level of the bass, mid-range, or treble
frequencies, respectively. The curve on the grid
will adjust accordingly. Double-tap a fader to
reset it to 0 dB.
The Peak indicator will light up
when the signal output level
reaches its maximum playback level. If this
indicator is lit continuously and if the
loudspeaker's or subwoofer's output sounds
distorted, (A) reduce the fader's level in the app,
(B) reduce the loudspeaker's or subwoofer's
volume control setting (on its rear panel), or (C)
reduce the output level from your mixer.

19
Tap the EQ Bypass button to
allow the signal to ignore the EQ
curve. Tap it again to re-enable it.
Tap the 80Hz HP button to apply
an 80 Hz high-pass filter to the
signal (in addition to the EQ curve). This is
useful when using a Black Series loudspeaker
as a crossover with a subwoofer that does not
have a high-pass output. This setting is also
useful for cutting all bass frequencies (e.g., for
in speech-only applications, or when used as a
delay or fill loudspeaker where the extra bass
frequencies are not needed).

20
Advanced Page
Tap the Delay Enable button to
apply a time delay to the
loudspeaker or subwoofer. Tap the ft (feet) or m
(meters) field to select the distance, and the ms
(milliseconds) field will show the amount of
delay. Alternatively, you can tap the ms field
and select the exact value.
Tap the High Pass Filter
Enable button to modify
the loudspeaker's high-pass filter from the
factory default setting. Tap the High pass freq.
field to set the frequency. This is useful when
using a Black Series loudspeaker as a
crossover with a subwoofer that does not have
a high-pass output. This setting is also useful
for cutting all bass frequencies (e.g., for in
Table of contents
Popular Mixer manuals by other brands

Cuisinart
Cuisinart HTM-3 HTM-5 INSTRUCTION AND RECIPE BOOKLET

Flex
Flex MXE 18.0-EC/5.0 Set Original operating instructions

Louroe Electronics
Louroe Electronics MLA-6 Installation and operating instructions

Varimixer
Varimixer W20D Spare part and operation manual

Marta
Marta MT-MX1522A user manual

Kambrook
Kambrook PowerMix KSM400 Series Instruction booklet