Alto Professional MIXPACK User manual

QUICKSTART GUIDE
ENGLISH ( 3 – 6 )

3
1
NEW
1
NEW
1
NEW
1
NEW
1
NEW
AC100V~ 50/60Hz
110-120V ~ 50/60Hz
220-240V ~ 50/60Hz RATEDPOWER CONSUMPTION:600W
FUSE:100V
110-120V
220-240V
T8AL AC250V
T8AL AC250V
T4AL AC250V
BOX CONTENTS
yMIXPACK
yPower cable
yQuickstart Guide
ySafety Instructions & Warranty Information booklet
CONNECTION DIAGRAM
Power
Speaker
Footswitch*
Drum Machine*
Microphones*
Headphones*
Notes:
yMicrophones, headphones, drum machine, footswitch, etc. are not included.
yTo reduce electrical hum at high gain settings, keep the mixer's power supply away from your cables
and the mixer's channel inputs.
* not included
Speaker

4
FEATURES
1
NEW
1
NEW
1
NEW
1
NEW
1
NEW
AC100V ~ 50/60Hz
110 -120V ~ 50/60Hz
220 -240V ~ 50/60Hz RATED POWER CONSUMPTION:600W
FUSE: 100V
110-120V
220-240V
T8 AL AC250V
T8 AL AC250V
T4 AL AC250V
25
26
27 28
29 30
31
32
3333
3434
35
36
37
38
39
3
12
44
5
6
8
9
10
11
12
13
15
16 16 16 16 16
17
17
18
19 19 20 20
21
22
23 24
21
18
11
12
13
15
11
12
13
15
11
12
11
12
13
15 15
14
10 10 10 10
9999
888
8
5
6
5
6
5
6
5
7
7
1. POWER IN – Use the included power cable to connect the mixer to a power outlet. While the power is
switched off, plug the power cable into the mixer first, then plug the power cable into a power outlet.
2. VOLTAGE SELECTOR – This 2-position switch sets the AC input voltage for the speaker. The switch
should already be set to the correct voltage for your location. (US users should set this switch to "100-
120V" whereas UK and most European users will need to set this to "220-240V.")
3. POWER SWITCH – Turns the mixer on and off. Turn on the mixer after all input devices have been
connected. Make sure the MASTER LEVEL knob is set to "zero" before turning it on.
4. SPEAKER OUTPUTS – Connect the speakers to these outputs using 1/4" cables.
5. MIC INPUT (XLR) – Connect a microphone to these inputs with an XLR cable.
6. LINE INPUT (1/4") – Connect line-level devices to these inputs with 1/4" TRS cables.
7. LINE INPUT (1/4") – Connect line-level devices to these inputs with 1/4" TS cables.
8. HI EQ (TREBLE) – Adjusts the high (treble) frequencies of the channel.
9. MID EQ (MID) – Adjusts the mid-range frequencies of the channel.
10. LOW EQ (BASS) – Adjusts the low (bass) frequencies of the channel.
11. AUX SEND 1 – Adjusts the channel audio (pre-fader) level that is sent to the AUX SEND OUTPUT 1
and CTRL ROOM OUT.
12. AUX SEND 2 – Adjusts the channel audio (post-EQ) level that is sent to the mixer's internal effects
processor or AUX SEND 2. Turn this up for the channels that you want effects applied to. You can use
this to apply effects to individual channels. (If you have an external device connected to the AUX SEND
OUTPUT 2 jack, the internal effects processor will be bypassed.)
13. PAN – Adjusts the (mono) channel's position in the stereo field.
14. BALANCE (CH 5/6) – Adjusts the balance between Channels 5 and 6.
15. CHANNEL LEVEL – Adjusts the audio level on the channel.
16. -20 dB SWITCH – When this button is engaged, the audio of that channel will be attenuated by 20 dB.
This can help increase the headroom and reduce distortion due to an overly loud input signal that
peaks frequently.

5
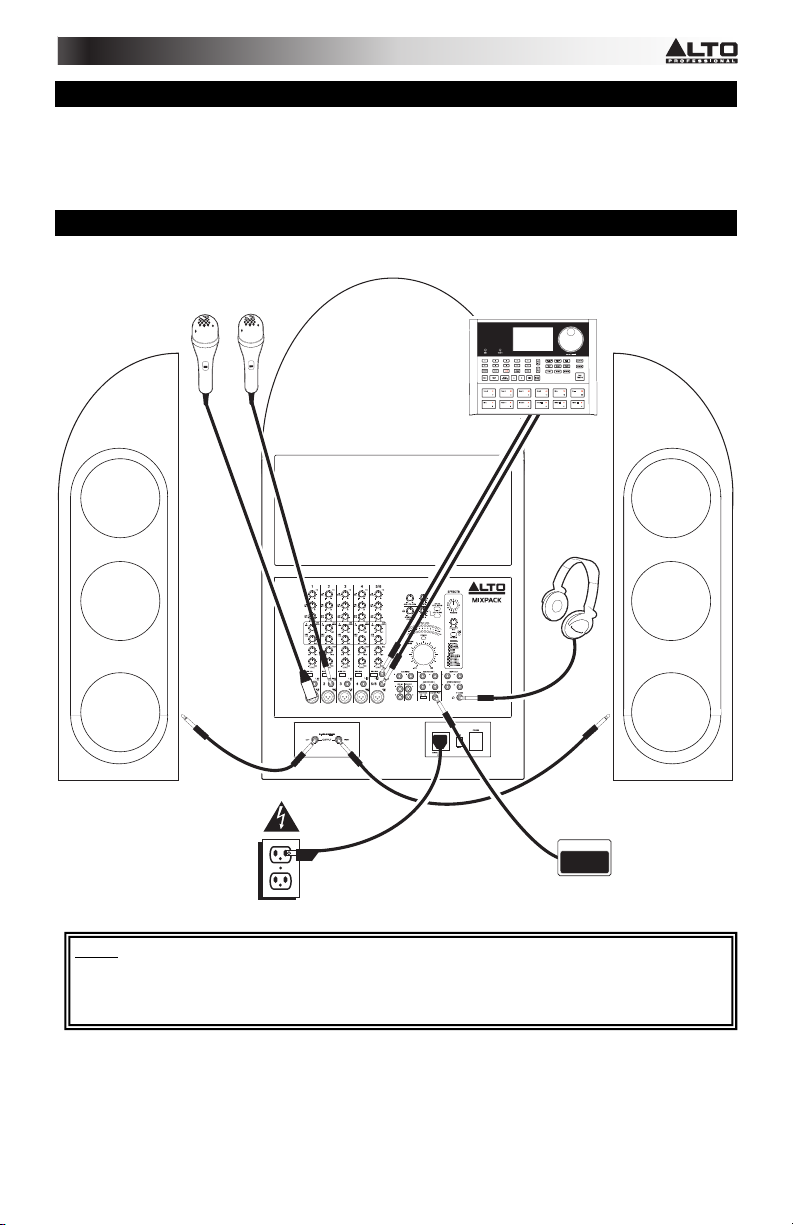
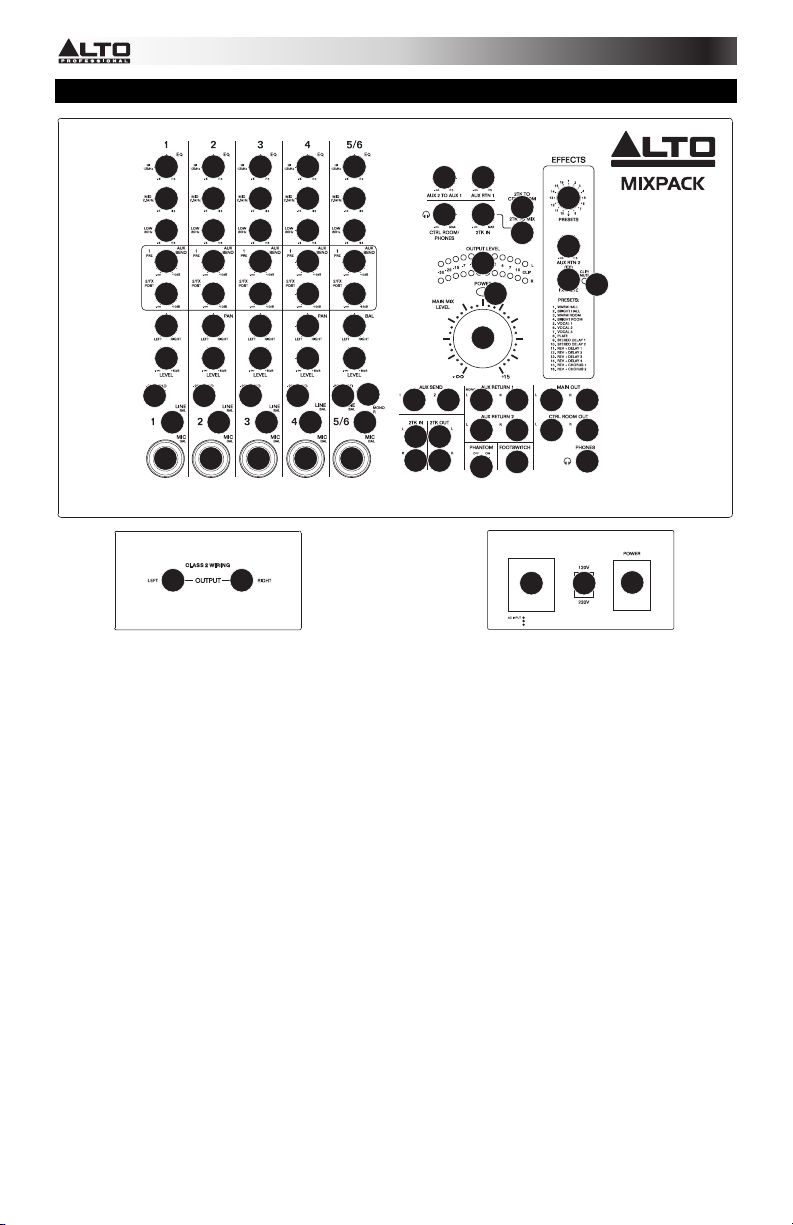
17. 2TK IN – You can use a standard stereo RCA cable to connect an additional audio source to this input.
The signal's volume can be adjusted with the 2TK IN LEVEL knob and sent to the monitor mix (CTRL
ROOM and PHONES) or main mix (MAIN OUT).
18. 2TK OUT – You can use a standard stereo RCA cable to connect this output to an external recording
device. The signal sent out these RCA outputs is the same as the MAIN OUT signal.
19. AUX SEND OUTPUT – You can use 1/4" TRS cables to connect these outputs to the inputs of external
devices. For instance, you can connect AUX SEND OUTPUT 1 to an amplifier or active monitor to
create a custom monitor mix for onstage musicians. You could also use Y-cables (not included) to
connect the AUX SEND OUTPUT 2 to the input of an external effects unit, then connect the unit's
outputs to the AUX RETURN 2 inputs.
20. AUX RETURN 1 – You can connect the outputs of an external device to these inputs with 1/4" TS
cables. This is usually used for outboard effects devices but can also be used like an extra input
channel for synthesizers, drum machines, etc. Adjust the volume of these inputs with the AUX RTN 1
knob.
21. AUX RETURN 2 – You can connect the outputs of an external device to these inputs with 1/4" TS
cables. This is usually used for outboard effects devices but can also be used like an extra input
channel for synthesizers, drum machines, etc. Adjust the volume of these inputs with the AUX RTN 2
(FX) KNOB.
22. AUX RTN 2 (FX) LEVEL – Adjusts the volume of either the mixer's internal effects processor or signal
being sent into the AUX RETURN 2 inputs. When cables are inserted into the AUX RETURN 2 jacks,
the internal effects processor will be bypassed.
23. FX MUTE – Press this button to mute/unmute the effects.
24. FX CLIP/MUTE LED – The LED will flash if the mixer's internal effects processor signal is clipping. If
this happens, decrease the setting of the FX AUX1 POST knob or CHANNEL LEVEL knob.
25. EFFECTS SELECTOR – Selects the effect that the mixer's internal effects processor will apply to the
various channels. Each channel can send different levels of audio to the processor by adjusting their
FX AUX1 POST knobs. See the EFFECTS section for an explanation of the available effects.
26. FOOTSWITCH – When a latching-style footswitch is connected to this jack with a 1/4" TRS cable, it
can be pressed to allow all channels to bypass the mixer's internal effects processor.
27. AUX 2 TO AUX 1 LEVEL – Adjusts how much of the AUX 2 bus is blended into the AUX 1 bus. This
allows you to send audio from the mixer's internal effects processor or an external effects unit
(connected to the AUX SEND 2 and AUX RETURN 2) to the monitor mix.
28. AUX RTN 1 LEVEL – Adjusts the level of audio sent into the AUX RETURN 1 inputs.
29. 2TK IN LEVEL – Adjusts the level of audio sent into to 2TK IN jacks and routed to the main mix or
monitor mix.
30. 2TK TO CTRL ROOM – When this button is depressed, audio sent into the 2TK IN jacks will be routed
to the monitor mix (CTRL ROOM OUT and PHONES).
31. 2TK TO MIX – When this button is depressed, audio sent into the 2TK IN jacks will be routed to the
main mix (MAIN OUT).
32. PHONES – Connect your 1/4" stereo headphones to this output. The MONITOR LEVEL knob controls
the volume.
33. CTRL ROOM OUT – Use a standard 1/4" cable to connect this output to your monitor or amplifier
system. The level of this output is controlled by the MONITOR LEVEL knob.
34. MAIN OUT – Use standard 1/4" cables to connect these outputs to the speakers. The level of these
outputs is controlled by the MASTER LEVEL knob.
35. CTRL ROOM / PHONES LEVEL – Adjusts the volume of the CTRL ROOM OUT and your
headphones.
36. MAIN MIX LEVEL – Adjusts the volume of the MAIN OUT.
37. LED METERS – Shows the audio level of the main mix and monitor mix. Turn the volume down if the
+10 LED lights up excessively.
38. PHANTOM POWER – Activates/deactivates phantom power. When activated, phantom power
supplies +48V to the XLR mic inputs. Please note that most dynamic microphones do not require
phantom power, while most condenser microphones do. Consult your microphone’s documentation to
find out whether it needs phantom power.
39. POWER LED – Illuminates when the mixer is on.

6
EFFECTS
TO HEAR THE EFFECTS ON A CHANNEL: Use the EFFECTS SELECTOR to choose one of the effects below, then turn up
the AUX SEND 2 for that channel.
# PRESET DESCRIPTION PARAMETER
1 WARM HALL Reverb, simulating the acoustics of a stage space. Decay time: 360 ms
Pre-delay: 45 ms
2 BRIGHT HALL Reverb, simulating a large acoustic space. Decay time: 290 ms
Pre-delay: 23 ms
3 WARM ROOM Reverb, simulating a bright studio room. Decay time: 210 ms
Pre-delay: 45 ms
4 BRIGHT ROOM Reverb, simulating a studio with many early reflections. Decay time: 210 ms
Pre-delay: 23 ms
5 VOCAL 1 Reverb, simulating a room without delay time. Decay time: 450 ms
Pre-delay: 0 ms
6 VOCAL 2 Reverb, simulating a room with a small delay time. Decay time: 240 ms
Pre-delay: 25 ms
7 VOCAL 3
Reverb, simulating a small space with a slight decay
time.
Decay time: 100 ms
Pre-delay: 114 ms
8 PLATE Simulates bright plate reverb. Decay time: 290 ms
Pre-delay: 10 ms
9 STEREO DELAY
Reproduces the signal after a small period of time with a
slight difference between the two stereo channels. Delay period: 352 ms
10 STEREO DELAY 2
Reproduces the signal after a small period of time with a
slight difference between the two stereo channels. Delay period: 238 ms
11 REVERB+DELAY 1 Delay effect with room reverb. Delay period: 326 ms
Reverse decay time: 290 ms
12 REVERB+DELAY 2 Delay effect with room reverb. Delay period: 211 ms
Reverse decay time: 240 ms
13 REVERB+DELAY 3 Delay effect with room reverb. Delay period: 375 ms
Reverse decay time: 210 ms
14 REVERB+DELAY 4 Delay effect with room reverb. Delay period: 277 ms
Reverse decay time: 150 ms
15 REVERB+CHORUS Stereo chorus effect with room reverb. Chorus rate: 3.67 Hz
Reverse decay time: 290 ms
16 REVERB+CHORUS 2 Stereo chorus effect with room reverb. Chorus rate: 3.02 Hz
Reverse decay time: 150 ms

27
TECHNICAL SPECIFICATIONS
MIXER SECTION:
FREQUENCY RESPONSE: 10 Hz – 55 KHz (+ 3 dB)
IMPEDANCE: 1.4 KΩ(mic input)
2.5 KΩ(channel insert return)
>10 KΩ(all other inputs)
1KΩ(tape out)
120 Ω(all other outputs)
SNR: > 94 dB
THD+N: 0.04% at +4 dBu, 1 KHz (mic, line, and stereo input channels)
GAIN: 35 dB (mic input)
15 dB (line input)
EQUALIZATION: High shelving: + 15 dB @ 12 KHz
Mid-bell:+15 dB @ 2.5 KHz
Low shelving: + 15 dB @ 80 Hz
DSP SECTION: 24-bit A/D and D/A converters
24-bit DSP resolution
Effects (16 presets): Reverbs (Hall, Room, Vocal, Plate), Stereo Delay,
Reverb + Delay, Reverb + Chorus
Controls: 16-position selector, clip LED, mute switch with LED indicator
NOISE (bus noise): Fader 0 dB, channels muted: -85dB (ref:+4dBu)
Fader 0 dB, all input channels set to Unity gain: -81dBr (ref:+4dBu)
MAX OUTPUT: Balanced outputs: 27dBu
Aux sends: 22dBu
SPEAKER SECTION:
SYSTEM TYPE: 3-way powered system bi-amp plus passive crossover into satellite
FREQUENCY RESPONSE: 55 Hz – 20 KHz at -10 dB
SPHERICAL HORN COVERAGE: 80° H x 80° V
POWER: Low Output: 150 W RMS Class AB
Mid-High Output: 75 W + 75 W RMS Class AB
Peak: 600 W Peak
MAX SPL @ 1m: 116.5 dB Continuous, 119.5 Peak (calculated)
SPEAKER SPECIFICATION: 12" (318mm) low-frequency driver; 2" (51mm) voice coil;
2 x 6.5" (165mm) mid-frequency driver; 1" (25mm) voice coil
1" (25mm) high-frequency compression driver; 1" (25mm) voice coil
CROSSOVER FREQUENCIES: Active: 125 Hz at 12 dB/Oct.
Passive: 3 KHz at 12 dB/Oct. with Electronic Dynamic Protections
AMPLIFIER SECTION:
IMPEDANCE: Low: 4 Ω
Mid/High: 8 Ω
PROTECTIONS: Soft start, short circuit, DC output voltage, thermal,
subsonic filter (30 Hz), 24 dB/Oct., limiter/compressor
DIMENSIONS (W x D x H): 41.2" x 27.6" x 27.6" (1060mm x 700mm x 700mm) (compact)
WEIGHT: 94.8 lbs (43 kg)
Inrush current at initial switch-on: 6.85A
Inrush current after power supply interruption: 8.64A
* Specifications are subject to change without notice.
Table of contents
Other Alto Professional Speakers System manuals

Alto Professional
Alto Professional Presenter PA User manual

Alto Professional
Alto Professional KICK I5 User manual

Alto Professional
Alto Professional Transport 12 User manual

Alto Professional
Alto Professional MIXPACK express User manual

Alto Professional
Alto Professional TS308 User manual

Alto Professional
Alto Professional SX153 TOURMAX User manual

Alto Professional
Alto Professional TOURMAX SXM112 A User manual

Alto Professional
Alto Professional MIXPACK EXPRESS User manual