Ambroise UTX-SWING User manual

MANUAL UTX®ORTHOSIS
Part of the IMS series
Twekkeler Es 24, 7547 SM Enschede,The Netherlands
+31 53 4302836 | info@ambroise.nl | www.ambroise.nl
www.youtube.com/AmbroiseHolland | www.facebook.com/AmbroiseHolland
USER
PRODUCT INFORMATION
PROFESSIONAL
INNOVATION MEETS STYLE

TABLE OF CONTENTS
Introduction
1. UTX ORTHOSIS USER INFORMATION 3
- When a UTX? 3
- Causes muscle weakness 3
- The UTX 3
- Treatment is necessary 3
- Photo measurement 3
- Delivery 3
- Donning and dofng the UTX 3
- Closing the clips 4
- Opening the clips 5
- Standing up with the orthosis 5
- Sitting down with the orthosis 5
- Getting used to it 6
- Check-up 6
- The rol of the physiotherapist, more than just practice 6
- Could the UTX orthosis benet you? 6
2. UTX ORTHOSIS PRODUCT INFORMATION 7
- Versions of the UTX 7
- SWING 7
- STABIL 7
- FREE 7
- POST 7
- UNILAT 7
- FS 7
- EZ 7
- DZ 7
- ESF 7
- ESC 7
- Itemnumbers / Knee function / Addition 8
- Operation of the SWING 9
- Operation of theSTABLE 9
- Operation of the FREE 9
- Operation of the POST 9
- Operation of the FS 9
- Operation of the EZ 9
- Operation of the DZ 9
- Operation of the ESF 9
- Operation of the ESC 9
- Focus points for handling the UTX-SWING 9
- Focus points for handling the UTX-STABIL 12
- Troubleshooting 12
- Maintenance 13
- Raplacement of spare parts 13
- Adjusting the orthosis 13
- Specications 13
3. UTX INFORMATION FOR THE PROFESSIONAL 14
- Contraindications 14
- Adjusting the ankle hinge 14
- Adjustment of the pelotte carrier 14
- Photo measurement UTX 15
- Placing pelottes 16
- Order form UTX orthosis 17

User information | +31 (0)53 4302 836 | info@ambroise.nl | www.ambroise.nl
UTX.2018.01 3
WHEN A UTX?
The UTX (Figure 1) is designed to maintain
the gait and support for persons with
reduced muscle strength.
Additionally, instability of the knee, in
x-position, o-position or overstretching can
be stabilized as well.
CAUSES MUSCLE WEAKNESS
Decreased strength in the leg can have
various causes. These include the effects
of (post-) polio, MS, femoral nerve injuries,
quadriceps insufciency, Inclusion Body
Myositis (IBM), muscular dystrophy, muscle
atrophy or a stroke.
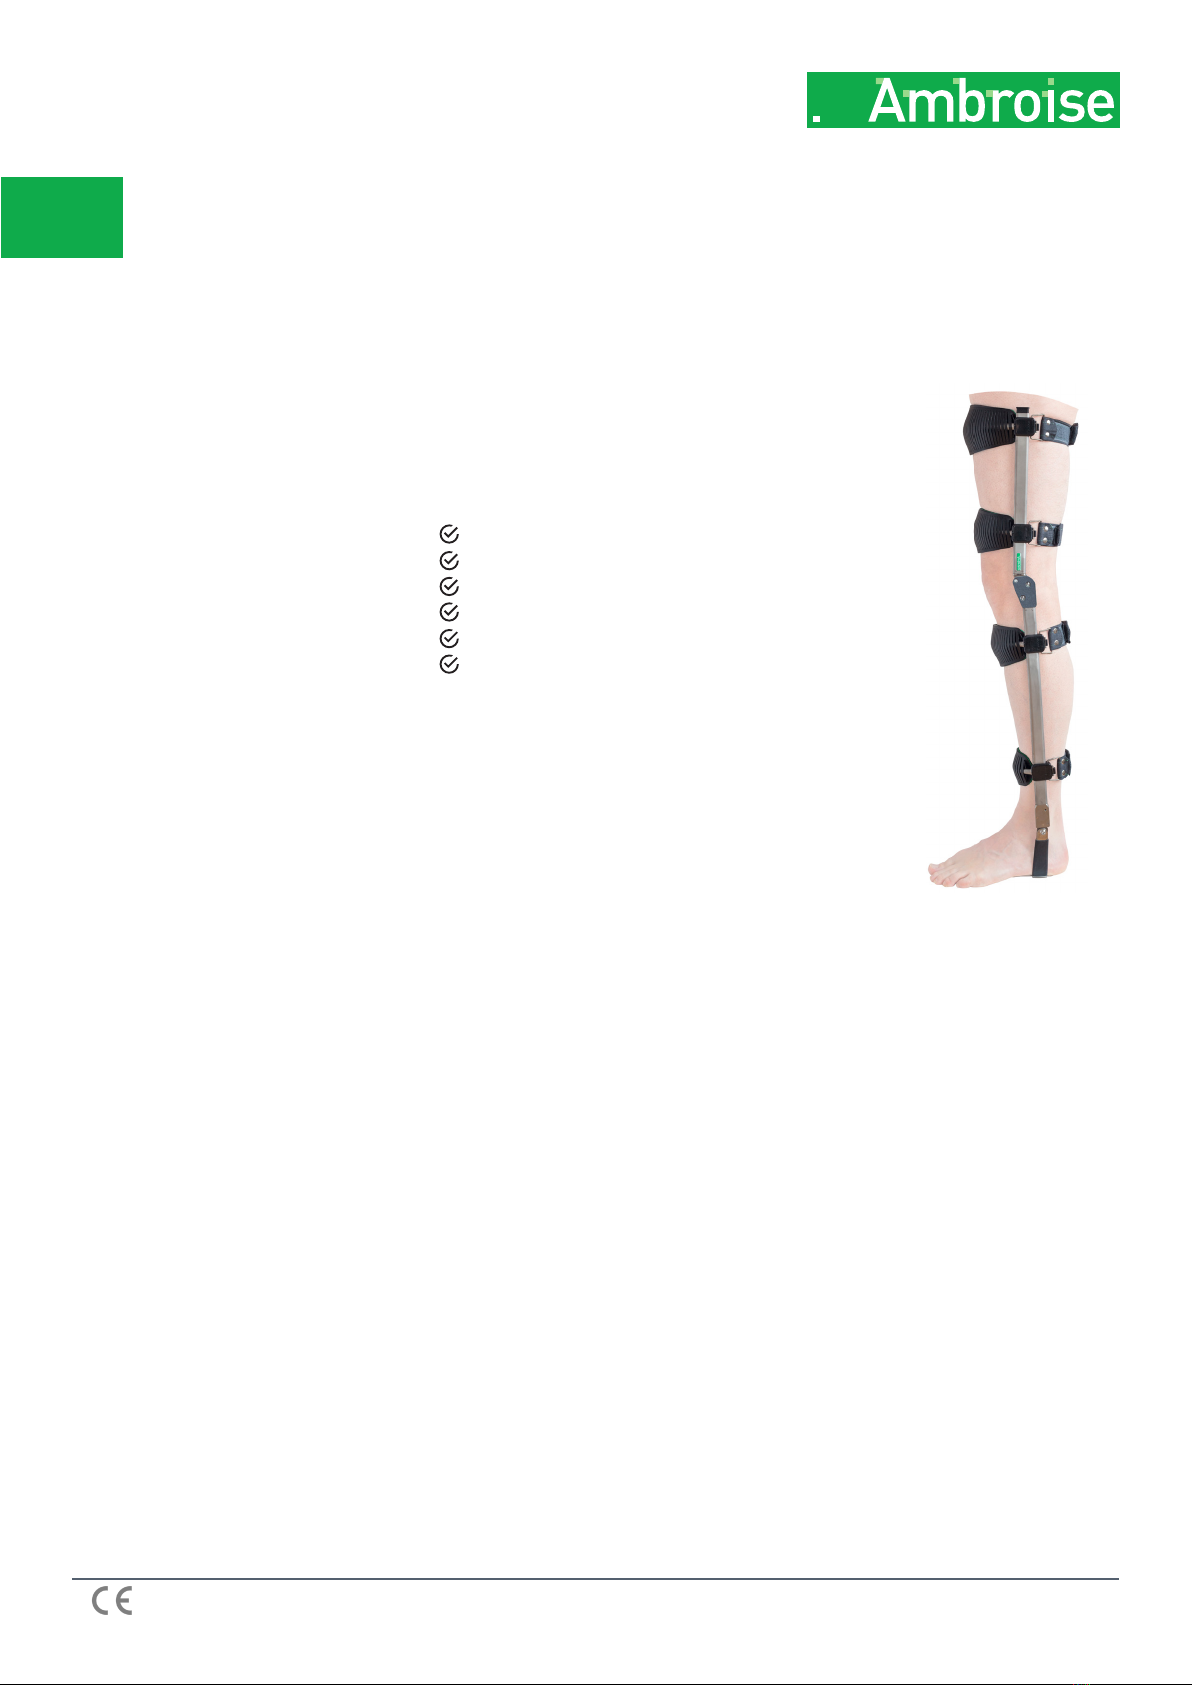
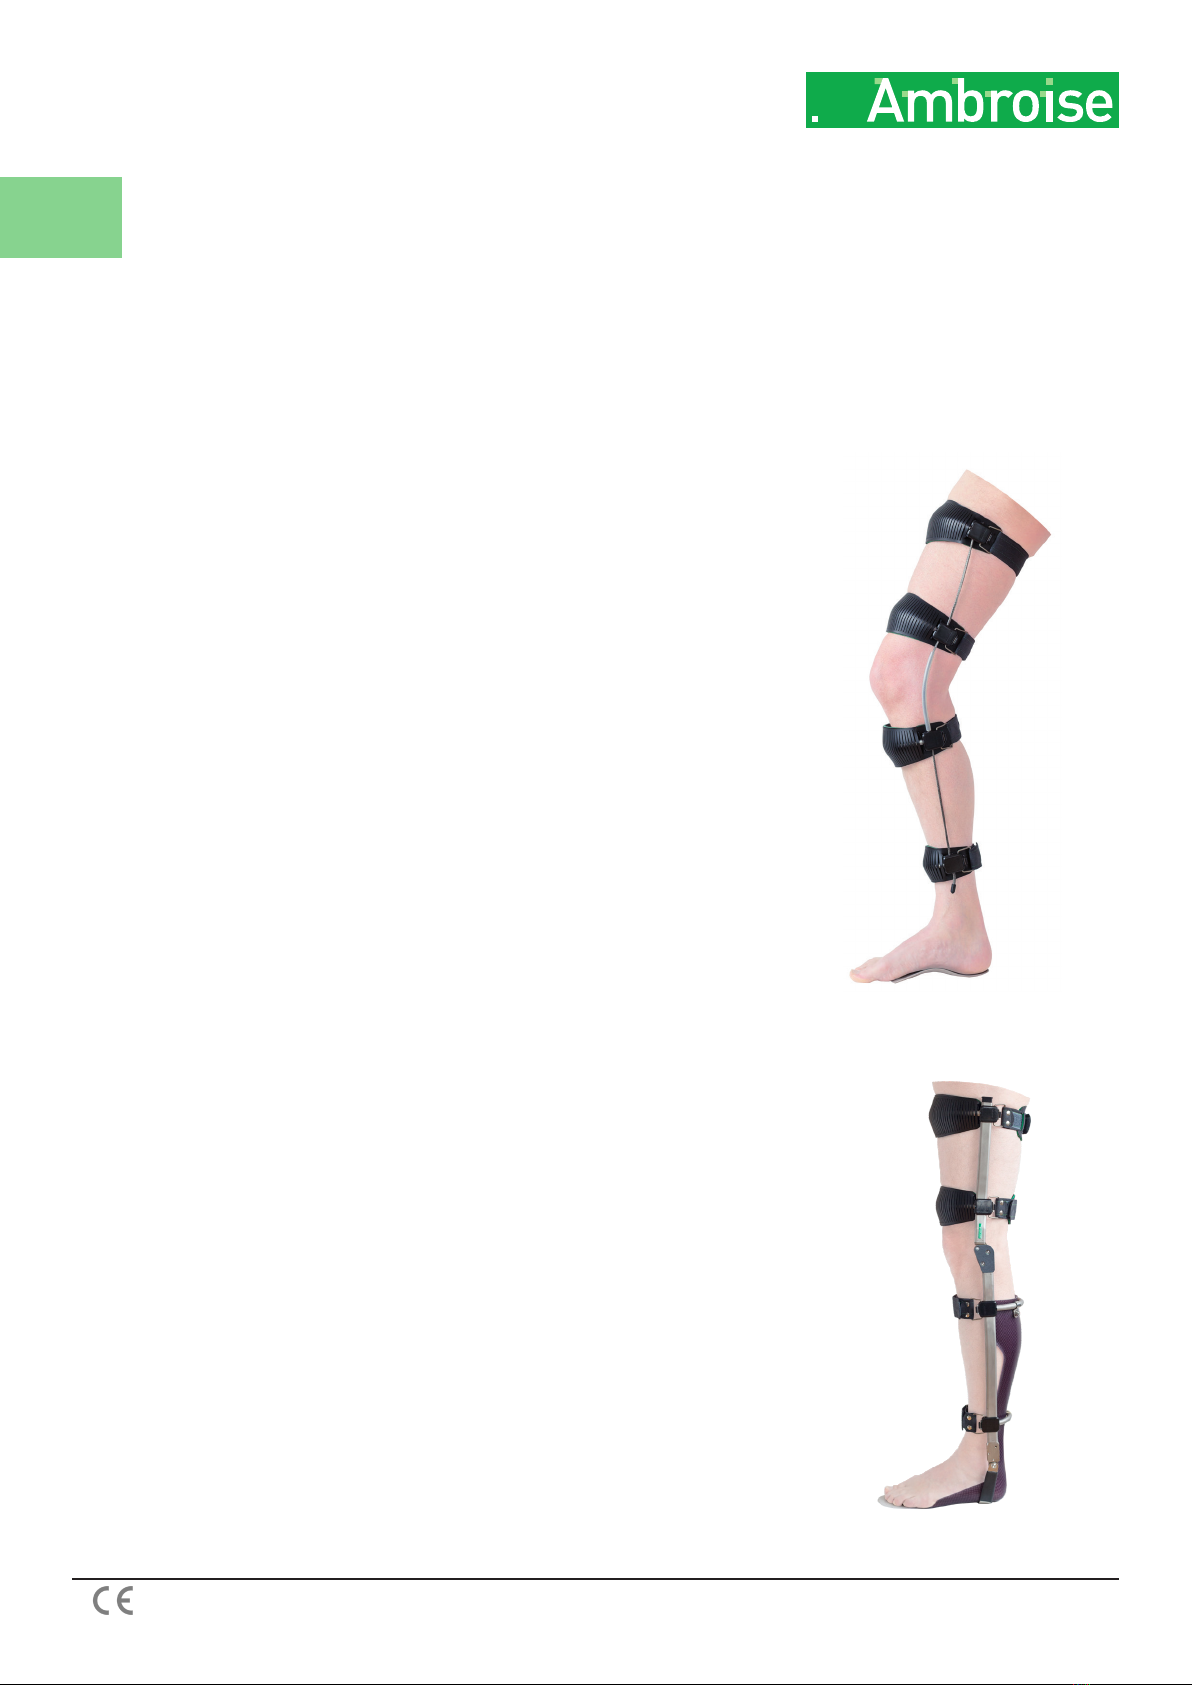
THE UTX
The UTX consists of a single-sided frame,
constructed of thin-walled tubular material,
which optimally supports the leg by means
of a four-point support. The contact with
the leg is provided by four tilting pelottes.
These are provided with a soft lining and are
perforated, thereby generating an optimal
skin contact with adequate ventilation.
There are different versions of the UTX, you
can read all about it from page 7 onwards.
TREATMENT IS NECESSARY
A leg, which can not remain sufciently
stable, can lead to insecurity, falling, but
also pain. This also hinders your mobility
and treatment is necessary. In addition, it
is important to start treatment in order
to minimize further damage to the internal
structures of the knee and to prevent falling
incidents.
PHOTO MEASUREMENT
Ambroise not only pays attention to the
innovation of its products, but also to the way
they are individually measured. Every UTX
is custom made based on two digital photos
using the Ambroise Photo Measurement
The UTX is a product line of Knee Ankel Foot Orthoses (KAFO) for people with partial or complete paralysis of one or both legs and/
or a severe instability of the knee.The UTX can stimulate the user to activate the remaining residual functions and to walk safely and
dynamically again.
UTX ORTHOSIS
USER INFORMATION
Technique. (See Figure 2, next page).
The Ambroise software converts the photos to a production drawing with the exact leg
contour and sizes. Casting the leg is history at Ambroise! Step one is an investigation of
residual muscle strength and mobility of the hip, knee and ankle. Then an analysis is made of
the gait. The measurement process including analysis, is done by appointment only and takes
about an hour.
DELIVERY
When the orthosis is ready, a delivery appointment is made. At that moment, the
nal check takes place before the orthosis is delivered. The process of getting you a
custom made orthosis can be quite time consuming: measuring, applying to the insurer,
tting, maybe an extra correction and nishing. The delivery time of a UTX orthosis
is very short despite all these steps, even though it is a fully custom made brace. The
orthosis can be delivered within 2 (working) weeks (if approved by the insurance).
Note: this is the standard procedure for orthoses made in the Netherlands. If you live outside of the
Netherlands, the procedure can be different. Please contact your local orthotist about the procedure
in your country.)
When going to the rst tting appointment, the user of the orthosis is recommended to wear
shoes which:
• have a sturdy closure (preferably laces)
• are comforable
• are not too high (no boots)
• have an average heel raise
Advantages of the UTX
Active and dynamic correction of the leg.
No limitation of the normal gait.
Light weight (750 - 1100 gr)
High comfort of wearing.
Can be worn fully underneath clothing.
Custom made and therefore great fitting.
Figure 1: UTX-SWING

User information | +31 (0)53 4302 836 | info@ambroise.nl | www.ambroise.nl
UTX.2018.01 4
• can open up far enough
DONNING AND DOFFING THE UTX
The UTX-SWING orthosis is put on while sitting. To achieve this, the orthosis must rst be
unlocked by hand. Straighten the knee hinge of the orthosis, make a dorsal exion at the ankle
hinge (bring the foot up) and bend the orthosis.
The orthosis is put on the leg while it’s in a 90 degree angle. In some cases, the foot is rst
placed on the foot support, so the foot and foot support can be inserted together in the
shoe. In other cases, the foot support is rst placed in the shoe. The strap below the knee is
fastened rst. The order to fasten the remaining three straps is up to your liking.
The UTX-ESF / STABIL orthosis is also put on while seated. To do so, the orthosis must rst
be unlocked by hand. Straighten the knee hinge of the orthosis, push the button at the top of
the orthosis and bend the orthosis.
On our YouTube channel you can nd a tutorial how the UTX can be donned and doffed.
www.youtbube.com/AmbroiseHolland
It will require practice to become skillful in donning and dofng the orthosis. See the following
instructional photo series:
CLOSING THE CLIPS -when brace is on the leg.
Figure 2: Photo measurement, casting the leg
is no longer needed.
1. Hold the clip between thumb and index nger and bring it
towards the connector. Beware of any skin entrapment.
2. Connect the clip with the connector with a twisting motion.
Make sure the clip is well connected.
3. Close the clip with your thumb. Beware of skin entrapment. 4.When you hear the ‘click’ it means the clip is closed correctly.

User information | +31 (0)53 4302 836 | info@ambroise.nl | www.ambroise.nl
UTX.2018.01 5
OPENING THE CLIPS - when brace is on the leg.
1. Place the top of you nger behind the ap of the clip. 2. Open the clip entirely until it is in line with the rest.
3. Grab the clip between thumb and index nger and twist the clip
to disconnect.
STANDING UP WITH THE ORTHOSIS
During standing up while wearing the UTX-SWING orthosis, most support must be gained from the unaffected side. Put the foot just below
the seat of the chair, so that most of the weight rests on that leg. Press yourself diagonally up. Once in position, properly extend the knee of
the leg with the orthosis until the hinge is locked (you will hear a click). Now you get support from the orthosis and a safe situation is created.
It is important that you are sure that the orthosis hinge is locked. If this is not the case, you can use your hand to push the knee even further
back, so that the hinge will get locked. In rare cases it is advisable though to stretch the leg and lock the hinge before you get up.
SITTING DOWN WITH THE ORTHOSIS
To be able to sit down with the UTX SWING orthosis, the knee hinge must be unlocked. Unlocking is done in the same way as when walking:
make a (small) step with the other leg whereby the ankle is sufciently brought in dorsiexion (lower leg tilted to the front relative to the
foot) and extend the knee. The orthosis is now unlocked and the knee can be bent.
To sit down with the UTX-STABIL orthosis the knee hinge must be unlocked manually. Extend the knee, push the button at the top of the
orthosis and bend the knee. If the knee is not extended, the orthosis will not unlock. This means that the orthosis can only be unlocked
consciously. It will never happen by accident.

User information | +31 (0)53 4302 836 | info@ambroise.nl | www.ambroise.nl
UTX.2018.01 6
The UTX-FREE does not need to be unlocked rst. This variant has no locking against bending.
GETTING USED TO IT
During advising, measuring, tting and delivering your orthopedic device much attention has been paid to a proper tting. Still, the leg will
have to get used to a new position or support. Give yourself and your leg time to go through this. It is advisable to use a schedule and slowly
build up the time you wear the orthosis.
CHECK-UP
It is always wise to make an inspection appointment after a few weeks. Once pressure sores occur which threaten to damage the skin, you
should always contact your orthotist immediately for inspection. Particularly in this case of diabetics, additional check-ups are very important.
If everything goes as planned, we recommend having an annual check-up for tting, functionality and comfort.
THE ROLE OF THE PHYSIOTHERAPIST, MORE THAN JUST PRACTICE
A lot of practice is needed when using the UTX. The user needs to be in control of the orthosis. The physical therapist can play an important
role so that the user becomes familiar with the orthosis and can use it safely. General and daily activities need to be practised and walking
needs to become an automatic rather than a conscious activity. Think of distractions as trac or uneven surfaces. It is also important to pay
attention to the mental process. An orthosis is intended as a medical device, that you’d rather do without. Moreover, it takes perseverance
to learn to handle it.
In the beginning the benets of the brace may not immediately outweigh the disadvantages. This could mean that the user becomes demotivated.
This will be prevented by proper instruction and guidance. That is why the role of a physiotherapist is so important. The orthosis is custom
made and is being individually measured. Residual muscle strength and mobility is taken into account. Important for the use of the orthosis is
that the existing muscle strength and mobility is maintained and used correctly. Besides gait training also think about muscle strength training
for remaining strength around hip, knee and ankle, as far as possible and preventing contractures (shortening of muscles).
COULD THE UTX ORTHOSIS BENEFIT YOU?
If you’re interested in additional information on the UTX or if you want to nd out if the UTX could benet you, please feel free to contact
us. You can phone us at +31 53 430 28 36 or email us: info@ambroise.nl. One of our clinical experts is more than happy to discuss the best
solution for your problems with you. And we’re more than happy to see how we can realise a well tted UTX for you, provided that this will
be a suitable option in your case. Your local orthotist or specialist should also be able to provide additional information on the applicability
of the UTX in your case.

UTX.2018.01 7
UTX ORTHOSIS
PRODUCT INFORMATION
VERSIONS OF THE UTX
The UTX is available in different versions with a plurality of mutually interchangeable options.
As a result, a large portion of the people in need of a knee ankle foot orthosis can be helped.
Each UTX is adapted to the leg of the user.
Stabilizing the knee in the sagittal plane (exion / extension):
SWING
The knee is locked against undesired exion in the stance phase, but unlocks automatically at
the end of the stance phase, so that a free swing phase is possible.
STABIL
The knee is locked during the entire gait. To sit down, the hinge can be unlocked manually.
FREE
The knee is free in exion and can bend at will. An extension stop in the knee joint prevents
overstretching the knee.
POST
For extra control in cases of severe overstretching by posterior placed interfaces on the
lower leg. (Figure 3). Can be combined with SWING, STABIL and FREE.
Stabilizing of the knee in the frontal plane:
UNILAT
This is the standard version of the UTX, using only a laterally placed orthosis. Used if no
additional stability is needed in the frontal plane. Because this is the standard version, the Figure 3: UTX-POST
term “unilat” is usually omitted.
FS
The FS version delivers additional stability in case of a valgus or varus knee instability via an intelligent cable design. In case of a valgus, the
UTX is placed laterally and the cable is placed medially. In case of a varus, the UTX is placed medially and the cable laterally.
Stabilizing the ankle:
EZ
This is the standard version of the UTX, with a lateral ankle hinge, and an insole.
DZ
In this version there is both a medial and lateral ankle hinge. The double hinge can be attached to the shoe or to an insole.
ESF
This version consists of a polypropylene AFO attatched to a UTX frame, without an ankle hinge. The AFO provides stability around the ankle.
Because the UTX frame has no hinge, this combination is only suitable for a STABIL or FREE.
ESC
This version consists of a polypropylene AFO attatched to a UTX frame, with an ankle hinge. The AFO provides stability around the ankle.
The frame is constructed as a UTX SWING.

UTX.2018.01 8
Figure 5: UTX-ESC
ITEM NUMBERS KNEE FUNCTION ADDITION
UTX Lateaal Left: 400420 SWING / STABIL / FREE FS / POST / DZ / ESC (SWING only)
UTX Lateral Right: 400421 SWING / STABIL / FREE FS / POST / DZ / ESC (SWING only)
UTX Medial Left: 400422 SWING / STABIL / FREE always FS / POST / DZ / ESC (SWING only)
UTX Medial Left: 400423 SWING / STABIL / FREE always FS / POST / DZ / ESC (SWING only)
UTX-ESF Lateral Left: 400500 STABIL / FREE FS
UTX-ESF Lateral Right: 400401 STABIL / FREE FS
UTX-ESF Medial Left: 400402 STABIL / FREE always FS
UTX-ESF Medial Right: 400503 STABIL / FREE always FS
OPERATION OF THE SWING
The UTX-SWING is locked against exion and extension during the stance phase of walking.
At the end of the stance phase the knee hinge automatically unlocks. During the swing phase a
natural knee exion is possible. If the leg extends again at the end of the swing phase, the knee
falls automatically into it’s lock again.
Locking
The UTX SWING falls into it’s lock when the knee hinge is sufciently stretched. A ratchet
jumps into the lock position prohibiting further bending of the knee. An extension stop in the
hinge prevents overstretching of the knee.
Unlocking
The knee hinge of the UTX-SWING orthosis is kept locked by a ratchet. The hinge will remain
locked until the end of the stance phase of walking. Then, the hinge is unlocked automatically. In
order to unlock the knee hinge at the end of the stance phase, you need to simultaneously reach
two conditions: First, a small dorsiexion with the ankle (minimum of 5 degrees) should be made.
This is a normally occurring ankle motion during the stance phase when the foot remains on the
oor and the leg moves forward. This is what happens in the UTX: the ankle hinge is attached to
the ratchet in the knee hinge via a cable. This ratchet can only be pulled from the lock when it is
released. This requires a (very small) knee extension. This is the second condition that must be
met. If either is missing, the knee hinge will not be unlocked.
Stretching the knee
Research has shown that stretching the knee at the end of the stance phase is part of normal
human gait. So the movement is natural. It requires certain residual functions. Persons who are
in possession of these residual functions, usually learn to master the technique as described
above. Persons who do not have sufcient rest function(s), can generally make optimal use of a
UTX-STABIL orthosis (optionally in combination with UTX-ESF)
There are three ways to stretch the knee at the end of the stance phase:
1. Stretching the hip with still present (partially) active hip extensors (3 MRC muscle strength
is required), in particular, M. gluteus maximus, (Hamstrings: M. Semimembranosus and
Semitendinosus, and M. Biceps femoris).
2. Stretching the knee with still present (partially) active knee extensors (3 MRC muscle
strength is required) M. quadriceps femoris.
3. By using knee hyperextension. (See also UTX selection protocol.)
In addition to this automatic release, it is also possible to manually unlock the UTX-SWING
Figure 4: UTX-FS

UTX.2018.01 9
by using a knob on the top side of the orthosis (identical to the unlocking in the STABIL)
Swing phase
During the swing phase, the knee hinge is not locked, so a natural knee exion is possible. At the end of the swing phase the leg reaches the
extended position again and the knee automatically falls into lock.
OPERATION OF THE STABIL
The knee hinge of the UTX-STABIL orthosis is kept locked by a ratchet. This ratchet locks the knee joint during stance and walking, but can
be unlocked manually before sitting down. For this unlocking, a push-button is mounted at the top of the UTX-STABIL orthosis.
By pushing in the button, the hinge is unlocked, but only when the knee is stretched. When the knee is not extended, unlocking is potentially
unsafe. In that situatie pusing the button therefore has no effect. So the user has complete control over sitting down safely. The ankle hinge
of the UTX-STABIL and SWING orthosis compensate for any accid foot drop by means of a built-in spring. The foot is thereby returned to
the neutral position in the swing phase.
On request, alternative release latches are also possible, such as a lever on the knee hinge, or a lever situated on the leg at the upper pelotte
carrier.
OPERATION OF THE FREE
No lock against exion, but still blocking hyperextension. (The UTX-FREE can optionally be extended with an FS and DZ as well as POST
and in ESF).
OPERATION OF THE POST
Pelotte carrier just below the knee positioned at the back (posteriorly) provides additional control in case of hyperextension. A thus placed
pelotte carrier immediately captures the force of the backwards bending knee.
OPERATION OF THE FS
Cable provides stability to frame, thereby generating control over valgus (UTX lateral, cable medial) or varus (UTX medial, cable lateral).
OPERATION OF THE EZ
Only lateral ankle hinge. In the ankle hinge of the UTX is a spring that helps to lift a accid foot drop during swing phase.
OPERATION OF THE DZ
Two hinges. Medially and laterally. Thus, greater control in the frontal plane for valgus and varus ankles.
OPERATION OF THE ESF
The UTX ESF has two versions for stability around the knee in the sagittal plane: FREE (no exion stop, but lock agains hyperextension) or
STABIL (fully locked but, manual release). In case there is a passive or spastic foot drop, the integrated AFO of the orthosis will generate the
required control. The AFO will give stability, for a foot drop or prevent equinus foot position.
OPERATION OF THE ESC
As ESF, but now with UTX frame in SWING embodiment.
FOCUS POINTS FOR HANDLING THE UTX-SWING.
Locking
During stand and during stance phase of walking the knee hinge of the UTX-SWING is locked.
The knee hinge is released at the end of the stance phase. The knee can move freely during the swing phase. At the end of the swing phase,
the hinge falls back into it’s lock for the next stand phase. This happens automatically when the knee is sufciently stretched. The extended
position does not necessarily have to correspond with a knee angle of 0°. The locking position depends on the personal alignment of the
UTX-SWING.

UTX.2018.01 10
Figure 6
Inuence of the step size on the occurring
dorsiexion at the end of the stance
phase. At small steps, there is insufcient
dorsiexion in order to allow unlocking the
hinge.
Figure 7
Inuence of the step size on the knee load.
With increasing step size, the knee load is
more strongly exing.
The user must learn to properly complete the swing of the orthosis leg. If he / she doesn’t do
this, then the next stance phase can begin without a locked knee.
In that case the user can only provide a safe situation by pressing the knee in extension from
the hip. If even this does not happen, an unsafe situation might occur. The user will transfer
his body weight on the supporting leg with an unlocked knee. Practice luckily shows that
users, after some training, generally have no difculty in extending the knee for the next
stance phase.
Unlocking
The ankle hinge is connected to the knee hinge with control wire. For unlocking the knee
hinge of the UTX-SWING, two conditions must be simultaneously satised:
1. First, the ankle should be in sufcient dorsiexion. Only a small amount of degrees is
required. About 5° is enough to trigger the hinge. Also, without active muscles, dorsal
exion still occurs naturally at the end of the stance phase when the supporting leg
rotate forward over the foot.
2. In addition to dorsiexion there must also, simultaneously, occur extension of the knee.
The knee hinge of the UTX-SWING has a lock in both exion and extension. The knee
hinge can only be unlocked when it is pressed against the extension lock, that is to say, if
around the knee an extension moment is present. Releasing the exion lock is safe in this
situation. If on the other hand the knee would be unlocked when it momentarily tends
to ex (is loaded with exing moment of force) an unsafe situation would occur, leading
to possible falling. With the UTX-SWING this is not possible, because an extension is
needed for release.
This compelling double condition: dorsiexion of the ankle ánd knee extension askes
for extra attention mainly during training of users. Especially the extension of the knee at
the end of the stance phase is tricky for some because it requires residual control over
the hip movements. Hip muscles are not necessarily required for this. Residual function of
still partially active knee extensors, but also an existing hyperextension of the knee may be
sufcient to stretch the knee.
There are a number of gait elements that need special attention during the training of UTX
SWING-users.
Step size
First, the step size matters.
When taking too small a step, it is possible that the upper body is insufciently placed in
front of the supporting leg at the end of the stance phase. As a consequence, no or insufcient
dorsiexion of the ankle will occur (Figure 6). The release of the knee hinge will not occur.
When taking too big a step, the other condition (knee extension) at the end of the stance
phase can be a problem. In very large strides it is difcult to make the oor reaction force
vector to run in front of the knee, in other words: to get the knee in extension. (Figure 7).
Timing
The requirement of getting the knee in extension at the end of the stance phase makes,
the users timing important. For some users, the required unlocking procedure seems
small step normal step
dorsiexion too small dorsiexion suffucient
normal step big step
oor reaction vector oor reaction vector

UTX.2018.01 11
1) initiële voetcontact 2) loading response 3) middenstandfase 4) eindstandfase
5) pre-zwaaifase 6) initiële zwaaifase 7) middenzwaaifase
1 2 3 4 5 6 7
contradictory. To bend the knee (in the swing phase) you should stretch it (at the end of the stance phase). As a result, some users are
prematurely busy trying to ex the knee. Without bringing it into the required extension. As a result the hinge will not unlock. Moreover,
the extension of the knee in the second half of the stance phase is a normal physiological movement. Even at normal walking at this stage
extension of the knee occurs.
Gait cycle
Finally attention must be paid to not lifting the heel of the oor too early. It may happen that both the required conditions (ankle-dorsiexion
and knee extension) are properly met. The knee hinge will therefore be in the unlocked position. Then, when the heel is lifted from the
oor without the knee rst being exed, the lock will automatically come into operation again. Because the leg is lifted from the oor the
dorsiexion of the ankle will disappear. If the knee hinge is still in the position at which it can be locked (meaning still no knee exion has
occurred), then the ratchet of the knee hinge will automatically fall back into its lock. The knee should be bent before the heel lifts off the
oor.
The ankle hinge has a spring mechanism that allows plantar exion only after a certain threshold. This results in a uniform and controlled
plantar exion that will bring the foot in full contact with the ground at initial contact. People with a foot drop can thus reduce the peak load
on the leg and show a more natural gait. In addition, the spring is strong enough to prevent a foot drop during the swing phase. Despite the
inhibition of the ankle hinge, it is sufciently exible so that people with mild spasticity also can use this provision without increasing the
spasm.
Pay attention when taking steep slopes or ramps. Unlocking is usually a little more difcult in that situation. At slopes that are too steep it is
advised to keep the leg locked.
Taking curbs or stairways is done in the same order as when walking with crutches. Going up, put the unaffected leg rst on the next step;
then follow with the orthosis leg. Going down, step with the orthosis leg down on the next step and place the unaffected leg next to it.
Cycling (also at the home trainer) is certainly possible, if taken into account that the orthosis is not allowed to lock. The knee should not reach
full extension because otherwise it lockes. To prevent this, don’t put the saddle too high.
1) Initial contact 2) Loading response 3) Mid stance 4) Terminal stance 5) Preswing 6) Mid swing 7) Terminal swing

UTX.2018.01 12
FOCUS POINTS FOR HANDLING THE UTX STABIL
Locking
Extend sufciently. The knee joint should lock automatically in full extension.
Unlock
Start with unloading the knee by bringing it into extension, then press button, and while pressing, bend the knee.
TROUBLESHOOTING
If the UTX-SWING orthosis does not work properly, it is important to identify the origin of the problems. The problem may lie with the
orthosis, or with the user or in the combination of the user and the orthosis. If it appears that the orthosis does not work properly, contact
your orthotist. Furthermore consult your orthotist for changes to the tting or adjustment of the hinges can be done in consultation. If the
orthosis does not work properly, the list below can be used to analyze the problem. If this does not lead to a solution, please contact your
orthotist or Ambroise.
SITUATION 1: The knee hinge does not unlock
Reason 1:
There is no or insufcient dorsal exion of the ankle joint at the end of the stance phase.
• Lifting the foot too early at the end of the stance phase. Train to keep the heel on the oor longer and to (mildly) bend the knee before
lifting the foot of the ground will offer a solution.
• An incorrect alignment angle of the ankle stirrup. Contact Ambroise or your orthotist to adjust the ankle angle.
• Play on the ankle hinge (The ankle stirrup is not tightened properly). Contact Ambroise or the orthotist to lock the ankle bolt.
• Excessive knee extension with small steps. Stretching the knee when the foot is on the oor always results in a smaller dorsal exion
angle. In a small step, this may lead to insufcient remaining dorsal exion causing the knee hinge to not unlock (see Figure 6). The user
must practice taking bigger steps.
Reason 2:
There is no or insufcient knee extension at the end of the stance phace.
• Stretching the knee at the wrong moment.
• Despite a present hyperextension, there is no extension at the end of the stance phase, possibly because the orthosis is aligned too
much in exion.
• The user makes too big a step which increases the bending load on the knee hinge (see Figure 7). This makes it harder for the hip and
knee muscles to stretch the knee. Smaller steps need to be taken.
• The leg is locked to the maximum anatomical limit. To unlock the knee hinge, the knee must be pushed slightly more in extension. If
the leg is already at its anatomical limit, further stretching is difcult. The orthosis must then be aligned more in exion. Contact your
orthotist for this.
SITUATION 2: The knee hinge unlocks too early
If early in the stance phase there is a partial or complete dorsal exion of the ankle joint, this is caused by an incorrect alignment of the ankle
stirrup to the ankle hinge. This can be checked by looking in the knee hinge from the back and see when the ratchet is pulled downwards.
Contact your orthotist so that the alignment can be changed.
SITUATION 3: The knee hinge does not lock
Reason 1: Incorrect ankle-alignment
A misalignment of the ankle stirrup that leads to full dorsal exion even at the start of stance prevents locking of the knee. Contact your
orthotist so that the alignment can be changed.
Oorzaak 2: The knee is required to extend beyond it’s anatomical limits
To lock the knee joint, the leg needs to sufciently extend. If sufcient extension means strechting beyond the anatomical limist. This will not
occur during swing. The orthosis needs to be aligned in more exion. Contact your orthotist.

UTX.2018.01 13
Reason 3: The leg extended too vigorously
When the leg is vigorously extended at the end of the swing phase, reaching full extension might lead to the foot move onwards into dorsal
exion due to inertia. Prior to putting the foot on the oor. If enough dorsal exion is reached the knee joint is unlocked. A less vigorously
swing is advised. The user must be further advised on this. Your PT can help.
POINTS OF ATTENTION:
• The orthosis is adjusted to the footwear at hand at that time. Changing shoes and hence the heel raise will change the timing of unlocking.
• Are the pelottes pinching your leg or are you experiencing sensitive skin underneath your brace? Possibly some tting alterations might
help to prevent this. Contact Ambroise, or your orthotist.
• If the hinge becomes hot then usually this means the joint has too much friction. Please stop using the orthosis, do not use lubricant, but
contact your orthotist. Usually this is due to incorrect alignment of the orthosis.
MAINTENANCE
Necessary maintenance extends the life of the product. The timely replacement of simple and relatively inexpensive parts helps to reduce
wear and tear on expensive and more difcult to replace parts.
Desired maintenance is also important for lasting high wearing comfort by replacing in a timely manner the parts that are in direct contact
with the skin, such as straps and pelottes.
When you notice the orthosis to not work smoothly, it is strongly advised not to lubricate hinges with oil or other lubricants. This seems to
help initially, but greasy substances will attract dust and dirt, which will cause even more problems. In addition, lubricants can cause dirty spots
in clothing. It is advised to clean the hinges with a degreasing product such as alcohol, acetone or similar products or contact the orthotist.
The straps can be washed. Please remove the straps from the orthosis. Make sure to close the Velcro in order to prevent cloth from sticking
to it. You can use a laundry bag at temperatures of max 30°C. Additional parts of the orthosis can be cleaned using a damp cloth.
REPLACEMENT OF SPARE PARTS
It may occur that parts of the orthosis need to be replaced. Of course you can order these from us. Please contact us and we will send a
replacement part.
ADJUSTING THE ORTHOSIS
If you have the feeling the orthosis is too tight (pinches) or too loose (slips) it is important that the orthosis will be properly tted by your
orthotist.
SPECIFICATION
Max. User weight: 120kg. See also UTX selection protocol for indication and contraindication parameters.

UTX.2018.01 14
Information for the professional | +31 (0)53 4302 836 | info@ambroise.nl | www.ambroise.nl
CONTRAINDICATIONS (SEE ALSO UTX SELECTION PROTOCOL):
• Moderate to severe spasticity
May cause high loading on leg and orthosis. It may also disturb the dorsal exion of the ankle at the end of the stance phase, or prevent proper
knee extension.
• Knee exion contracture > 10°
A exion contracture in the knee > 10° results in excessive loading on the leg and orthosis. Knee extension is also required for unlocking the
swing at the end of the stance phase, which is more difcult with a exion contracture.
• Varus / valgus deformity > 10° which can not be redressed.
In case of knee instability > 10° which can not be rectied, there may be excessive loading on leg and orthosis.
• Weight > 120 kg
• Ischial weight bearing required
This is not possible with a UTX. Ischial tuberosity weight bearing is occasionally required in severe pelvic/torso instability or with required
unloading of skeletal elements in the leg.
• Insufcient cognitive abilities
Limited cognition can make it difcult to (learn to) handle the orthosis.
Figure 6:Ankle hinge
Figure 7: Pelotte carrier
ADJUSTING THE ANKLE HINGE
1. Remove the tape from the ankle hinge.
The UTX is standard delivered with a untightened ankle hinge, which must be adjusted
on location to the footwear of the client and secured in that alignment.
2. Loosen the locking screw from the ankle hinge.
3. Determine the right angle of the ankle stirrup. More dorsal exion means unlocking later /
more plantar exion means unlocking sooner.
4. Tighten the socket head screw
Use a good (non-rounded) Allen key. When the Allen key is slipping use the included spare
screw and nd a better Allen key
5. Check the timing of unlocking, if necessary adjust the hinge (back to step 2).
The following steps are required when the ankle stirrup must be disassembled.
1. Unscrew the screw from the ankle hinge.
2. Remove the screw.
3. Insert a center punch into one of the clamp block pins of the ankle stirrup and slightly hit it
with a hammer, vary with other pen until the ankle stirrup is loose.
ADJUSTMENT OF THE PELOTTE CARRIER
1. Open the clip with your thumb and index nger until the cap is in line with the rest of the clip.
2. Grab the clip between thumb and index nger and twist the clip to disconnect.
3. Remove the IMS pelotte of the pelotte carrier (instruction page. 16)
4. Unscrew the two screws, using the appropriate Allen key.
5. Push a at screwdriver into the opening of the pelotte carrier clamp.
6. Increase the gap in the pelotte carrier clamp by the screwdriver with half a turn.
7. Hit the pelotte carrier with a plastic hammer (right next to the at oval) to move it up or
down.
8. Place the clamp plates in the in the vice and position the pelotte carrier clamp between it
9. Make sure that the pelotte carrier clamp is properly sealed on the at oval by lightly turning
the vice.
10. Retighten the screws.
11. Put the pelotte back on the pelotte carrier (instruction page. 16)
UTX ORTHOSIS
INFORMATION FORTHE PROFESSIONAL

UTX.2018.01 15
Information for the professional | +31 (0)53 4302 836 | info@ambroise.nl | www.ambroise.nl
PHOTO MEASUREMENT UTX
Focus points by the preperation of the photo measurement
• Fold the poster on the black line and attach it to the wall.
• Measure 2m distance from the wall.
• Mark the oor at 2m distance from the wall.
• Determine the anatomical knee axis.
• Mark knee center at the lateral side of the leg, positioned at the anatomical axis.
• Mark the lateral malleolus of the ankle.
• Mark the medial malleolus of the ankle.
Focus points when taking the photos
• Frontal photo: the heel against the line indicated. Make sure the feet point straight
forward so all the markers are visible while taking the frontal photo, and the leg is
not internally or externally rotated.
• Make sure the medial side of the foot hits the line while taking the sagital photo.
• Take the frontal photo at knee height, 2 meters from the wall. Hold the camera
vertically. (Portrait).
• Make sure at least 3 of the 4 corner markers on each side of the grid are visible on
the photo.
• Take the sagittal photo at knee height, 2 meters from the wall. Hold the camera
vertically. (Portrait).
• Make sure that the legs are fully in frame, from the feet up to the groin. Remove
unwanted concealing clothes.
• Measure distance lateral malleolus till oor.
• Measure distance medial malleolus till oor.
• Measure distance lateral malleolus till knee center.
• Write the measurements on the measurement form.
Send the completed form to: utxorder@ambroise.nl
Order code 300187 for the UTX background kit, including markers.

UTX.2018.01 16
Information for the professional | +31 (0)53 4302 836 | info@ambroise.nl | www.ambroise.nl
PLACING PELOTTES
Placing pelottes. Identical for al IMS pelottes. In this series you see the application to the UTX.
1A: outer shell 1B: inner shell 2. Slide the outer shell on the tube (matte side out).
3. Remove the yellow strip, and press the aps of the inner shell
trough the rst groove of the outer shell.
4. Shape to an S-bend. Press the aps of the inner shell through
the outer groove of the outer shell.
5. Remove the other yellow strip so that the adhesive strip is
exposed. Press the adhesive strip well.
6. You can nd the size of the shell on the inside of the outer shell.
1A
1B

Ambroise | Twekkeler Es 24, 7547 SM Enschede, the Netherlands | +31 53 4302 836 | [email protected] | www.ambroise.nl |
www.youtube.com/AmbroiseHolland | www.facebook.com/AmbroiseHolland

Twekkeler Es 24, 7547 SM Enschede,The Nederlands
tel: +31 53 4302836 | info@ambroise.nl | www.ambroise.nl
www.youtube.com/AmbroiseHolland | www.facebook.com/AmbroiseHolland
This manual suits for next models
5
Table of contents
Popular Personal Care Product manuals by other brands

Climax
Climax Mobile Lite-R8 Slim Installer's guide

Mangar International
Mangar International Freedom Airflo Mk3 User instructions and warranty

Universal Furniture
Universal Furniture 35602M instruction sheet

Sensio Spa
Sensio Spa SSPA05 instruction manual

Vitesse
Vitesse VS-968 manual

Healy
Healy 0006 Instructions for use