American Diagnostic Corporation Satin Manual

ADC®SatinTM Standard,
Fiber Optic and Disposable
Lar ngoscope Blades and Handles
Directions
for Use
®

2
Thank you for choosing an
ADC®Satin™ aryngoscope.
Device Description and Intended Use
A laryngoscope is a two-part, hand-held device consisting of a handle that contains bat-
teries and a detachable blade. aryngoscopes are designed to provide illumination
within the larynx during the process of performing intubations. This instruction book cov-
ers standard, fiberoptic, and disposable laryngoscopes. Fiberoptic laryngoscopes are in-
dicated by an “F” following the item number.
Disposables are indicated by a “D” following the item number.
Contr indic tions
The following are only relative contraindication to tracheal intubation:
1. Severe airway trauma or obstruction that does not permit safe passage of an endotra-
cheal tube. Emergency cricothyrotomy is indicated in such cases.
2. Cervical spine injury, in which the need for complete immobilization of the cervical
spine makes endotracheal intubation difficult.
General Warnings
A w rning st tement in this m nu l identifies condition or pr ctice
which, if not corrected or discontinued immedi tely, could le d to p tient
injury, illness, or de th.
WARNING: Federal law restricts this device to sale by or on the order of a physician or li-
censed healthcare practitioner.
WARNING: ON Y TRAINED PERSONNE SHOU D USE A ARYNGOSCOPE FOR
INTUBATION.
!

3
WARNING: ADC®recommends that spare lamps, batteries, and replacement parts always
be available for emergency use.
WARNING: The sterilization guidelines included in this instruction booklet are intended as
procedures compatible with specific materials. Sterilization must be performed to approved
hospital protocol. ADC®cannot guarantee that any of the recommended methods will guar-
antee sterility. This must be validated by the hospital and/or sterilization equipment manu-
facturer.
WARNING: Fiberoptic handles may be used with A fiberoptic blades (reusable or dis-
posable) that conform to the ISO 7376 standards. Standard handles may be used with any
standard blades that conform to the ISO 7376 standards. Standard and fiberoptic blades and
handles are NOT interchangeable.
peration of all Laryngoscope Models
To Activ te: Attach selected blade onto handle by hooking
blade onto handle rod as shown in Figure 1. Pull blade up-
ward to open position to automatically activate light.
To turn off, push blade downward into off position and dis-
connect from handle. (See Figure 1).
Compatibility/Standards
Standard ADC®Satin™aryngoscopes conform to current ISO 7376 standards. They are
compatible with virtually all major brands of standard illumination hook-on blades and
handles.
Fiberoptic ADC®Satin™aryngoscopes and Disposable aryngoscope blades conform
to current ISO 7376 standards. They are compatible with virtually all major brands of
fiberoptic illumination hook-on blades and handles. For easy visual identification, A
fiberoptic models are clearly delineated by a green indicator on both handle and blade.
Off Position
Handle Rod
Pull Blade Up
Into On
Position
OnPosition
Figure 1
Off Position
Handle Rod
Pull Blade Up Into
On Position
On Position

4
Cleaning, Disinfecting, and Sterilization Procedures
ADC®Satin™ aryngoscope blades are crafted from rugged stainless steel. ADC®Dispos-
able Fiberoptic aryngoscope blades are crafted from poly-carbonate, and are for single use
only and should not be cleaned or sterilized. Reusable handles are machined from chrome-
plated brass or anodized aluminum. To ensure maximum life and optimum performance, the
following instructions should be strictly adhered to. Disposable handles are made of ABS,
and are for single use only and should not be cleaned or sterilized.
See the sections on the reverse panel for specific cleaning, disinfection, and
sterilization procedures for your laryngoscope type.
Cle ning Procedure for All Reus ble Models: Almost immediately after use,
laryngoscope blades should be cleaned to prevent blood, saliva, etc. residues from dry-
ing. On conventional blades, the lamp socket and wires are an integral part of the blade
for cleaning and replacement.
WARNING: Ultrasonic cleaning is not recommended.
Disinfection/Steriliz tion W rnings for All L ryngoscope Bl des
CAUTION: ADC®laryngoscope blades do not come sterilized. The Sterrad process is
NOT to be used with disposable fiberoptic blades or fiberoptic blades.
WARNING: Flash autoclaving and hot air sterilization are not recommended, as these
processes will damage the instrument. The repeated high temperature and changes in
temperature caused by autoclaving will shorten the life of all laryngoscope products.
WARNING: Do not immerse blades in bleach, betadine, or peroxide solutions. Doing
so will severely damage the instrument. Also, avoid metal to metal contact on non-dis-
posable blades.
Disinfection/Steriliz tion W rnings for All B ttery H ndles:
CAUTION: Do not allow excess fluid to seep into electrical contact. Be sure that the top
and bottom of the battery handle are secure before use. Poor maintenance of this device or
failure to follow the warnings in this instruction booklet could result in device failure and/or
patient injury. NOTE: Remove lamp cartridge, bulb, and batteries before disinfecting/steril-
izing.

5
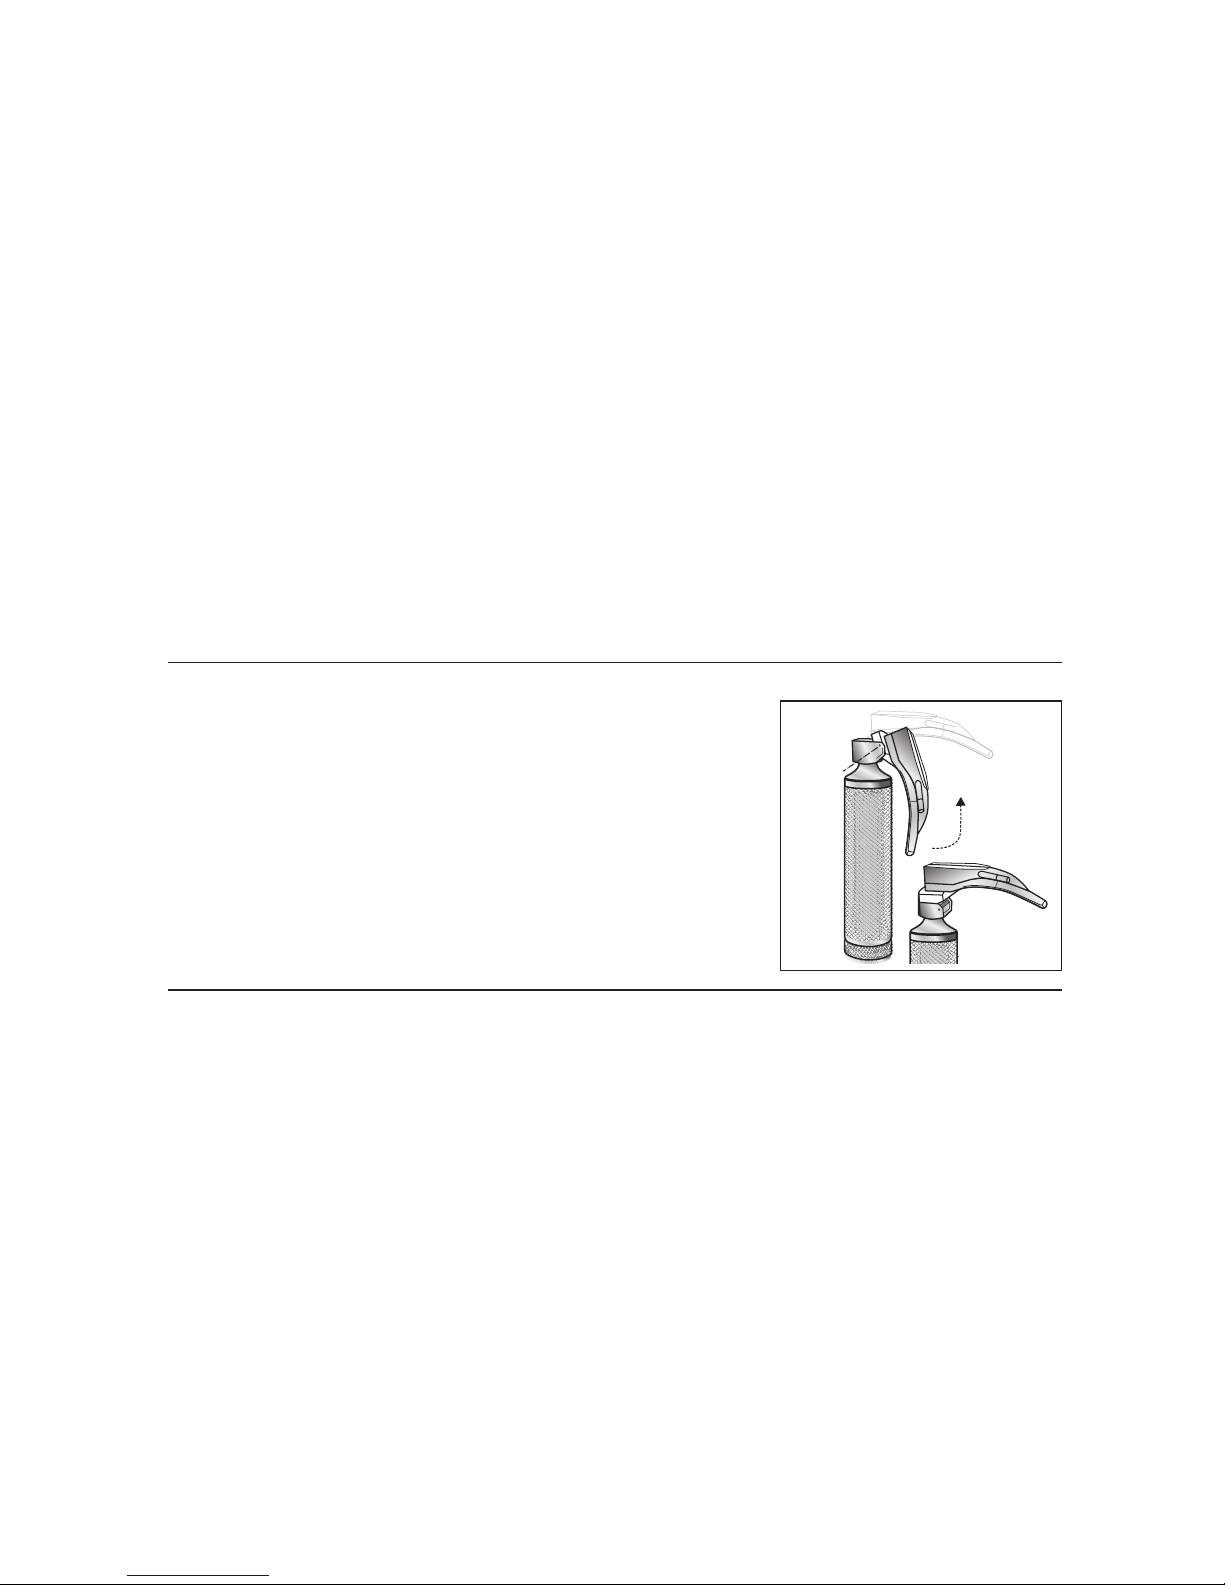
B sic Cle ning Procedure for St nd rd nd Fiberoptic Bl des:
Prepare a Klenzyme®, Manu-klenz™, or equivalent cleaning solution as per manufac-
turer’s instructions and soak for ten minutes. Rinse devices with lukewarm running tap
water for one minute to remove any residual detergent after cleaning. Dry with a clean,
lint-free cloth.
B sic Cle ning Procedures for St nd rd nd Fiberoptic H ndles:
Prepare a Klenzyme®, Manu-klenz™, or equivalent cleaning solution as per manufacturer’s in-
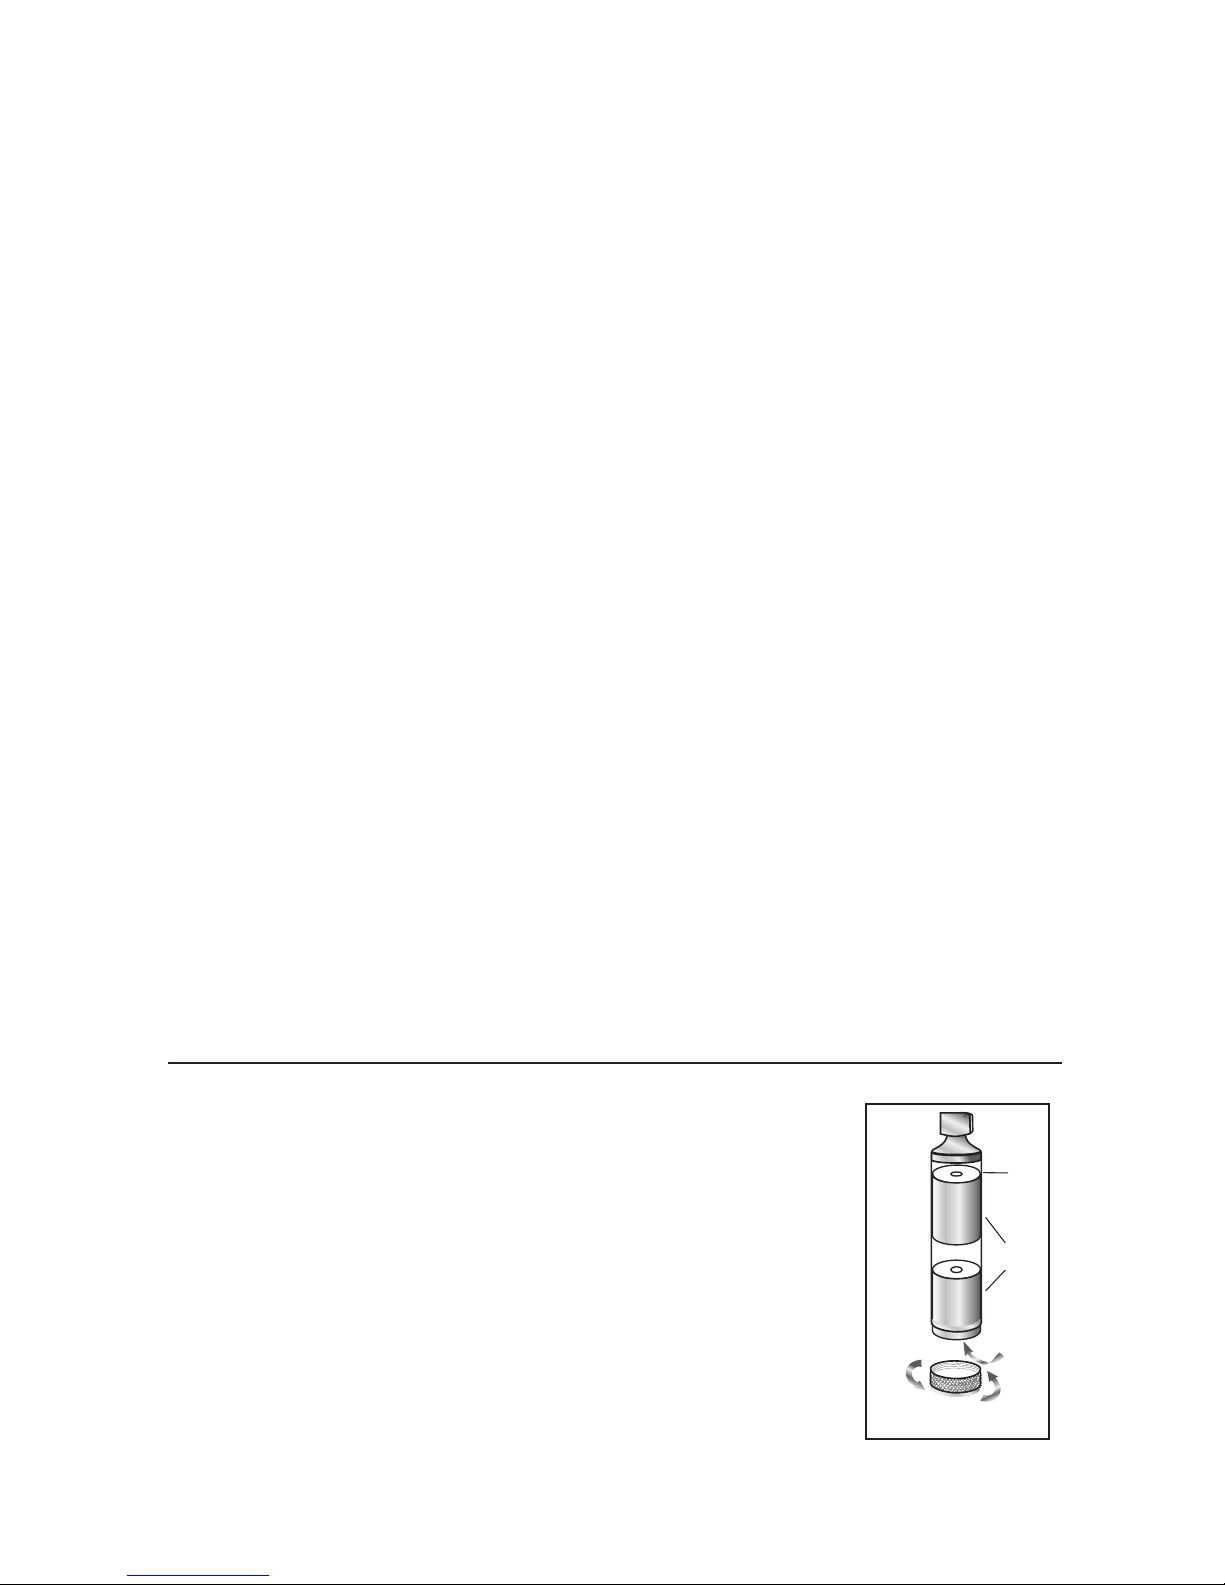
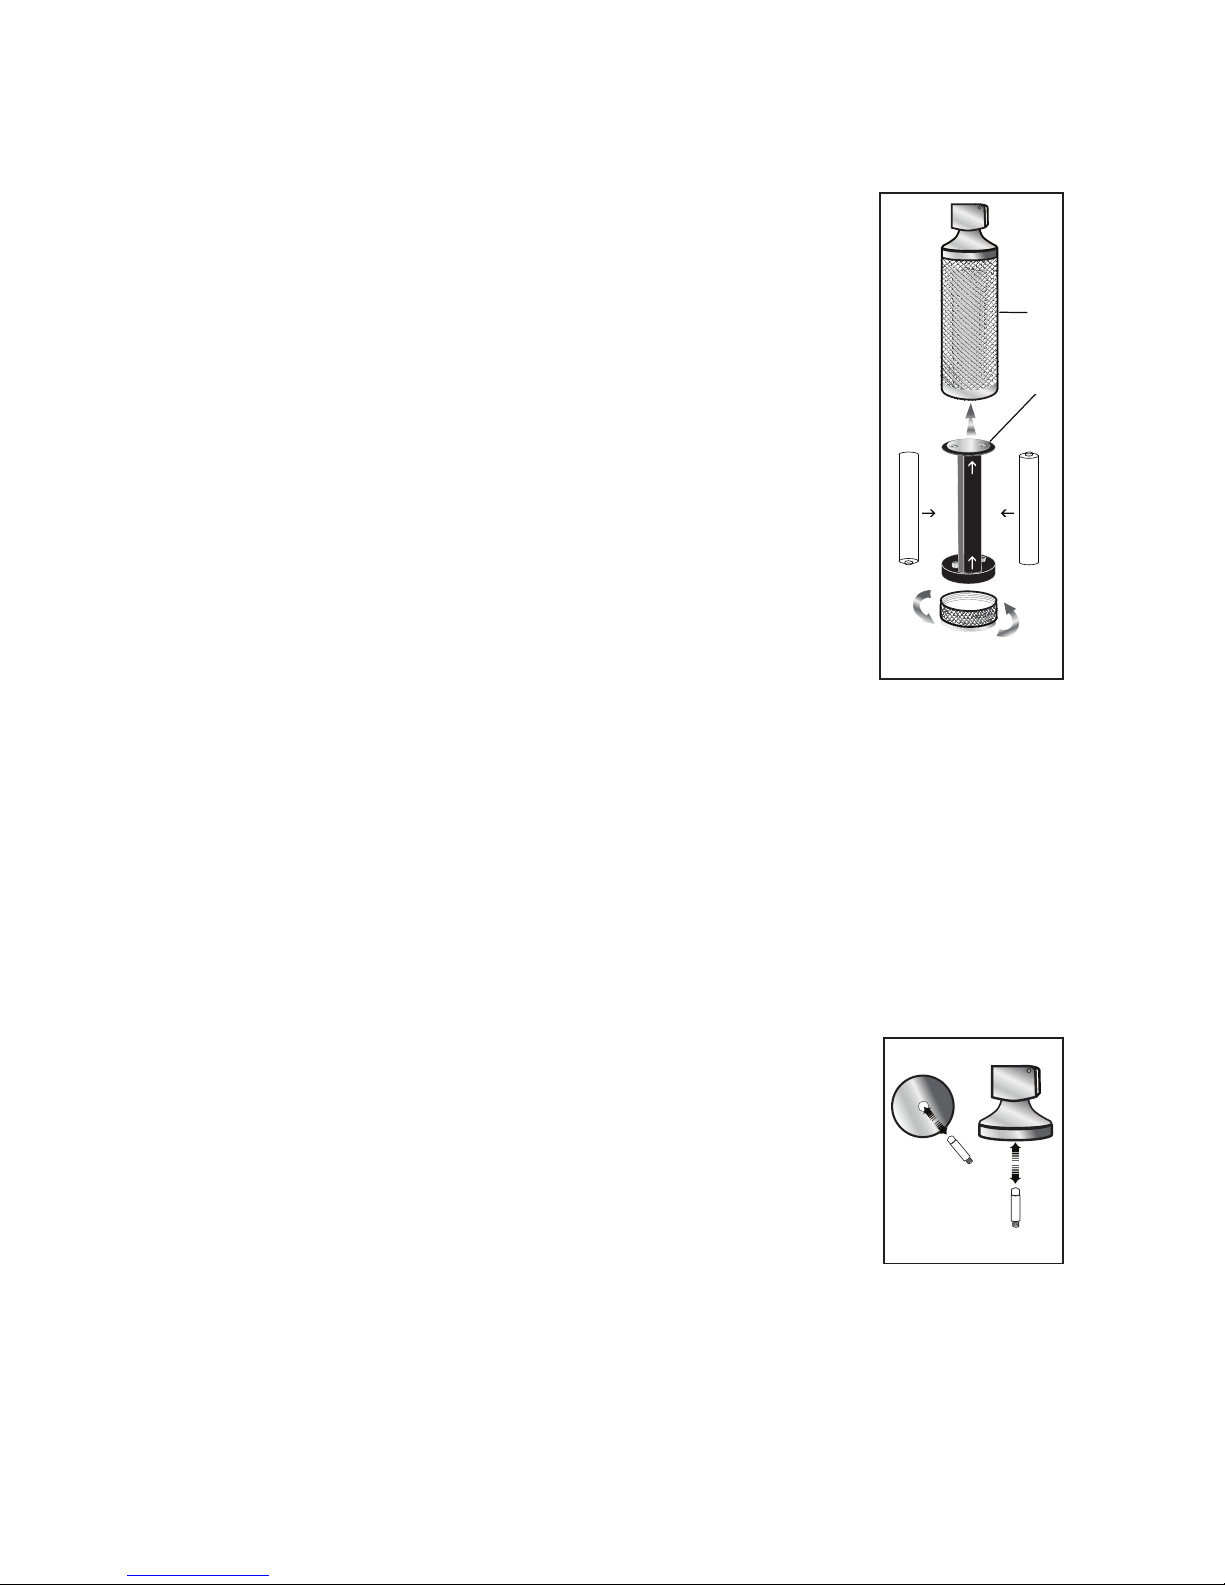
structions. Remove both end caps, lamp cartridge and bulb, and batteries from device, and
rinse with lukewarm tap water until all visible contamination has been removed. Soak handle
and end caps in the prepared solution for a minimum of ten minutes, ensuring that all compo-
nents are fully submerged. After the soak, the components should be scrubbed with a soft
bristled brush paying particular attention to hard to reach areas. Rinse with cool running tap
water to remove all residual detergent. Dry with a clean, lint free cloth. Note: Always allow
handles to completely dry before disinfection or use. amp cartridge and bulb can be wiped
with a cloth dampened with 70% isopropyl alcohol. DO NOT A OW SO UTION TO ENTER
INTO THE CARTRIDGE. The lamp cartridge and bulb CANNOT be SOAKED OR AUTO-
C AVED.
High-Level Disinfection for St nd rd nd Fiberoptic Bl des:
To achieve high-level disinfection, a 2.4% glutaraldehyde solution (Cidex®or equivalent)
must be prepared at 77°F (25°C) to the manufacturer’s instructions. The blades should be
fully immersed in the disinfectant for a minimum of 45 minutes. No air bubbles should be
visible on the immersed blades during this soak time. The blades should then be removed
from the disinfectant and immersed in purified water to rinse off all disinfectant. Immersion
should be for a minimum of one minute and the process should be repeated two additional
times using fresh purified water each time. Once rinsing is complete, the blades should be
thoroughly dried using a sterile, lint-free cloth. Note: Always allow blades to completely dry
before use.
High-Level Disinfection for Dispos ble Fiberoptic Bl des:
Disposable fiberoptic laryngoscope blades are supplied non-sterile. They are designed for
single patient use only and are not disinfected after use. Gas sterilization by Ethylene oxide
following these guidelines. Temperature 55°C (±5°C) EO pressure - 180 mmHg (± 20
mmHg) Chamber pressure 210mmHg (±20mmHg).

6
High-Level Disinfection for St nd rd nd Fiberoptic H ndles:
To achieve high-level disinfection, a 2.4% glutaraldehyde solution (Cidex®or equivalent)
must be prepared at 77°F (25°C) to the manufacturer’s instructions. The end caps of the
handles, lamp cartridge and bulb, and batteries must be removed. Both the end caps and
handles should be fully immersed in the disinfectant for a minimum of 45 minutes. No air
bubbles should be visible on the immersed components during this soak time. The com-
ponents should then be removed from the disinfectant and immersed in purified water to
rinse off all disinfectant. Immersion should be for a minimum of one minute and the
process should be repeated two additional times using fresh purified water each time. Once
rinsing is complete, the components should be thoroughly dried using a sterile, lint-free
cloth. Note: Always allow components to completely dry before reassembling the handles,
inserting batteries, or using the devices. amp cartridge and bulb can be wiped with a cloth
dampened with 70% isopropyl alcohol. DO NOT A OW SO UTION TO ENTER INTO THE
CARTRIDGE. The lamp cartridge and bulb CANNOT be SOAKED OR AUTOC AVED.
Steris Steriliz tion Processes for Dispos ble nd Fiberoptic L ryngoscopes:
This product has been validated with the V-PRO 1 Standard Cycle; V-PRO 1 Plus umen
and Non umen Cycles; V-PRO maX umen, Non umen, and Flexible Cycles; V-PRO 60
umen and Non umen Cycles using the V-PRO 60 ow Temperature Sterilization System
with VAPPROX® HC Sterilant and V-PRO maX ow Temperature Sterilization System.
Ste m Steriliz tion for St nd rd nd Fiberoptic Bl des nd H ndles:
Sterilizer Type:
Preconditioning Pulses:
Minimum Temperature:
Full Cycle Time:
Minimum Dry Time:
Gravity
249.8°F (121°C)
30 minutes
15 minutes
Sterilizer Type:
Minimum Temperature:
Full Cycle Time:
Minimum Dry Time:
Prevacuum
3
269.6°F (132°C)
4 minutes
20 minutes
Repair/Maintenance
B ttery Repl cement:
(Reuse ble Models)
1) Unscrew bottom cap of handle and remove batteries.
2) Replace with appropriate size battery, taking care to insert posi-
tive ends first. Screw bottom cap on and tighten. (Figure 2).
NOTE: Alkaline batteries should be used with your handle for max-
imum performance and are recommended for replacement. Ordi-
nary carbon zinc batteries may also be used.
➱
Main
Handle
Batteries
O
Figure 2
Batteries
Main
Handle

7
B ttery Repl cement:
(4067F Stubby H ndle)
1) Unscrew bottom cap of handle and remove battery insert.
2) Replace with appropriate size batteries. Insert 1 battery positive
end first and the other negative end first into battery insert, paying
attention to the polarity markings. Slide battery insert back into han-
dle following the direction of the “Insert This Way Only” arrows.
Screw bottom cap on and tighten. (Figure 3)
NOTE: Alkaline batteries should be used with your handle for maxi-
mum performance and are recommended for replacement. Ordinary
carbon zinc batteries may also be used.
L mp Repl cement:
(St nd rd Models)
For correct illumination, alignment, and assurance of watertight seal during
immersion/autoclave, we recommend using only ADC #4500-1 and #4501-1 replace-
ment lamps for standard blades.
1) To remove lamp on standard blades, grip lamp collar and rotate lamp counterclock-
wise until free.
2) Replace the lamp with a new ADC lamp.
3) Verify that lamp is sufficiently tightened before use.
CAUTION: Be sure lamp’s glass surface is clean and free from fingerprints after assem-
bly. If necessary, the glass may be cleaned with a soft cloth or cotton ball moistened in alcohol.
L mp Repl cement:
(Fiberoptic Models)
For correct illumination and alignment we recommend using only
ADC replacement lamp model #5111N-4 (Figure 4).
1) Prior to removal, allow lamp time to cool.
2) Unscrew the laryngoscope head from the barrel of the handle in a
counterclock-wise direction.
3) Pull lamp out of the laryngoscope head. The lamp is friction fit and does not need to
be twisted.
4) Insert replacement lamp by firmly pressing into head until it is completely seated.
5) Screw the laryngoscope head onto the barrel of the handle. Tighten by hand only.
Main
Handle
Battery
Insert
AA Battery
AA Battery
Insert This Way Only
Figure 3
Main
Handle
Battery
Insert
AA Battery
AA Battery
Figure 4
Insert This Way Only

8
CAUTION: Be sure lamp’s glass surface is clean and free from fingerprints after assem-
bly. If necessary, the glass may be cleaned with a soft cloth or cotton ball moistened in
alcohol.
Fiberoptic Light Guide Repl cement:
1) oosen the locking screw with a screwdriver. (Note: This screw is
NOT designed to be completely removed. This prevents the screw
from falling out while the laryngoscope is in use. DO NOT attempt to
remove this screw from the laryngoscope blade.)
2) Pull out the green base of the fiberoptic bundle and slide out the light guide (Figure
5). (Note: The fiberoptic bundle is tightly fitted and may be difficult to remove.)
3) Insert new fiberoptic bundle by reversing the above steps.
4) Tighten the locking screw, ensuring that the fiberoptic bundle is securely attached to
the laryngoscope blade.
Figure 5
Test Procedures
aryngoscope blades and handles should always be tested after
cleaning/disinfecting/sterilization, and prior to use. To test, connect the laryngoscope
blade to handle and push blade to ON position. If the unit fails to light or flickers, check
the lamp for a secure connection, batteries, and electrical contacts. Be sure to have ade-
quate supplies of replacement bulbs and batteries.
Caps on battery handle should be secure before use. If they are not, it could cause the
blade to move out of position. aryngoscopes should be visually inspected for wear or
aging prior to use and after long storage periods. It is strongly recommended that back-
up laryngoscopes are kept on hand for emergency situations.

9
REPLACEMENT PARTS CHART
St nd rd
Bl de
4070
4071
4072
4073
4074
4080-0
4080
4081
4082
4083
4084
4090
4091
40915
4092
4093
4094
4065
4066
4067
STANDARD MODELS
DESCRIPTIONS
L ryngoscope
Item
Mac 0
Mac 1
Mac 2
Mac 3
Mac 4
Miller 00
Miller 0
Miller 1
Miller 2
Miller 3
Miller 4
Wisconsin 0
Wisconsin 1
Wisconsin 1.5
Wisconsin 2
Wisconsin 3
Wisconsin 4
“C” Cell Handle
“AA” Cell Handle
Stubby Handle
St nd rd
Repl cement L mp
4500
4500
4500
4501
4501
4500
4500
4500
4501
4501
4501
4500
4500
4500
4501
4501
4501
NA
NA
NA

10
STANDARD MODELS
DESCRIPTIONS
REPLACEMENT PARTS CHART
L ryngoscope
Item
Mac 0
Mac 1
Mac 2
Mac 3
Mac 4
Miller 00
Miller 0
Miller 1
Miller 2
Miller 3
Miller 4
Wisconsin 0
Wisconsin 1
Wisconsin 1.5
Wisconsin 2
Wisconsin 3
Wisconsin 4
“C” Cell Handle
“AA” Cell Handle
Stubby Handle
Fiberoptic
Bl de
4070F
4071F
4072F
4073F
4074F
NA
4080F
4081F
4082F
4083F
4084F
NA
NA
NA
4NA
NA
NA
4065F
4066F
4067F
Fiberoptic
Repl cement L mp
NA
NA
NA
NA
NA
NA
NA
NA
NA
NA
NA
NA
NA
NA
NA
NA
NA
4532-1 (old) / 5111N-4 (new)
Fiberoptic Light
Guide
4070F P-00
4071F P-00
4072F P-00
4073F P-00
4074F P-00
NA
4080F P-00
4081F P-00
4082F P-00
4083F P-00
4084F P-00
NA
NA
NA
NA
NA
NA
NA
NA
NA

11
Fiberoptic
Bl de
NA
4071D-20
4072D-20
4073D-20
4074D-20
4080-0D-20
4080D-20
4081D-20
4082D-20
4083D-20
4084D-20
NA
NA
NA
NA
NA
NA
NA
4065D-20
NA
SPU MODELS
DESCRIPTIONS
REPLACEMENT PARTS CHART
L ryngoscope
Item
Mac 0
Mac 1
Mac 2
Mac 3
Mac 4
Miller 00
Miller 0
Miller 1
Miller 2
Miller 3
Miller 4
Wisconsin 0
Wisconsin 1
Wisconsin 1.5
Wisconsin 2
Wisconsin 3
Wisconsin 4
“C” Cell Handle
“AA” Cell Handle
Stubby Handle

12
LIMITED WARRANTY
American Diagnostic Corporation (ADC®) warrants its products against defects in
materials and
workmanship under normal use and service as follows:
1. Warranty service extends to the original retail purchaser only and commences
with the date of delivery.
2. Your laryngoscope is warranted for one year from date of purchase (all parts).
Wh t Is Covered: Replacement of parts, and labor.
Wh t Is Not Covered: Transportation charges to and from ADC®. Damages caused
by abuse, misuse, accident, or negligence. Incidental, special, or consequential dam-
ages. Some states do not allow the exclusion or limitation of incidental, special, or
consequential damages, so this limitation may not apply to you.
To Obt in W rr nty Service: Send item(s) postage paid to ADC®, Attn: Repair
Dept., 55 Commerce Dr., Hauppauge, NY 11788. Please include your name and ad-
dress, phone no., proof of purchase, and a brief note explaining the problem.
Implied W rr nty: Any implied warranty shall be limited in duration to the terms
of this warranty and in no case beyond the original selling price (except where pro-
hibited by law). This warranty gives you specific legal rights and you may have other
rights which vary from state to state.
F R QUESTI NS, C MMENTS, R SUGGESTI NS
CALL T LL FREE:
1-800-ADC-2670
To Register Your Product, visit us at
www. dctod y.com
and follow the links
This manual is available in a variety of languages,
follow the links for language options.
www. dctod y.com/c re

ADC
55 Commerce Drive
Hauppauge, NY 11788
U.S.A.
ADC (UK) Ltd.
Unit 6, P 14 1TH
United Kingdom
Inspected in the U.S.A.
Reusable models:
Made in Pakistan
Disposable models: Made
in Taiwan/China
tel: 631-273-9600
toll free: 1-800-232-2670
fax: 631-273-9659
www.adctoday.com
info@adctoday.com
IB p/n 9358-00 rev 14 Printed in the U.S.A.
Table of contents