American Flyer E-Wave User manual

E-Wave Electric Bicycle
Ownerʼs Reference Guide
American Flyer Bikes
640 N Tustin Ave #100, Santa Ana, CA 92705
Tel: (949) 791-8099
admin@americanflyerbikes.com
www.AmericanFlyerBicycle.com

Important Warranty Information
- Before assembling your E Wave
Register your American Flyer bike by visiting our website:
www.AmericanFlyerBicycle.com/warranty-registration/
Perform a visual inspection of your shipping box and your bike to see
everything arrived without shipping issues. Take pictures if you
suspect excessively rough handling.
-Before Riding your American Flyer bike
Be sure all the items are properly torqued, tightened and connected.
Especially the handlebar, front wheel and pedals. The pedals, in
particular, must be very tightly fastened. Your bicycle's warranty is
voided if not assembled by an authorized American Flyer Service
Center.
If you have any doubts contact us via our support number
(949) 791-8099, or send us an email at
TechSupport@AmericanFlyerBikes.com
1

What is Pedal Assist?
Also known as Pedelec, pedal assist refers to the use of sensors
that measure the cadence (speed) of your pedaling. This info is
passed to the bike's controller, which generates the power needed
to give you a great ride.
We recommend you to ride your bike with the power off at first, to
become familiar with your E-Wave's braking and gear shifting. Then,
you can start testing the assist levels incrementally to gain familiarity
with the optimal settings for your riding style.
2

Charging the Battery
The American Flyer E-Wave features a high-capacity Lithium Ion
rechargeable battery. Charge the battery fully before your first use.
The charger that came with your E-Wave recognizes the battery
pack’s initial charge and will automatically cease charging when the
battery is fully charged; don’t be shy about topping off your battery
any time at all.
•Be sure the bike is powered off.
•The battery pack can be charged while connected on-board the bike
and it can also be charged when removed off of the bike (see
Removing Battery pack on page 13).
Onboard charging:
•Stand on the left side (non-drive side) and locate the charge port cover
on the bottom of the battery pack.#
•Lift the rubber dust cap away to expose the DC charge port.
•Carefully, plug the charger into the charger port
•Connect the AC power cable into the charger and plug the cable into
the power outlet.
•The charger will automatically start charging if the battery needs to be
charged.
•When the charger is charging the battery, the indicator LED will turn
RED. When the charger is complete, the charger will turn GREEN.
3

•Charging takes between 1 and 6 hours, depending on battery size and
initial charge level (see verifying battery charge level on page 10).
•When the pack is fully charged, the charger’s light will change from
amber to green and automatically stop charging.
•Disconnect the charger from the wall. Remove the charger plug from
battery and close the rubber dust cap.
Caution:
The charger can become warm during charging.
Do not place anything over the charger while it is charging.
Do not use the charger in wet areas.
Do not cover the body of the charger when charging.
Do not charge he battery with any charger which is not supplied or
approved to charge your bike.
Do not drop the charger or subject to high vibration.
Make sure the rubber cap is properly closed at all times the battery isn’t
charging.!
4

Turning the bicycle ON and OFF
The electric bicycle can be ridden like a normal bicycle with the power
turned ON or OFF. However the Pedal Assist and Throttle (if installed)
will be active only if the power is turned ON.
•Locate the power button on the front face of the Controller.
•Have both feet off the pedals as the torque sensor will calibrate when
turning on.
•Press the power button.
•The lights on the controller's display panel will illuminate, giving an
indication of the battery’s charge level and selected assist level.
For the Sport Controller (Class 3)
•The E-Wave will Pedal Assist up to 28 mph.
5

For the Sport Controller with the Throttle kit installed (Stock
version)
•The E-Wave can now ride on battery power alone. Throttle up to
20 mph. Also the pedal Assist will be active at the same time up
to 28 mph.
•Pressing and holding the power button again will turn off the controller.
•Power should be turned off after each ride to avoid draining the battery.
6

Using the Brakes
The bike comes equipped with front and rear Shimano disc
brakes; one of the most reliable bike brands. The brake's main
function is to slow down or to stop the bicycle.
•The brake on the front wheel is controlled by the lever on the left-
hand side of the handlebar.
•The brake on the rear wheel is controlled by the lever on the right-
hand side of the handlebar.
•The front brake provides the majority of the bicycle's stopping power.
•When slowing down on slippery surfaces, use the rear brake first
before applying the front brake.
•A signal wire from each brake lever automatically cuts power to the
motor when either brake is being used. This prevents undue wear to
the electric motor.!
7

Shifting the gears
Your E-Wave comes equipped with a Shimano 8 speed gear set.
The lower gears are useful for starting off from a stop or when
riding slowly or climbing steep hills. Higher gears are most
effective when riding at speed. The mid gears fit into the space
between. As a normal bike, you will get used to using the gear
settings that are most comfortable for your ride and trip.
•The twist shifter is located on the right side of the handlebar.
The gear shifting system and motor assist are entirely
independent; neither affects the other’s performance. Both work
toward the goal of propelling the bike, of course, and their
contributions are additive.!
8

Using the Assist Control
The control system can be used to maintain a constant level of
pedal assist.
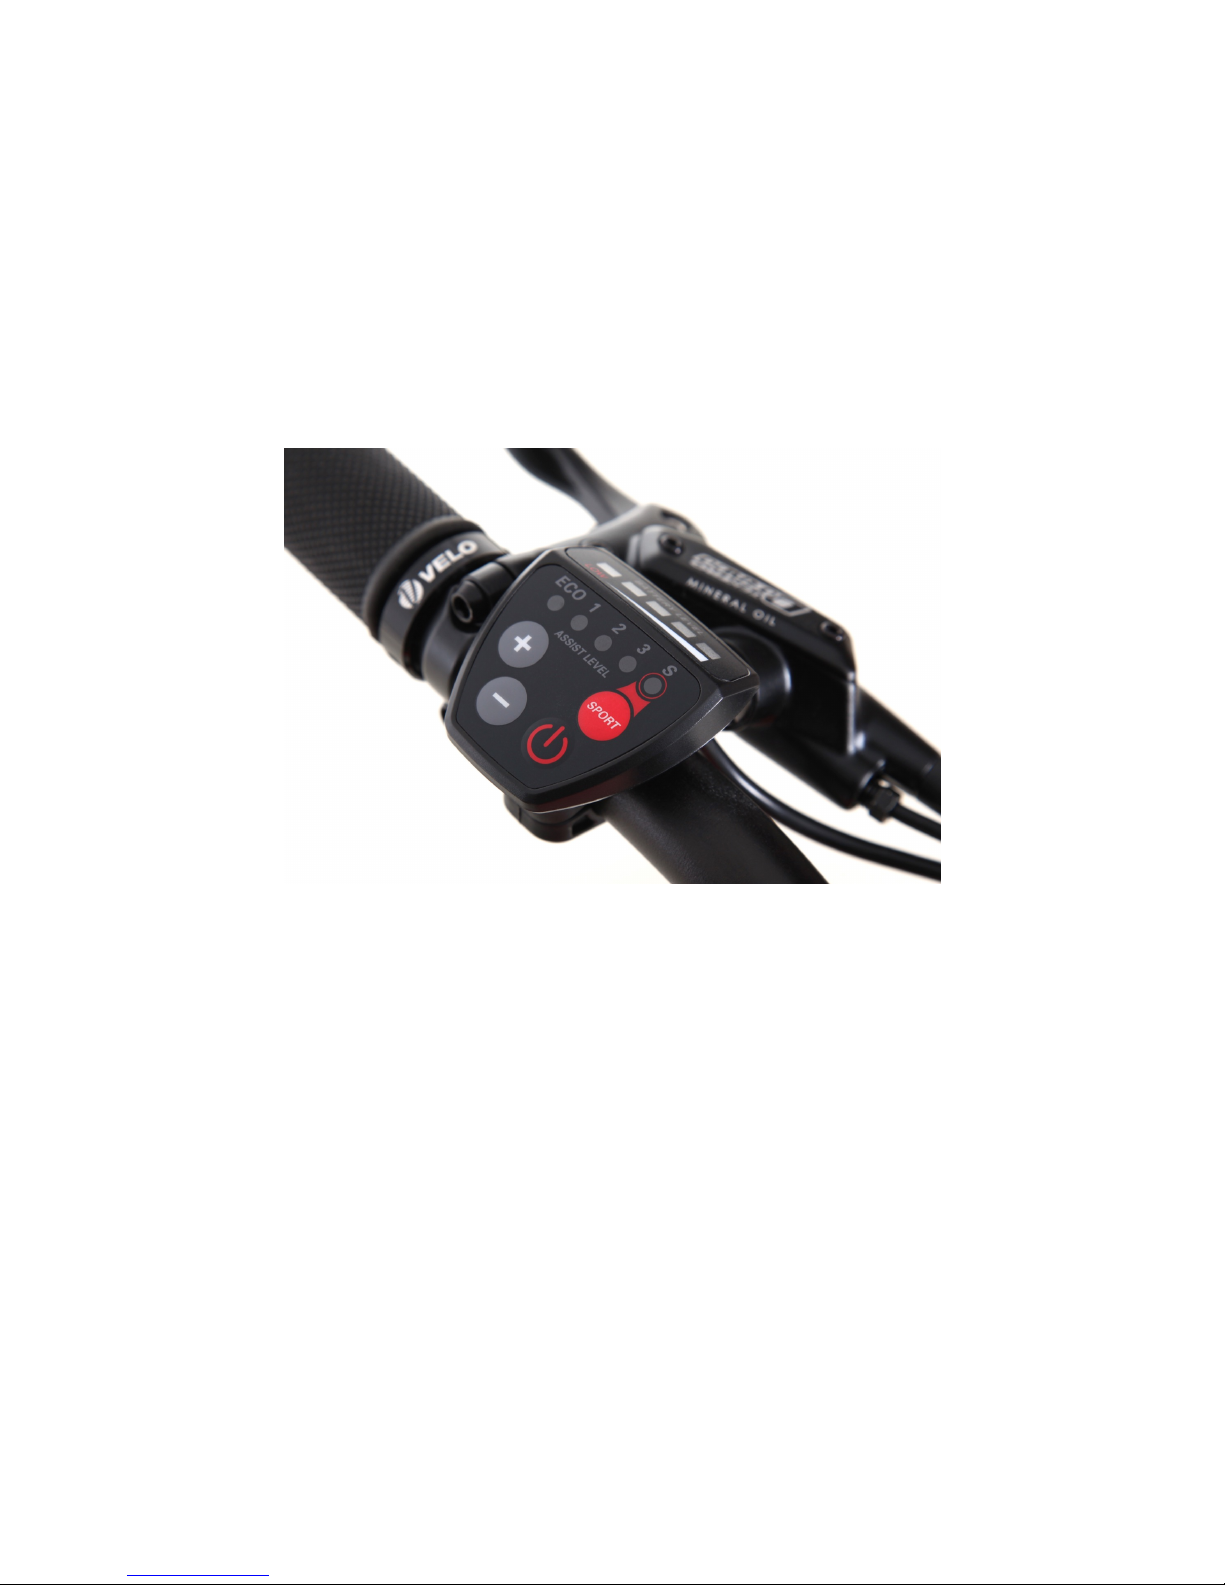
How to use the Assist control feature:
•Turn your bike on.
•Using the +or -Buttons, you can select the Assist levels between
ECO ( Battery efficiency ), 1, 2 and 3.
•The LED will illuminate to indicate the Assist Level you are selecting
•Only by pushing the Sport button, the controller will set to the
maximum Assist level.
•Once you start pedaling, the controller will make the motor turn
accordingly.
•The bike will now maintain a constant Pedal Assist until:
1. The brakes are applied, or
2. The + or - buttons are pressed to adjust the Assist level, or
3. You stop pedaling, or
4. The battery runs down completely
Note: If your battery level is low, we recommend selecting a lower assist level as the
Battery Management system can deactivate the assist support to protect the
battery from getting too low. Charge your battery fully before each ride.
9

How to read the battery level
There are 5 LED lights on top of the Controller's display which will give
you an indication of the batteryʼs voltage ( Additionally, there are 4
LED on top of the battery pack that are useful when charging the
battery outside the bike ). Because the battery gauge measures
voltage, only an approximate estimation of the battery's state can be
obtained. The battery’s voltage can vary greatly depending on a
variety of conditions.
The voltage will decrease temporarily when using the throttle and/or
Assist. It may drop to only 1 light when going uphill regardless of the
charge state. This is normal operation. The voltage will be lower if the
battery has been in a cold environment.
To more accurately read the batteryʼs charge state, let off the throttle.
The display lights will stabilize after 1 second to give an indication of
the battery’s level.
Use this guideline to estimate the battery's charge level:
Let off the throttle or stop pedaling to read the Lights
!!!!! 5 Lights
The battery is between 90% and 100% charged.
!!!!!4 Lights!
The battery is between 60% and 80% charged.
!!!!! 3 Lights$
The battery is between 40% and 50% charged. Speed will feel reduced
!!!!! 2 Lights
The battery level is low and should be recharged soon. Select a lower assist level
!!!!!1 Light!
Stop using the throttle, recharge the battery pack.
10

Understanding Battery Range
All electric bicycles have a riding range that can vary greatly
depending on how it is ridden, terrain, tire pressure, temperature,
payload and wind. After a few rides, you will get a sense of the
electric bicycle’s range capability.
Factors that will decrease your range:
•Rapid accelerations using the motor
•Uphill riding
•Heavy payloads
•Headwinds
•Under-inflated tires
•Extreme hot or cold weather
How to increase your range:
•Start by pedaling instead of only using the motor
•Avoid rapidly accelerating using the throttle
•Pedaling to help the motor up steep hills . Use your gears
•Reduce your average assist level and pedal along with the motor
•Reduce payload weight
•Properly inflating your tires between 35-45 psi ( stock tires )
•Coast to a stop and avoid rapid decelerations
$
Notice: Riding downhill or pedaling when not using the throttle will not recharge
the battery pack. Do not over-inflate the tires.
11

Battery Information and Safety
About the Lithium ion battery
Your Lithium battery does not have a “memory effect” associated
with older battery technologies. It is highly recommended you
charge the battery after every ride even if the battery is only lightly
used.
An on-board circuit prevents the battery from over-charging. The
battery can achieve between 500 to 700 full charge cycles. As the
battery receives more charge cycles, the capacity will become
decreased. Charging a partially flat battery is not considered a full
charge cycle.
Notice: The battery must be recharged at least once every
month. A battery left unused for several months may result in
permanent capacity loss.
The battery’s capacity will be temporarily reduced in cold
environments. Avoid using the electric bicycle in very hot weather.
Store the electric bicycle in a sheltered place.
Battery Safety Information
•Use only the charger supplied with the bicycle.
•Improper usage can cause explosion or fire.
•Do not short-circuit the battery’s terminals.
•Do not use if the temperature is over 60 C (140 F)
•Do not disassemble the battery pack.
•Do not submerge the battery in liquid or use in wet areas.
•Do not set flame to the battery.
•Do not expose battery to freezing temperatures for an extended
period.%
12

Removing the battery
The battery can be removed from the bike. This is useful for storing
the bike or when the bike is being transported.
•Turn off the bicycle.
•Stand on the non-drive side of the bicycle.
•Locate the Keyhole on top of the battery.
•Insert the key into the bike.
•Turn the key counter clockwise and hold.
•Lift the battery lever.
•Pull the upper portion of the battery towards you.
•The battery will pivot sideways and can be lifted away from the bike.
13

Key parts of the electric bicycle
An electric bicycle is a lot like a normal bicycle. The major difference is
the inclusion of a motor which provides a boost when desired. An
onboard rechargeable lithium ion battery supplies the motor with
electric power. The bicycle can be ridden using both pedal power and
battery power at the same time.
Controller
The controller regulates how much power is sent from the battery to the
motor.
Throttle
The throttle allows the rider to control the bike’s speed. It sends a signal to
the controller telling it how much power to send to the motor.
Battery
Electrical energy is stored in the battery pack. It is composed of many
smaller battery cells similar to that of a modern mobile phone.
Charger
The charger plugs into the electrical outlet and is used to pump energy
back into the battery pack when it becomes depleted. The more energy that
is discharged from the battery pack, the longer it will take to recharge.
Display
The display reads the battery’s voltage. This will give an approximation of
the battery’s charge state. The display may have other buttons to control
other functions.
Motor
The motor is built into the hub of the rear wheel. When power is sent to the
motor, it will began to spin, propelling the bike forward.
14

Key parts of the electric bicycle (continued)
Gear Shifter
The gear shifter changes the ratio between the pedals and the rear wheel.
It is used to find a more comfortable pedaling cadence under different
riding conditions. The low gear is used for pedaling during starts, uphill or
loaded riding. The higher gears are use when pedaling downhill or during
faster riding.
Brakes
The brakes use friction to slow the bike down. The levers on the
handlebars control the braking. The brakes have an electrical switch which
cuts the power to the motor at the moment when the brakes are used. This
prevents accidental accelerations while braking.
Fuse
The battery has a fuse which is used to prevent excessive amounts of
power surging through the wires and damaging the electronics. When the
fuse is tripped, it will need to be replaced.
Tire and Inner tube
The tire is made of rubber and provides traction for your bicycle. The Inner-
tube, is a rubber tube inside the tire retains the tire’s air.
PSI (Pounds per Square Inch)
The PSI is a measure of air pressure inside the tire. It can be measured
with a tire gauge. Pumping more air into the tire increases the PSI and
makes the tire harder. Releasing air from the tire decreases the PSI and
makes the tire softer. Both over and under inflating the tire can have
negative effects.
15

Adjusting the bicycle for riding comfort
1. Adjusting the seat height
Pull the seat clamp lever outward to loosen the seat post. Adjust the seat the
desired height. The maximum height should not extend beyond minimum
extension mark marked on the seat post. Tighten the seat clamp and close the
lever to lock in the seat’s height.
2. Adjusting the seat tilt and distance
Using a 5 mm Hex wrench, loosen the bolts under the seat. Adjust the seat tilt
and seat distance forward or backward. Tighten the bolts securely to lock in your
desired position.
3. Adjusting the handlebar tilt angle
Use a 6mm Hex wrench to loosen the two screws near the center of the
handlebars. Tilt the handlebars to the desired position. Re-tighten the screws
securely to lock in the handlebars. Be sure all screws are tightened equally.
16

Important Safety Information
Basic Bicycle Safety
• Always wear a helmet.
• Follow all traffic and safety rules
• Use a light and wear reflective clothing when riding at night.
• Reduce speed when riding on a wet surface.
• Properly inflate tires.
• Apply the rear brake before using front brake in low traction conditions.
• Do not follow other vehicles too closely.
• Do a pre-trip inspection
• Brake disk rotors can get extremely hot for brief periods after braking. $
17

Electric Bicycle Safety
• For maximum stability, avoid accelerating or braking while turning.
• Avoid riding in extremely wet conditions.
• Do not leave the electric bicycle in the rain.
• Discontinue the use of the electric bicycle if the battery pack is
damaged due to crash or a drop.
• Do not disassemble the battery pack or modify the wiring.
• Do not use the charger outdoors in wet conditions.
• Do not ride up or down extremely steep inclines.
• Do not ride off-roads or jump the electric bicycle.
• Always use the kickstand or center stand when not on the bicycle.
• Do not exceed the carrying capacity.
• Do not ride on the sand.
• The motor can get hot, do not touch the body of the motor for at least
2 hours after riding.
• Do not race or taunt other cyclists.
18

19
Table of contents