neomouv PLIMOA User manual

USER MANUAL
PLIMOA
THIS MANUAL CONTAINS IMPORTANT INSTRUCTIONS FOR SAFETY AND
OPERATION.
At the end of this manual:
YOUR WARRANTY CERTIFICATE
«Model complies with safety requirements»

SUMMARY
1- ADJUSTMENTS / ASSEMBLY .................................................................................................................... 5
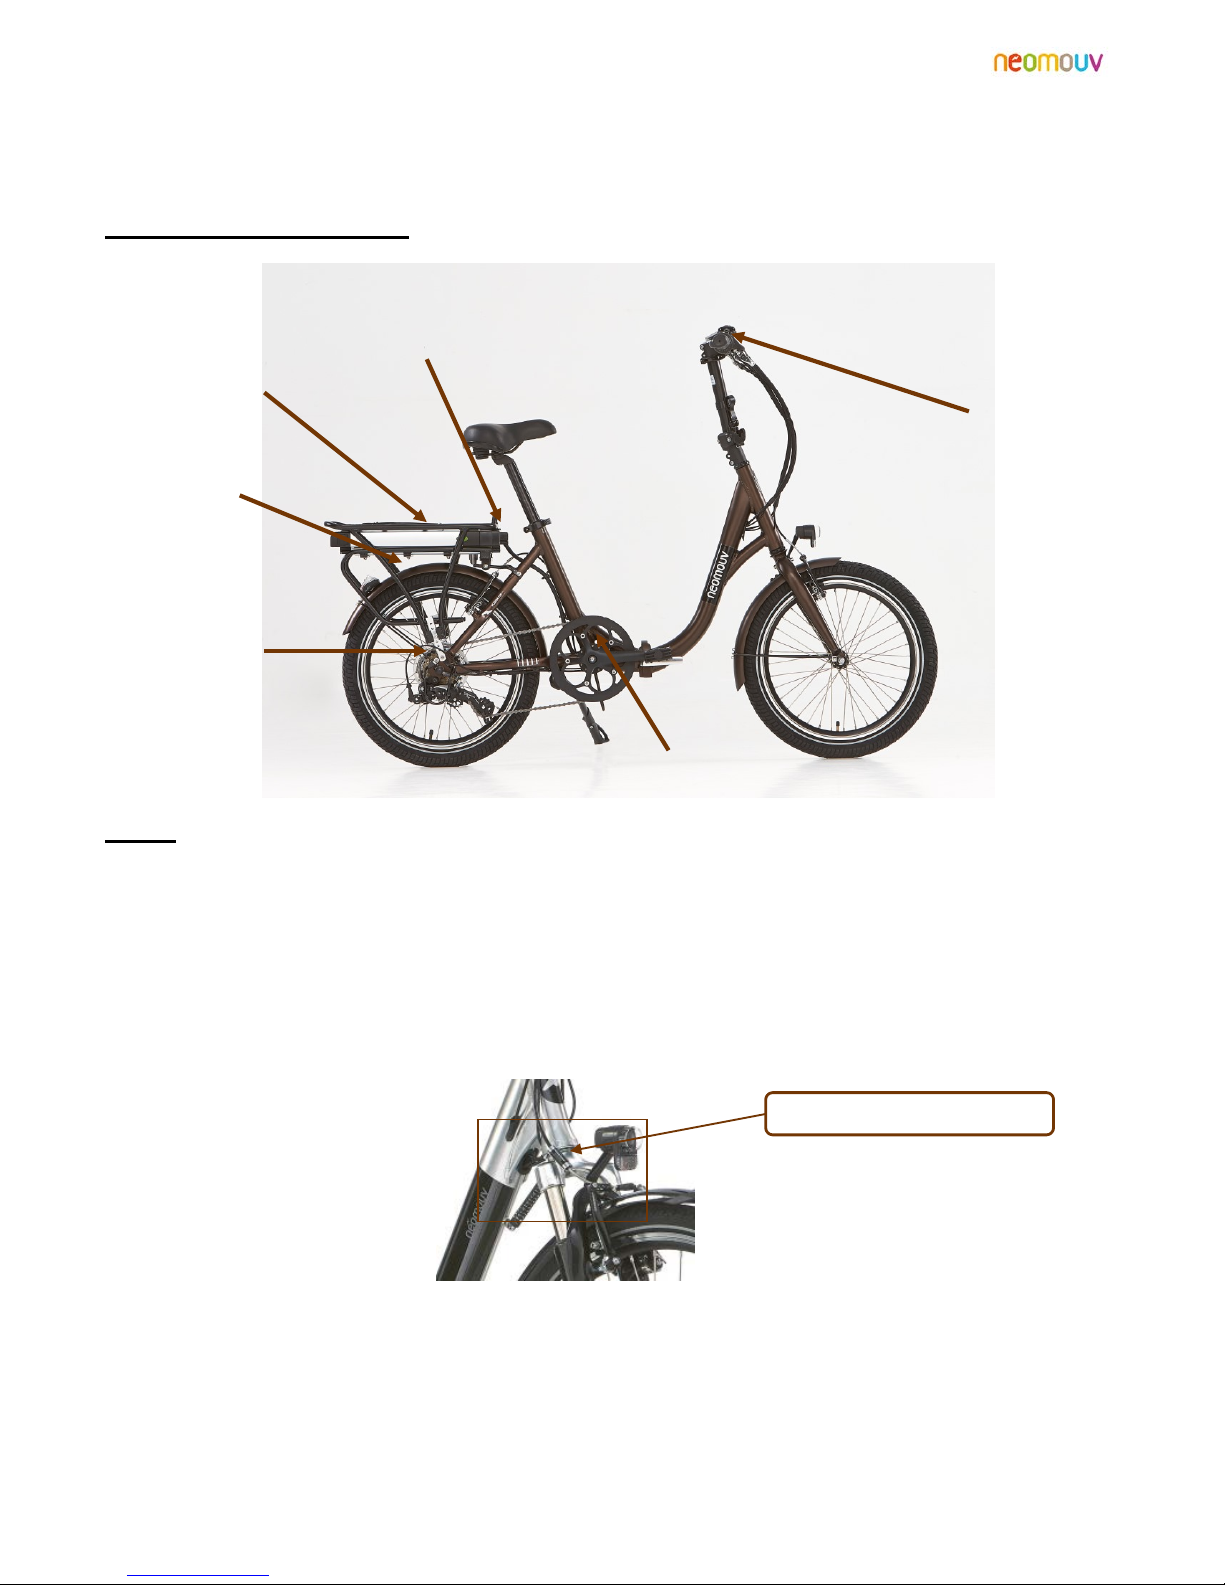
1.1 Saddle settings........................................................................................................................................ 5
1.1.1 Adjusting the saddle....................................................................................................................... 5
1.1.2 Saddle height.................................................................................................................................. 5
1.2 Adjusting the handlebars........................................................................................................................ 6
1.3 Brake adjustment.................................................................................................................................... 7
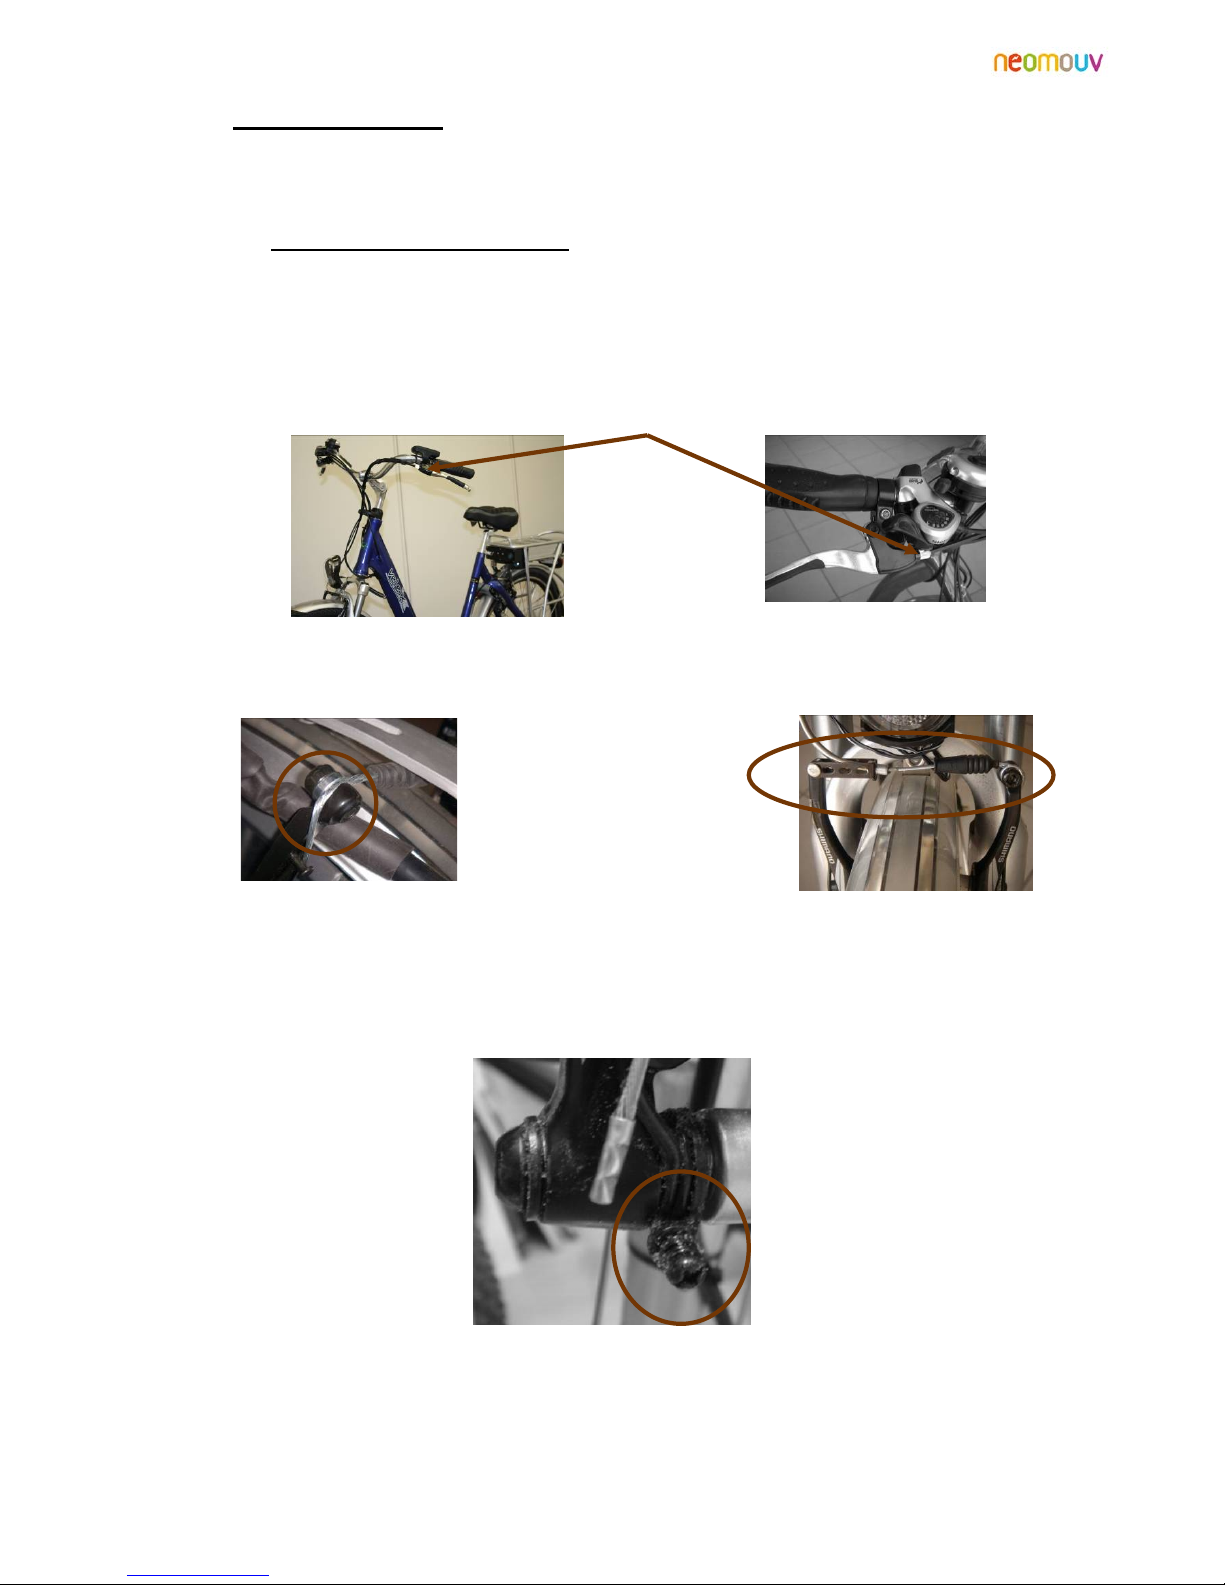
1.3.1 Front brake Type V-Brake.............................................................................................................. 7
1.3.2 Rear Brake Type V-Brake.............................................................................................................. 8
1.4 Carrier..................................................................................................................................................... 9
1.5 Assembly and disassembly wheels (rear wheel by specialist) ............................................................ 10
1.5.1 Front wheel .................................................................................................................................. 10
1.5.2 Rear wheel ................................................................................................................................... 10
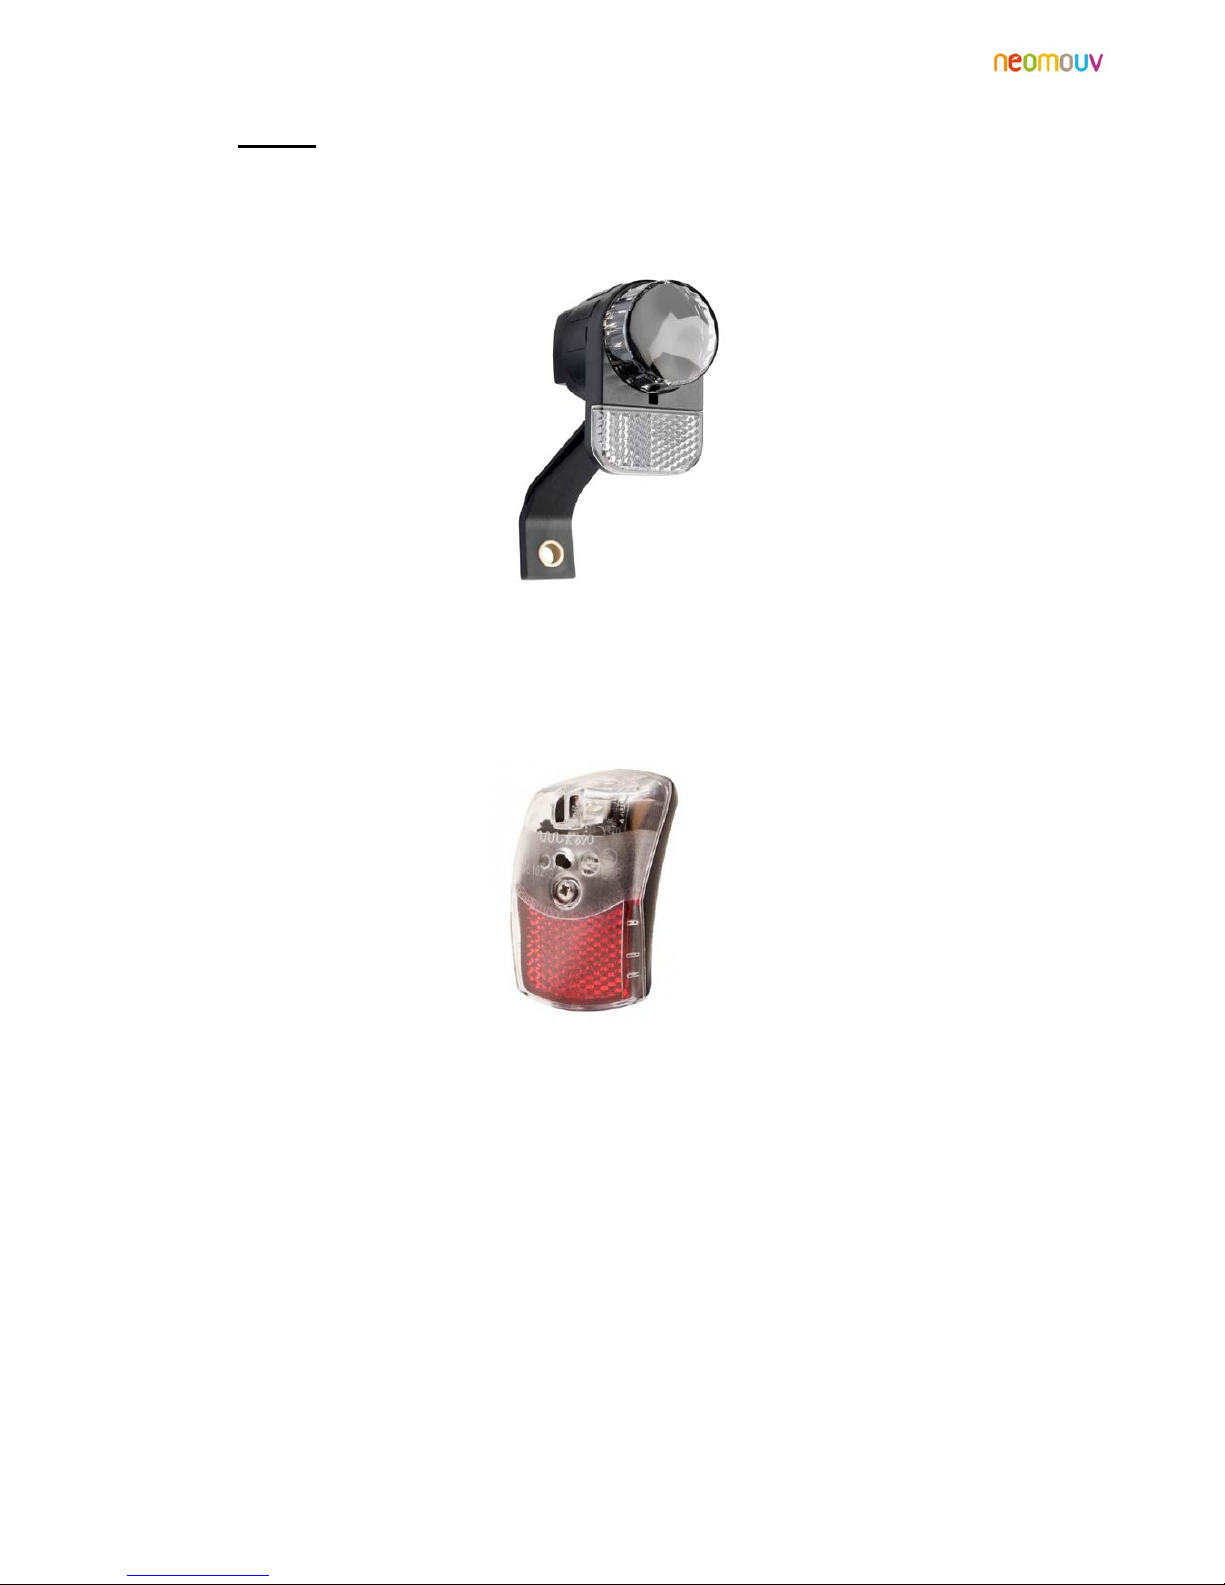
1.6 Lights.................................................................................................................................................... 12
1.7 Folding the e-bike ................................................................................................................................ 13
2 - USE OF AN EBICYCLE ............................................................................................................................. 15
2.1 Shifting gears........................................................................................................................................ 15
2.2 Change speeds electronic .................................................................................................................... 15
2.3 The display .......................................................................................................................................... 16
2.4 The electric assistance.......................................................................................................................... 17
2.4.1 Operation ..................................................................................................................................... 17
2.4.2 Performance values ..................................................................................................................... 17
2.4.3 Technical specifications of the assistance system ....................................................................... 18
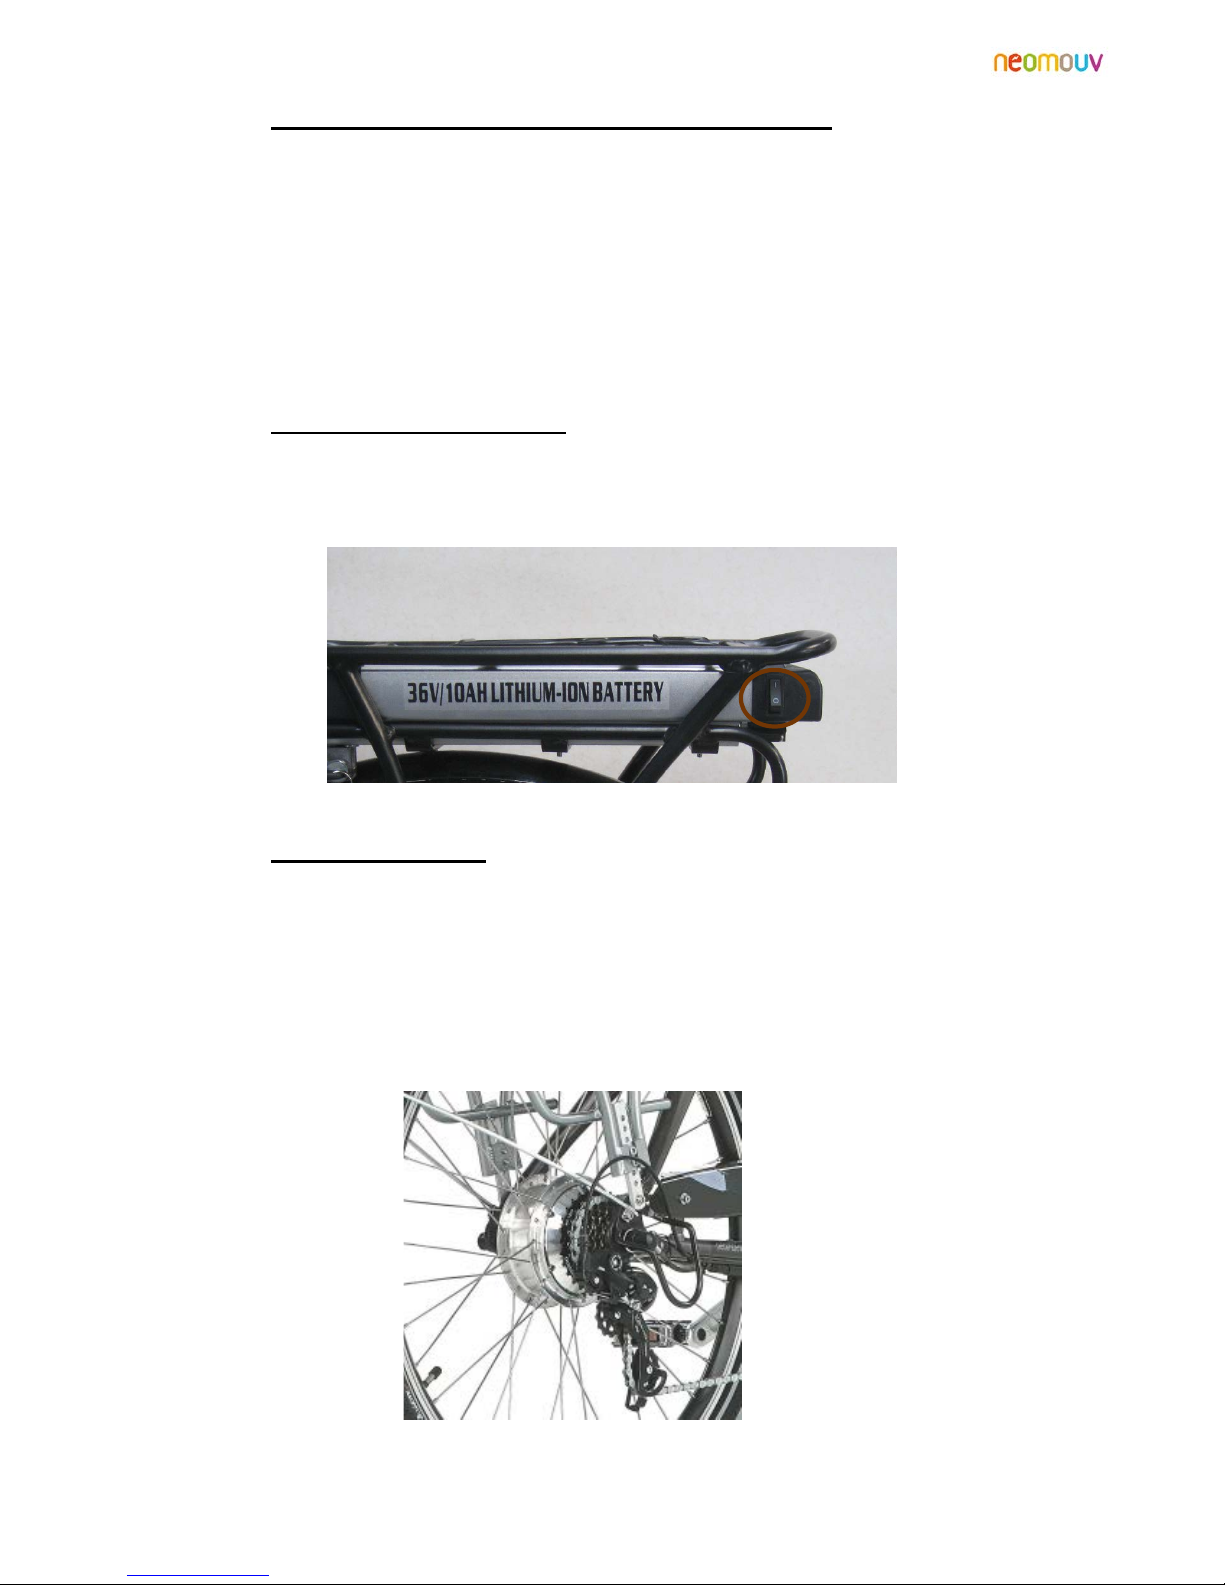
2.4.4 Switching on the battery............................................................................................................... 18
2.4.5 The electric motor ........................................................................................................................ 18
3 - CHARGING THE BATTERY .................................................................................................................... 19
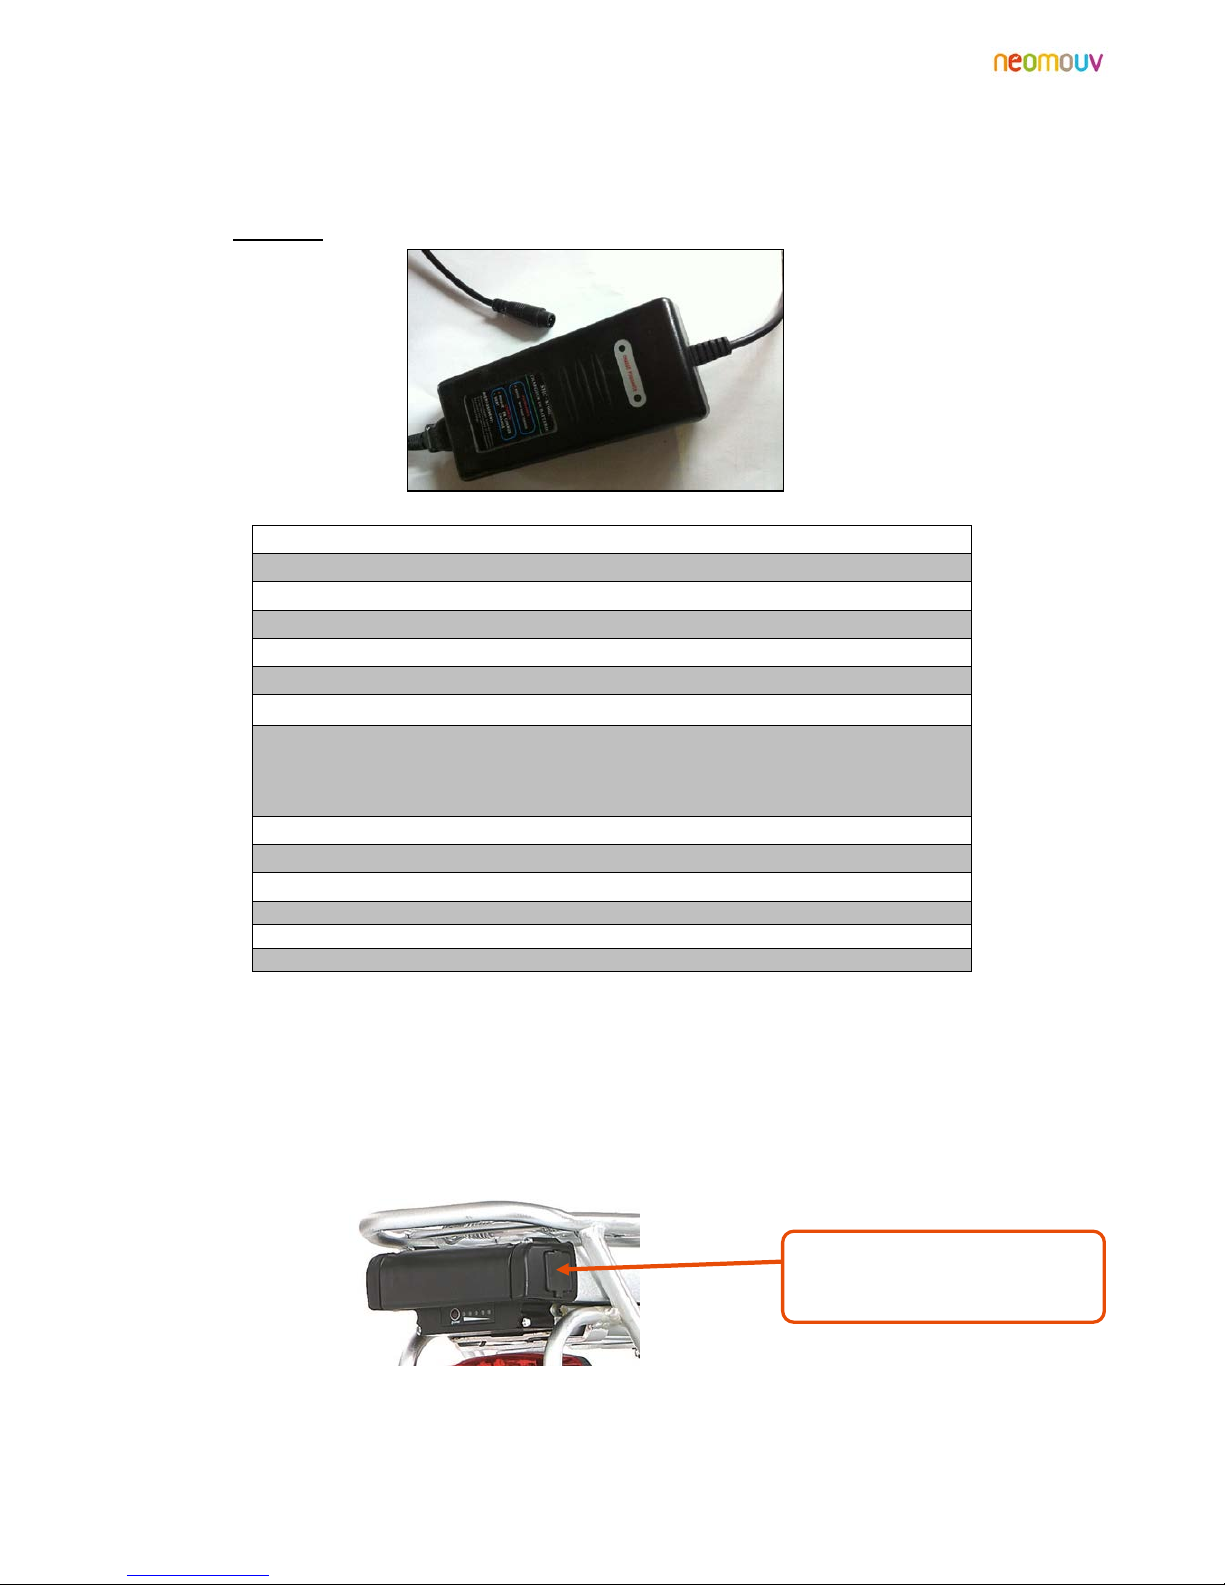
3.1 Charger................................................................................................................................................. 19
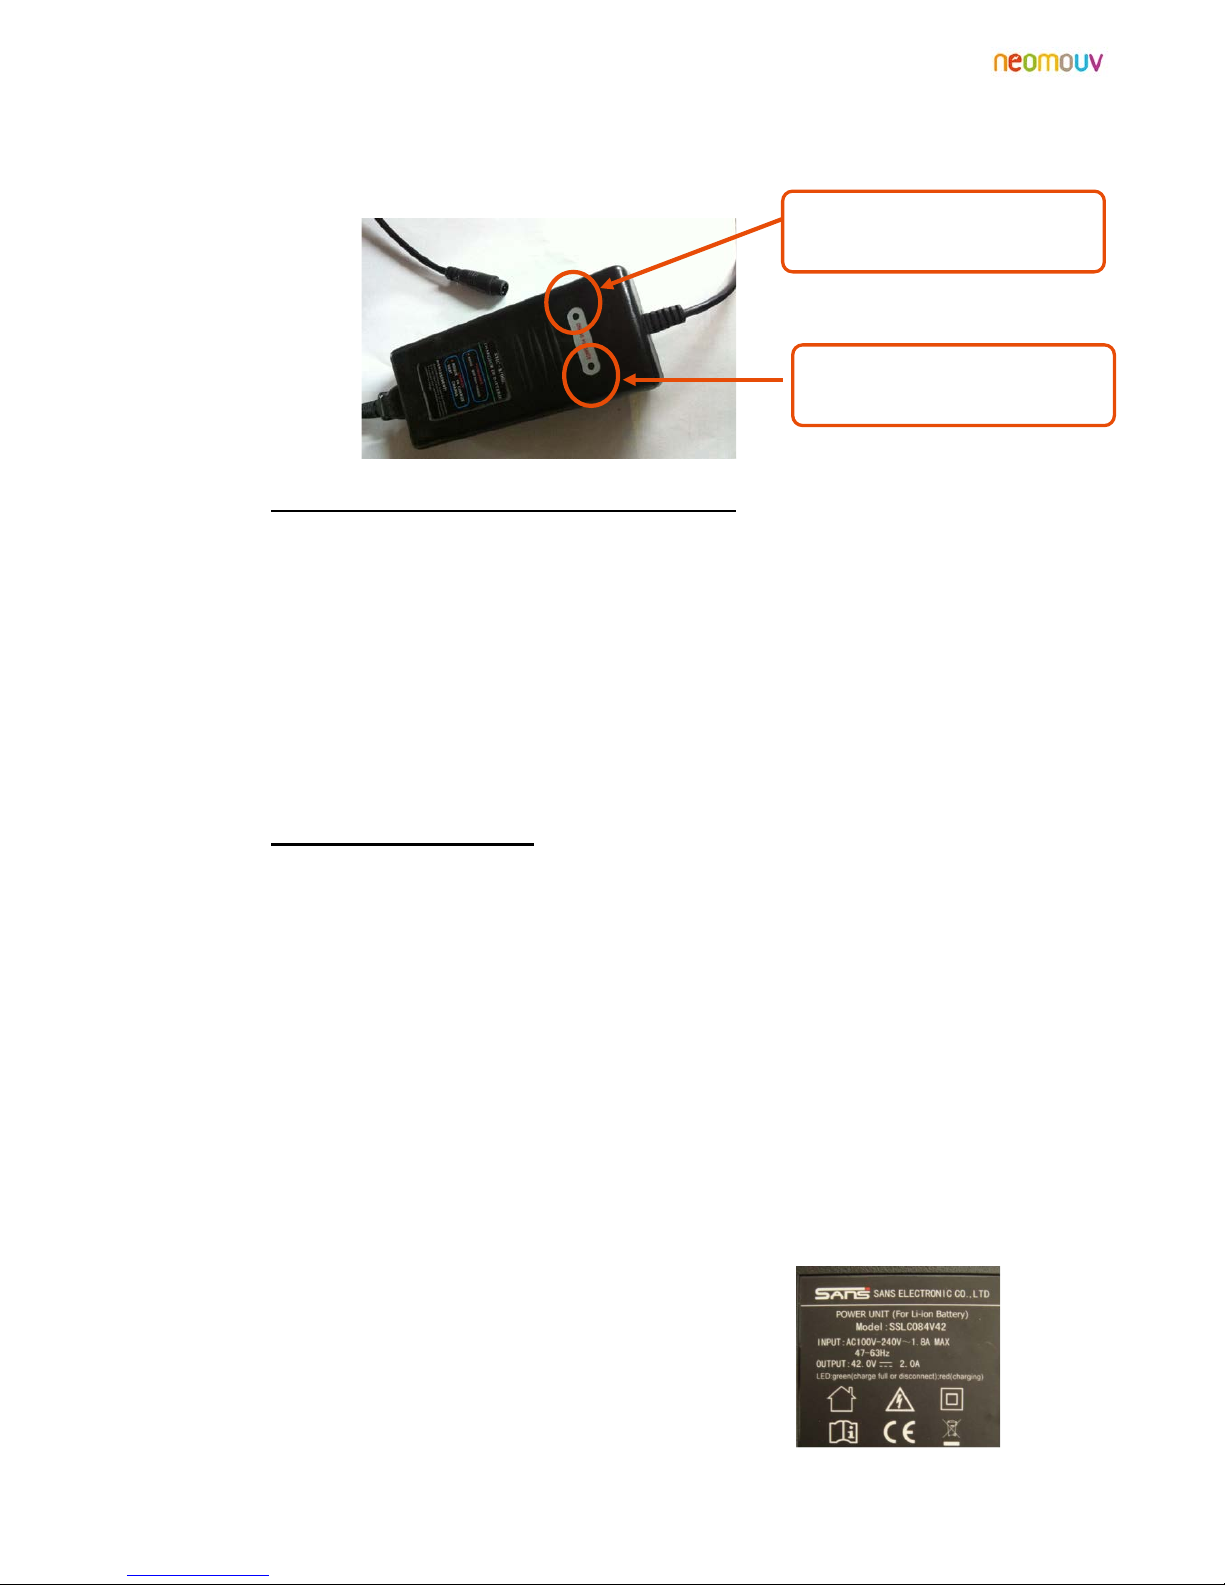
3.1.1 Precautions for use (safety instructions)........................................................................................... 20
3.1.2 Protecting the charger....................................................................................................................... 20
3.2 Battery .................................................................................................................................................. 21
3.3 Recommendations for your battery...................................................................................................... 22
Manual PLIMOA
2

4 - TIPS FOR INCREASED AUTONOMY .................................................................................................... 23
5 - SERVICING AND MAINTENANCE OF YOUR PLIMOA ................................................................... 24
5.1 Servicing............................................................................................................................................... 24
5.2 Lubrification......................................................................................................................................... 24
5.3 Maintenance ........................................................................................................................................ 24
6 - SAFETY – RECOMMENDATIONS ......................................................................................................... 25
7 - TECHNICAL DATA.................................................................................................................................... 26
8 - EC CONFORMITY STATEMENT............................................................................................................ 27
9 - WARRANTY CONDITIONS...................................................................................................................... 28
10 - WARRANTY CERTIFICATE.................................................................................................................. 29
11 - CONFORMITY CERTIFICATE.............................................................................................................. 31
Manual PLIMOA
3

INTRODUCTION
Thank for choosing a Néomouv electric bicycle (e-bike).
Introduction to the e-bike:
Notes:
• The symbol indicates recommendations and important security measures. These instructions
must be followed.
• Some adjustments, assembly and disassembly require particular tools and skills; only carry out
these operations if you are appropriately experienced, otherwise consult your authorised dealer or a
specialist.
• The symbol indicates the tool you will need to make the adjustments.
• Your e-bike has a serial number engraved on the frame at the top of the fork.
MAXIMUM LOAD:100 KG.FOR YOUR SAFETY, DO NOT EXCEED THE MAXIMUM LOAD WHEN USING
YOUR BICYCLE.
Battery
Electric motor
Pedaling
sensor
Display
Rear carrier
(max weight 25 kg)
Controller
Serial number
Manual PLIMOA
4

1- SETTINGS / INSTALLATION
1.1 Saddle settings :
Allen key 6 mm
1.1.1 Adjusting the saddle:
Loosen the nut under the saddle
Adjust the angle of the saddle, in order to get the best for your comfort position. Tighten the nut (tightening
torque 25 Nm).
1.1.2 Saddle height:
The e-bike allows the saddle to be set lower than on a traditional bicycle. Thanks to the electric assistance,
you expend less effort and can therefore take a lower, more secure sitting position. For optimal use of the
bike, the height of the user (cyclist) should be between 1.65m and 1.90m. Therefore, you should adjust the
height of the saddle in the seated position by following these steps:
Release the quick-release seat clamp.
When sitting in the saddle and wearing specialist cycling shoes, place one pedal in its lowest position. Place
one heel on a pedal: your leg should be able to extend normally without becoming stiff. Raise or lower the
saddle to achieve the optimal saddle height. When pedalling, you should not have to swing your hips from
side to side.
Lock the quick release clamp.
Nut
Quick
hitch
Manual PLIMOA
5

THE SEAT POST MUST NOT BE PULLED OUT ABOVE THE ENGRAVED SAFETY MARK (VERTICAL BARS).
The minimum height between the upper surface of the saddle and the ground is 78 cm.
1.2 Handlebar adjustment:
Allen key 6 mm
To be comfortable, the position of your handlebars should be at least at the same height as your saddle, or
more depending on your comfort. Unscrew the Allen screw and set the desired height of your handlebar.
Be careful to tighten the quick hitch tie fully before using your bike.
To adjust the tilt, use an Allen wrench to loosen the 4 screws on the stem.
After adjusting, firmly re-tighten the screw, with tightening torque max: 19.6Nm.
Safety Mark
Handlebar inclination
adjustment screw
Quick hitch
Manual PLIMOA
6

1.3 Brake adjustment:
Allen key 5 mm
Screwdriver
1.3.1 Front brake Type V-Brake:
The front brake is maneuvered by the left brake lever on the handlebar.
Fully tighten the nut on the brake lever, this feature allows you to compensate later the natural release of the
brake cable.
Loosen the cable clamp and pull the cable until the brake pads touch the rim. Tighten the cable clamp (special
attention is to be made at each end of the sheath which is to enter without forcing into the housing of each
rigid tip, brake lever and V-Brake).
The pads are properly adjusted when they are equidistant from the rim. The final adjustment is to tighten the
screws mounted on brake holders with a screwdriver (distance of approximately 0.1 to 0.5 mm from the rim).
Your setting is correct when the wheel freely rotates and stops smoothly.
Manual PLIMOA
7

1.3.2 Rear Brake Type V-Brake:
The rear brake is operated by the right handle to the handlebar.
As for the front brake (See: 1.3.1) fully tighten the nut on the brake lever, this feature allows you to
compensate later the natural release of the brake cable.
Loosen the cable clamp (See: photos of the front brake control) and pull the cable until the brake pads
touch the rim.
Tighten the cable clamp (special attention is to be made at each end of the sheath which is to enter without
forcing into the housing of each rigid tip: brake lever and V Brake.)
The pads are properly adjusted when they are equidistant from the rim. The final adjustment is to tighten the
screws mounted on the brake holder with a screwdriver (distance of approximately 0.1 to 0.5 mm from the
rim).
WARNING!WHEN RAINING OR ON WET SURFACES,THE STOPPING DISTANCE INCREASES.
Manual PLIMOA
8

1.4 Carrier:
DO NOT LOAD YOUR CARRIER WITH AWEIGHT EXCEEDING THE INDICATED MAXIMUM: 25 KG.
All carrying devices and other forms of luggage that you place in your carrier (child seat - other luggage, etc.)
must be compatible with the bicycle’s geometric characteristics and resistance.
YOU SHOULD OCCASIONALLY CHECK THAT YOUR CARRIER ARE SECURELY AFFIXED.
Any modifications made to the carrier by the user are made at the user’s own risk.
When the carrier are loaded, you should take into account potential changes to the bicycle’s handling
characteristics (stability in wind, braking distances, differences when changing direction…). For their safety,
the user should keep such changes to the bicycle’s handling characteristics in mind.
When loading soft luggage, the user must always carry out a safety check (e.g.: ensure no straps are hanging
down, no danger of items catching in spokes, no chance of falling).
The front signal light must not be hidden by any baggage, soft luggage, etc. contained in the front carrier.
Manual PLIMOA
9

1.5 Assembly and disassembly wheels (rear wheel by specialist):
1.5.1 Front wheel:
Wrench 14 mm
Disassembly the front wheel:
You must first loosen the cable clamp of the V-Brake to release the pads in order to remove the wheel.
Loosen the nuts on each side of the axis of the wheel and release the washers.
Lift the bike and lightly hit the top of the tire to clear the wheel.
Assembly the front wheel:
Position the washers on the wheel axle. Lift the bike and insert the wheel spindle in the bottom of the legs of
the fork.
Control the washer’s position as well as the centering of the wheel. Screw the wheel nuts. Alternately on each
side gradually tighten the wheel nuts (tightening 18-25 Nm).
If the wheel is not centered, loosen nuts and start again.
DO NOT TOUCH THE SMALL NUTS OF THE AXLE,YOU MAY DAMAGE THE BEARINGS.
Adjust your brake again (See: 1.3.1).
1.5.2 Rear wheel:
THIS OPERATION IS TO BE PERFORMED BY A PROFESSIONAL,BUT IN CASE YOU WOULD LIKE TO DO IT,HERE IS
THE PROCEDURE TO FOLLOW.
Required tools: wrench of 18 mm.
Disassembly of the rear wheel:
Disconnect the motor (connector located on the right of the e-bike, on the lower, horizontal section of the
frame). Disconnect the “Colson” motor cable attachment on the frame if necessary.
Remove the nut covers on the left and right of the wheel. Loosen the nuts. Remove the nuts and washers
from the wheel axle.
Loosen the brake cable V-Brake clamp to release the pads in order to remove the wheel.
Release the chain sprocket wheel with special attention to the tilting of the chain.
Remove the wheel from the frame by pulling it forwards, and remove the chain from the axle.
Manual PLIMOA
10

Assembly of the rear wheel:
Take the wheel and place the chain on the small sprocket on the right side, then engage the wheel
between the brake pads.
By sliding it backwards, insert the wheel axle into its position on the left and right of the frame. Put in place
the washers and wheel nuts. Tighten the nuts by hand at first, until they make contact with the frame.
Entre the wheel in the frame. Ensure that the wheel is centered and positioned in line with the front wheel,
and that the chain is positioned correctly.
Screw the nuts on each side of the wheel, without tightening them completely. Check the position of the
wheel again, ensuring that it is centered and that the chain is positioned correctly.
Tighten the wheel nuts on each side gradually, alternating between the two sides (tightening torque max: 30
Nm). Replace the nut covers.
Reconnect the motor cable, and replace the “Colson” in the frame.
NB The motor cable connector is fitted with coded pin. Place the two ends of the connector facing one
another in order to correctly reconnect the motor.
Régler les patins de freins (Cf 1.3.2).
Position the two
arrows one in
front of the other
to reconnect the
motor plug.
Manual PLIMOA
11

1.6 Lights:
Your bike is supplied with:
A fixed front light (2 CR 2032 batteries) which is switched on by the switch under the light.
A batterie powered rear light (2AA type batteries) switched on using the switch situated on the
center of the front faceplate of the light
To change the batteries on the rear light:
Undo the screw on the front face, then you have access to the batteries.
Respect the polarity when inserting the new batteries
Screw back on the front faceplate
ALWAYS KEEP YOUR LIGHTING CLEAN AND IN GOOD CONDITION.
LIGHTING EQUIPMENT IS MANDATORY AT NIGHTFALL.
Manual PLIMOA
12

1.7 Folding of the e-bike:
The folding of your e-bike is made in stages:
1. Lower the handlebars to the lowest position
2. Fold pedals
3. Fold the crutch
4. Fold the frame
5. Fold the handlebar stem
1. Lower the handlebars to the lowest position by using the fast tie.
2. Fold pedals.
3. Fold your crutch. It is beforehand necessary to have deactivated the safety.
4. Folding of the frame.
To the lowest position
by using the quick
Swivel the complete
mechanism to clear the
frame
Push the fixation upward to
push away the safety clip
The fixation is then undone
and the frame can be folded
Manual PLIMOA
13

1. Folding the handlebar stem.
Great caution must be used when performing the reverse operation.
The repositioning of your bike in road position must be done in the reverse order, but remember you are
responsible for the correct configuration and a quick check is recommended for the safety of all concerned.
Or accident to the user, or other 3rd party, because of a defective assembly made by the user arisen on the
people physical appearance.
First remove the plastic hook which
holds the handle
Then pull on the handle
Push downwards to release
the handlebar stem
The handlebar stem can
Manual PLIMOA
14

2 - USE OF AN EBICYCLE
2.1 Shifting gears:
Shifting between gears uses a derailleur and 6 sprockets.
1 sprocket with 14 teeth (largest sprocket) which allows you to increase your speed in easy riding
conditions (gentle descent, flat)
3 intermediate sprockets with 16, 18 and 21 teeth, to be used in normal riding conditions
2 sprockets (smallest) with 24 and 28 teeth for more difficult riding conditions and for moving off.
2.2 Change speeds electronic:
Your bicycle is equipped with 5 electric assists
Position 1 and 2 = economy setting. In this setting, your e-bike consumes less energy;
Position 3 and 4 = medium assistance setting;
Positions 5= maximum setting. In this setting, your e-bike affords you the maximum level of assistance –
but also consumes the most energy.
To select assistance, press the «Mode» button boutons up or down.
The assistance level selector is located to by the left handle.
Assistance
level
Manual PLIMOA
15

2.3 The display:
Assistance set at 6 km/h: Holding the "DOWN" button (under the control) triggers a 6km/h start-up aid
that allows the VAE to start without pedaling up to 6km/h.
Speed Information: Long press "UP" to select the desired speed of instant information, average (avg) or
max (max).
Night mode: Long press "UP and MODE" simultaneously turn on or turn off the backlight of the screen
and the front and rear lights.
Setting the Clock: Long press "UP and DOWN" simultaneously provides access to the clock settings.
Set the time using the UP and DOWN buttons.
Briefly press the MODE button to switch to the minutes setting.
Set the minutes using the UP and DOWN buttons.
Press and hold the MODE button to accept these changes and return to normal mode.
DOWN arrow
Reduce the level of
assistance
MODE button
Turn on or off the
system (pressure for 3s)
UP arrow
Increases the level of
assistance
Assistance level
Battery level
Clock
Speed
information
Number of
kilometers
Manual PLIMOA
16

2.4 Electric assistance:
2.4.1 Operation:
Your bicycle is an electric bicycle (e-bike): it is equipped with an electric motor, located in the rear wheel.
This motor activates automatically (if switched on and the battery is charged) when you pedal, and only when
you pedal.
The electric assistance is activated by an electromagnetic sensor, which cuts power to the motor when the
pedals stop turning.
The motor is also cut:
• When you pull either of the two brake levers;
• When you reach the upper speed limit of 20 or 25 km/h (depending on configuration).
This principle enables the motor to give you its full power when you need it, and to make “energy savings”
when you are riding downhill or riding on flat ground.
This energy control increases the e-bike’s battery life. These functions and energy control are achieved using
an electronic unit or “controller”.
WE WOULD LIKE TO POINT OUT THAT THE ACTIVATION OR DEACTIVATION OF THE ELECTRIC
ASSISTANCE MAY LEAD TO ABRUPT ACCELERATION OR DECELERATION.
2.4.2 Performance values:
The electric assistance on your bike is limited up to 25 km/h (according to configuration).
At this speed, the power supply to the motor will be automatically cut.
Your bicycle’s battery life depends on numerous parameters:
Weight transported:
Your bicycle’s performance values refer to an average load of 75 kg.
Exterior temperature:
The performance values refer to an exterior temperature of around 20°C. Below this temperature,
performance values decrease; however, this drop in performance is not particularly significant unless
temperatures fall below 5°C.
Battery wearing:
Your battery is designed to provide you with stable performance values over 750 charging cycles (or
an average service life of 3 years). After these 750 cycles, the battery will still be operational, but its
performance values will fall proportionally, and its battery life will decrease along with it.
But most of all, the battery’s run time depends on the terrain you ride on:
The theoretical battery life ranges from 30 to 50 kilometers, based on a near-continuous demand on
flat ground or with gentle inclines (10 to 20% of the total). If your route is flat and includes a portion
of declines (even gentle declines), your battery’s run life will increase. If you climb inclines steeper
than 5% (the motor “struggles” on inclines of above 8%), your battery life may decrease
proportionally.
Manual PLIMOA
17

2.4.3 Technical specifications of the assistance system:
Motor: Brushless type – 250 watts
Battery: Cellule Samsung or Panasonic lithium Ion 36 V – 9, 11 or 15.4 Ah – Life cycle: 750 full charge /
discharge cycles under normal load condition.
Autonomy: 50 km for 9 Ah battery
65 km for 11 Ah battery
90 km for 15.4 Ah battery
(For someone of 75Kg with the ECO assist level).
2.4.4 Switching on the battery :
The Switching ‘On’ and ‘Off’ is done by the switch switch on the left side of the battery container (1/0
position).
2.4.5 The electric motor:
Located in the hub of the rear wheel, the motor is an electric Brushless motor (250w).
The motor does not require any maintenance by the user, and also benefits from a two-year manufacturer’s
warranty. After three years or 25,000 kilometers, we recommend that you have the motor serviced by an
authorized dealer or a specialist.
Although the motor is designed to be water-resistant, it must never be washed with a high-pressure water jet.
This risks damaging the motor. This also invalidates the warranty.
Manual PLIMOA
18

3 - CHARGING THE BATTERY
3.1 Charger
SPECIFICATION
36 volts model
SSHC8100LC
Intelligent charger for Lithium Ion batteries
Voltage
AC100 -240 V
Frequency
47-63 hz
Charging voltage
42 V+/- 0.2 V
Output current
2.0 A
Power LED shows:
red Charging
Power LED shows:
green Charged or
disconnected from
battery
Efficiency (at full load)
100 %
Operating temperature range Between
10° C and 35° C
Humidity
<+ 90 %
Safety norm
EN60335 –1- A2 –2006
Weight
460 g
Dimensions
165x73x47 mm
The charger included with your bicycle conforms to CE manufacturing standards, and to environmental safety
standard IEC/EN 60335-1. It has been specifically designed to recharge your e-bike’s battery. It completely
recharges your battery in 4 to 8 hours, depending on the ambient temperature and battery wear. This charge
time, called “slow”, is optional but aims to preserve the battery’s service life.
Operation is simple: Connect the output jack of the charger on the socket of your battery and then connect
the plug to the electricity of your home
According to the version of your battery, charger can have one or two diodes. In case your charger has only
one diode, on top of the charger the diodes indicates when charging the battery.
First connect the charger to the
battery and then to the sector
Manual PLIMOA
19

It is red when the battery is charging and turns green when the battery is fully charged.
In case the charger has 2, the diode "power" LED indicates that the charger is plugged it and remains red.
Another diode "charge" indicates the battery is charged. It is red when the battery is charging and turns green
when the battery is charged.
3.1.1 Precautions for use (safety instructions):
• Do not connect the charger to a power socket with wet or moist hands (danger of electrocution).
• Charging must only take place in well-ventilated areas.
• Always ensure that the charger is compatible with the local electric power network.
• When charging, do not place the device in a humid environment or near to flammable or explosive
materials (charging always causes heat to be emitted, danger of fire or explosion).
• Do not store the device in a hot location.
• Do not charge a battery which is defective or out of use.
• Do not leave the charger and its connections within reach of children when connected to power.
• Do not attempt to dismantle the charger.
3.1.2 Protecting the charger:
• Do not expose to rain.
• Do not leave the charger disconnected from main power (220 volts) and connected to the battery.
• Do not submerge.
• Do not place objects on the charger or cover the charger.
• Take care of the electric cables leading to and from the charger.
• To protect the charger following a long charge (over 24 hours), disconnect the electric connection and
leave the device to rest in a dry and well-ventilated location.
• Avoid leaving the charger connected to the mains power socket for more than 24 hours.
WARNING! FOR YOUR SAFETY, NEVER OPEN THE CHARGER (RISK OF ELECTRICAL DISCHARGE -
HIGH VOLTAGE). CONTACT YOUR DEALER TO DISCUSS ANY PROBLEMS WITH YOUR CHARGER OR
MALFUNCTIONS.
SEE ALSO FOR YOUR SAFETY SYMBOLS ON BACK OF CHARGER.
1) Indoor Use Only
2) Hazard Warning
3) Double insulation (use without earthing)
4) Read leaflet
5) Compliance with CE standards
6) Do not discard with household waste.
Diode power (always red)
Diode load (turns green when
the battery is charged)
Manual PLIMOA
20
Other manuals for PLIMOA
2
This manual suits for next models
1
Table of contents
Other neomouv Bicycle manuals

neomouv
neomouv Montana Brose User manual

neomouv
neomouv DRIVE User manual

neomouv
neomouv PLIMOA User manual

neomouv
neomouv FACELIA N3 User manual

neomouv
neomouv CARLINA User manual

neomouv
neomouv CROONY User manual

neomouv
neomouv ENARA User manual

neomouv
neomouv CRONOS User manual

neomouv
neomouv PLIMOA User manual

neomouv
neomouv FURTIVOO User manual