AMI eBOX-322 Series User manual

Product Manual
eBOX-322X
Fanless Industrial BOX PC
Ver:V2.0

Acceptance statement
AMI is trademark of Award Software International, Inc.
Intel and Atom are trademarks of Intel Corporation.
IBM、PC/AT、PS/2 and VGA are trademarks of International Business Machines Corporation.
Microsoft Windows is a registered trademark of Microsoft Corp.
RTL is trademark of Realtek Semiconductor Co. Ltd.
This manual is suitable for the eBOX-322X series.
Warning!
Without the approval of the authority to change or repair equipment,that the
user’s authority to operate this equipment may be cancelled.
Packing list
After you open the packing,please comfirm the package list as follows:
–eBOX-322X product 1pcs
- product manual 1pcs
- Driver disk 1pcs
- Power terminal 1pcs
- Product inspection certificate 1pcs
- Service warranty card 1pcs
- Power wire 1.8M(optional) 1pcs
- 12V power adapter(optional) 1pcs
If any one missing or damaged please contact your distributor or sales immediately.
Ording information
Model:
eBOX-322X description
eBOX-3220 Onboard Intel® D2500/1.86GHz dual-core processor(TDP10W)/ DDR3 2GB(MAX 4G)
1*VGA/1*DVI/2*LAN/1*Audio/6*COM/6*USB/6*RS232
eBOX-3221 Onboard Intel® D2500/1.86GHz dual-core processor(TDP10W)/ DDR3 2GB(MAX 4G)
1*VGA/1*DVI/2*LAN/1*Audio/11*COM COM7~COM10 could be set RS485 / 6*USB

Catalogue
Part One Introduction
1.1 Brief introduction
1.2 Product features
1.3 Product specification
1.3.1 System parameter
1.3.2 Institutions and power
1.3.3 Environmental parameter
1.4 Product appearance size
1.5 Simple assembly and disassembly
1.5.1 Replace hard-disk
1.5.2 Serial port setting
Part Two System installation
2.1 Start guide
2.2 Interface definition
2.3Installation steps
2.3.1 Connect the power cable
2.3.2 Connect the keyboard mouse
2.4 BIOS settings
2.5 Install operation system
2.6 Install driver
2.6.1 Driver
2.6.2 Install graphics card driver

Part One Introduction
1.1 Brief introduction
eBOX-322X is a high performance fanless industrial BOX PC,Pick up the lastest generations
of Intel Atom- D2500 processor,Support mSATA 、2.5"SSD or HDD. interface including
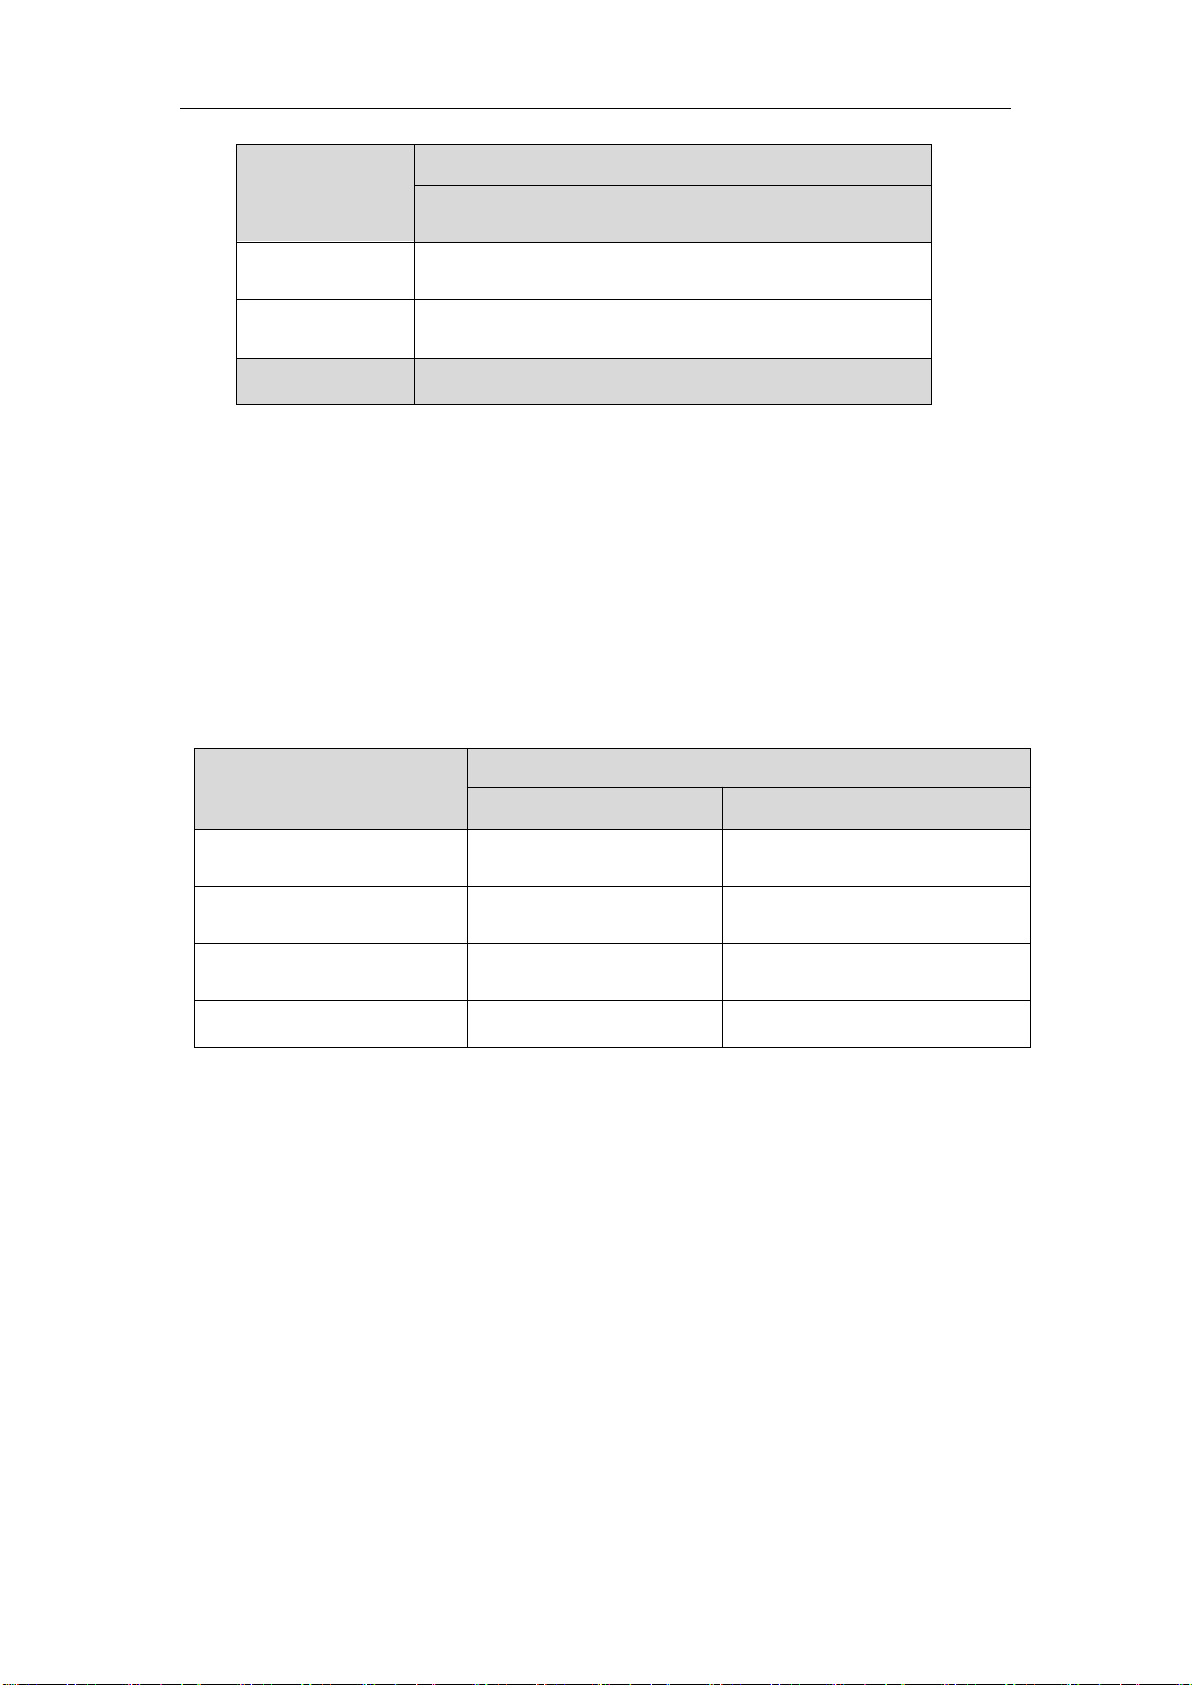
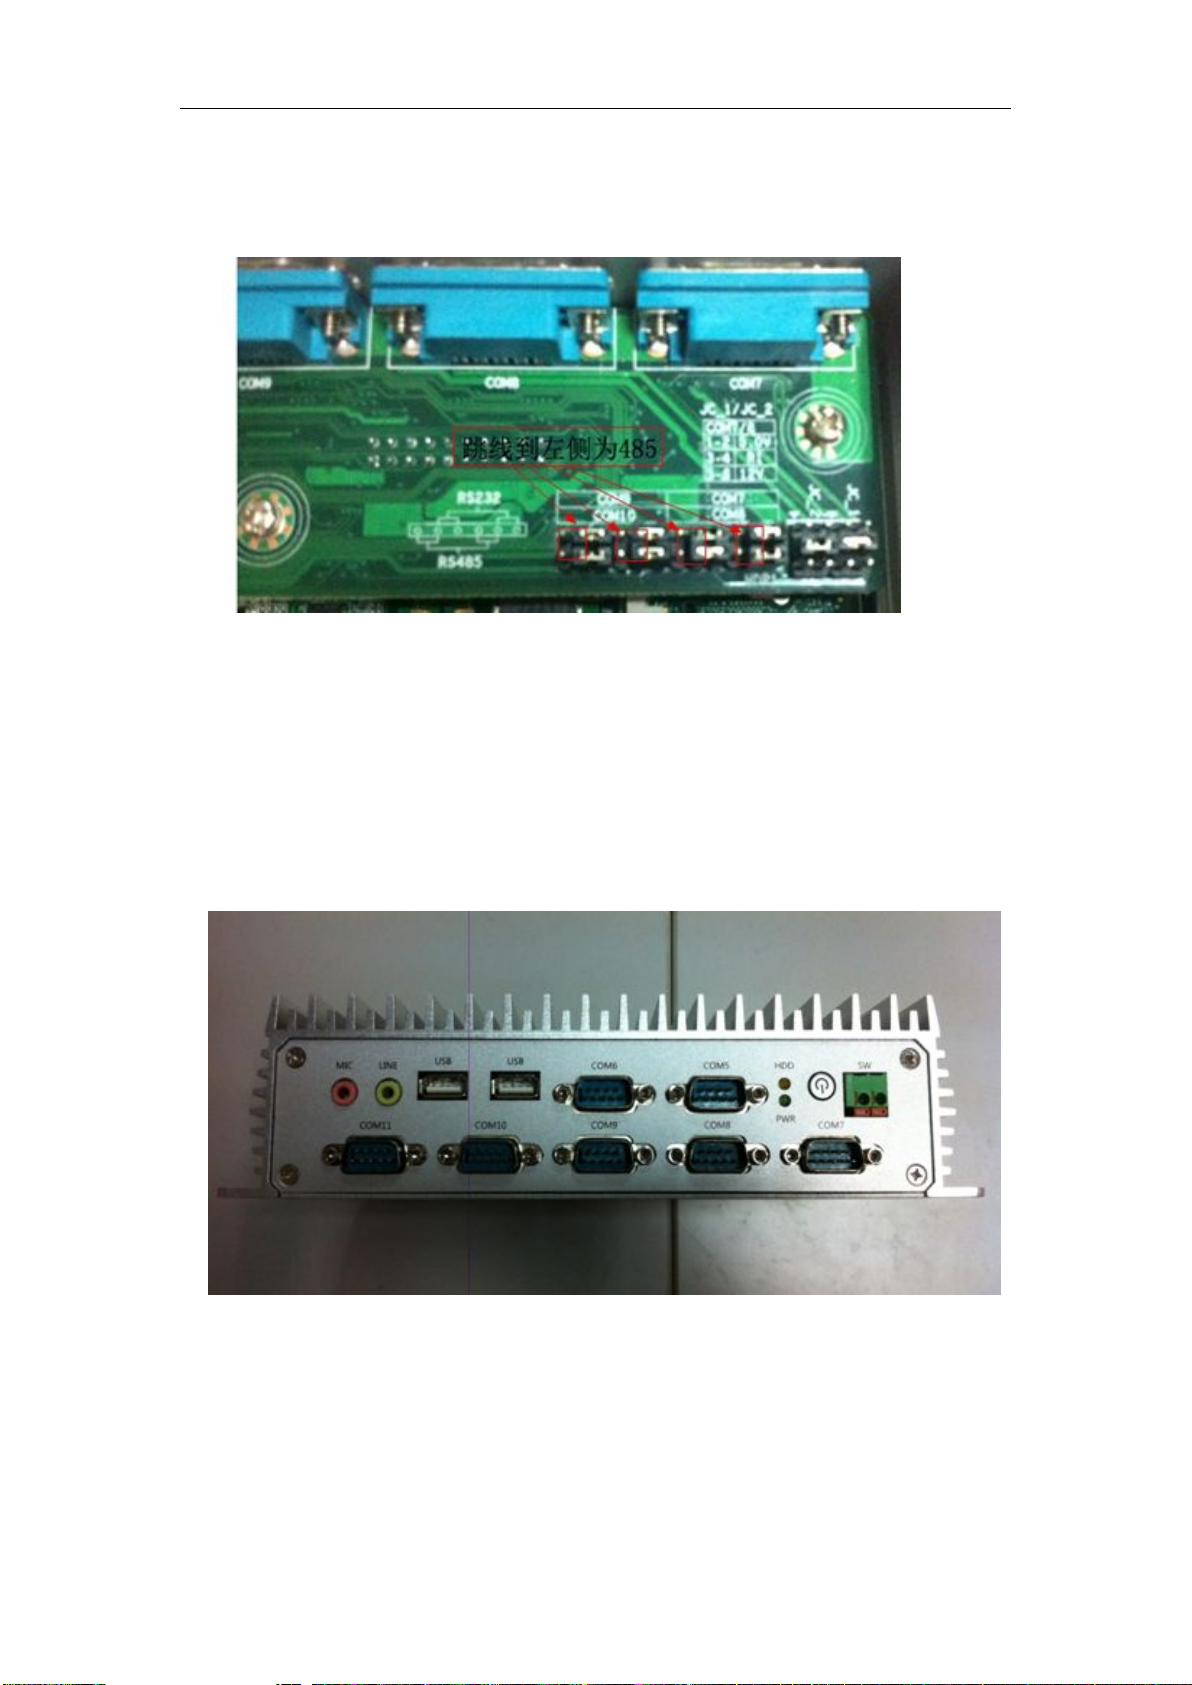
2×1000Mbps RJ45 ,4×USB2.0,6×RS232(can be extended to 11,COM7-COM11 support
RS232/485 optional),DC 12V input,Overcurrent, overvoltage and reverse polarity protection.
eBOX-322X is compatible with Windows XP,Windows XP Embedded、Windows 7、
Windowso 8、and Linux operating system .
1.2 Product features
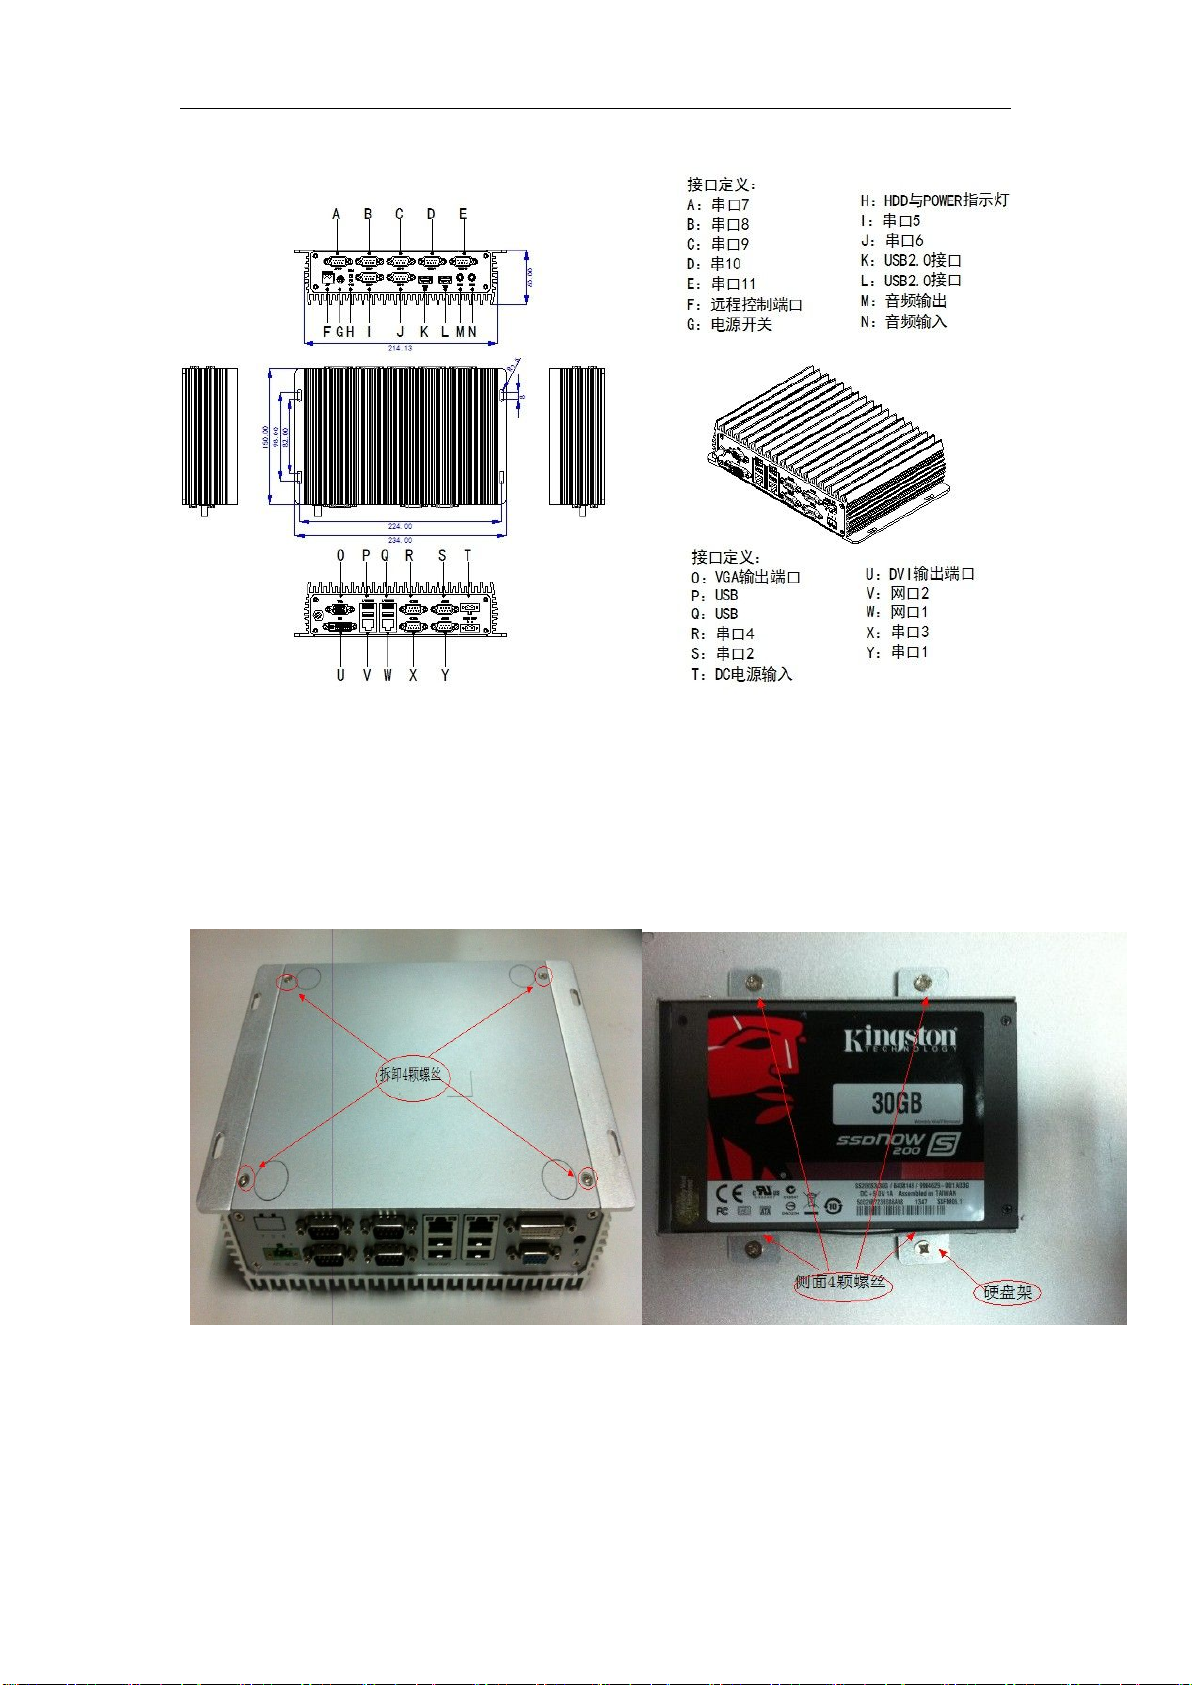
Hard disk uses a cable connection,extension interface with surge protection function Intel
Atom D2500 1.86GHz dual-core processor,onboard DDR3 2GB memory,2×INTEL 82583V
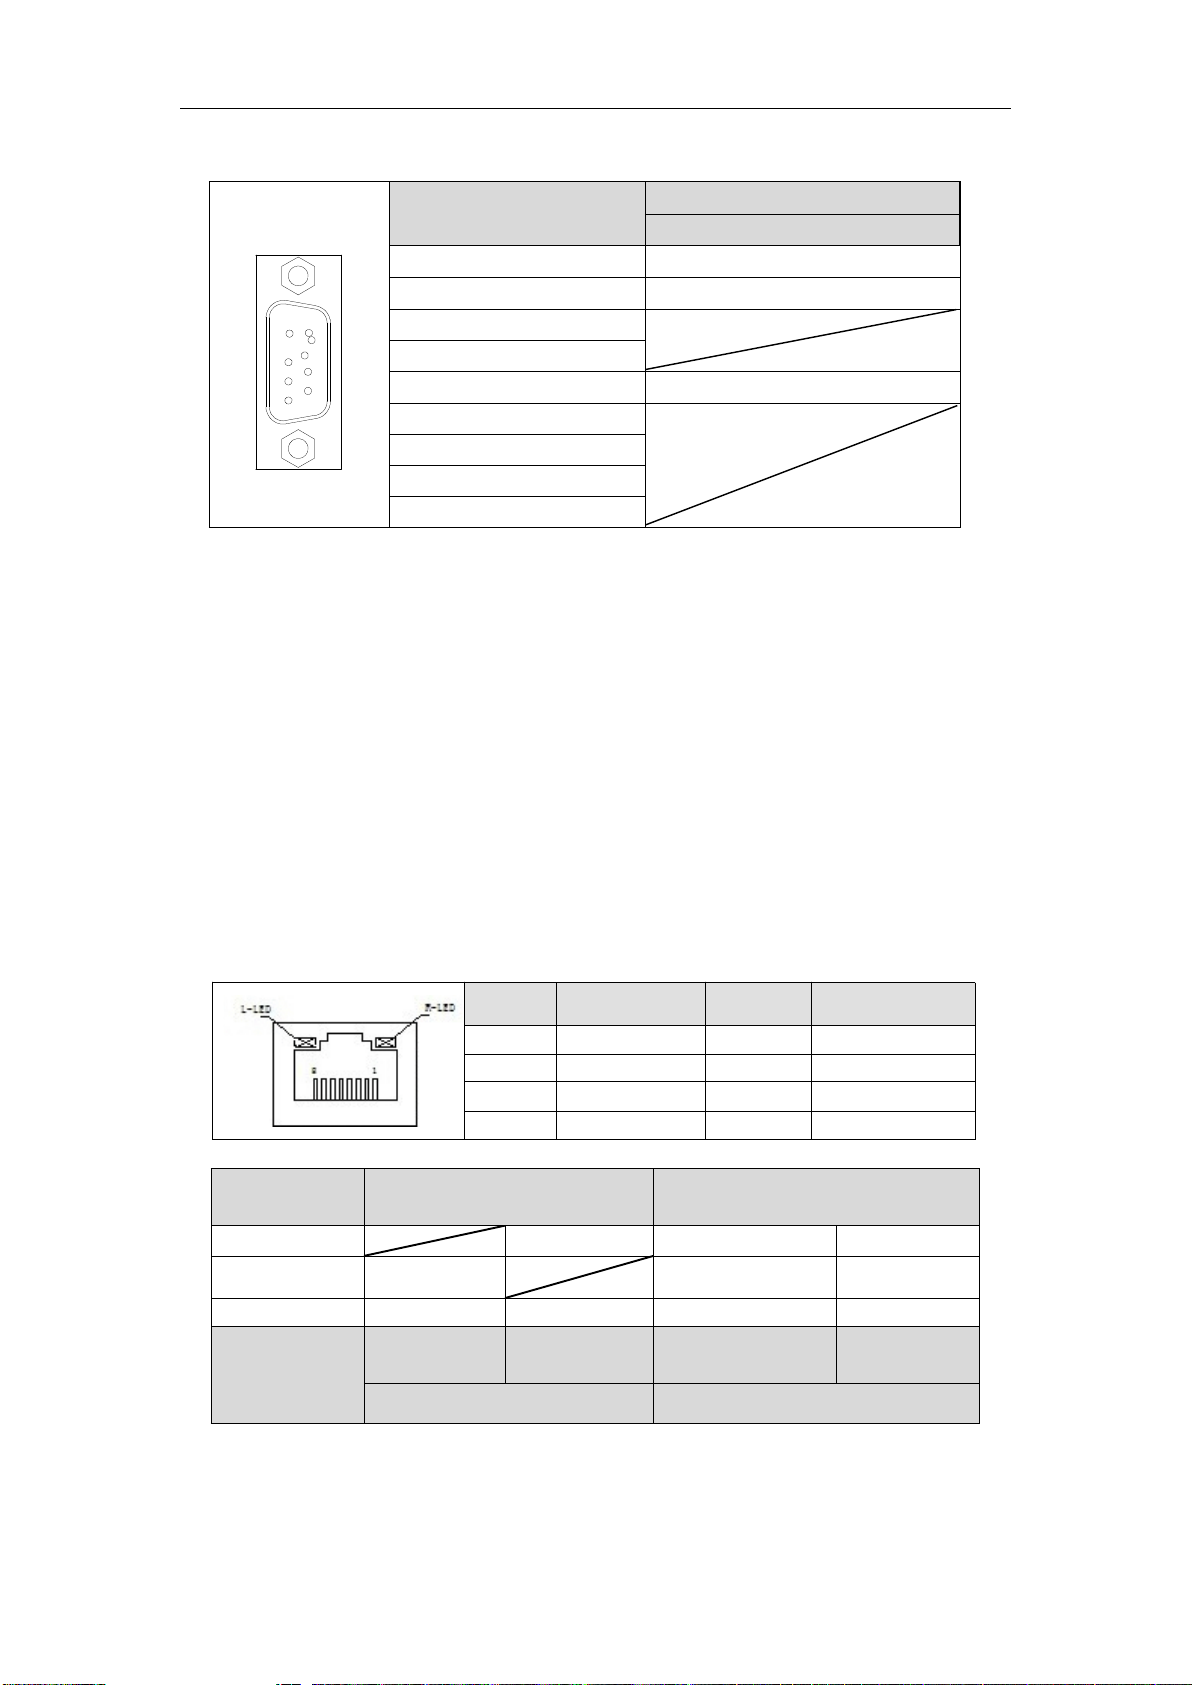
10/100/1000Mbps RJ45 port
eBOX-3220 has 6×RS232;
eBOX-3221 has 11×RS232(com7~com10 RS485 optional)
1.3 Product specification
1.3.1 system parameter
CPU:Onboard Intel Atom D2500 dual-core processor(TDP10W)
Chipset:Intel NM10(TDP2.1W)
Memory: DDR3 2GB(Max :4G)
Disk :support SATA 2.5inch SSD‚HDD and CFAST
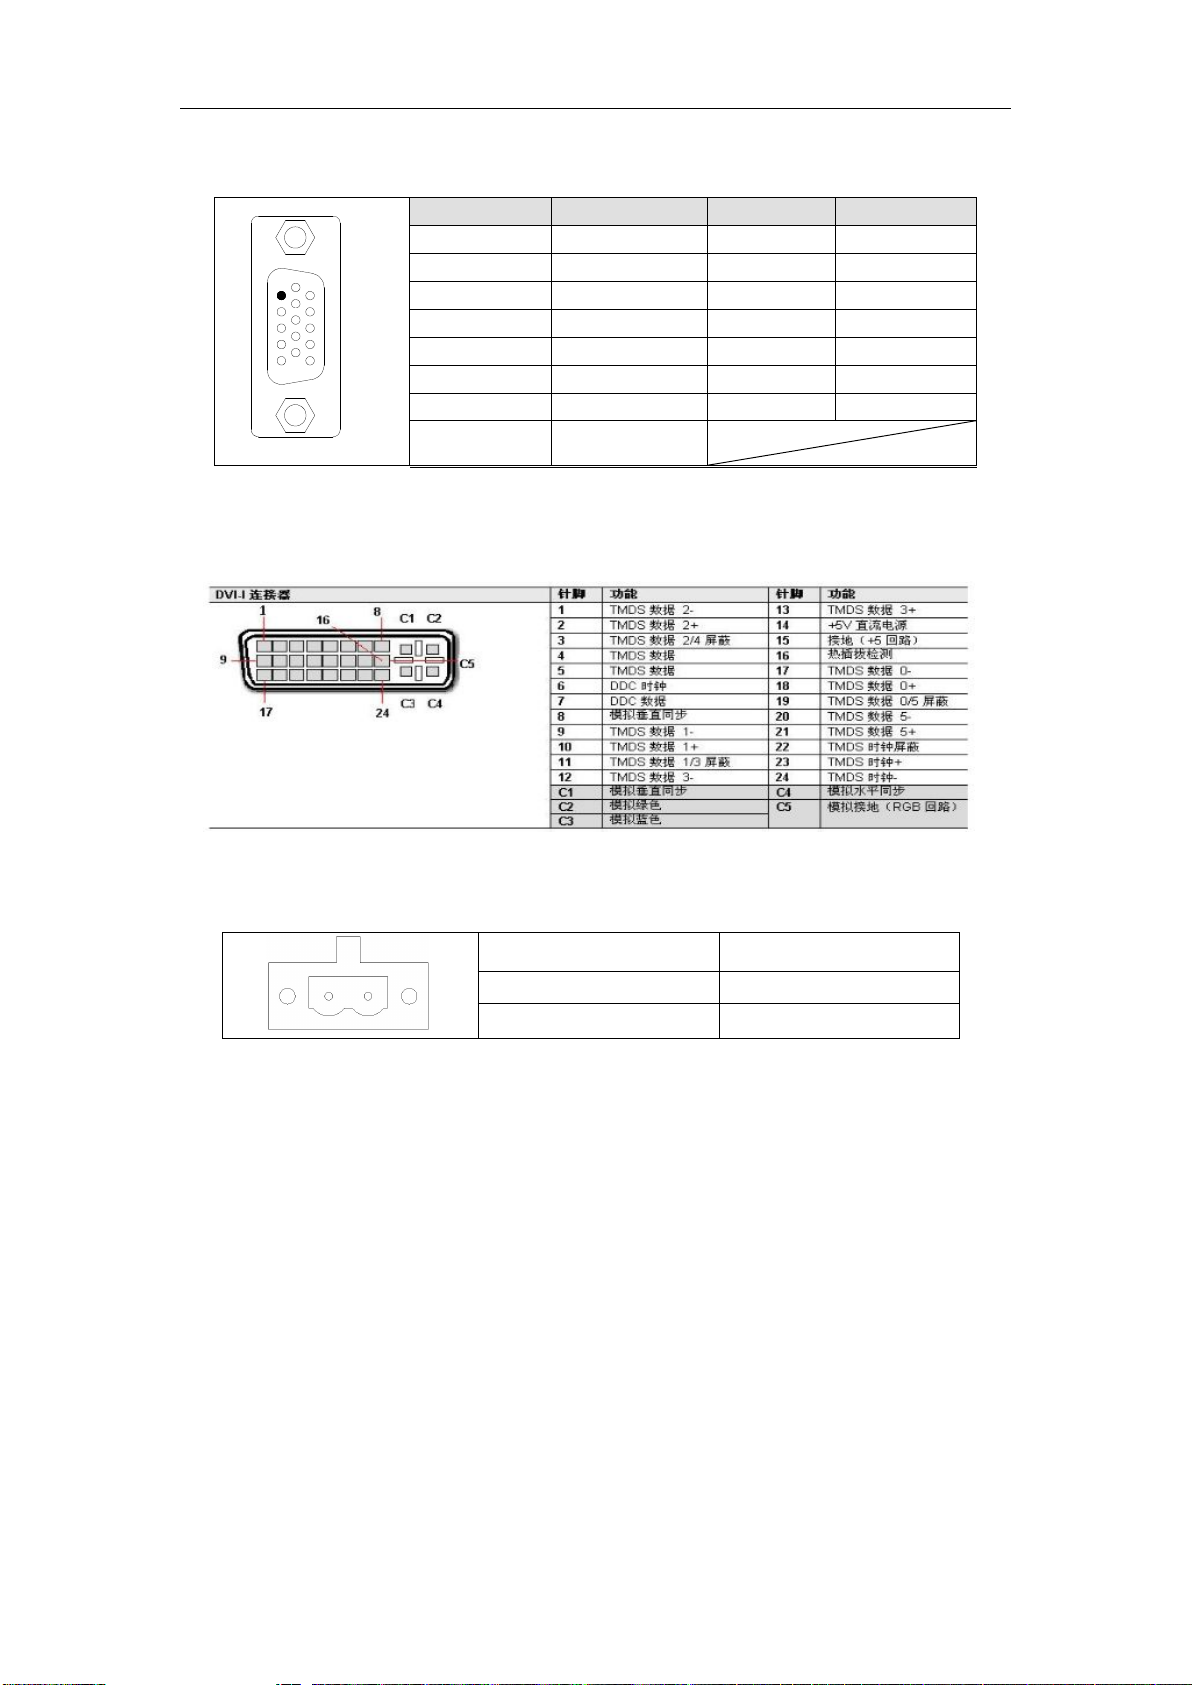
Display:Intel GMA3600 chipset,support DVI, VGA output
LAN:2 Realtek RTL8111E
Wifi:1Mini-PCIe slot,can be extended 3G,wifi
Audio:Realtek ALC662
USB:6×USB2.0
COM:6×RS232(can be extended 11 COM,COM7-COM11 support RS232&485 optional)
Watchdog: 1~255s programmable setting
I/O:VGA/DVI/2GLAN/6USB/6COM/AUDIO
1.3.2 Institutions and power
Box structure:Aluminum box structure
Installation: desktop and wall mounted
Switches and indicators: Power Switch / Power LED / HDD LED
Power: DC 12V,overcurrent, overvoltage and reverse polarity protectionDC12V
Overall dimensions:234 x150x60mm
Box color:Silver
Machine Weight: 3KG
Power consumption:

Item MODEL
eBOX-322X
Standby(min)9.5W
Full load(max)13.6W
OS Windows XP
1.3.3 Environmental parameter
Operating Temp :-20~60℃
Storage Temp :-40~80℃
Constant temp wet test:60℃95%RH/1000 hrs
High temp test :60℃/1000 hrs
Operating Humidity :10-95%@40℃(Non-condensing)
Vibration :5-50Hz,1.5G,0.15mm peak
Impact :10G(11ms)
1.4 Product appearance and size
Item MODEL
eBOX-3220 eBOX-3221
Color Silver Silver
Overall dimensions 234 x150 x60mm 234 x150 x60mm
Dimension of packing case 350 x275 x165mm 350 x275 x165mm
Machine Weight 3KG 3.5KG

1.5 Simple assembly and disassembly
eBOX-322X adopts independent structure design,Easy to replace hard-disk and Serial port
jumper setting
1.5.1 Replace hard-disk
As pic 5.1,Remove the blow 4 screws,can open the lid , then as pic 5.2,Remove the blow 8
screws to replace hard disk.
Pic 5.1 Pic 5.2

1.5.2 Serial port jumper setting
a:Remove pic 5.1 four screws you will see the definition of serial jumper (as pic 5.3)
图5.3
Pic 5.3
b:COM7-COM10 default jumper on the right side as RS232,jumper on the left side as RS485(as
pic 5.3)
Part Two system installation
2.1 Start guide
Before installing,please refer below pic know about product’s interface and function:
将EBOX-322X转到后方,可以看到I/O接口面板区域,如图2.2所示。(该接口面板区
域包括各种I/O端口,如串口、网口、USB接口等)
(此处需冯岩把EBOX-322X系列机子的前面板图片放这里)
2.2 Interface definition
COM:
eBOX-3220 has 6 serial port .
com1~com6 as RS232 DB9 standard interface,com1 pin9 safaults to RI,defines as follows:

DB9 pin9 defaults to R1,through the jumper can be set to 5V、12V
eBOX-3221,increased com7~com10 , RS232/485 optional,RS232 defines as follows:
Open the lid,COM7~COM10 through the jumper can be set to RS485
COM7 COM8
COM9 COM10
pins Signal name
RS232
1DCD
2RXD
3TXD
4DTR
5GND
6DSR
7 RTS
8 CTS
9 RI
Pins Signal name
RS232
1DCD
2RXD
3TXD
4DTR
5GND
6DSR
7 RTS
8 CTS
9 RI
1
5
6
9
1
5
6
9

COM7~COM 10 RS485 defined as follows:
USB interface
The front panel provides a USB interface,I/O interface with2*2 double USB interface, 5 USB
can be used at the same time ,are defined as follow:
Audio interface (LINE_OUT)
Provides a standard Ø3.5 PhoneJack(LINE_OUT) ,Users can be used directly connected audio
equipment
LAN Port (LAN1、LAN2)
Provides 2 standard 10/100/1000Mbps RJ-45,Users can be used directly connected network
adapter cable.
RJ-45 interface side have two indicators lamp, the left is status indicators,the right is data
indicators.
Network state Left(LILED)two
colors(orange/green light) Right(ACTLED)single
color(yellow light)
1000M Normally on Twinkle Turn off
100M Normally on Twinkle Turn of
10M Turn of Turn of Twinkle Turn of
Activity
description
Green light Orange light Data transmission Data
transmission
Connection status indicator Active state indicator
CRT Display output interface
Provides one DB15 display output interface, users can be used directly connected CRT
pins Signal name
RS485
1DATA-
2DATA+
3
4
5GND
6
7
8
9
pin Signal name pin Signal name
1
TX0+
5
TX2+
2
TX0-
6
TX2-
3 TX1+ 7 TX3+
4 TX1- 8 TX3-
1
5
6
9

equipment,defines as follows:
DVI interface:
Rear panel provides one DVI-D interface,can display with VGA at the same time,defines as
follow:
Power interface :
eBOX-322X provides a 2PIN power interface,defines as follow:
Pins dedinition
1 GND
2 +12V
PWR:
Front panel provides a power switch botton used to open the computer power supply.
2.3 Installation steps
2.3.1 Connect the power cable
DC 12V wide voltage input,please note positive and negative direction and can not connection
220V when useing.
2.3.2 Connect the keyboard mouse
Please connected mouse and keyboard before you start your computer,the panel has four USB
interface can be used to plug the USB keyboard or mouse.
pins
Signal
name
pins
Signal
name
1
RED
2
GREEN
3
BLUE
4
NC
5
GND
6
GND
7
GND
8
GND
9
+5V
10
GND
11
NC
12
DDCD_ATA
13
HSYNC
14
VSYNC
15 DDC_CLK
12
1
6
11
510 15

2.4 BIOS settings
After the computer normally open you will see a BIOS program prompt
information,now,according to the prompt information(usually <Del>)to enter the BIOS setup
Once in the AMI UFI BIOS setup,the screen will show the main menu.Main setup provides
six setting function and two kinds of exit option.The user can choose function by the direction key
projects,press <Enter>to submenu。
<↑>Forward <↓>Backward <←>Aleft;
<→>Move right <Entel>Comfirm
<ESC>Exit Menu or return to main menu
<F3>Load optimized defaults
<F4> Save and exit
Set-method:Use the direction keys move the cursor to the selected item,press Entel to setting
menu.
Attention:Because of the BIOS program updates from time to time, the following
setting method for your reference.
2.4.1 Main Setup
After startup press DEL BIOS setup menu,move the cursor to Main option you can see the
BIOS version, system Date opeion can set CMOS time..

2.4.2 CPU Configuration Setting
Move your mouse to Advanced/CPU Configuration option,you can see CPU information:
2.4.3 Super IO Configuration
Move your mouse to Advanced/ superIO configuration option,you can set com1~com6、IRQ (as
below)

2.4.4 RestoreAC Power LOSS Configuration
Move your mouse to chipset/south Bridge option,you can see Power on after Power Fail
Option enter setting this item(it defaults to power off)
Power off: No matter what kind of off -position state last time,the motherboard power supply
will not start.
Power on: No matter what kind of off -position state last time,the motherboard power supply
will start.
Last State:Motherboard suddenly power supply when the power is cut off,back off state.

2.4.4 Boot Configuration
Move your mouse to BOOT,Set up BOOT Option #1,then you can set the computer boot
from the specify a storage device,Save.
After the BIOS settings ,when you startup the computer next time,it still from the
storage device to guide,press F7 can from the popup memu select boot device .
2.5 Install operation system
The computer in the Windows XP disc press F7 option may from USB drive guide.
According to the prompt information input serial mumber,complete Windows XP operating
system installation.
Attention:please use Microsoft copyright driver disk.
2.6 Install driver
After the installed system,user can install eBOX-322X chipset drivers、ethemet port driver
audio driver、graphics driver etc(all drivers stored in CD of attachment box )
The following focuses on installed Windows XP Intel EMGD graphics driver.
2.6.1 Driver
You may browsing the driver CD or D:\Backup\Drivers view driver file:

2.6.2 Install graphics card driver
a:Double-click graphics driverinstallation program ,default decompress address:
C:\Program Files\Graphics_N,click on the install button decompression and installation
program,click Next complete the installation.
B:After the driver installation,its default VGA(clone)DVI double show,set CRT
resolution,make it consistent with VGA(clone)DVI resolution (set as follow):
desktop→properties→setting→advanced→Display Config optin→Secondary
Mode ,resolution change 1024X768@60Hz
This manual suits for next models
2
Table of contents
Other AMI Industrial PC manuals
Popular Industrial PC manuals by other brands

IEI Technology
IEI Technology uIBX-230-BT Series user manual

IEI Technology
IEI Technology PPC-F A-H81 Series user manual

JLT
JLT JLT6012 quick start guide

iSMA
iSMA iSMA-D-PA10C-B1 user manual

Moxa Technologies
Moxa Technologies V481-XPE Quick installation guide

Acrosser Technology
Acrosser Technology AR-V6002FL user manual