Amplicomms TV 2410NL User manual

User Guide
Handleiding
Manual de
instrucciones
TV
2410NL
Wireless induction
neck-loop system
Draadloze ontvanger
met inductielus
Receptor por radio
con bucle de
inducción

At a glance
Overzicht
Información general
Please open this page for “At a glance“ guide to your TV 2410NL.
Dit uitvouwblad toont u een overzicht van uw TV 2410NL.
Esta página desplegable le muestra una visión general de su TV 2410NL.

ÜBERSICHTTV 2410NL
1
2
89 10
34 56
7
Receiver / Ontvanger / Receptor
Transmitter base / Zender / Transmisor

Receiver
1 Microphone button for room monitoring
2 3.5 mm Audio output jack
3 Microphone
4 Volume control
5 Power on indicator
6 On/Off switch
7 Volume balance (left/right)
8 Battery
Transmitter base
1 Charging cradle
2 LED indicator of tone clarity
3 Tone clarity button
4 LED indicator of power
5 LED charging indicator for main battery (attached to neck-loop
receiver)
6 LED charging indicator for spare battery
7 Spare charging slot
8 DC In
9 3.5 mm Audio in socket
10 Mono/Stereo switch
Helpline UK 0844 800 6503
(See page 14 for costs and hours of operation)
AT A GLANCE

1
Helpline UK 0844 800 6503
(See page 14 for costs and hours of operation)
Getting started

Getting started
Box contents
• 1 Receiver with induction neck-loop
• 1 Transmitter base
• 1 AC adapter for the transmitter
• 2 Rechargeable batteries for the receiver (Lithium Polymer)
• 1 Audio cable (both ends with 3.5 mm stereo plug)
• 1 Adapter cable (RCA)
• 1 SCART Adapter for TV
• 1 Adapter plug 6.3 mm to 3.5 mm
• 1 External microphone with adapter plug and holder
• 1 User guide
Connecting the transmitter
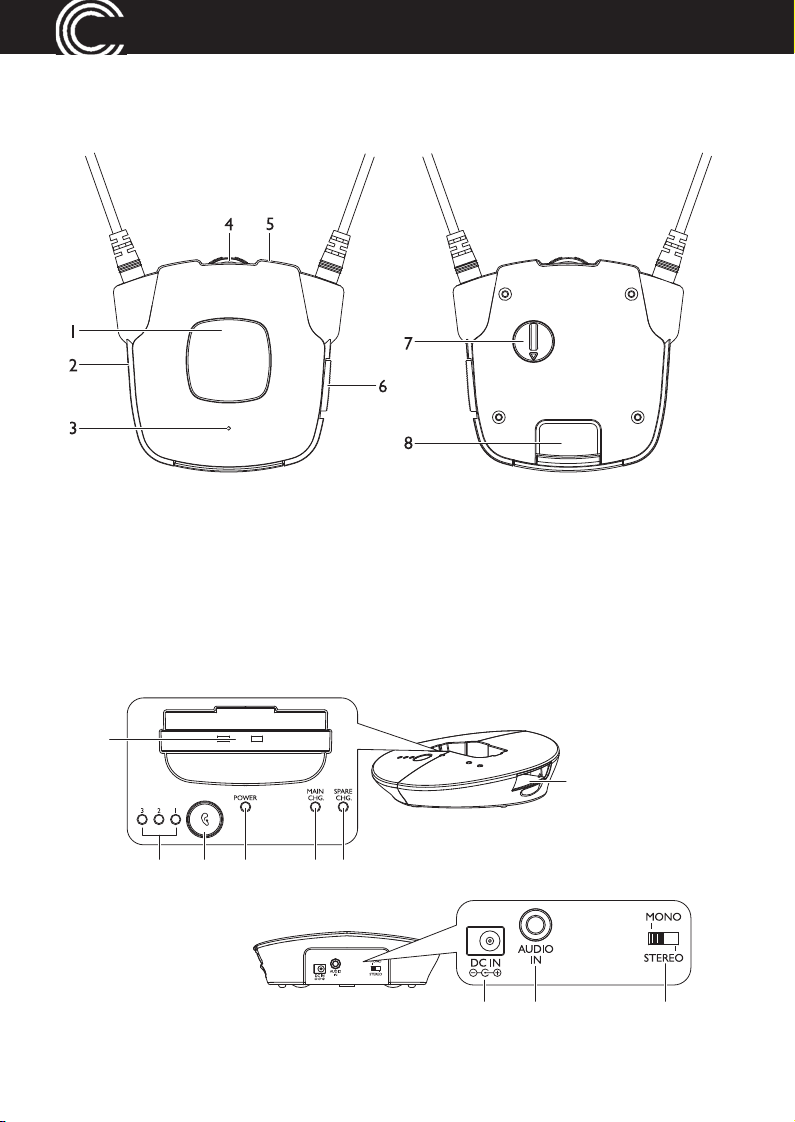
1 Connect the power adapter to the DC IN input socket located on the
transmitter rear panel.
2 Connect the power adapter provided to an electrical outlet.
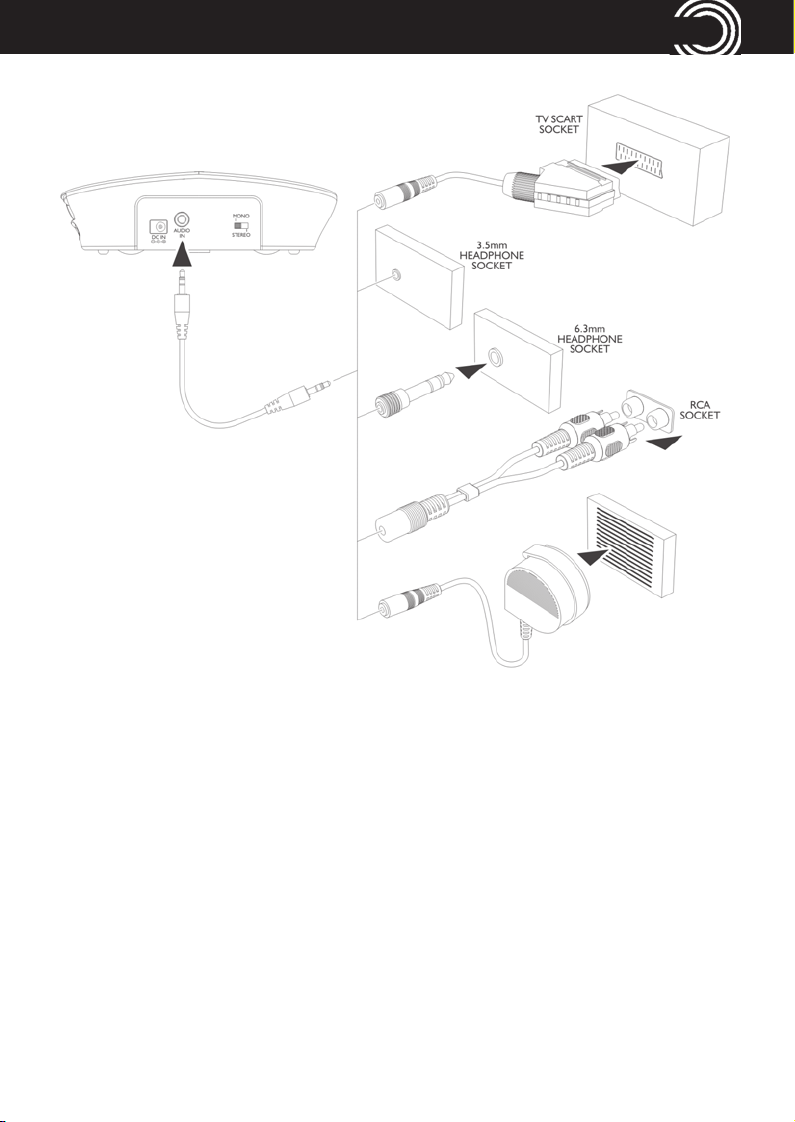
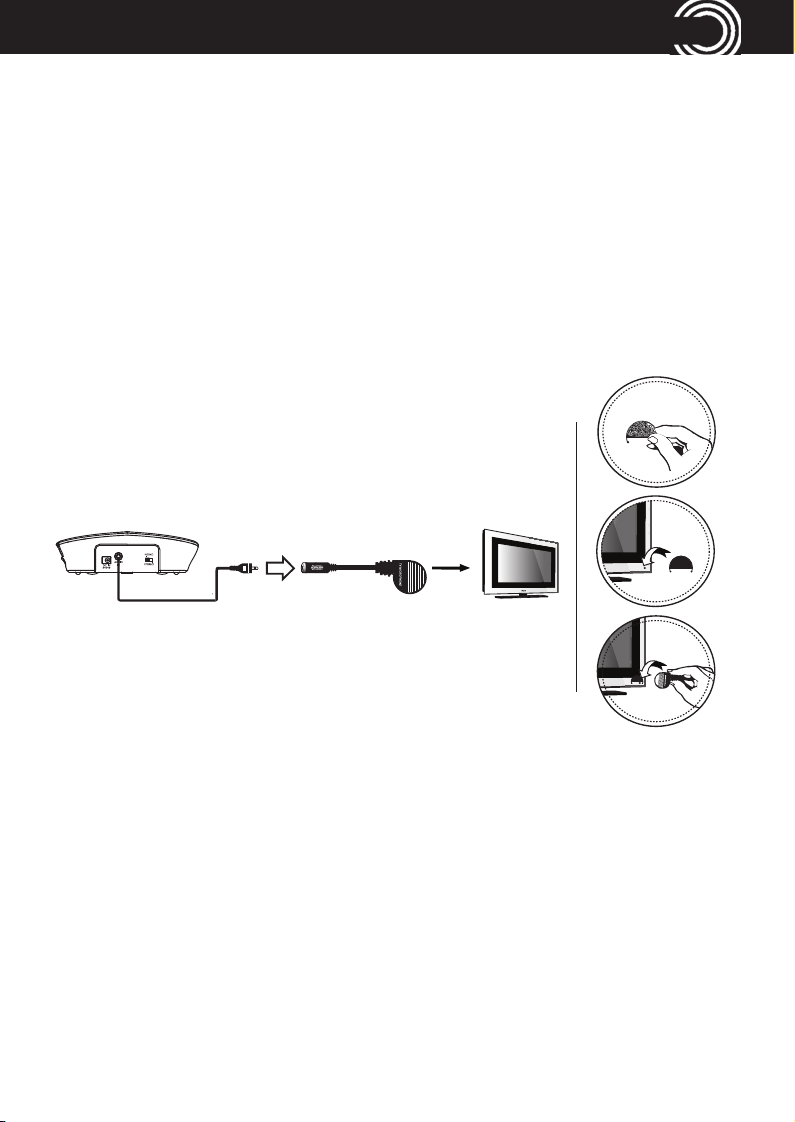
3 Connect the transmitter to your audio source.
RCA adapter cable, audio cable, 6.3 mm to 3.5 mm adapter plug, external
microphone and a SCART adapter for TV are provided for various type of
connection to your audio source (e.g. TV set, Hi-Fi system, MP3 or iPod).
The green power indicator LED will blink as soon as you have connected the
power adapter to the electrical outlet and when the audio signal is detected
from the audio source, the green LED indicator will glow constantly.
Important: please make sure you’ve read the safety information on page
12 before you set up your device.
GETTING STARTED
2Helpline UK 0844 800 6503
(See page 14 for costs and hours of operation)

GETTING STARTED
3
Helpline UK 0844 800 6503
(See page 14 for costs and hours of operation)

4
GERÄTE IN BETRIEB NEHMEN
Helpline UK 0844 800 6503
(See page 14 for costs and hours of operation)
GETTING STARTED
Set up the receiver
Installing and charging the battery
1 Insert a battery into the receiver with correct polarity.
2 Charge the battery for about 3 hours before first use.
Switch off the receiver (position OFF).
Place the receiver into the charging cradle of the trans-
mitter. The charging process starts automatically. The
battery LED indicator will be red and will turn to green
when the battery is fully charged. This takes about 3
hours.
3 Insert the spare battery into the
base as indicated in the drawing.
The LED will remain red and turn
green when it is fully charged after
about 2 hours and 30 minutes.
• A fully charged battery provides up to 5 hours of listening enjoy-
ment.
• To conserve battery power, the receiver automatically shuts off if no
signal is detected for a period of approx. 5 minutes or when the level
is too low. However, if the signal returns to an acceptable level, the
transmitter will automatically switch ON again.

Helpline UK 0844 800 6503
(See page 14 for costs and hours of operation)
Additional earphone/headset jack
You may connect a usual earphone/headset (3.5 mm) to the socket placed
on the side of the receiver.
Please note, that the transmission via the neck-loop induction cable is swit-
ched off when an earphone/headset is connected.
External microphone
If your TV set or HiFi system does not have any audio jack you should use
the external microphone.
1 Connect the audio cable to the microphone.
2 Fasten the microphone holder using the adhesive strip adjacent to the
speaker grill on the TV and then clip the microphone into the holder so
that it locates just above the speaker.
3 Please initially set a low volume on the TV/Hi Fi system and adjust to the
required volume in conjunction with the volume control on the headset.
The position of the microphone has a decisive influence on the volume -
please determine the best position by experimentation.
GETTING STARTED
5

Helpline UK 0844 800 6503
(See page 14 for costs and hours of operation)
Note: The output will be in mono when using the microphone.
Please make sure that the microphone is not too close to the transmit-
ter, otherwise this will result in interference being picked up by the
microphone which will be heard as digital noise in the receiver.
GETTING STARTED
6

7
Helpline UK 0844 800 6503
(See page 14 for costs and hours of operation)
Operation

OPERATION
8
Operation
1 Switch on the audio source. The green indicator LED on the transmitter
will glow constantly.
2 Switch the On/Off switch on the receiver to ON position,
3 The neck-loop induction cable can transmit the audio signal to the hearing
aid device for listening (Note : any earphone/headset must be pulled out
from the 3.5 mm audio output jack).
4 Adjust the tone clarity setting to achieve optimum performance.
Note: When the battery level is low you will hear 3 beeps every minute
in the receiver. The receiver will be switched off automatically after 5
minutes.
The microphone button
The microphone opening at the side of the receiver pick up the sounds of
your surroundings. When the microphone is switched on, you will hear
your surroundings louder. You can hear for example your door bell, your
telephone or your conversational partner louder when you are wearing the
receiver.
Press the button to switch the microphone on. The power on indicator will
turn from green to red and two short beeps are to be heard. Make sure that
the microphone opening is not covered!
You can hear your surroundings and you use the receiver as an assistive lis-
tening device which helps you hear other people better.
To switch the microphone off press the button again. The power on indica-
tor will turn to green and you will hear the sound from the audio source.
Hearing damage due to high volumes!
• Before putting the receiver on lower the volume setting and gradually
increase the volume to suit.
• Do not continuously expose yourself to high volumes.
Helpline UK 0844 800 6503
(See page 14 for costs and hours of operation)

Helpline UK 0844 800 6503
(See page 14 for costs and hours of operation)
Tone clarity
You can set the tone clarity with the key on the transmitter. Press and
release the required key repeatedly. The current setting will be indicated by
the status of the three LED's.
The following table shows the settings. Try out which setting works best for
you.
Stereo / mono switch - transmitter base
Although the output from the neck loop will always be a mono signal, if the
source output is in stereo, the resultant output can be affected as follows:-
If you want both stereo channels from the source signal to be equally blen-
ded into a mono signal, switch to mono (this is the recommended setting).
Left or right channels can be partially filtered by switching to stereo and
adjusting the balance control on the headset.
Setting
Default Flat
Bass Boost +
Treble Boost
Treble Boost
Bass Boost
EffectLED indicator (orange)
OPERATION
9

Helpline UK 0844 800 6503
(See page 14 for costs and hours of operation)
Troubleshooting
No sound
- Ensure that the mains adapter is pushed fully into the power outlet and
that its cable is properly connected to the DC IN connector on the trans-
mitter.
- Ensure that the receiver power ON/OFF switch is switched to ON.
- The charge level of the battery inside receiver may be too low. Recharge
the battery or replace it with a fully charged battery.
- Ensure that the TV set, Hi-Fi system or audio component is switched ON
and set to a channel that broadcasts an audio signal.
- Use the volume control on the receiver to increase the sound level.
- The connected audio/video equipment may not be in playback mode.
Start playback on by the equipment.
- The receiver output level is set too low. Adjust the volume to a suitable
level.
- Try using a different connection RCA, SCART or HEADPHONE or use the
supplied microphone.
Distortion
- The charge level of the battery inside the receiver may be too low. Rechar-
ge the battery or replace them with a fully charged battery.
- The receiver may be too far away from the transmitter. Move closer to it.
- The audio signal input level is too low. Increase the volume from the
audio source.
- The audio signal input level may be too high, lower the volume from the
audio source.
OPERATION
10

11
Helpline UK 0844 800 6503
(See page 14 for costs and hours of operation)
Appendix

Appendix
Safety Information
Please read this operating instruction manual thoroughly.
Intended use
This device was developed to transmit audio signals from an audio source
like TV or HiFi device to a receiver, using cordless transmission. Any other
use is considered unintended use.
Unauthorised modification or reconstruction is not permitted. Under no cir-
cumstances open the devices or complete any repair work yourself.
Installation location and safety information
• Prevent excessive exposure to smoke, dust, vibration, chemicals,
moisture, heat and direct sunlight.
• Furniture polish, over time, may disintegrate the rubber feet of the
transmitter which may stain your furniture. To avoid a potential
stain, you may want to place the transmitter on a pad or mat.
• This listener allows you to amplify sounds to a loud volume, but lis-
tening to earphones at a high volume over an extended period of
time may damage your hearing; especially in children. Thus, we sug-
gest that you set the volume to a level that is comfortable to your
hearing.
For users wearing a pacemaker
It is recommended that if you have a pacemaker fitted you check with a
medical expert or your health adviser before using this product. Switch the
device off immediately if you notice or suspect any adverse effects.
12
ANHANG
Helpline UK 0844 800 6503
(See page 14 for costs and hours of operation)
APPENDIX

Helpline UK 0844 800 6503
(See page 14 for costs and hours of operation)
APPENDIX
13
Power adapter plug
Pay attention that the plug and cable are in perfect condition. Kinked or
worn cable represents the risk of a fatal accident!
The power adapter plug supplied fulfils the
ecodesign requirements of the European Union
(Directive 2005/32/EC). This means that, both in an
operating state and in an idling state, the power
consumption is considerably lower compared to
power adapter plugs with an older design.
Rechargeable batteries
Disposal
In order to dispose of your device, take it to a collection point
provided by your local public waste authorities (e.g. recycling
centre). According to laws on the disposal of electronic and
electrical devices, owners are obliged to dispose of old electro-
nic and electrical devices in a separate waste container. The
adjacent symbol indicates that the device must not be disposed
of in normal domestic waste!
Attention: Never throw batteries into a fire. Only use batteries of the
same type! Pay attention to correct polarity.
Attention: Only use the power adapter plug contained in the material
supplied since other power adapter plugs could damage the transmitter.
Ensure access to the power adapter plug is not obstructed by furniture
or such.

Batteries represent a hazard to health and the environment!
Never open, damage or swallow batteries or allow them to pol-
lute the environment. They may contain toxic, ecologically
hazardous heavy metals. You are legally obliged to dispose of
power packs and batteries at the point of sale or in the corres-
ponding containers provided at collection points provided by
local public waste authorities. Disposal is free of charge. The
adjacent symbols indicate that the batteries must not be dispo-
sed of in normal domestic waste and must be brought to col-
lection points provided by local public waste authorities.
Packaging materials must be disposed of according to local
regulations.
Helpline
If you need some help and you’re in the UK, please first check and see if
your problem can be solved using the troubleshooting guide on page 10. If
it can’t , please call us on 0844 800 6503 (using a UK landline, at the time of
going to print: calls cost 6p for connection charge and then 5p a minute.
Mobile costs may vary). Lines are open Monday to Friday, 9am to 5pm,
excluding public holidays.
If you’ve a claim on your 2-year guarantee, please contact your supplier.
Declaration of conformity
This device fulfils the requirements stipulated in the EU directive:
1999/5 EU directive on radio equipment and telecommunications terminal
equipment and the mutual recognition of their conformity.
Conformity with the above mentioned directive is confirmed by the CE sym-
bol on the device.
To view the complete Declaration of Conformity, please refer to the free
download available on our website www.amplicomms.com
14
ANHANG
Helpline UK 0844 800 6503
(See on this page for costs and hours of operation)
APPENDIX

Helpline UK 0844 800 6503
(See page 14 for costs and hours of operation)
APPENDIX
15
Maintenance
• Clean the housing surfaces with a soft, fluff−free cloth.
• Never use cleaning agents or solvents.
Technical data
Transmission mode: Digital hopping
Carrier frequency: 2.4GHz ISM Band
Range: Up to 25 meters (open area)
Frequency response: 30 Hz – 20 KHz
Max volume 120 dB
Distortion: < 0.5%
Signal-to-noise ratio: > 75 dB
Operating voltage (Transmitter): 5 VDC, 550 mA
Operating voltage (Receiver): 3.7 V, 350 mA Lithium Polymer Battery
Operation time: With fully charged battery up to 5 hours
Charging time: For empty battery approx. 3 hours
Weight Receiver 78 g
Weight Transmitter 115 g
Table of contents
Languages:
Other Amplicomms Hearing Aid manuals