manuals.online logo
Brands
  1. Home
  2. •
  3. Brands
  4. •
  5. Anchor
  6. •
  7. Speakers
  8. •
  9. Anchor bigfoot Instruction manual

Anchor bigfoot Instruction manual

For a complete Owner’s Manual, visit anchoraudio.com. Please check your new unit carefully for
any damage which may have occurred during shipment.
*Please keep the product box(es) that your Anchor Audio product(s) was shipped in, so it is available in the event the
product(s) need to be shipped back to Anchor Audio for any reason.
BIGFOOT | BEACON | LIBERTY | GO GETTER | MEGAVOX
QUICK START
MANUAL
BATTERY INFORMATION
SYSTEM PLACEMENT
ANCHOR AIR: USEFUL INFORMATION
CORRECT INCORRECT
NEED MORE HELP?
anchoraudio.com | 800.262.4671 | [email protected]
HAVING TROUBLE WITH YOUR SOUND SYSTEM?
CONDITION POSSIBLE SOLUTIONS
No Sound (Power LED: OFF)
•Turn POWER switch ON
•Check battery level, charge battery, or plug in AC cord
No Sound (Power LED: ON)
•Check your source audio and turn up volume of source audio
•Make sure all cables are completely plugged in
Poor Wireless Range /
Poor Wireless Audio Quality
•Check battery level of microphone and system
•Re-position system away from any possible interference sources
•Raise system onto a higher level (speaker stand)
• Minimize obstructions between the system and wireless microphone
•Ensure the antennas are properly installed
•Try different frequencies along the whole 900 MHz spectrum
•If AIR wireless range continues to be poor, call Anchor Audio
Tech Support
Distorted Sound
•Check battery level, charge battery, or plug in AC cord
•Lower system volume
•Lower source audio volume
•Wireless belt pack - ensure Mic and/or Line Level setting is correct
Excessive Feedback (Squelching)
•Lower the volume on the microphone (handheld or belt pack)
•Do not stand within at least 10 feet in front of the speaker
with the mic(s)
Excessive Hum or Noise
•Use shielded cables on transmitter unit (Example: EX-50PPS)
•Use a balanced microphone
•Check wired/wireless device connection
AC OPERATION & BATTERY CHARGING
Sound systems include an automatic charging system designed to properly charge and maintain the system’s built-in
Lithium Ion batteries. To charge batteries, plug the system into an AC outlet and operate as normal while built-in
batteries are charging. While unit is on, the battery fuel gauge will indicate the battery level. The BATTERY INDICATOR
LED will show solid red light when charging and will show green light when charging is complete. Charge system
overnight to replenish drained batteries.
BATTERY MAINTENANCE & STORAGE
In order to ensure a long battery life, we encourage the following best practices for Lithium Ion battery maintenance
and storage. Do not block any ventilation openings. When your speaker is not in use, it should be stored in a cool dry
place. Do not expose your speaker to excessive heat, flames, or fire. Unplug the speaker during lightning storms. If
storing speaker for an extended period of time, leave speaker unplugged
BATTERY SAFETY
Refer all servicing to qualified personnel. Do not attempt to remove the rechargeable Lithium Ion battery from this
product. The battery used in this device may present a risk of fire or chemical burn if mistreated. Please recycle or
dispose of your speaker and/or battery properly based on the laws and rules of your municipality. Do not incinerate.
•Main unit must have built-in AIR Companion Transmitter (X-series)
•Main unit can support unlimited number of AIR companion speakers (AIR & R-series)
•AIR companion speaker can be placed 300+ ft. from the main unit
•Although AIR has volume control, the main unit volume will raise or lower AIR volume
CONNECTING ANCHOR AIR WIRELESS COMPANION SPEAKER
1. Connect provided external antennas to main unit and AIR companion unit.
2. Power on main unit and AIR companion.
3. Verify the AIR companion speaker is in AIR MODE.
4. On main unit, push AIR Companion Transmitter POWER button to turn on AIR transmitter. On AIR companion, push
AIR Companion Receiver POWER button to turn on AIR receiver.
5. Adjust volume knob on back panel as needed.
NOTE: Verify both AIR Companion Transmitter and AIR Companion Receiver are synchronized to the same channel.
The default frequency setting is 902.00. This can be changed as needed.
CONNECTING ANCHOR AIR SYSTEMS WITH ASSISTIVE LISTENING BELT PACK RECEIVERS
1. Follow instructions to set up AIR Companion Transmitter
2. Install 2 AA 1.5V batteries in Assistive Listening belt pack (ALB-9000)
3. Straighten belt pack antennas for maximum reception
4. Plug in headphones to belt pack
5. Power on belt pack and adjust volume as needed.
NOTE: Verify both AIR Companion Transmitter and ALB-9000 are synchronized to the same channel. The default
frequency setting is 902.00. This can be changed as needed. Follow instructions above in Changing Frequencies.
CHANGING FREQUENCIES ON THE AIR COMPANION TRANSMITTER AND AIR COMPANION RECEIVER
1. Using a pointed edge tool, hold SET button for 2 seconds. Digital display will blink.
2. Press UP or DOWN to select desired frequency.
3. To confirm frequency selection, press SET or wait 10 seconds for display to stop blinking
CONNECTING MULTIPLE SOUND SYSTEMS - WIRED
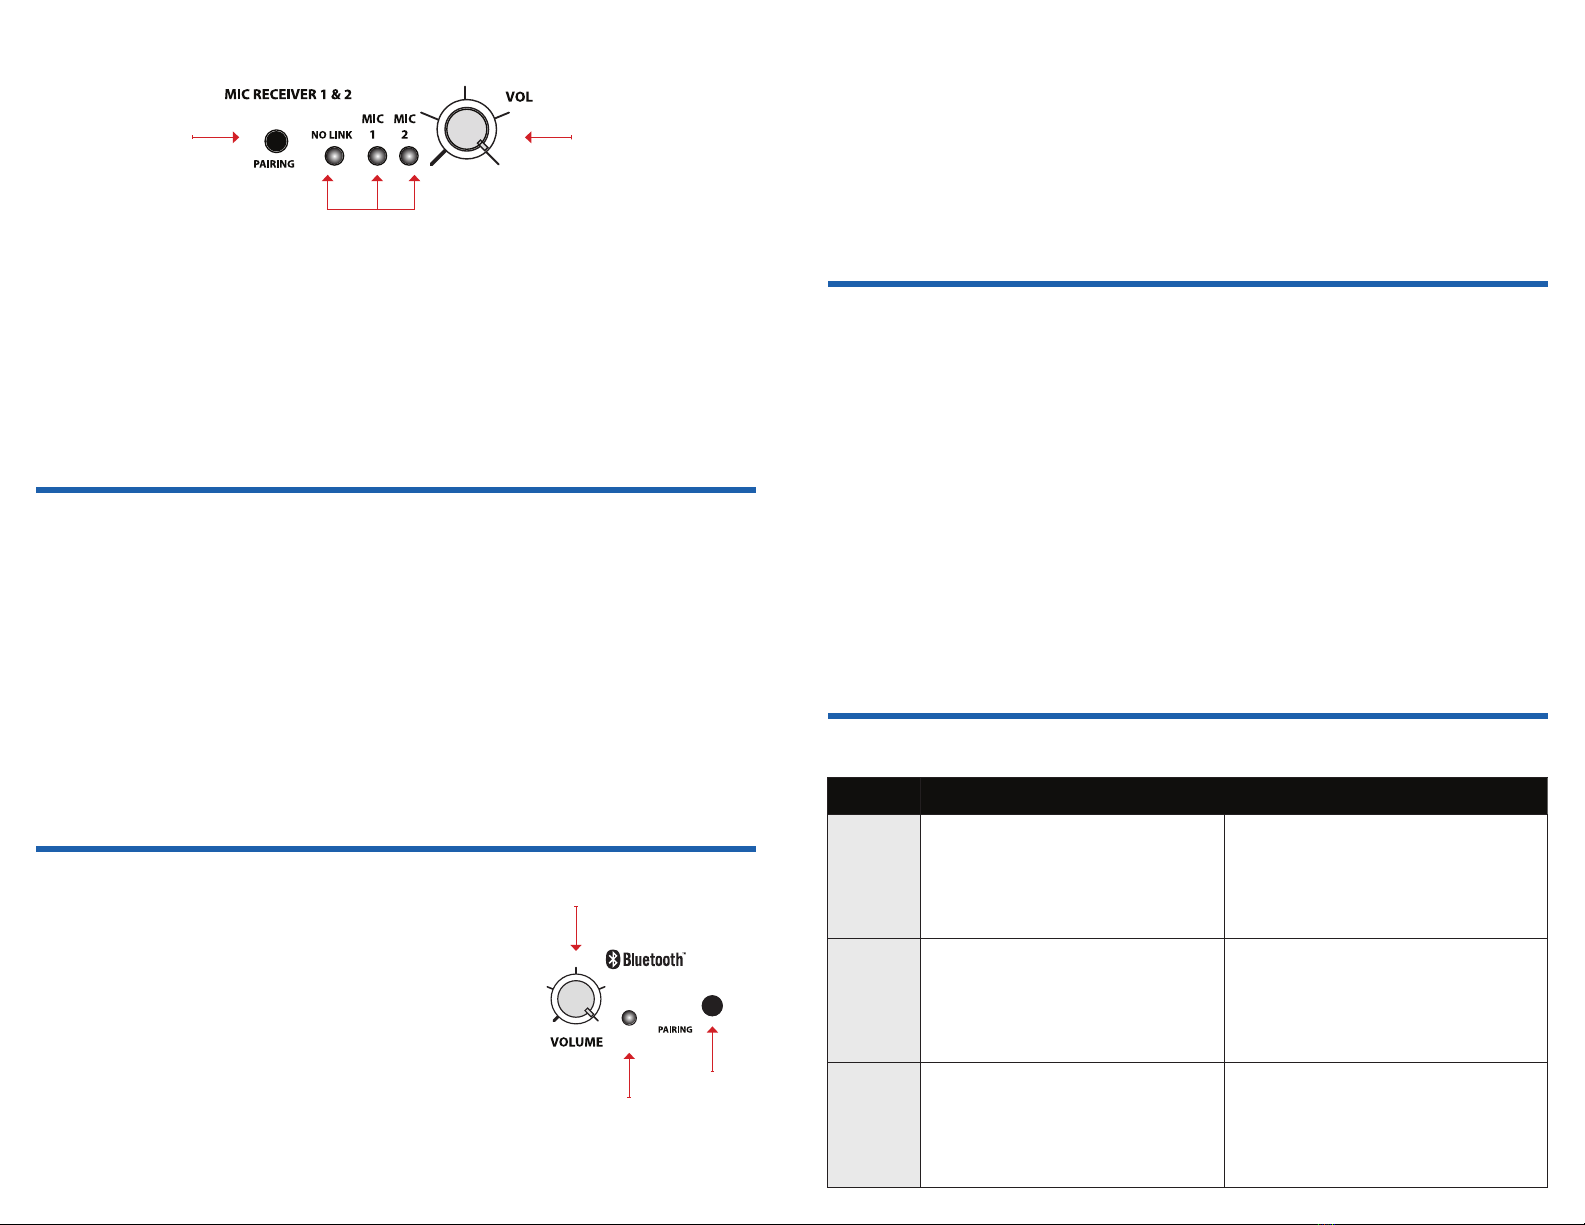
PAIRING ANCHORLINK WIRELESS MICROPHONES
UN-PAIR WIRELESS MICROPHONES
1. Turn on Mic Receiver (Volume knob clockwise) then hold Pairing button until green light for Mic 1 flashes,
release button.
2. Turn on Mic then press and hold Mute button until Mic red light turns off, release button.
3. Press and hold Mute button again until Mic green light flashes.
4. The Mic is paired when the green light is solid on both the Mic and Mic Receiver.
5. Repeat these steps for Mic 2 on the same Mic Receiver (Mic 1 will stay paired through this process). If
applicable, repeat these steps for Mic 3 and 4 on Mic Receiver 2.
NOTE: You may pair only one microphone at a time. Each Mic Receiver included supports two wireless
microphones. Two Mic Receivers = Four wireless microphones supported. You will only need to pair your
microphone once.
1. Start with the speaker On and the Mic Receiver in the Off position (Volume knob turned counter-clockwise until "click").
2. Press and hold the Pairing button on the Mic Receiver.
3. While holding Pairing button, turn on the Mic Receiver (Volume knob clockwise).
4. Continue to hold the Pairing button. Lights will appear in the order listed below. Process takes approximately 25 seconds.
• Mic 2— Green blinking
• No Link —Red blinking
• Pause
• Mic 1 —Green blinking
• No Link — Red
5. Once the No Link red light is solid both Mics have been un-paired.
6. Repeat these steps for the 2nd Mic Receiver (if included).
NOTE: This process un-pairs both Mics from a Mic Receiver. The Mics are not needed to un-pair from the Mic Receiver.
INDICATOR LIGHTS
VOLUME/POWER KNOBPAIRING BUTTON
1. Turn on the Bluetooth using the volume knob (it will make a boot up noise).
2. Press the pairing button and the blue LED will blink. Bluetooth will enter
sleep mode after 90 seconds if idle and unpaired.
3. If discoverable during pairing mode, choose ‘Anchor Audio’ from selection list.
4. When the device has successfully connected to the Bluetooth, the
Bluetooth module will beep to signify connection and the blue LED will
become solid.
5. Now you can play audio from your Bluetooth device to the Anchor Audio
portable sound system. You can adjust volume by using the Bluetooth
module’s knob, as well as the volume control on your device.
OPERATING THE BLUETOOTH
NOTE: If a previously paired device is in range and discoverable, the unit should automatically make a connection,
however, this may depend on your individual device.
INDICATOR LIGHTS
VOLUME/POWER KNOB
PAIRING BUTTON
CONNECTING ANCHOR AIR COMPANION SPEAKER VIA WIRED CONNECTION
1. Power off main unit and AIR companion speaker.
2. On the AIR companion speaker, move toggle switch to WIRED MODE.
3. Follow instructions below to connect speakers using a wired connection.
BATTERY POWERED SOUND SYSTEM UNPOWERED COMPANION
BIGFOOT &
BEACON
Connect speaker cable (EX-50PPS) from the
LINE OUT on the first powered sound system to
the LINE IN on the other powered system. Set
volume level of the second system to maximum,
this gives full volume control to the first or
primary sound system.
LIBERTY &
GO GETTER
Connect speaker cable (EX-50PPS) from the
LINE OUT on the first powered sound system to
the LINE IN on the other powered system. Set
volume level of the second system to maximum,
this gives full volume control to the first or
primary sound system.
Connect speaker cable (SC-50NL) to the SPEAKER
OUT jack on the back of the powered Liberty or Go
Getter sound system. Connect the other end of
the jack to the back of an unpowered companion
speaker. AC power is not required for an unpowered
companion speaker.
MEGAVOX
Connect speaker cable (SC-50) from the LINE
OUT on the first powered MegaVox to the LINE
IN on the second powered MegaVox. Set volume
level of the second system to maximum, this
gives full volume control to the first or primary
PA system.
Connect speaker cable (SC-50) to the SPEAKER OUT
jack on the back of a powered MegaVox PA system.
Connect the other end of the jack to the back of an
unpowered companion speaker. AC power is not
required for an unpowered companion speaker.

Other manuals for bigfoot

4

This manual suits for next models

4

Other Anchor Speakers manuals

Anchor AN-Mini User manual

Anchor

Anchor AN-Mini User manual

Anchor AN-1001X User manual

Anchor

Anchor AN-1001X User manual

Anchor MegaVox PRO MEGA-6000 User manual

Anchor

Anchor MegaVox PRO MEGA-6000 User manual

Anchor TourVox Instruction manual

Anchor

Anchor TourVox Instruction manual

Anchor megavox User manual

Anchor

Anchor megavox User manual

Anchor AN-1001X User manual

Anchor

Anchor AN-1001X User manual

Anchor AN-MINIU2 User manual

Anchor

Anchor AN-MINIU2 User manual

Anchor MiniVox User manual

Anchor

Anchor MiniVox User manual

Anchor AN-1000X User manual

Anchor

Anchor AN-1000X User manual

Anchor AN-1000X+ User manual

Anchor

Anchor AN-1000X+ User manual

Anchor AN-1000X+ Instruction manual

Anchor

Anchor AN-1000X+ Instruction manual

Anchor AN-130 User manual

Anchor

Anchor AN-130 User manual

Anchor ClassACT CA-130U1 User manual

Anchor

Anchor ClassACT CA-130U1 User manual

Anchor MiniVox Lite PB-30 User manual

Anchor

Anchor MiniVox Lite PB-30 User manual

Anchor Xtreme XTR-6000CU2 User manual

Anchor

Anchor Xtreme XTR-6000CU2 User manual

Anchor Xtreme XTR-6000CU1 User manual

Anchor

Anchor Xtreme XTR-6000CU1 User manual

Anchor Beacon BEA-6000 User manual

Anchor

Anchor Beacon BEA-6000 User manual

Anchor AN-Mini User manual

Anchor

Anchor AN-Mini User manual

Anchor AN-1000X User manual

Anchor

Anchor AN-1000X User manual

Anchor LIBERTY PLATINUM User manual

Anchor

Anchor LIBERTY PLATINUM User manual

Anchor MegaVox PRO MEGA-6000 Manual

Anchor

Anchor MegaVox PRO MEGA-6000 Manual

Anchor AN-130 User manual

Anchor

Anchor AN-130 User manual

Anchor MiniVox Instruction manual

Anchor

Anchor MiniVox Instruction manual

Anchor AN-130+ User manual

Anchor

Anchor AN-130+ User manual

Popular Speakers manuals by other brands

MTX MUD65PL owner's manual

MTX

MTX MUD65PL owner's manual

Promate Rustic user guide

Promate

Promate Rustic user guide

Party Light & Sound PARTY-BAZOOKA user manual

Party Light & Sound

Party Light & Sound PARTY-BAZOOKA user manual

Toa PC-668R installation manual

Toa

Toa PC-668R installation manual

KEF Ci 130DS Information sheet

KEF

KEF Ci 130DS Information sheet

Atlas C10A Series Specifications

Atlas

Atlas C10A Series Specifications

TAIDE ELECTRONICS BT023 user manual

TAIDE ELECTRONICS

TAIDE ELECTRONICS BT023 user manual

ENERGY SISTEM Acoustics 100 Wood Box user manual

ENERGY SISTEM

ENERGY SISTEM Acoustics 100 Wood Box user manual

Sony SRS-RA3000 Help guide

Sony

Sony SRS-RA3000 Help guide

DAPAudio D3511 manual

DAPAudio

DAPAudio D3511 manual

Magnat Audio NEEDLE 9000 ALU installation manual

Magnat Audio

Magnat Audio NEEDLE 9000 ALU installation manual

Philips SPA4350/10 user manual

Philips

Philips SPA4350/10 user manual

Gofreetech GFT-B008 user manual

Gofreetech

Gofreetech GFT-B008 user manual

AMK DT62-A installation manual

AMK

AMK DT62-A installation manual

The Source inStudio 8018049 user manual

The Source

The Source inStudio 8018049 user manual

JB Systems VIbe-15 Operation manual

JB Systems

JB Systems VIbe-15 Operation manual

Mackie C200 user manual

Mackie

Mackie C200 user manual

AMK DS82-B installation manual

AMK

AMK DS82-B installation manual

manuals.online logo
manuals.online logoBrands
  • About & Mission
  • Contact us
  • Privacy Policy
  • Terms and Conditions

Copyright 2025 Manuals.Online. All Rights Reserved.