Andersen Hitches Limited Warranty
PLEASE RETAIN YOUR ORIGINAL BILL OF SALE AS YOU WILL NEED TO PRESENT IT SHOULD YOU REQUIRE SERVICE UNDER THIS WARRANTY.
LIMITED LIFETIME WARRANTY: Andersen Manufacturing, Inc. (hereinafter referred to as “ANDERSEN”) warrants specic Andersen brand products (“Products”) purchased
directly from Andersen or an Authorized Andersen Dealer, in accordance with the terms and conditions detailed herein for the periods indicated below.
WARNING: IF YOU PURCHASE AN ANDERSEN PRODUCT FROM AN UNAUTHORIZED DEALER, YOUR ANDERSEN WARRANTY WILL NOT BE VALID.
SCOPE OF WARRANTY: Commencing with the date of retail purchase and continuing for the periods specied in the Warranty Period table below, this Limited Warranty
is extended to the original purchaser (“BUYER”) only and warrants the Product against latent defects in materials and workmanship under normal use and service (rust,
corrosion and ordinary wear and tear excepted) and is subject to the Exclusions and Limitations set forth below. A dated purchase receipt or bill of sale, or other proof of the
purchase date, is required for Warranty service. If the Product is determined to be latently defective, ANDERSEN will, at its own discretion, replace or repair the Product and/or
associated parts.
This Limited Warranty applies only to authentic Products manufactured and/or distributed by ANDERSEN. It does not apply to non-ANDERSEN supplied goods, even if they
are packaged or sold with ANDERSEN branded Products or falsely identied as ANDERSEN Products. While some non-ANDERSEN supplied goods sold with an ANDERSEN
Product may be covered by their own warranties, ANDERSEN, to the extent permitted by applicable law, provides such third-party products “AS IS”.
EXCLUSIONS and LIMITATIONS: IF YOU PURCHASE AN ANDERSEN PRODUCT FROM AN UNAUTHORIZED DEALER, YOUR ANDERSEN WARRANTY WILL NOT BE
VALID, please use our List of Authorized Dealers or our Authorized Dealer Locator.
BUYER is responsible for maintenance checks to the Product on a regular basis. It is also the responsibility of the BUYER to have the trailer braking system checked and
maintained on a regular basis. Damages resulting from failure to perform these maintenance checks shall not be covered by this Warranty.
As the condition of trailers and vehicles used with the ANDERSEN Product is beyond ANDERSEN’s control, ANDERSEN cannot and does not warrant or assume liability for
damages incurred to trailers or vehicles during use of the Product.
ANDERSEN does not warrant against discontinuation of Product, defects in items or components not manufactured by ANDERSEN, or against damages resulting from use
of such non-ANDERSEN made products or components. ANDERSEN passes on to BUYER the warranty it received (if any) from the maker of any non-ANDERSEN made
products or components.
This Limited Warranty does not apply to any Product upon which repairs have been affected or attempted by persons other than those in possession of written authorization
from ANDERSEN.
Additionally, this Limited Warranty does not apply with respect to any of the following:
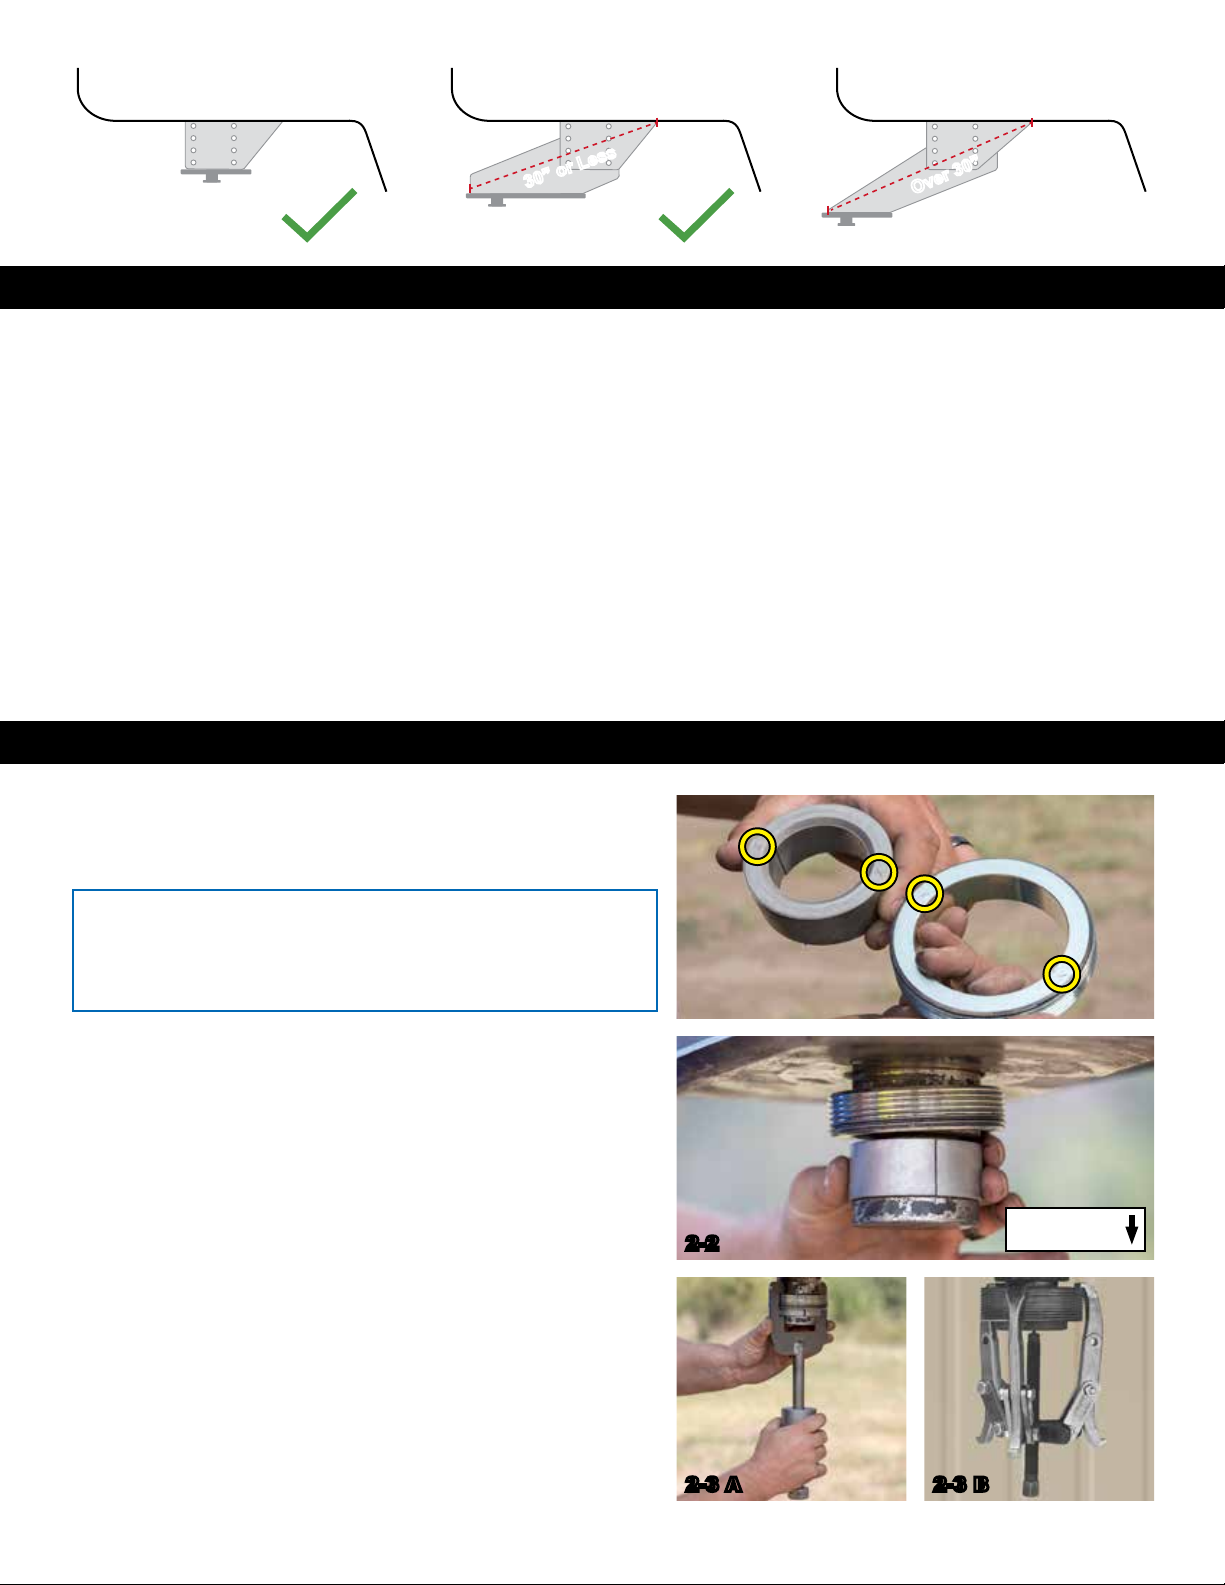
1. Defects or damage resulting from improper installation, unauthorized alteration, unreasonable use, or improper maintenance including, but not limited to loading the
Product beyond the Product’s rated load capacity.
2. Defects or damage caused by an accident, sudden impact arising from a collision, or other abnormal occurrences.
3. Defects or damage caused by re, smoke, ood, water damage, lightning, or other acts of nature/acts of God.
4. Defects or damage caused by abuse, misuse, negligence, accident, unauthorized product modication or service, or failure to observe the instructions contained in the
manual furnished at the time of original purchase.
5. Damage caused during shipment or handling.
6. Products purchased from anyone other than ANDERSEN or an Authorized Andersen Dealer. If you are uncertain as to whether a dealer is authorized, please visit our
List of Authorized Dealers or contact our Customer Service Department.
7. Products that have been altered or repaired by anyone other than ANDERSEN or an Andersen Authorized Dealer in a manner that has affected the product’s
performance, stability or reliability.
8. Any accessories or products attached to or used with ANDERSEN Products
9. Packing materials and cosmetic items like stickers.
10. Parts which have prescribed useful lives dependent upon the degree of their use, such as rubber pads, duffel bags, chemical products, etc.
11. Maintenance, cleaning or periodic check-ups.
12. Loss of keys to ANDERSEN’s Stainless Steel Locking Pins.
THIS WARRANTY IS EXCLUSIVE. To the extent allowed by law, ANDERSEN shall not be liable for any incidental, consequential, or any other damages including, without
limitation, breach of any implied warranty, merchantability, or tness of the Product for a particular purpose. The sole and exclusive obligation of ANDERSEN shall be to repair
or replace the defective Product in the manner stated above. ANDERSEN shall not have any other obligation with respect to the Product or any part thereof, whether based on
contract, tort, strict liability, or otherwise. It is understood that the seller’s liability, whether in contract, in tort, under any warranty, in negligence or otherwise, shall not exceed
the return of the wholesale amount of the purchase price paid by the BUYER. Under no circumstances, whether based on this Limited Warranty or otherwise, shall ANDERSEN
be liable for incidental, special, or consequential damages. The price stated for the Product is considered in limiting ANDERSEN’s liability.
ANDERSEN’s employees’, representatives’ or Dealers’ ORAL OR WRITTEN STATEMENTS DO NOT CONSTITUTE WARRANTIES, shall not be relied upon by BUYER, and
are not a part of the contract for sale or this limited warranty.
This warranty does not include labor charges nor does it include transportation charges for returning the Product to the consumer. Removal, shipping and installation of the
replacement Product or replacement parts shall be at BUYER’s expense.
RANCH HITCH ADAPTER WARRANTY PERIOD (from date of purchase): 1 Year
OBTAINING WARRANTY SERVICE: For warranty service and returns please visit our website and click on “Warranty” at the bottom of the page or call our customer service
department at 1-800-635-6106. Select warranty claims can be submitted digitally through the help.andersenhitches.com website.
Warranty Registration and Validation
Andersen Weight Distribution Hitch
To register your Weight Distribution Hitch, simply visit
www.AndersenHitches.com/register and complete your registration online.