Andersen Hitches Ultimate 5th Wheel Connection User manual

andersenhitches.com
Standard 3220
‘Lowered’ 3221
IMPORTANT! DEALER OR INSTALLER: Please make sure your customer receives
this manual for safety tips, warranty, and future removal or installation information
Important Safety Information .............................................
Contact Andersen Hitches Customer Service ....................
Parts Illustration .................................................................
Section 1: Turning Clearance ............................................
Section 2: Installing the Base Unit .....................................
Section 3: Installing the Kingpin Coupler Block .................
Section 4: Attaching the Remote Latch Cable Bracket ......
Section 5: Connecting Your Trailer to the Base Unit ..........
Section 6: Removing the Base Unit ...................................
Popular Add-ons for your Ultimate Connection .................
Warranty Information .........................................................
Page 2
Page 2
Page 3
Page 4
Page 4
Page 5
Page 7
Page 8
Page 9
Page 10
Page 11
Table of Contents Want to see a video of the install?
Use your Smart Phone to scan the
QR Code above and to go to
our Installation Videos on the web.
NOTE: THERE IS NEVER A NEED TO GREASE BALL OR COUPLER
Ultimate 5th Wheel Connection - Gooseneck Mount
INSTALLATION MANUAL
For Part #3220 / #3220-TBX and #3221 / #3221-TBX • 24,000 lbs GTWR - 4,500 lbs Tongue

Page 2 of 12 • Andersen Ultimate 5th Wheel Connection (Gooseneck Mount) Installation Manual 2-2018 • www.AndersenHitches.com
Thank you for choosing the Ultimate 5th Wheel Connection! This indispensable product adapts a kingpin style
5th wheel trailer pin box so it can attach to a raised 2-5/16” ball hitch – giving you a smooth, solid and safe
driving experience. The Ultimate Connection can be installed in a short amount of time with only a few tools.
When you unpack your Ultimate 5th Wheel Connection, compare it with the Parts List on Page 3. If any parts
appear to be missing or damaged, DO NOT RETURN IT TO YOUR DEALER. Instead, contact us directly
using the contact information below. If the packaging appears to be damaged, please include pictures of the
packaging in your email. If you ever lose or damage any part of your Ultimate 5th Wheel Connection, visit
AndersenHitches.com or contact [email protected] for replacements.
Note: The Ultimate 5th Wheel Connection hooks to your current gooseneck ball and under bed system
(we do not offer in-bed gooseneck balls or under bed systems). Please refer to the manufacturer’s instructions
regarding installation and use of your gooseneck system.
IMPORTANT SAFETY INFORMATION
WARNING
Read the entire manual before towing a 5th wheel trailer using the Ultimate 5th Wheel Connection.
Before each trip—and regularly during a trip—check all hardware, bolts and nuts for wear and fatigue,
and make sure that they are all properly tightened and that all pins and clips are secured in place.
Failure to follow all safety warnings could result in severe injury or even death.
Read and understand the manufacturer’s instructions for your trailer, tow vehicle and hitching equipment.
Follow all safety warnings, setup instructions and recommended maintenance before installing your hitch.
Before towing, make sure the kingpin coupler is coupled properly to the kingpin and to the Ultimate 5th
Wheel Connection ball and that it is secured in place using the remote latch.
ANDERSEN HITCHES CUSTOMER SERVICE
www.AndersenHitches.com
Customer Service: 1-800-635-6106
customerservice@anderseninc.com
If you have a question, concern, or problem regarding your Ultimate 5th Wheel Connection, please contact our
Customer Service team by scanning the QR code below or using the contact information provided.
Make sure that you have enough clearance for your pin box so that it does not hit your
truck when turning (see Section 1 and Section 3). As with any 5th wheel hitch, there
is a point beyond which every trailer will contact the tow vehicle. Each trailer is
unique, so become familiar with your specic vehicle/trailer limitations. When
turning or reversing sharply in your tow vehicle, be very aware of the front corners
and nose of your trailer so they do not hit the windows or cab of your tow vehicle.

Page 3 of 12 • Andersen Ultimate 5th Wheel Connection (Gooseneck Mount) Installation Manual 2-2018 • www.AndersenHitches.com
PARTS ILLUSTRATION – ULTIMATE 5th WHEEL CONNECTION, GOOSENECK MOUNT
The 3220, 3220-TBX and 3221 assemblies include all items listed on this page.
• The 3220 assembly is used for most standard truck installations.
• The 3221 assembly is a shorter version of the 3220 and is intended ONLY for at-bed truck installations
where the gooseneck ball is recessed below the bed.
• The 3220-TBX and 3221-TBX assemblies are designed for use in truck beds with a large fuel tank or toolbox.
Kingpin Coupler Assembly #3246
1. Kingpin Coupler Block (greaseless) #3233
2. Ball Funnel for kingpin coupler block #3244
3. Kingpin Coupler Set Screws (4 pcs, 40 ft-lb torque) #3232
4. 5/8” x 5” Kingpin Coupler Bolts with nuts and washers
(2 sets) #3232
5. Remote Latch Cable #3204
6. 5/16” Self-Tapping Screws for Remote Latch Cable Bracket
Base Assembly #3240 / #3240-TBX
or # 3224 / #3224-TBX (lowered)
7. Pin with Clip (2 sets) #3430
8. Ultimate Ball (2-5/16” ball) #3201
9. 5/8” x 3” Top Bolt with metal and plastic washers
for square Coupler Tube (60 ft-lb torque) #3228
10. Coupler Tube Set Bolts (2 pcs, 40 ft-lb torque) #3228
11. Ultimate Base #3241 / #3241-TBX or #3238 / #3238-TBX (lowered)
12. One Square Coupler Tube
6” (#3223), 7-3/4” (#3237), 9-1/8” (#3227), 10-1/2” (#3239),
11-7/8” (#3222), or 13-1/4” (#3234)
Tools Needed for Installation
Measuring Tape
5/16” socket for self-tapping screws
1/4” Allen wrench - at least 2-inches long
Torque Wrench capable of at least 60 ft- lbs of torque
Two 15/16” Box End / Socket Wrenches or two medium adjustable wrenches
Assembled
Kingpin Coupler
Assembled
Base Unit
7
7
8
9
11
12
10
3
2
4
5
6
1

Page 4 of 12 • Andersen Ultimate 5th Wheel Connection (Gooseneck Mount) Installation Manual 2-2018 • www.AndersenHitches.com
Measurement 2 Ultimate Ball to Back of Cab
Measurement 1 Center of the Coupler
Block Ball Socket to Farthest Corner of Trailer
1-1. To gure your approximate turning clearance do the following: Using a tape measure, determine the
distance of Measurement 1 on your Trailer (see diagram below). Next, determine Measurement 2 on the tow
vehicle (see same diagram).
1-2. If Measurement 1 is SHORTER than Measurement 2 then you might be close to having perfect
clearance. However, “perfect clearance” is not really necessary for 5th wheel trailer towing, most truck/
trailer combinations work great with 60°-70° turning clearance. If you want more details about turning
clearance, watch the short video clip on our website at the link below (or scan the QR code).
Go to help.andersenhitches.com/install
...then click on the picture of the Ultimate 5th Wheel Connection
to see a list of available videos
SECTION 1: TURNING CLEARANCE
NOTE: Before installation make sure that the gooseneck ball in the bed
of the truck is in the up position and locked into place.
SECTION 2: INSTALLING THE BASE UNIT
2-1. Place the Ultimate Connection base in the bed of your
truck with the Ultimate Ball closest to the tailgate. You can
use your bed grooves to square up the hitch before tightening
it down.
±IMPORTANT Ensure
that the coupler tube set
bolts are loose enough to
allow free movement of the
coupler tube.
NOTE: If the coupler block is not installed, you can get an approximate idea for Measurement 1 by placing the tape
measure on the center of the kingpin and then measuring the distance to the furthest corner of the trailer front end.
If the base is not installed, Measurement 2 can be determined by measuring from the cab to the center of the
gooseneck ball in the bed of the truck and then adding 5 inches to that number.
±IMPORTANT As with any 5th wheel hitch, there is a point beyond which every trailer will contact
the tow vehicle. Each trailer is unique, so become familiar with your specic vehicle/trailer limitations.
2-1
Use your Smart Phone to scan
this QR Code and go to our
Installation Videos page on the web.

Page 5 of 12 • Andersen Ultimate 5th Wheel Connection (Gooseneck Mount) Installation Manual 2-2018 • www.AndersenHitches.com
2-2. Place the pin through the lower coupler sleeve
under the gooseneck ball and secure it in place
with the hairpin clip. Push the entire base forward
towards the cab of the truck until it will not go any
further.
2-3. Using a 15/16” socket wrench, tighten the top
bolt of the square coupler to 60 ft-lbs of torque.
This will ensure that the coupler is pulling up
on the gooseneck ball and holding the Ultimate
Connection rmly to the bed of the truck.
2-4. Using a 15/16” socket wrench, tighten the two
coupler tube set bolts to approximately 40 ft-lbs of
torque to take out any play in the tube.
60 ft-lbs of torque 40 ft-lbs of torque
SECTION 3: INSTALLING THE KINGPIN COUPLER BLOCK
Measurement 5
Ultimate Ball to Tailgate
Measurement 4
Ultimate Ball to Side Rail
Measurement 3 Position 1
Center of Coupler Block Ball Socket
(4” in front of kingpin) to Rear of Pin Box
Position 2
Position 1
Measurement 3 Position 2
Center of Coupler Block Ball Socket
(4” behind kingpin) to Rear of Pin Box
3-1. For adequate tailgate and side rail clearance
Measurement 3 (center of the installed Coupler Block’s ball
socket to the rear of the trailer’s pin box) should be shorter
than both Measurement 4 and Measurement 5 (center of the
Ultimate Ball to the inside of the side rails and tailgate).
If this is not the case with the coupler block in Position 1, you
may need to install the Coupler Block in Position 2 with the
greaseless opening behind the trailer kingpin. Also, keep in
mind that there can be 15° up-and-down movement
of the pin box, so be sure to allow for
that above the tailgate and side rails.
±IMPORTANT
When properly installed, the pin
box should be able to rotate inside
the bed of the truck. For longer
pin boxes, Position 2 installation
provides better side rail clearance
than Position 1.
2-2 A 2-2 B
2-3 2-4

Page 6 of 12 • Andersen Ultimate 5th Wheel Connection (Gooseneck Mount) Installation Manual 2-2018 • www.AndersenHitches.com
3-2. Place the kingpin coupler block on the trailer
kingpin with the greaseless ball socket face-down.
Longer pin boxes may require installation of the
coupler block with the greaseless opening towards
the back of the pin box. Do not attach the remote
latch cable bracket yet.
3-3. Insert the two 5” long kingpin bolts into their
holes to hold the coupler block on the kingpin and
place the nuts on the two bolts as illustrated at left,
DO NOT tighten the nuts until step 3-6. Make sure
the bolts are all the way ush to the block.
3-4. Make sure the coupler block is centered to the
pin box.
3-5. Using a 1/4” allen wrench or allen wrench bit,
tighten the 4 set screws to 40 ft-lbs of torque.
3-6. Use wrenches to tighten the nuts on both kingpin
bolts until they are snug. Do not over tighten the
bolts or it could result in cracking the red funnel.
NOTE: Because kingpins vary in
height, some blocks will have space
between the coupler block and the
kingpin plate (as shown at right) while
others will be ush. This is normal and
does not affect performance at all.
3-3 NOT fully tightened
Tighten until snug
(over tightening could crack funnel)
40 ft-lbs of torque
3-2
3-5 3-6
NOTE: You can tow without the red funnel
without affecting the performance of the hitch.

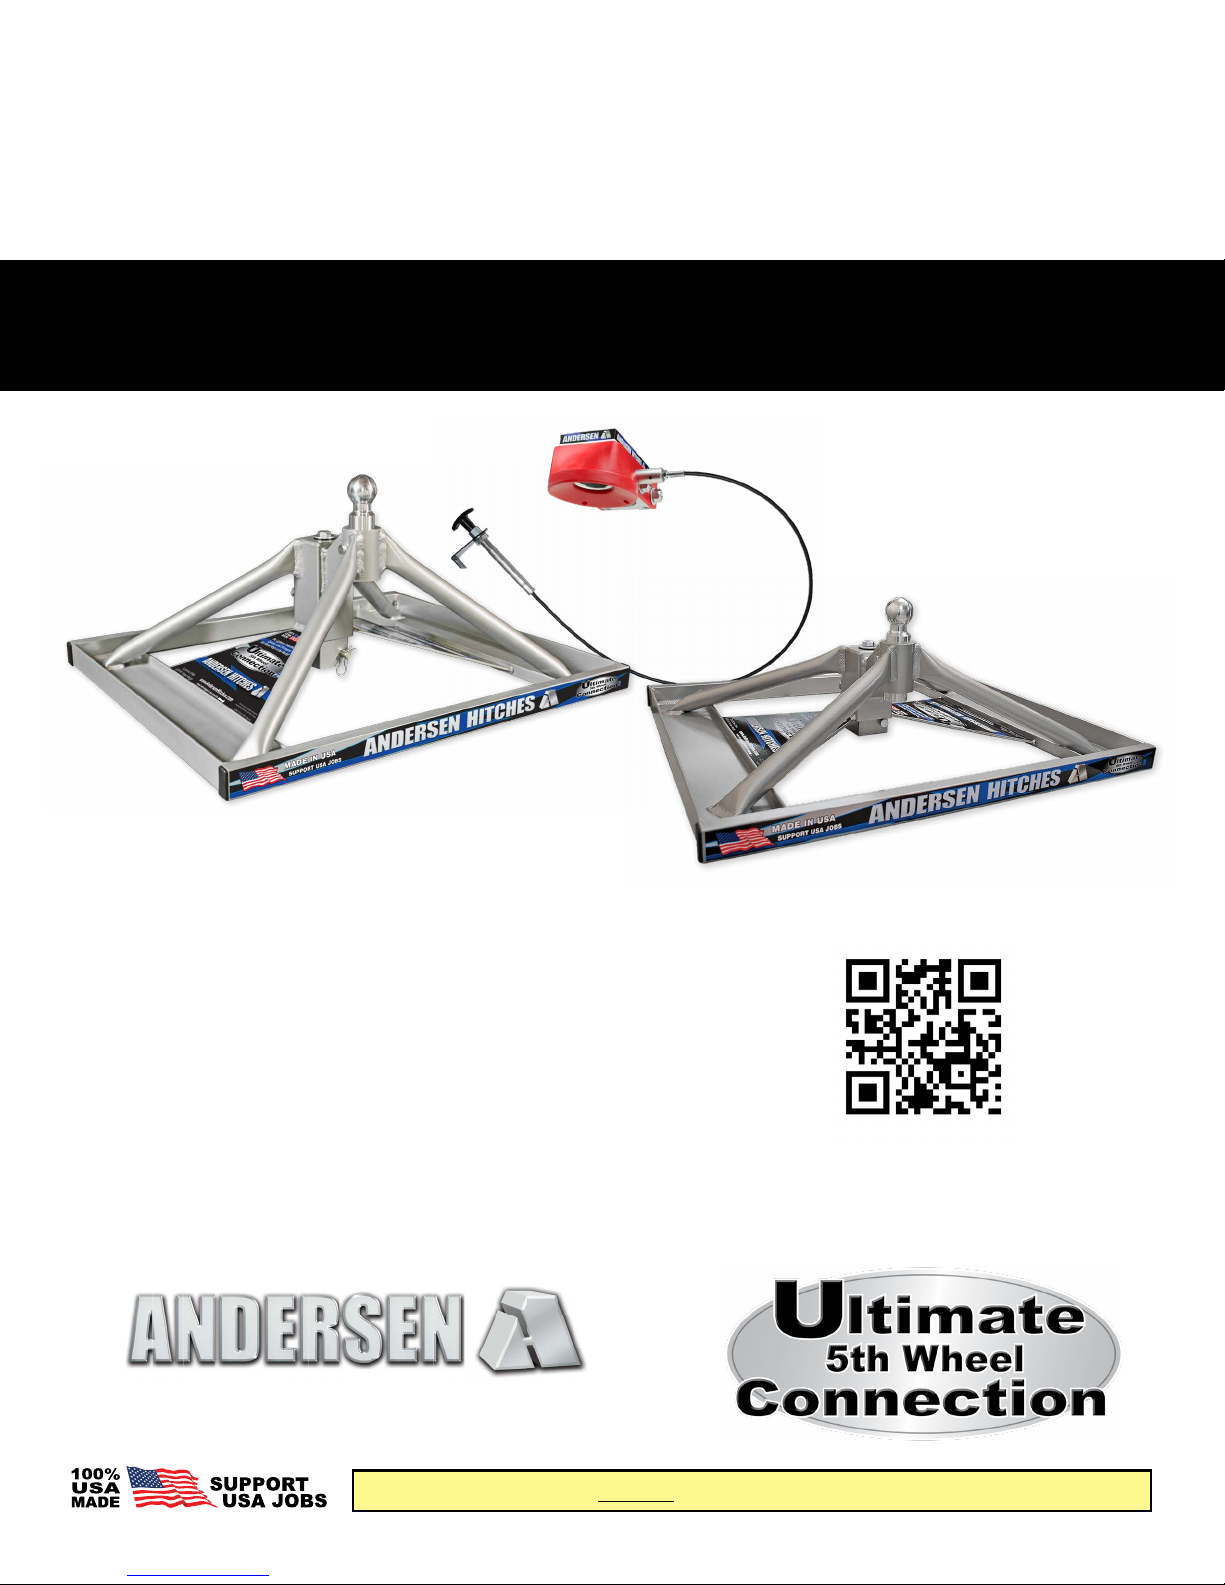
Page 7 of 12 • Andersen Ultimate 5th Wheel Connection (Gooseneck Mount) Installation Manual 2-2018 • www.AndersenHitches.com
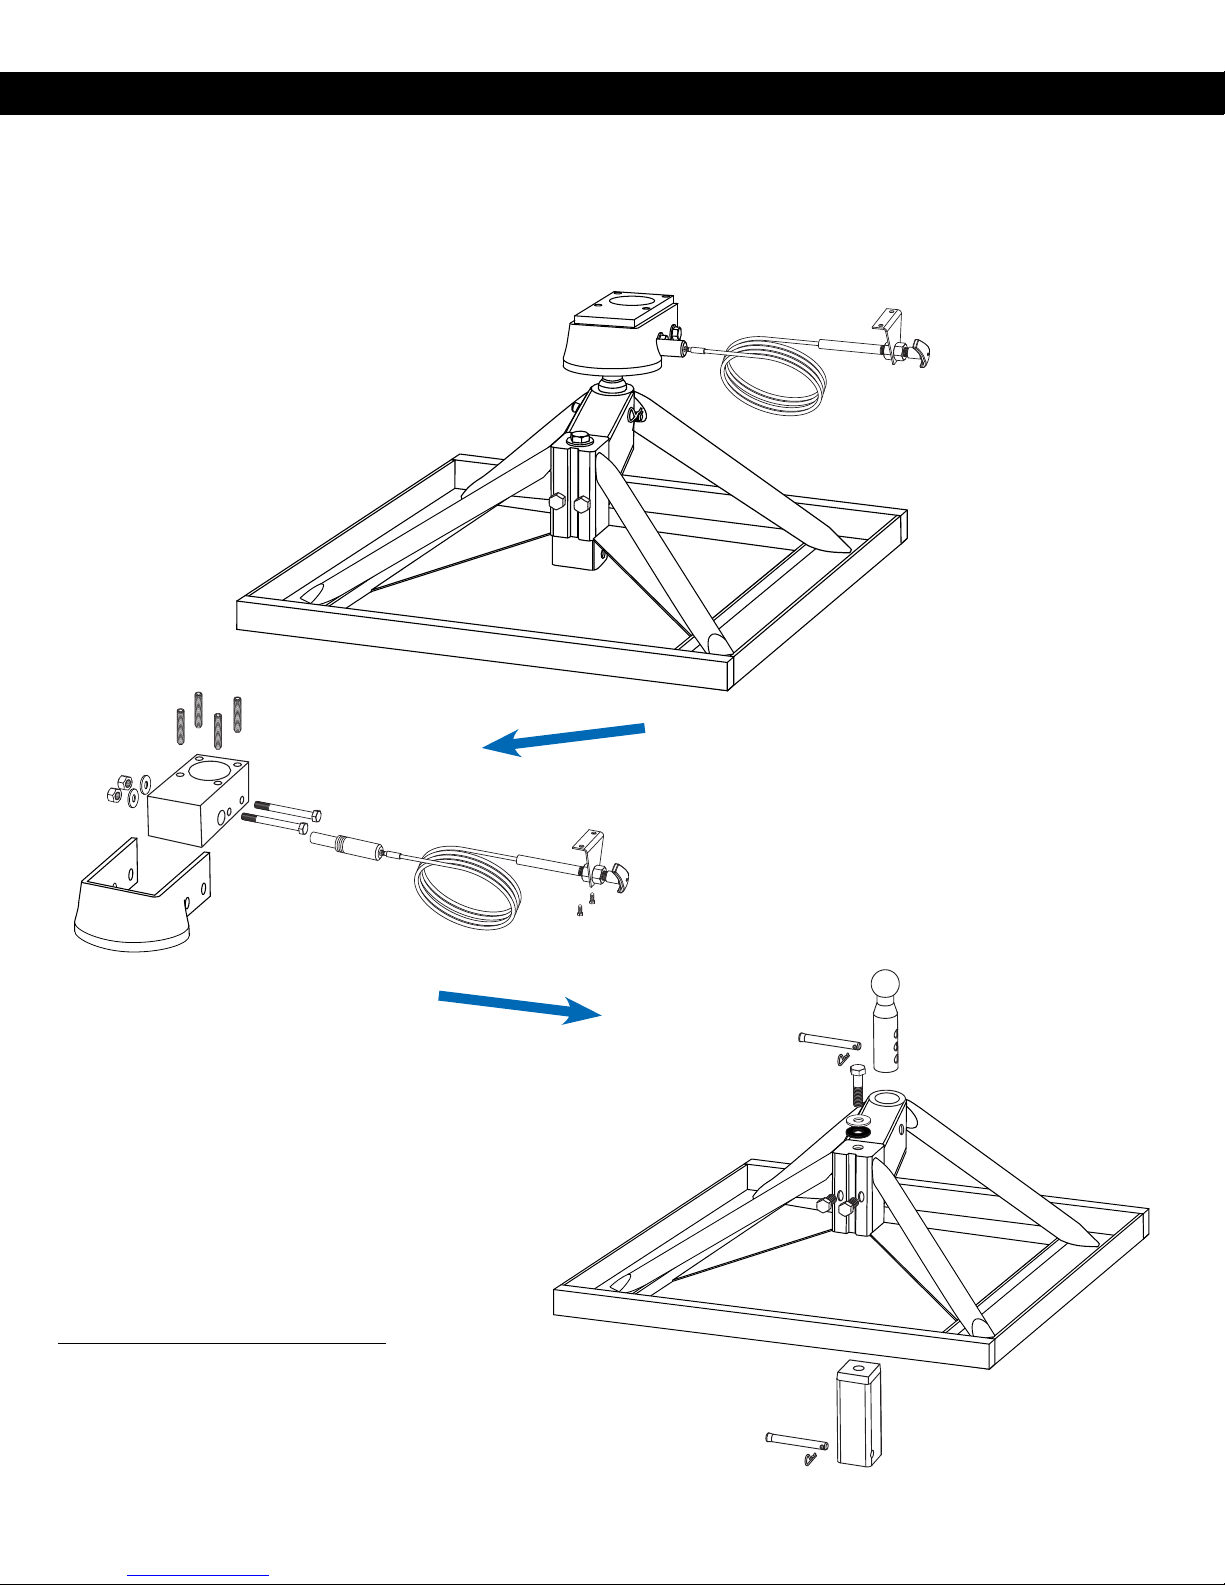
SECTION 4: ATTACHING THE REMOTE LATCH CABLE BRACKET
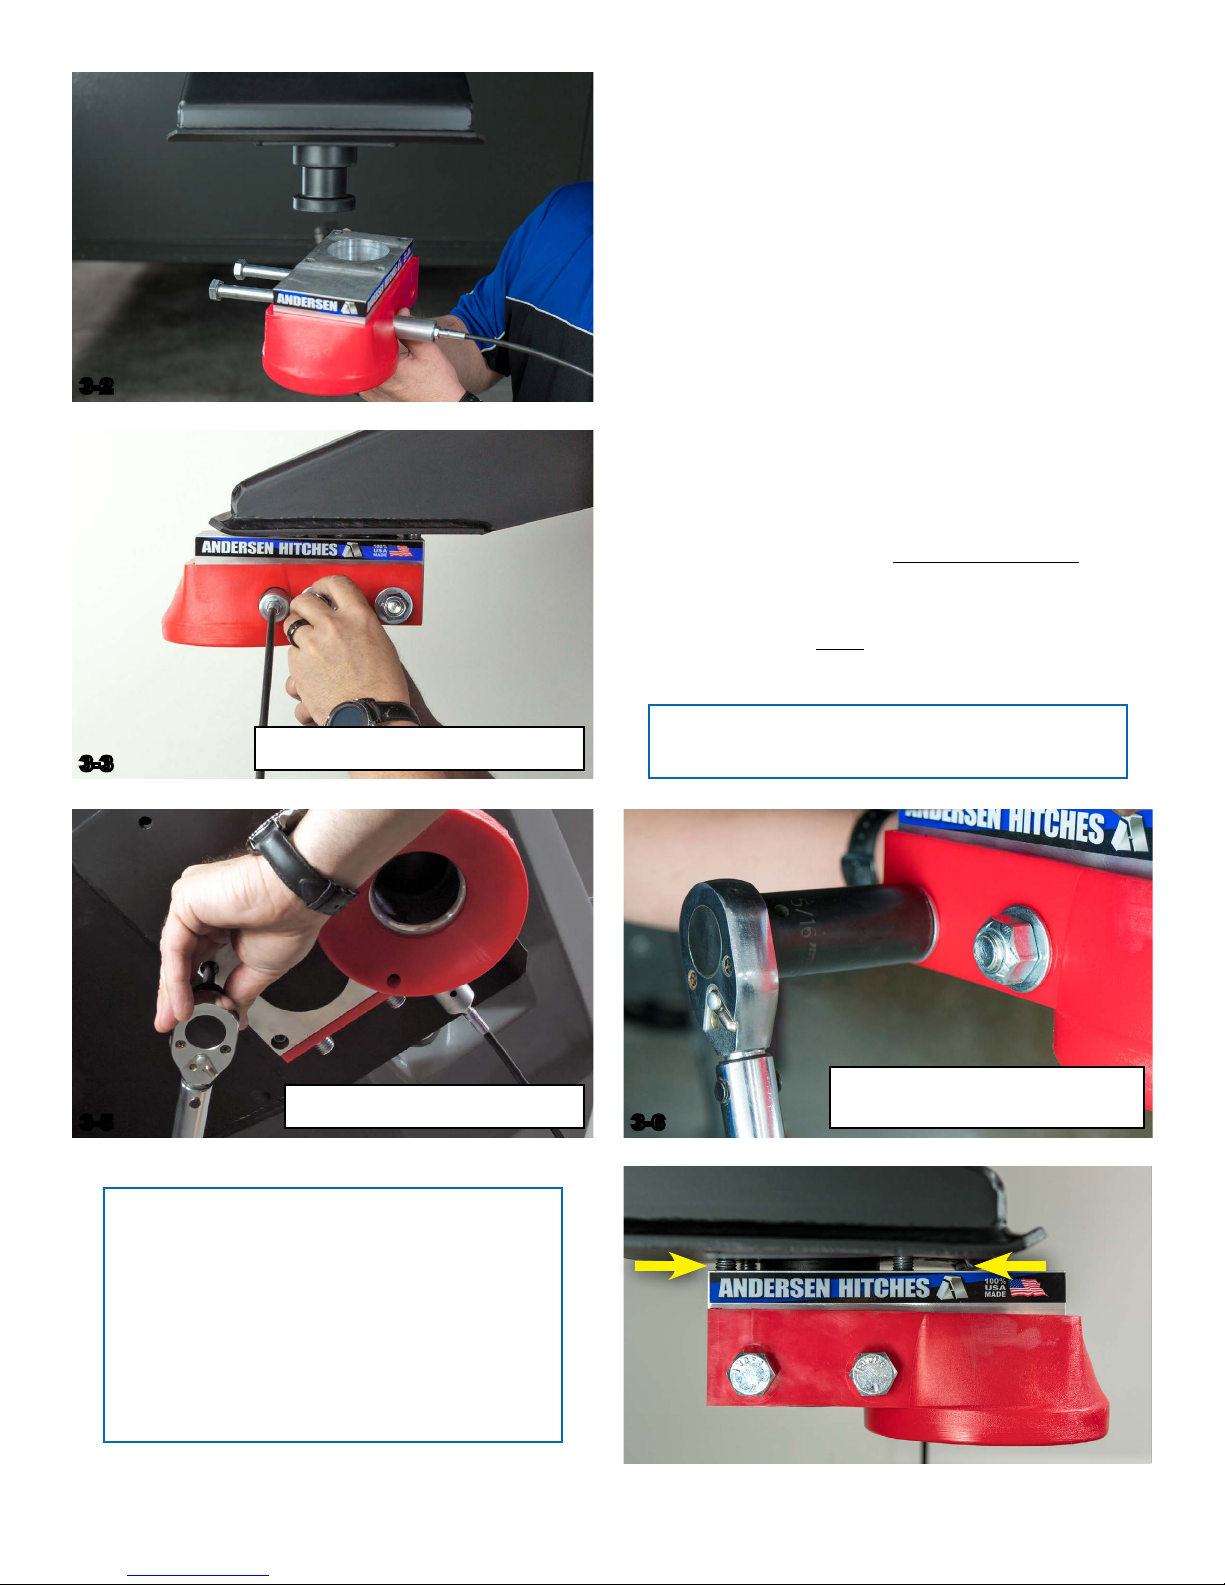
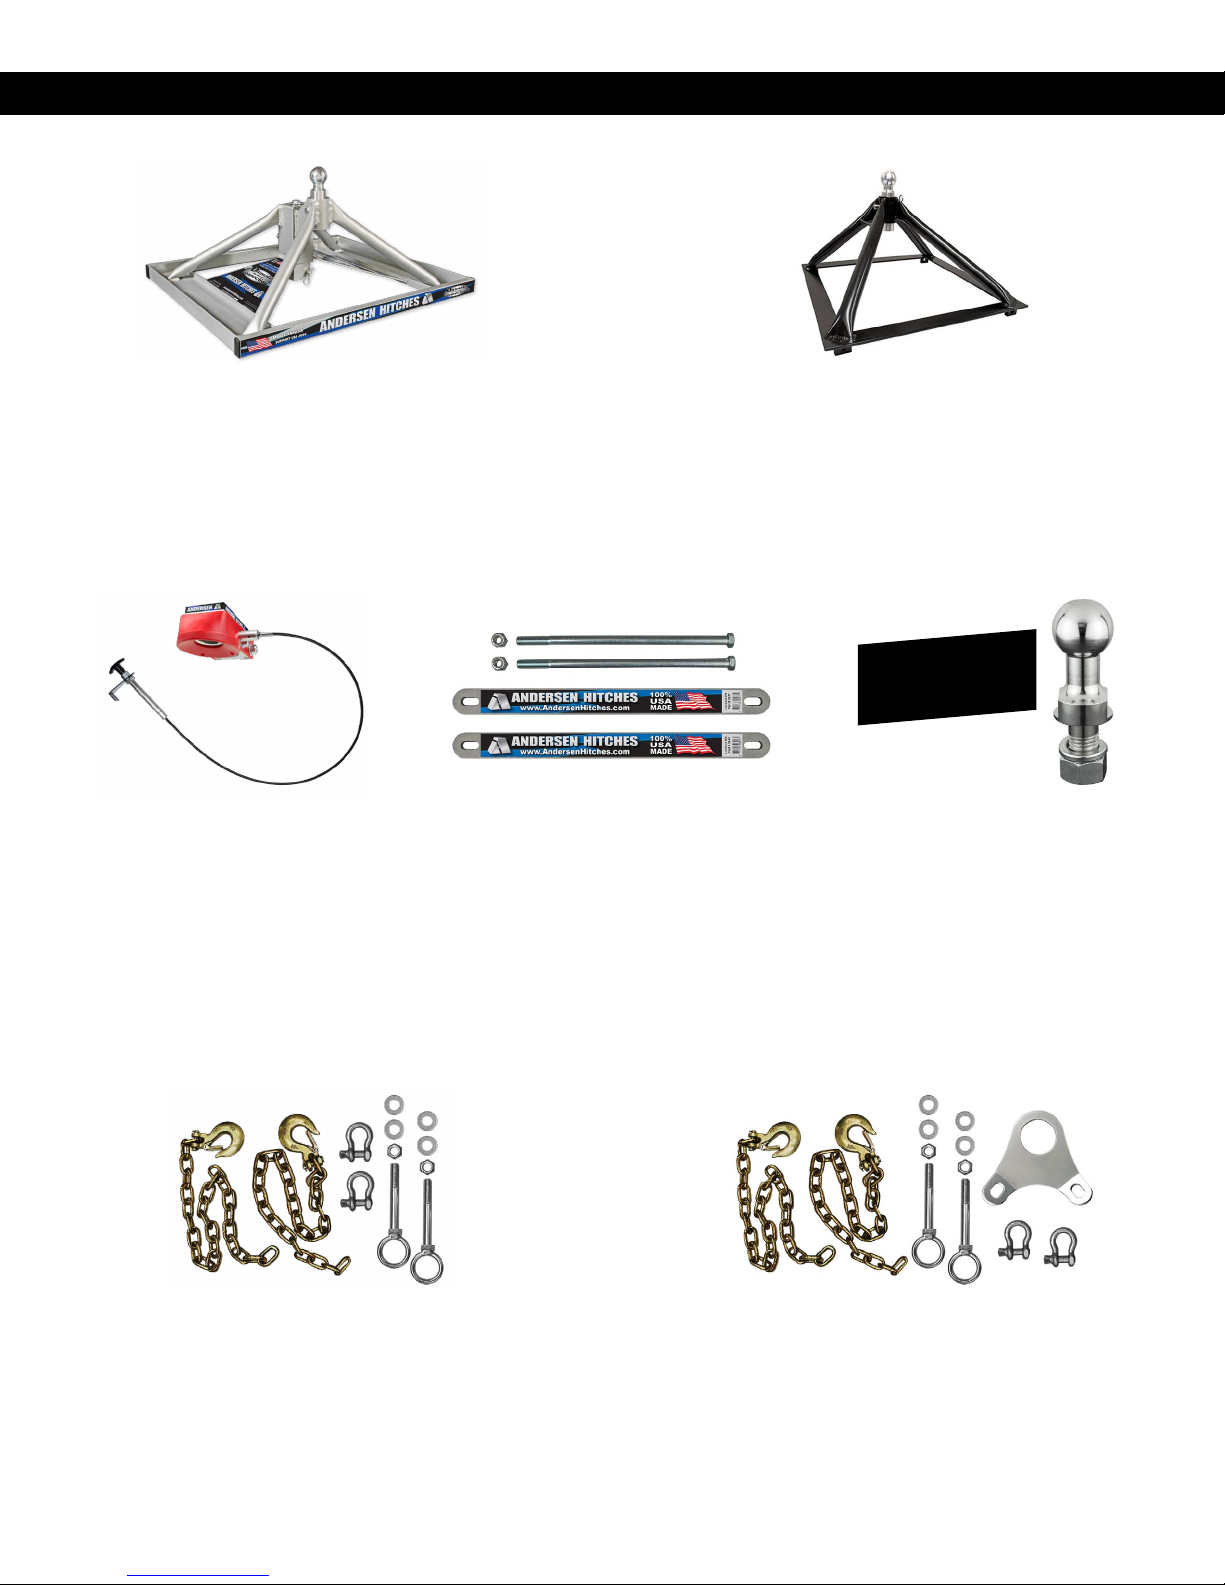
4-1. Use a 5/16” socket to install the two self-tapping
screws provided.
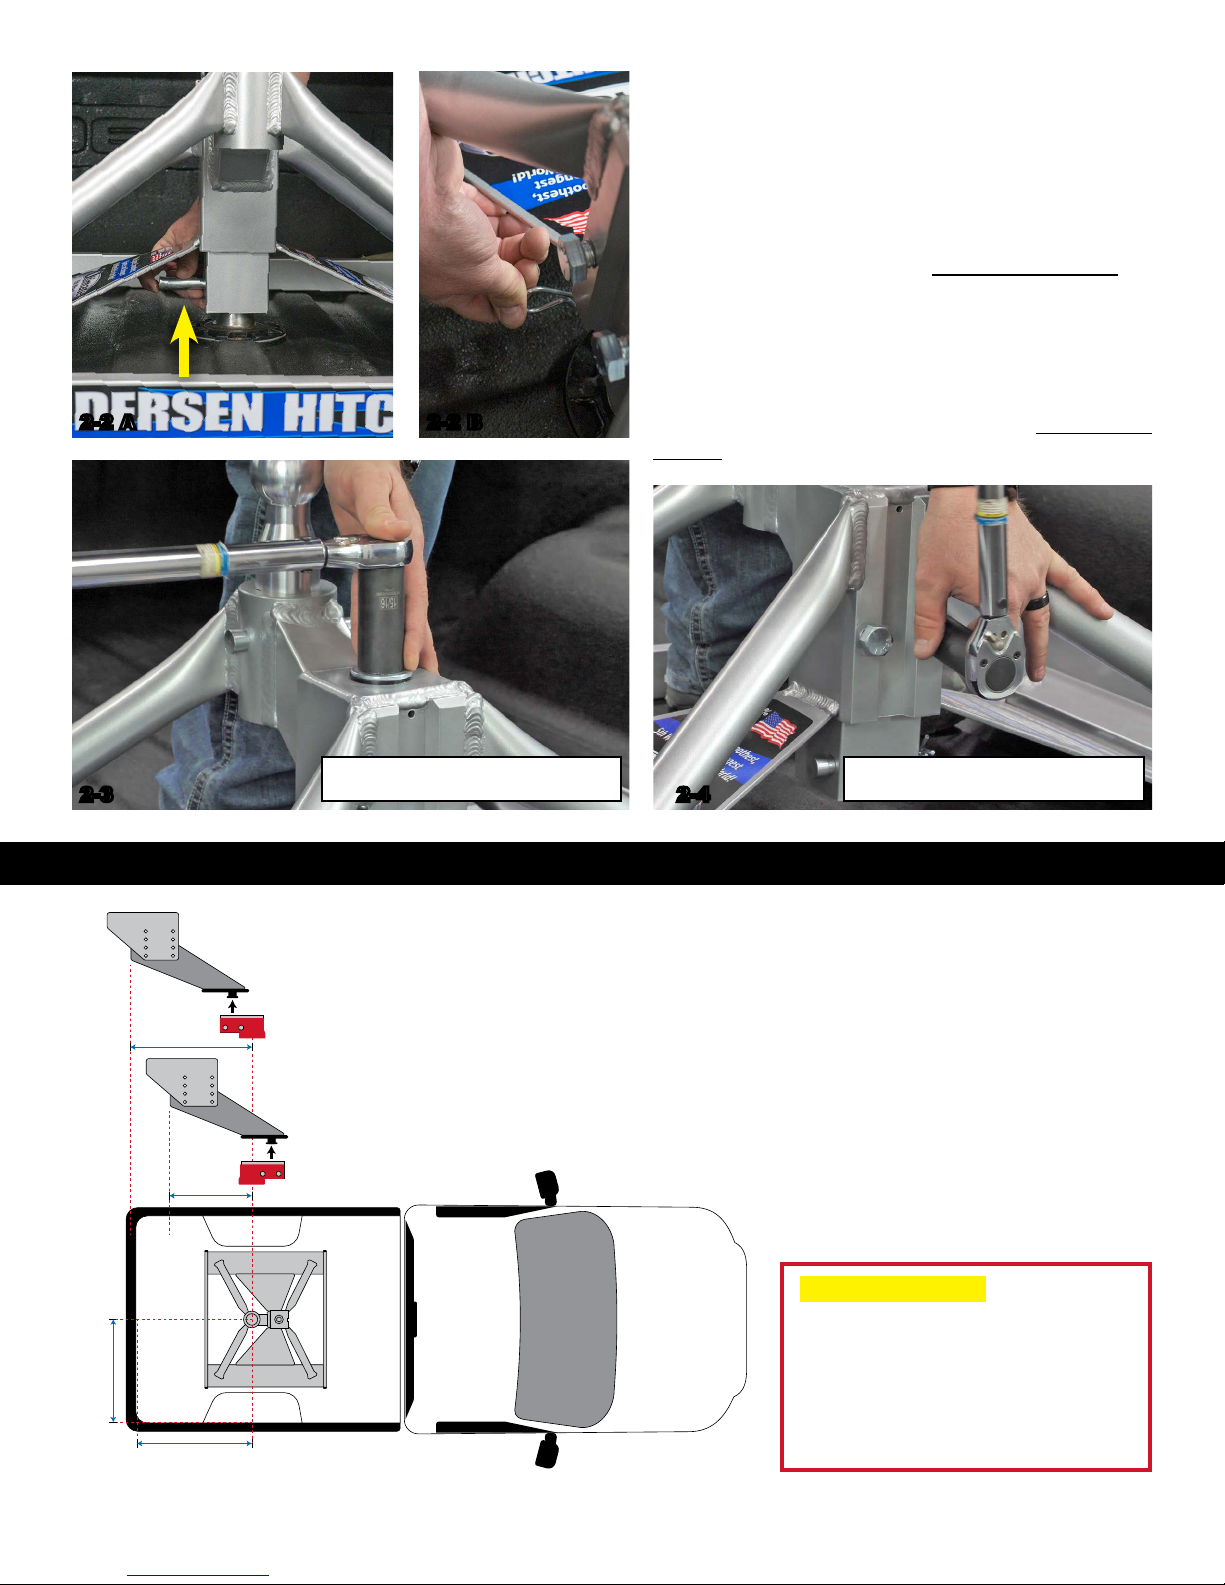
NOTE: Due to tight tolerances, if the trailer and
tow vehicle are angled too much in reference to
each other, the kingpin coupler block may not fully
seat on the ball. This applies to uncoupling the
kingpin coupler as well. If this occurs, the kingpin
coupler block may become ‘stuck’ on the ball.
To alleviate this problem, ensure that the truck
and trailer are somewhat level in reference to
each other. Raise the trailer up to clear the ball,
disconnect your wiring harnesses and any safety
cables and chains, then drive your truck out from
under the trailer.
4-2. Once installed, test the cable to ensure that the
handle moves freely in and out. This will make sure
that the pin attached to the kingpin coupler block is
able to engage and disengage correctly.
Using the remote latch cable:
To engage, simply turn the handle to unlock it,
push the handle until it’s all the way in and then turn
it fully in either direction to lock in place.
To disengage, turn the handle to unlock it, pull the
handle until it’s all the way out and then turn it fully
in either direction to lock in place.
±IMPORTANT The remote latch cable bracket
should be installed so that the cable does not have
any sharp turns or kinks in it. This allows the cable
to operate correctly and prevents it from binding.
For best results, we suggest installing the latch
cable bracket on the opposite side of the pin box
from where the cable enters the coupler block. See
our installation video online for further information.
4-1 A
4-1 B
4-2 A
4-2 B
NOTE: We suggest installing the remote latch
cable bracket at the back of the pin box brackets,
as shown right. If this location does not work on
your trailer, make sure that the latch cable bracket
is installed securely and that the cable and bracket
will not come in contact with the truck side rails.

Page 8 of 12 • Andersen Ultimate 5th Wheel Connection (Gooseneck Mount) Installation Manual 2-2018 • www.AndersenHitches.com
Every time you connect a trailer to a tow vehicle
using the Ultimate 5th Wheel Connection, you
should make sure that all bolts are tightened to
the proper torque specs. Additionally, before each
trip—and regularly during a trip—check all
hardware, bolts and nuts for wear and fatigue.
5-1. With the latch in the open position, back the
tow vehicle underneath the trailer until the Kingpin
Coupler is directly above the Ultimate Ball.
SECTION 5: CONNECTING YOUR TRAILER TO THE BASE UNIT
NOTE: THERE IS NEVER A NEED TO GREASE BALL OR COUPLER
±IMPORTANT Before connecting the
Ultimate Connection base to the kingpin
coupler, make sure that the remote latch
cable is pulled out to the open position.
Failure to do so can result in the trailer not
being secured to the Ultimate Connection
base. It may also cause damage to the coupler
assembly and/or Ultimate Ball.
±IMPORTANT DO NOT FORCE THE LATCH
CABLE HANDLE INWARD. If the handle will not
push in fully, check to make sure that the receiver
is fully seated over the Ultimate Ball.
NOTE: The red ball funnel that is part of your
Kingpin Coupler allows you to easily hook up the
Ultimate 5th Wheel Connection, even when up to
3” off center.
5-2. Lower the trailer until its full weight is resting
on the Ultimate Ball, making sure that the ball is
seated completely inside the coupler block’s ball
socket.
The height of the Ultimate Ball can be adjusted
to allow for trailer leveling or to help with side rail
clearance for longer pin boxes.
5-3. Secure the Coupler Block by pushing in the
remote latch handle and then locking it in place by
turning it a full 90 degrees in either direction.
5-1
5-2
5-3

Page 9 of 12 • Andersen Ultimate 5th Wheel Connection (Gooseneck Mount) Installation Manual 2-2018 • www.AndersenHitches.com
SECTION 6: REMOVING THE BASE UNIT
Before removing the base unit of your Ultimate 5th Wheel Connection, you will need to
open the remote latch cable and disengage the kingpin coupler from the base unit.
Once your 5th wheel trailer is out of the way, you can remove the base and free up your truck bed.
Tip: You can hang your
Ultimate Connection on wall
hooks when not in use.
6-1. Using a 15/16” socket wrench, loosen the
two coupler tube set bolts. Make sure that the
coupler tube set bolts are loose enough to
allow free movement of the coupler tube.
6-2. Using a 15/16” socket wrench, loosen the top
bolt of the square coupler. The Ultimate Base will
now become loose in the bed of the truck, but it is
still connected to the vehicle’s gooseneck ball.
6-3. Remove the hairpin clip from the pin under the
gooseneck ball and then remove the pin from the
coupler block, completely freeing the base from the
tow vehicle’s gooseneck ball.
6-4. Carefully remove the Ultimate Connection
base from the gooseneck ball. You can now take
the base out of the truck bed.
6-1
6-2
6-46-3 B6-3 A

Page 10 of 12 • Andersen Ultimate 5th Wheel Connection (Gooseneck Mount) Installation Manual 2-2018 • www.AndersenHitches.com
POPULAR ADD-ONS for your ULTIMATE 5th WHEEL CONNECTION
Complete Ultimate Base Assembly
Part #3240 / #3240-TBX or #3224 / #3224-TBX (lowered)
Do you use more than one vehicle for towing? No problem!
Add an Ultimate Base Assembly to your other truck(s) to
make hookups fast and easy!
Kingpin Coupler with Funnel
Part #3246
If you have more than one 5th Wheel,
that’s no problem either! Just add an
extra Kingpin Coupler to your other
trailer(s) for fast and easy hook-ups!
Rota-Flex “Lockout” Kit
Part #3247
If you are using an Ultimate 5th Wheel
Connection with a Trailair Rota-Flex Pin
Box, we suggest installing this lockout kit
prior to installing the coupler block.
Rail Mount Ultimate Base
Part #3202
If one of your tow vehicles has rails instead of a gooseneck
ball, we’ve got you covered! The Rail Mount Ultimate Base
Assembly works with your current Kingpin Coupler Block.
Ultimate 5th Wheel Connection Safety Chains
Standard Safety Chain Kit
Part #3230
Do you need safety chains to use with your Ultimate
Connection? This kit includes everything you need for tow
vehicles that have built-in safety chain hookups.
Safety Chain Kit with Plate
Part #3249
Don’t have safety chain hookups in your truck bed? Don’t
worry! Our safety chain plate installs over your gooseneck
ball and provides a convenient hook up point.
Long-Neck 2” Hardball
Part #3665
This specically designed hardball helps
dealers move trailers equipped with the
Ultimate Connection Kingpin Coupler
Block without damaging the ball funnel.
DEALERS
ONLY

Page 11 of 12 • Andersen Ultimate 5th Wheel Connection (Gooseneck Mount) Installation Manual 2-2018 • www.AndersenHitches.com
Ultimate 5th Wheel Connection Limited Lifetime Warranty
WARNING: The weight ratings and certications for the Andersen Ultimate 5th Wheel Connection are intended to represent only the product capability and
in no way reect the capacity or ratings of any towing system it is used with. In many cases, the rating of our hitch will be greater than those of the vehicle
towing system, hitch, and trailer being used with our accessory. We strongly advise the consumer and operator to learn the ratings of the various components
of the towing system and to NOT exceed the limits of the lowest rated component.
LIMITED ONE YEAR WARRANTY: Andersen Mfg. Inc. (“ANDERSEN”) warrants to the original purchaser (“BUYER”), the Andersen Ultimate 5th
Wheel Connection (“PRODUCT”) against latent defects in materials and workmanship under normal use and service, rust, corrosion and ordinary wear and
tear excepted, from the date of retail purchase for the ownership life of the original BUYER, subject to the limitations as set forth below.
If the PRODUCT is latently defective ANDERSEN will replace or repair the PRODUCT and/or associated parts when a proper Return Merchandise
authorization (RMA) number is obtained by the BUYER, and the PRODUCT is returned with transportation charges prepaid to ANDERSEN manufacturing
plant.
ANDERSEN shall not be required to replace or repair any items damaged as a result of improper installation, unauthorized alteration, unreasonable use, or
improper maintenance including, without limitation, loading the PRODUCT beyond the PRODUCT’s rated load capacity, damaged caused by an accident,
sudden impact arising from a collision or other abnormal occurrences. BUYER is responsible for maintenance checks to the PRODUCT on a regular basis.
Since it is beyond ANDERSEN’s control as to what trailers or vehicles the PRODUCT may be used with, and what condition said trailers or vehicles may be
in, ANDERSEN will not warrant or assume liability for damages incurred. It is the responsibility of the BUYER to have the trailer braking system checked
and maintained on a regular basis. ANDERSEN does not warrant against discontinuation of PRODUCT, acts of God, defects in items or components not
manufactured by ANDERSEN, or against damages resulting from such non-ANDERSEN made products or components. ANDERSEN passes on to BUYER
the warranty it received (if any) from the maker thereof of such non-ANDERSEN made products or components. This warranty also does not apply to
PRODUCT upon which repairs have been affected or attempted by persons other than pursuant to written authorization by ANDERSEN.
THIS WARRANTY IS EXCLUSIVE. To the extent allowed by law, ANDERSEN shall not be liable for any incidental, consequential, or any other damages
including, without limitation, breach of any implied warranty, merchantability, or tness of the PRODUCT for a particular purpose. The sole and exclusive
obligation of ANDERSEN shall be to repair or replace the defective PRODUCT in the manner stated above. ANDERSEN shall not have any other obligation
with respect to the PRODUCT or any part thereof, whether based on contract, tort, strict liability, or otherwise. It is understood that the seller’s liability,
whether in contract, in tort, under any warranty, in negligence or otherwise, shall not exceed the return of the wholesale amount of the purchase price paid
by the BUYER. Under no circumstances, whether based on this Limited Warranty or otherwise, shall ANDERSEN be liable for incidental, special, or
consequential damages. The price stated for the PRODUCT is considered in limiting ANDERSEN’s liability.
ANDERSEN’s employees, representative’s or Dealers ORAL OR OTHER WRITTEN STATEMENTS DO NOT CONSTITUTE WARRANTIES, shall not be
relied upon by BUYER, and are not a part of the contract for sale or this limited warranty.
This warranty does not include labor charges nor does it include transportation charges for returning the PRODUCT to the consumer. Removal, shipping and
installation of the replacement PRODUCT or replacement parts shall be at BUYER’s expense.
Return Merchandise Authorization (RMA) and warranty procedure may be obtained by visiting Andersen’s website at www.andersenhitches.com and clicking
on ‘Return Policy’ at the bottom of the page, or by calling our customer service department at 1-800-635-6106.
Warranty Registration and Validation
Andersen Ultimate Connection 5th Wheel Hitch
To register your Ultimate 5th Wheel Connection, simply visit
www.AndersenHitches.com/register and complete your registration online.
Andersen’s $5 Million Limited Supplemental Warranty for the Ultimate 5th Wheel Connection
If the original purchaser (“purchaser”) or dealer (on behalf of an original purchaser) is denied written warranty coverage by an RV manufacturer, trailer-frame
manufacturer or ‘King Pin’ manufacturer, because of purchaser’s use of the Andersen Ultimate 5th Wheel Connection (gooseneck or rail mount), and it is
shown that the warranty was properly and legally voided by manufacturer as a result of purchaser’s use of the Andersen Ultimate 5th Wheel Connection, then
Andersen Manufacturing (d.b.a. Andersen Hitches) will reimburse purchaser for any and all amounts that would have been covered by the manufacturer’s
original warranty, up to $5,000,000 (ve million dollars), and in such event, Andersen will also pay the purchaser an additional $500 (ve hundred dollars) for
the inconvenience.
Certain Requirements and Restrictions Apply, scan the QR code at right or visit
andersenhitches.com/Catalog/ultimate-connection-warranty.aspx
and click on “$5 Million Warranty” at the bottom of the page for more information.

Other manuals for Ultimate 5th Wheel Connection
1
Table of contents
Other Andersen Hitches Automobile Accessories manuals