Andrew James AJ000641 User manual

1
Please read the manual fully before using the appliance and keep the
manual safe for future reference.
Commercial Sealer
Pour la version française veuillez consulter notre site de web
www.andrewjamesworldwide.com
Die deutsche Version nden Sie auf unsere Webseite
www.andrewjamesworldwide.com

2
Important Safeguards
When using any electrical
appliance, basic safety
precauons should always be
followed, including:
This appliance can be used by
children aged from 8 years
and above and persons with
reduced physical, sensory or
mental capabilies or lack of
experience and knowledge if
they have been given
supervision or instrucon
concerning use of the
appliance in a safe way and
understand the hazards
involved. Children shall not
play with the appliance.
Cleaning and user
maintenance shall not be
made by children unless they
are older than 8 and
supervised. Keep the
appliance and its cord out of
reach of children less than 8
years old.
Always ensure the voltage on
the rang label corresponds
to the voltage in your home.
Check the power cord and
plug regularly for any
damage. If the cord or the
plug is damaged, it must be
replaced by a qualied
electrician or a service repair
centre. If in doubt please
contact our customer service
team.
Incorrect operaon and use
can damage the appliance
and cause injury to the user.
Do not use the appliance if it
has been dropped or
damaged in any way. If the
unit has been damaged take
the unit for examinaon and
or repair by an authorised
service agent.
Do not immerse or expose
the motor assembly, plug or
the power cord in water or
any other liquid for any

3
reason.
If the supply cord is
damaged, it must be
replaced by the
manufacturer or by someone
who is suitably qualied to
avoid a potenal hazard.
Do not let the cord hang over
the edge of a table or
counter. Ensure that the cord
is not in a posion where it
can be pulled or tripped over
accidentally.
Do not allow the cord to
touch hot surfaces and do
not place the cord near hot
gas, electric burners or in a
heated oven.
Always operate the appliance
on a smooth, even and stable
surface. Do not place the unit
on a hot surface.
Always remove the plug of
the appliance safely. Do not
pull on the appliances cord to
remove the appliance plug
from the electrical socket.
Use of an extension cord
with this appliance is not
recommended. However if it
is necessary to use an
extension cord, ensure that
the extension cord is equal to
or greater than the power
consumpon of the
appliance to avoid
overheang of the appliance
and extension cord. Do not
use any other appliance on
the extension cord. Do not
place the extension cord in a
posion where it can be
pulled on by children or
animals or be tripped over.
Always operate the appliance
on a smooth, even and stable
surface. Do not place the unit
on a hot surface.
Always remove the plug of
the appliance safely. Do not
pull on the appliances cord to

4
remove the appliance plug
from the electrical socket.
Never handle or operate the
appliance with wet hands or
with bare feet.
Do not immerse any part of
the appliance in water or
liquid.
Appliance specic safeguards
Do not use any bags or
aachments not
recommended for this
machine.
Do not touch the hot sealing
elements located on the
edge of the top cover of this
machine as this may cause
burning.
5
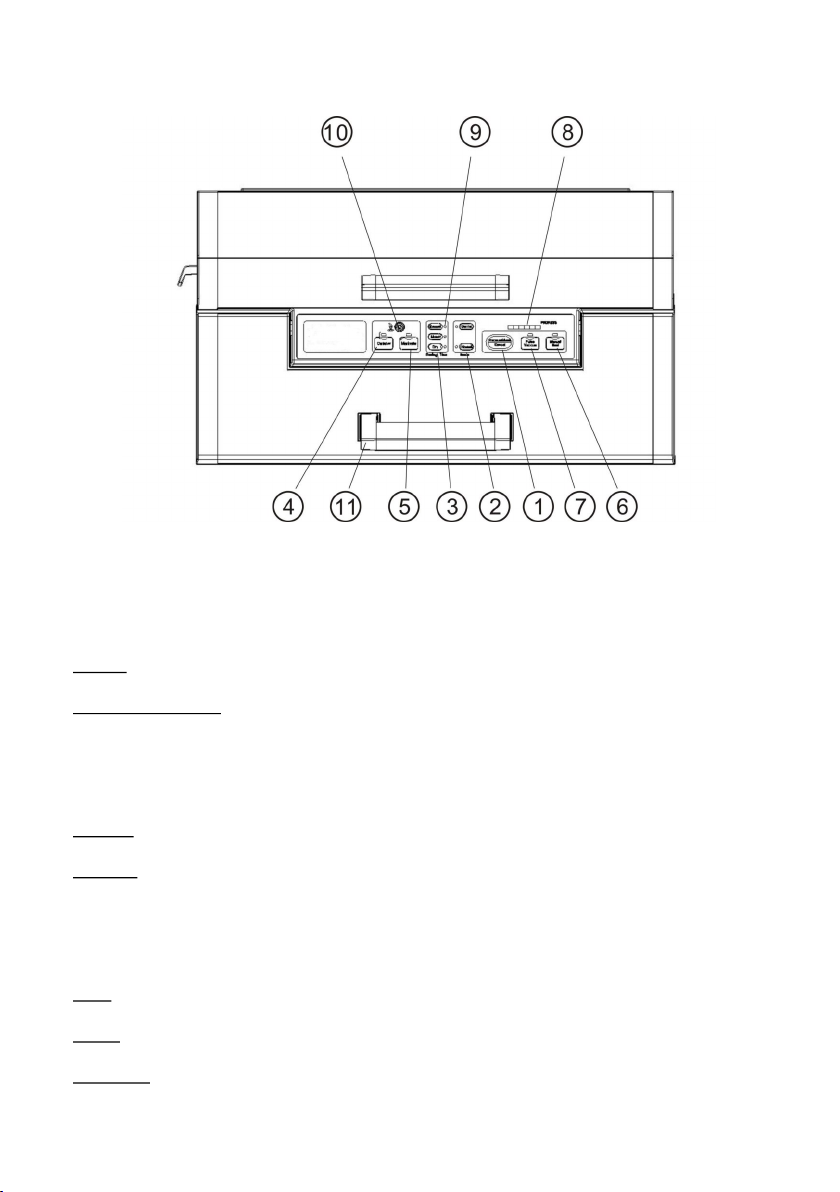
Appliance Funcons
1. Vacuum and seal/cancel
This buon has two funcons depending on the machines status:
Cancel: Stops the operaon of the machine.
Vacuum and seal: At working condion, vacuuming or sealing
2. Vacuum
There are two buon opons to select the vacuum pressure:
Normal: For regular item storage in normal vacuum pressure.
Gentle: For so, crushable item storage where less pressure is desired.
3. Sealing me
There are 3 buons opon for a choice of sealing me:
Dry: For bags without moisture content, requires a shorter heat sealing me.
Moist: For bags with wet contents, a normal heat sealing me.
Extended: For bags with very wet/moist foods, an extended heat sealing me.

6
4. Canister: To vacuum canisters
through a hose.
5. Marinade: To marinate food in a mar-
inang bowl or canister.
6. Manual Seal
This buon can be used to seal the open
end of a bag without using the vacuum
funcon, it can also be used to make a
bag from a bag roll. When the ‘Vacuum
& Seal’ funcon is in operaon this
buon stops the motor pump and starts
to seal the bag so there is less vacuum
pressure in the bag and it can be con-
trolled by the user. The appliance needs
to cool down for 15 seconds aer each
sealing cycle.
7. Pulse Vacuum
Press the Pulse Vacuum buon and the
appliance will start to vacuum; let go
and the sealer stops. This can be repeat-
ed unl the bag is vacuumed to require-
ment. The bag can then be sealed using
the Manual Seal buon.
8. Progress LED Indicators
The indicators show the progress of all
working processes.
9. LED Indicators
Indicates the status of the vacuum/seal
process.
10. Hose Port
To insert the hose for the canister be-
fore marinang or canister operaons.
11. Front Handle
Press down to lock the cover. Pull to
li the cover.
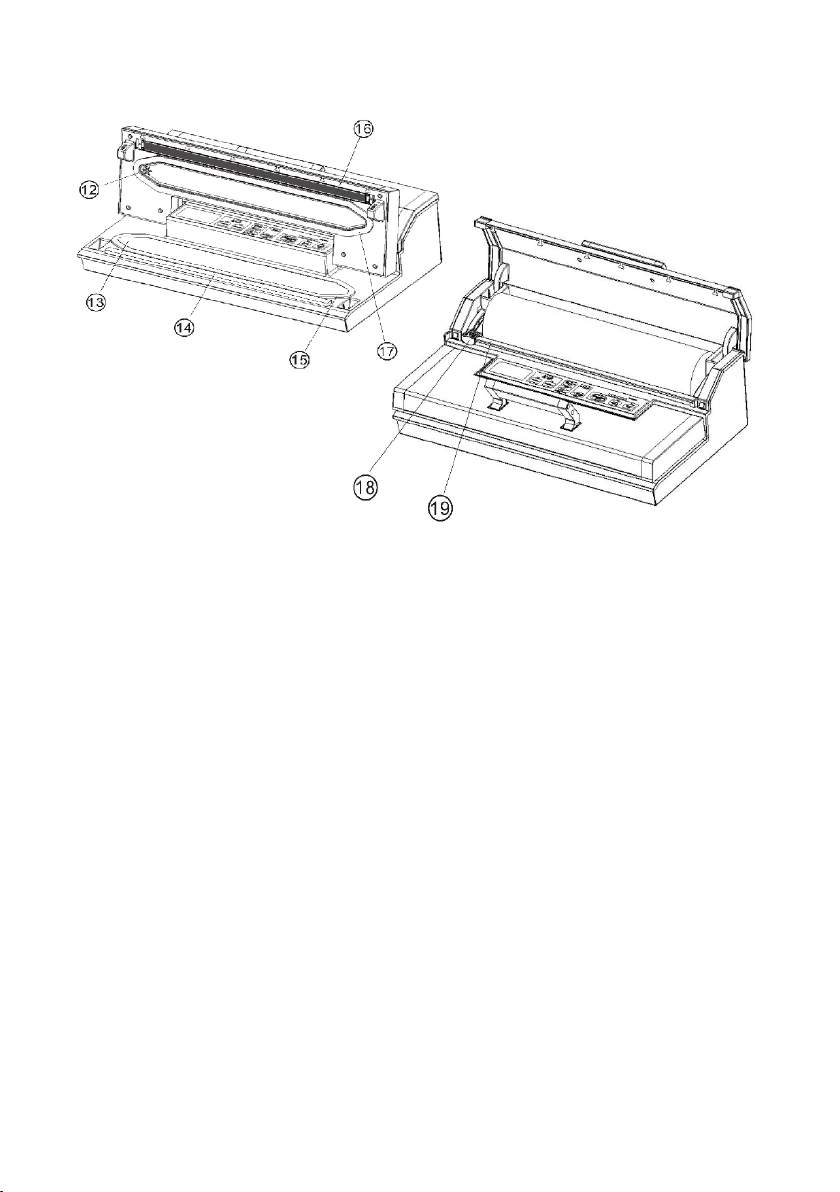
12. Air Intake
Air intake connects with the vacuum
chamber and pump. The air intake in-
let must not be covered when placing
the vacuum bag for vacuum and seal
operaons.
13. Vacuum chamber
When the open end of the bag is placed
in the chamber, the air is drawn out of
the bag and also catches any liquid
overowing from the bag.
7
14. Sealing Strip
Place the vacuum bag over the strip to
be vacuum sealed. The strip needs to be
cleaned and dried, and replaced if
broken. For a replacement contact our
customer services (Contact details pg.
19)
15. Lower Gasket
This keeps air away by forming a vacuum
chamber with the upper gasket in the
vacuum chamber. The gasket needs to
be cleaned and dried, and replaced if
broken. For a replacement please
contact our customer services (Contact
details pg. 19).
16. Sealing element
Teon-coated heang element which is
hot and seals the bag.
17. Upper Gasket
This keeps air away by forming a vacuum
chamber with the lower gasket in the
vacuum chamber. The gasket needs to
be cleaned and dried, and replaced if
broken. For a replacement contact our
customer services (Contact details pg.
19).
18. Bag Cuer
Press and slide in either direcon to cut
bags to desired size.
19. Cuer rack
Supports the cuer to slide along.

8
Making a bag with a bag roll
1. Plug the appliance into a power source. Turn the
switch located at the back of the appliance to “I”.
2. Open the top cover.
3. Make sure the bag cuer is at one end of the cuer
rack. Li and push back the cuer rack. (Fig. 1)
4. Pull the bag roll to the length required. (Fig.2)
5. Put the cuer rack down on top of the bag roll.
Slide the cuer from one side to the other, to cut the
bag. (Fig.3)
6. Place one open end on the sealing strip, ensuring it
doesn’t enter the vacuum chamber. (Fig.4)
7. Close the upper lid, pressing unl it clicks into place.
(Fig.5)
8. Press “Manual Seal” to start sealing the bag. (Fig.6)
9. Once complete, li the front handle to open the
cover. Take the bag out of the machine ready to ll.
(Fig.7)
Fig. 1
Fig. 2
Fig. 3
Fig. 4
Fig. 5
Fig. 6
Fig. 7

9
Vacuum packaging with a bag
1. Place food items inside a clean vacuum bag.
2. Clean and straighten the open end of the bag ensuring
there is no food debris, wrinkles or ripples.
3. Place the open end of the bag in the vacuum
chamber area. Make sure the air intake is not
covered by the bag. (Fig.1)
4. Push the cover down and press the front handle to
lock the cover. (Fig.2)
5. Select the seng according to the moisture
content of your food (Dry, Moist, Extended).
6. Select the desired vacuum pressure according to
the type of food you are vacuum sealing.
7. Press the “Vacuum & Seal” buon and the appliance will vacuum and seal
the bag automacally. (Fig.3)
Note: The vacuum sealer provides high vacuum pressure during the vacuum
process. The food you wish to seal may require a more gentle opon to avoid
crushing or damage. If the food has a high moisture content it may not progress as
well. Observe the LED progress on the control panel and switch to the “Manual
Seal” opon if required.
8. Once the vacuum packing is complete, li the handle
to open the cover and take out the packed bag .
(Fig.4)
Note:
For best sealing eect, allow the appliance to cool down for one minute
before using again. Clean the vacuum chamber, wiping away any food
residue, aer each bag is sealed.
The appliance will overheat if used connuously. The unit will go into cool
down mode for 30 seconds, the rst progress LED will ash, and the vacuum
seal operaon will be rejected during cool down mode.
Fig.1
Fig.2
Fig.3
Fig.4
10
The appliance will only work with the vacuum sealer bags/rolls provided.
Can be purchased separately at www.andrewjamesworldwide.com
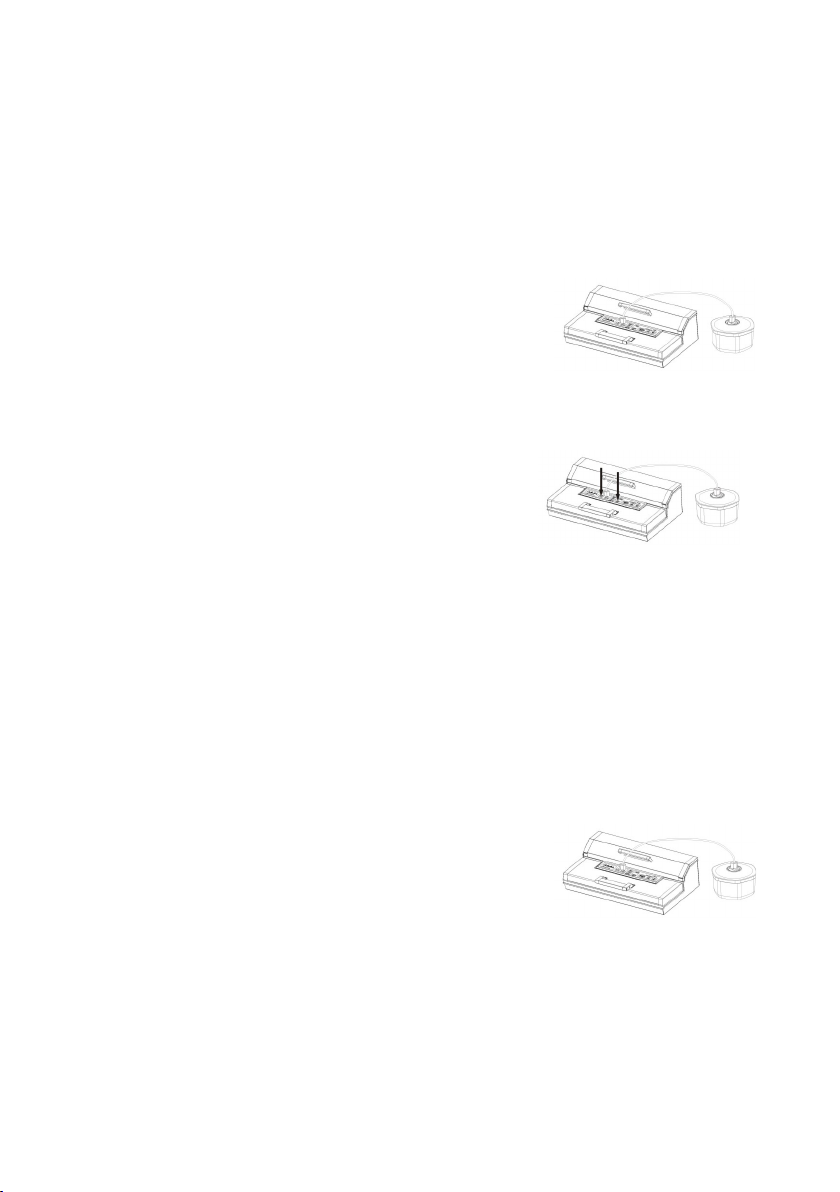
Vacuuming in a canister (Can be bought at www.andrewjamesworldwide.com)
1. Clean the canister cover and base ensuring they are clean and dry.
2. Place the items into the canister. Do not over ll. Ensure the cover
has a good contact with the canister bowl rim.
Clean the cover rim of the canister and boom
seal gasket of the canister cover.
3. Insert one end of the hose into the air intake and
the other end of the hose into the centre hole of the canister cover. (Fig.1)
4. Turn the canister to lock the “seal”.
5. Check the LED status of “Vacuum” and make
sure it is at “Normal” seng.
6. Press the canister buon to start vacuuming.
(Fig.2)
To ensure there is no air leaking between the cover and the canister, push
down on the cover with your hand at the beginning of the vacuuming
work. The appliance will stop automacally when enough pressure is
achieved.
7. Take out the hose tube from the canister as soon as the vacuum sealing is
complete.
Opening canister aer vacuum packing
In order to open the canister you need to press the
“Release” buon on the canister.
Marinang meat in a canister bowl– Hose accessory and canisters sold separately
at www.andrewjamesworldwide.com
1. Take out the hose accessory from the inside cover. Insert it into the canister
port on the appliance control panel and in the centre hole of the canister
cover. (Fig.1)
Fig.1
Fig.2
Fig.1

11
2. Check the LED status of “Vacuum” to conrm the desired vacuum pressure
(Normal/Gentle) according to the food in the canister. The default mode is
“Normal”.
3. Press Marinate. The vacuum will work for 5
cycles, vacuuming then releasing the air. The
whole marinate process will take approximately
6 minutes.
4. When the Marinate light goes out, the process is complete. Remove the
hose from the canister cover and canister port.
Cord Storage
Once the power cord is unplugged, it should be stored in the cord storage at the
rear of the appliance. Do not wrap the power cord around the appliance.
Vacuum Sealer Storage
Store on a at, stable surface.
Keep out of reach of children.
Do not keep the lid of the sealer locked when not in use or storing. Locking
the cover will damage the foam gaskets causing problems when sealing.
Fig.2

12
Nothing happens
when I try to
vacuum package.
Check the power cord to ensure it is rmly plugged into the
power supply.
Check switch is set to “0”.
Check to see if the handle has been fully pushed down.
Examine power cord for any damages.
Make sure the bag is placed correctly inside the vacuum
chamber and beneath the air intake.
To seal properly the open end of the bag should be placed
enrely inside the vacuum chamber area.
Air is not removed
from the bag
completely.
Check the sealing strip and the foam gasket ensuring there is
no debris and is in the correct posion. Ensure the gasket is
not broken or distorted. Wipe clean and smooth back into
place.
Check there is no leak in the vacuum bag.
Use the vacuum bags recommended by the supplier.
Leaks along the seal caused by wrinkling, food and liquids can
cause inadequate vacuum. Reopen the bag, wipe the top
inside the bag and reseal.
The appliance does
not turn to seal
aer vacuuming.
There is a vacuum pressure sensor built into the appliance. If
the vacuum pressure inside the bag is not at the
predetermined standard the appliance will not seal the bag.
Check the sealing strip and the foam gasket for any debris
and to ensure the posioning is correct.
Ensure the foam gaskets are not broken or distorted. Take
them out of the grooves, wash and dry; or replace with a new
gasket (supplied by www.andrewjamesworldwide.com)
Troubleshoong

13
The vacuum bag may have a leak. To test, seal the bag with
some air in it, submerge in water and apply pressure. Any
bubbles indicate there is a leak.
If the food contains a high amount of liquid, it is recommend-
ed to freeze it. Please take into account some foods are not
suitable for freezing
Leaks along the seal caused by wrinkling, food and liquids can
cause inadequate vacuum. Reopen the bag, wipe the top
Air has re-entered
the bag aer being
sealed.
Leaks along the seal caused by wrinkling, food and liquids.
Reopen the bag, wipe the top inside the bag and smooth out
any wrinkles then reseal.
Fruits and vegetables release natural gases and some foods
can ferment. If the food has begun to spoil, discard. If the
food has not been refrigerated or the temperature in the
refrigerator has uctuated, this can cause the food to spoil.
Check the bag for punctures which may have released the
vacuum. If vacuuming foods with sharp points such as bones,
cushion the edges with paper towels.
The bag melts If the sealing strip or heang element overheat and melt the
Only use bags supplied. To order more bags go to
www.andrewjamesworldwide.com
Check the hose is well connected to both the canister and the The canister will not
vacuum
Check the knob on the canister is in the posion of “seal”.
Press the lid at the beginning of vacuuming to avoid leaking
Check the canister for damage. Replace if necessary.
Check the vacuum funcon is working properly.
Clean the rim of the canister.

14
UK and EU Guarantee
Your new Andrew James product comes
with a 24 month guarantee and a 2 year
xed warranty, eecve from receipt
conrmaon. Your receipt or order
number is required as proof of purchase
date so it is imperave that you keep it
safe. This guarantee only applies if the
item has been used solely for the use
intended, and all instrucons have been
followed accordingly.
Abuse of your product will invalidate the
guarantee. Returned goods can only be
accepted if repackaged properly within
the original colour product box, and
presented with the original receipt of
sale/order number. This does not aect
your statutory rights.
Returned products must be cleaned and
returned to us in as close to delivery
condion as possible.
If your product develops a problem
within the rst 12 months of the xed
warranty, we will pay all shipping costs
to have it returned to us. Aer 12
months the customer will be liable for
the cost of returning the product to us.
We will then pay to have the repaired/
replaced item shipped back to the
customer.
If you wish to return your item for a full
refund, you have the right to do so
within the rst 30 days, however we will
deduct the cost of shipping from the
value of the refund.
Customers are responsible for any
taxes applied to our products when
they are shipped outside of the EU.
All of our prices are inclusive of VAT.
Once a product has been returned to
us, we will aim to repair or replace it
within 30 days of receipt.
The guarantee does not cover any
defect arising from improper use,
damage, build-up of lime scale or repair
aempts made by third-pares. Also,
the guarantee does not cover normal
wear and tear of individual parts.
Electrical Informaon
Always ensure the voltage on the rang
label corresponds to the power supply
where the product is being used.
WARNING! This product must be
connected to an earthed electrical
power supply. The green/yellow
conductor in the supply cord must be
connected to the Earth terminal in the
plug. The power supply must have an
Earth connecon.
Precauons should be followed for safe
cable management and connecon to
the power supply
If a new mains plug needs to be ed
follow the ng instrucons supplied
with good quality BS1363A plugs. If in

15
doubt consult a qualied electrician or
appliance repair agent.
Recommended fuse: 13A.
If an extension cable is required, it must
have an earth conductor. To avoid
overheang the extension cable should
be rated no less than 13A and be fully
unwound before use.
Do not aempt to modify electrical plugs
or sockets or aempt to make an
alternave connecon to the electrical
supply.
Disposal of the appliance
Waste Electrical & Electronic
Equipment (WEEE) Waste & Recycling
Disposal of Electrical and Electronic
Waste
Non-household waste. This product
must not be disposed of together with
ordinary household waste.
Separate collecon of used products,
baeries and packaging allows the
recovery and recycling of materials. Re-
use of materials helps prevent environ-
mental polluon and reduces the
demand for raw materials.
Local authories, retailers and
collecon organisaons may provide
for separate collecon of elec-trical
products, baeries and packaging.
Safely dispose of the old plug.
Connect the brown lead to the live
terminal “L” in the new plug.
Connect the blue lead to the neu-
tral “N” terminal.
Connect the green/yellow lead to the
earth “E” terminal.

16
Contact details
Andrew James UK LTD
Unit 1
P C Henderson Premises
Bowburn North Industrial Estate
Bowburn
Co Durham
DH6 5NG
Customer Service / Technical Support
Telephone: 0844 335 8464
Email: customerservices@andrewjamesworldwide.com
Web: www.andrewjamesworldwide.com
Twier: @andrewjamesltd
Facebook: Andrew James
Copyright Andrew James
Pour la version française de ce noce veuillez visiter notre site:
www.andrewjamesworldwide.com
Bie nden Sie die deutsche Version dieser Bedienungsanleitung auf unserer
www.andrewjamesworldwide.com
AJ000641
09/2016
Table of contents
Other Andrew James Food Saver manuals

Popular Food Saver manuals by other brands

SEVERIN
SEVERIN FS-3604 Instructions for use

Loveshaw
Loveshaw Little David LD24 Operator's manual

BEER
BEER Uno Top Hot Instructions for Installation and Start-up

Hamilton Beach Commercial
Hamilton Beach Commercial HVC254 Operation manual

Hamilton Beach
Hamilton Beach 78217 manual

Harbor Freight Tools
Harbor Freight Tools 43476 Assembly instructions


