Electric Sand™ Timer - by AAnneellaaccee
This package contains a timer and 3 “AA” batteries.
Congratulations! You’ve chosen the Anelace “Electric Sand” Timer.
It resembles a standard sand timer but has the distinct advantage of
allowing you to set and read with precision a measured time between 1
minute and 60 minutes. Also, whenever the timer is running, additional
time - up to the maximum full-scale of 60 minutes - can be added.
When the time runs out, the display flashes and an audible alarm alerts
you.
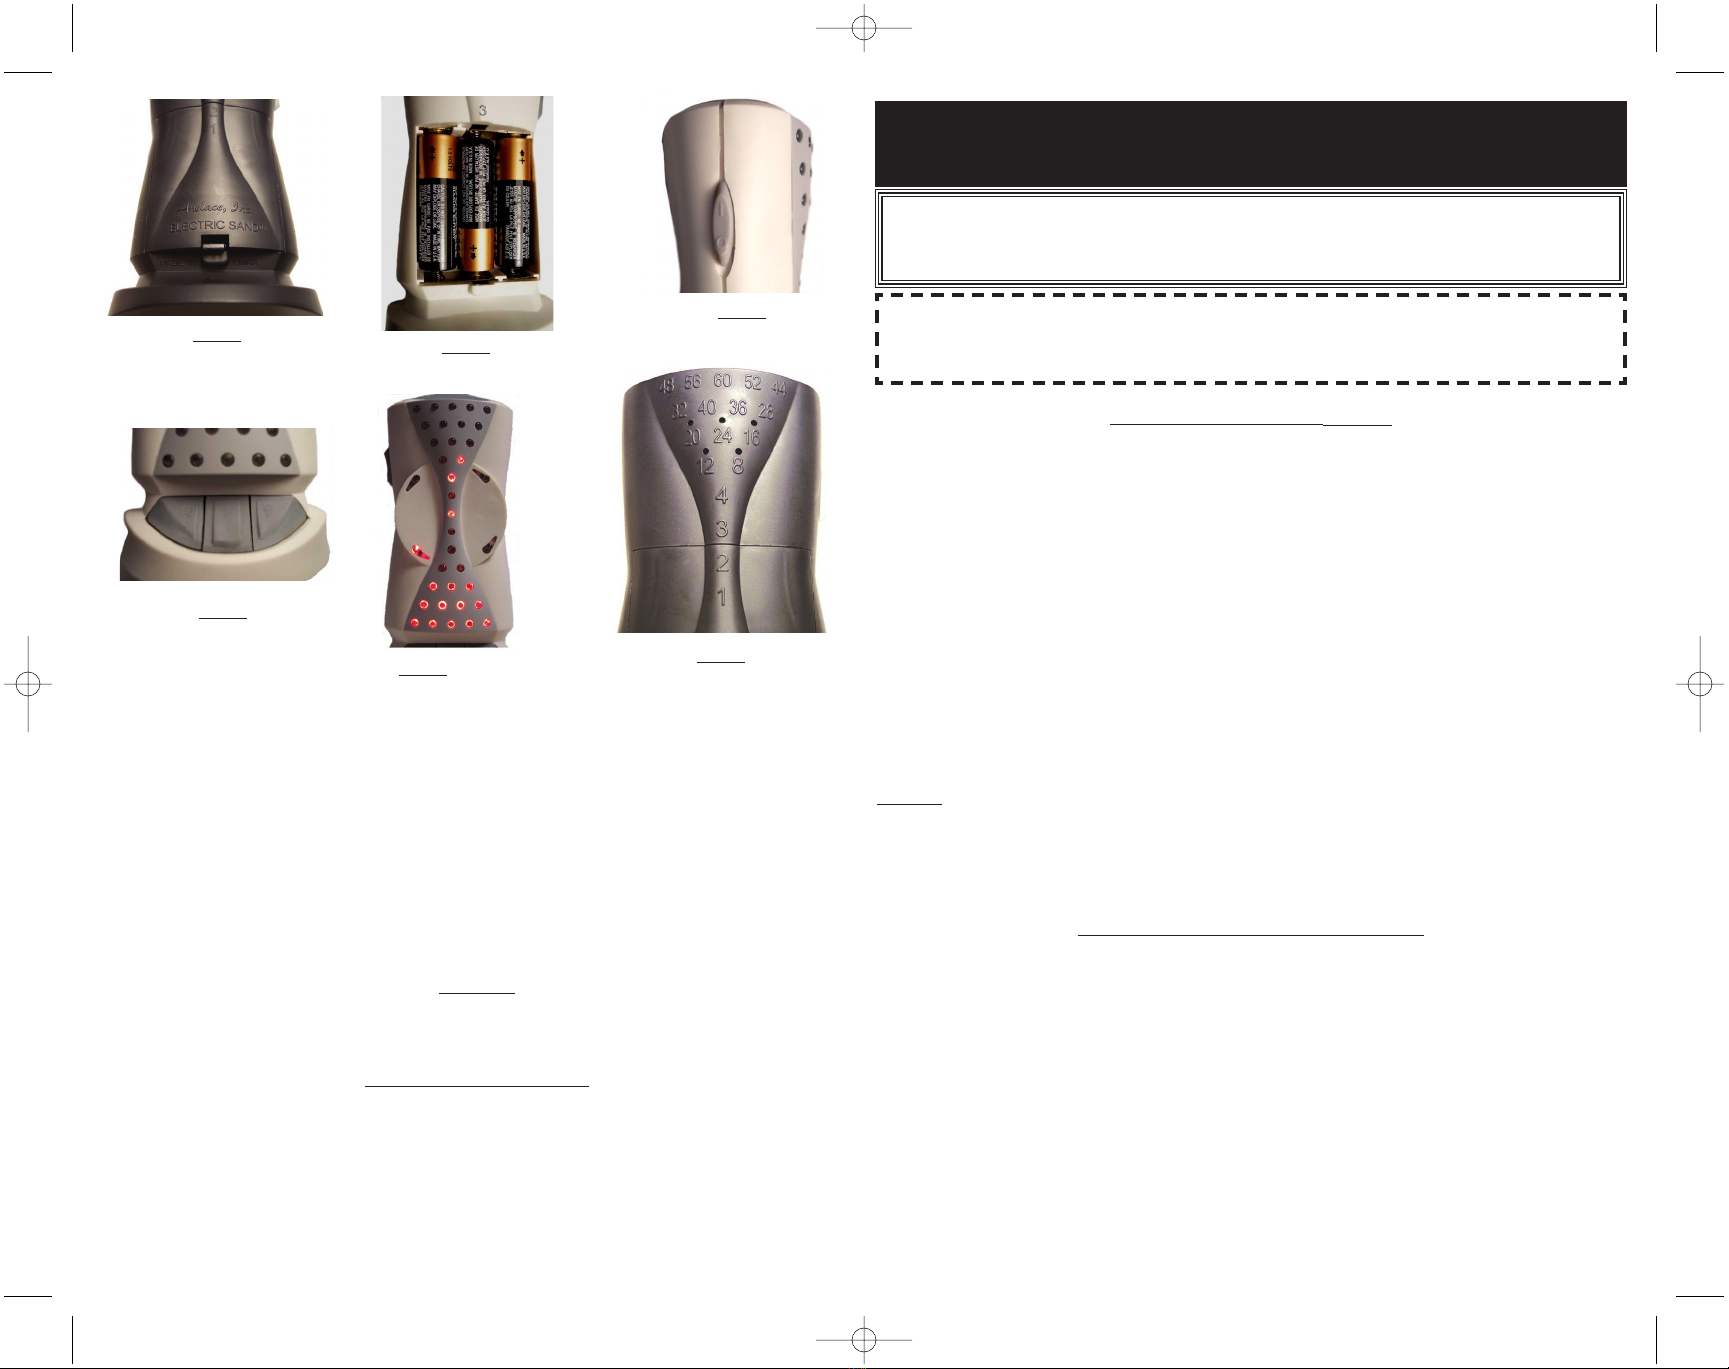
Getting started: On the rear of the timer, remove the battery cover by
lifting up on the release latch (Fig. 1) and pulling lightly. Install the three
‘AA” batteries in the directions indicated in the markings (Fig. 2). Replace
the battery cover by catching the upper tab, then push the lower edge
until it clicks into place.
Turning on the timer: To start the timer, slide the Battery Save switch
(Fig. 3) to the upper position. The bottom 15 LEDS will light up. [If they
don’t, verify that the batteries are charged and are installed correctly.]
Starting or Adding time: There are three buttons on the bottom edge of
the timer (Fig. 4). With each push, the buttons will add 10 minutes, 5
minutes, and 1 minute, respectively. For example, to set the timer for 20
minutes, push and release the “10” button twice. As soon as a button is
pushed, the timer will start counting down. This will be indicated by the
circular sweep of the LEDs in the disk in the center of the timer.
Note: These complete a full circle each second.
The maximum time (all top 15 LEDs lit) is 60 minutes. The minimum time
is 1 min. The minimum increment is 1 min.
When the time runs out: When the preset time has elapsed, the bottom
array of 15 LEDs will begin to flash on and off continuously. The buzzer
will activate 4 times. Thereafter, until the timer is turned off or additional
time is added, the buzzer will beep about twice per minute as a reminder.
After about 1/2 hour, the unit will enter sleep mode and extinguish lights
and buzzing.
Clearing the Timer/Clearing the Time-out Alerts
To stop the timer - or to stop the flashing lights and buzzer after timing
out - press down and release the button on the top of the timer.
Battery Life: To maximize battery life, slide the Battery Save switch (Fig.
3) to its Down position whenever you’re done using the timer.
Reading the Timer: If you need to know the precise time remaining, you
can tell how much time is left on the timer in one of 2 ways:
1) Each lit LED in the top array of 15 is equal to four minutes. Add the
value from the 3 ‘neck” LEDs: The top LED is worth 3 minutes, the middle
one is 2 minutes, and the bottom is 1 minute. Fig. 5 shows the pattern at
10 minutes [2 LEDs x 4 minutes + the middle neck LED is 2 minutes
more.]
2) Follow the guide molded on the back of the timer (Fig. 6): Find the
position of the highest value of the lit LEDs, and add the minutes
described by the ‘neck” LEDs. In Fig. 6, the LED in the “8” position is lit,
as is the “2” in the neck LEDs. 8+2=10 minutes remaining.
Note that it displays “10” just up until the moment when the time
decreases to 9 minutes.
Temporizador “Electric Sand™” - por AAnneellaaccee
Este paquete contiene un temporizador y 3 baterías “AA”.
¡Felicitaciones! Usted a seleccionado el temporizador “Electric Sand”, producto
de Anelace.
El temporizador se parece a un temporizador de arena estándar, pero tiene una
marcada ventaja de permitirle sincronizar y leer con precisión un tiempo medido
de entre 1 y 60 minutos. Asimismo, cada vez que el temporizador esté
funcionando, se le podrá agregar tiempo—hasta la escala máxima de 60
minutos.
Cuando se agota el tiempo, el visualizador (display) empieza a destellar y una
alarma audible le alerta.
Dar inicio: En la parte posterior del temporizador, quite la cubierta de las
baterías levantando el pestillo de desenganche (Fig. 1) y jalando suavemente.
Instale las 3 baterías ‘AA” en las direcciones que indican el diagrama (Fig. 2).
Vuelva a colocar la cubierta de las baterías enganchando la parte superior;
luego presione la orilla inferior hasta que se sujete en su lugar (haga “clic”).
Activación del temporizador: Para activar el temporizador, deslice el
interruptor (switch) de ahorro de batería (“Battery Save”) (Fig. 3) hacia la
posición superior. Se iluminarán en la parte inferior, los 15 diodos emisores de
luz (LEDs, por sus siglas en inglés). [Si no se iluminan, verifique que las
baterías estén cargadas y colocadas de manera correcta.]
Iniciar o agregar tiempo: La orilla inferior del temporizador tiene tres (3)
botones (Fig. 4). Cada vez que los presione, los botones agregaran 10, 5 y 1
minuto, respectivamente. Por ejemplo, para programar el temporizador por 20
minutos, presione y suelte 2 veces el botón “10”. En cuanto se presiona un
botón, el temporizador iniciará la cuenta regresiva. Esto será indicado por el
movimiento circular de los LEDs en el disco en el centro del temporizador.
Nota: Los LEDs realizan un círculo completo cada segundo.
El tiempo máximo (los 15 LEDs superiores iluminados) es de 60 minutos. El
tiempo mínimo es de 1 minuto. El incremento mínimo es de 1 minuto.
Cuando el tiempo se agota: Cuando ya transcurrió el tiempo preprogramado,
la serie inferior de 15 LEDs empezará a destellarse y apagarse continuamente.
El zumbador se activará 4 veces. Posteriormente, y hasta que se apague el
temporizador o se le agregue tiempo, el zumbador sonará unas 2 veces por
minuto como un recordatorio. Después de aproximadamente media hora, la
unidad entrará en la función de dormir y apagará las luces y el zumbido.
Para borrar la programación del temporizador / borrar las alertas de tiempo límite
Para parar el temporizador - o parar las luces destellantes y el zumbador
después del tiempo límite - presione y suelte el botón en la parte superior del
temporizador.
Duración de la batería: Cuando termine de usar el temporizador y para
maximizar la duración de la batería, deslice el interruptor de “Battery Save”
(Fig. 3) hacia abajo, en la posición de “Down”.
Interpretar / leer el temporizador: Si necesita saber el tiempo preciso que
queda en el temporizador, usted lo podrá determinar de dos formas:
1) Cada LED iluminado en la serie superior de los 15 LEDs equivale a 4
minutos. Sume el valor de los 3 LEDs “cuello”: El LED superior vale 3 minutos,
el medio vale 2 minutos y el inferior vale 1 minuto. La Fig 5 muestra el patrón
de 10 minutos [2 LEDs x 4 minutos + el LED medio es de 2 minutos
adicionales.]
2) Siga la guía en la parte posterior del temporizador (Fig. 6): Encuentre la
posición del valor más alto de los LEDs iluminados y sume los minutos
descritos por los LEDs “cuello”. En la Fig. 6, el LED en la posición “8” está
iluminado, al igual que el “2” en los LEDs “cuello”. 8 + 2 = 10 minutos restan.
Nótese que muestra “10” justo hasta el momento en que el tiempo disminuye a
9 minutos.
Electric Sand™ Minuteur Sablier Electronique de AAnneellaaccee
Cet emballage contient un sablier électronique et 3 piles AA
Félicitations! vous avez le Minuteur Anelace « Sablier Electronique ».
Il ressemble à un sablier/minuteur standard, mais il a l’avantage particulier de
vous permettre de fixer et de mesurer le temps de manière précise entre une
minute et 60 minutes. A tout moment lorsque le sablier est en marche et
décompte les minutes vous pouvez ajouter un délai
supplémentaire. Lorque le temps fixé est écoulé le sablier émets des flashs et
un signal sonore
Installation: Ôtez le couvercle de piles à l’arrière du minuteur en soulevant
et tirant légèrement le cran ( Fig1). Installez les trois piles "AA" en respectant
le sens de polarité qui est indiqué sur les gravures (Fig.2). Remettez en
place le couvercle de batterie en engagez la partie supérieure de la pièce et
en poussant la partie inférieure jusqu'à entendre un clic.
Mise en marche du Minuteur: Pour mettre en marche le minuteur, faites
glisser le bouton/curseur d’économie d'énergie des piles (Fig.3) en position
haute . Les 15 diodes du bas s’allument alors (Si elles ne s’allument pas,
vérifiez que les piles soient chargées et qu'elles soient installées
correctement)
Démarrage et réglage: Sur le bord inférieur du minuteur, se trouvent trois
boutons ( Fig.4). A chaque pression les boutons ajouteront 10 minutes, 5
minutes et une minute respectivement.Par exemple pour régler à 20 minutes,
poussez et relâchez le bouton »10 » deux fois. Dès qu’un bouton est poussé,
le minuteur commence à décompter les minutes. Ce décompte est visualisé
par le balayage circulaire des diodes sur le disque au centre du minuteur.
Ce balayage parcourt un tour complet chaque seconde.
Le temps maximum (toutes les 15 diodes étant alors allumées) est de 60
minutes. Le temps minimum est de 1 minute. L’incrément minimum est de 1
minute.
Quand le temps fixé est écoulé: Dès que le temps de minutage fixé est
écoulé, l’ensemble des 15 diodes clignotent et le buzzer se met en marche 4
fois. Après, jusqu'à ce que le minuteur soit éteint ou que le régliez de nouveau
en ajoutant des minutes le buzzer va biper deux fois par minute pour rappel.
Après environ une demi-heure, le minuteur se met en mode veille , lumière et
buzzer éteints.
Remise à zéro du minuteur/Arrêt des signaux de fin du minutage
Pour arrêter le minutage - ou le clignotement des diodes et le buzzer après
la fin du minutage, pousser puis relàchez le bouton en haut du minuteur.
Autonomie des piles: Pour préserver au maximum l'autonomie des piles,
faites glisser le bouton d'économiseur d'énergie vers sa position basse
(Fig.3) lorsque que vous avez plus besoin du minuteur.
Lecture du minutage restant: Pour connaître le temps de minutage restant
de manière précise, vous pouvez procéder de deux façons :
1) Chaque diode allumée dans le cadre supérieur des 15 diodes est égale à 4
minutes. Ajoutez la valeur des trois diodes du "cou" si elles sont éclairées : la
diode supérieure représente 3 minutes, celle du milieu 2 minutes, celle du bas
une minute. La figure 5 montre la configuration correspondante à 10 minutes
[2 diodes x 4 minutes+ la diode du milieu du cou x 2 minutes.]
2) Suivez la procédure inscrite à l'arrière du minuteur (Fig. 6): repérez la
position de la plus grande valeur parmi les diodes éclairées et ajoutez les
minutes indiquées par le diodes du cou. Sur la Fig. 6, la diode en psition"8"
est éclairée, ainsi que la diode en position"2" de la partie médiane le temps
restant est de 8+2=10 minutes.
Notez que cet affichage "10" va changer dès que le temps restant passe à 9
minutes.
P/N 800-0002/A