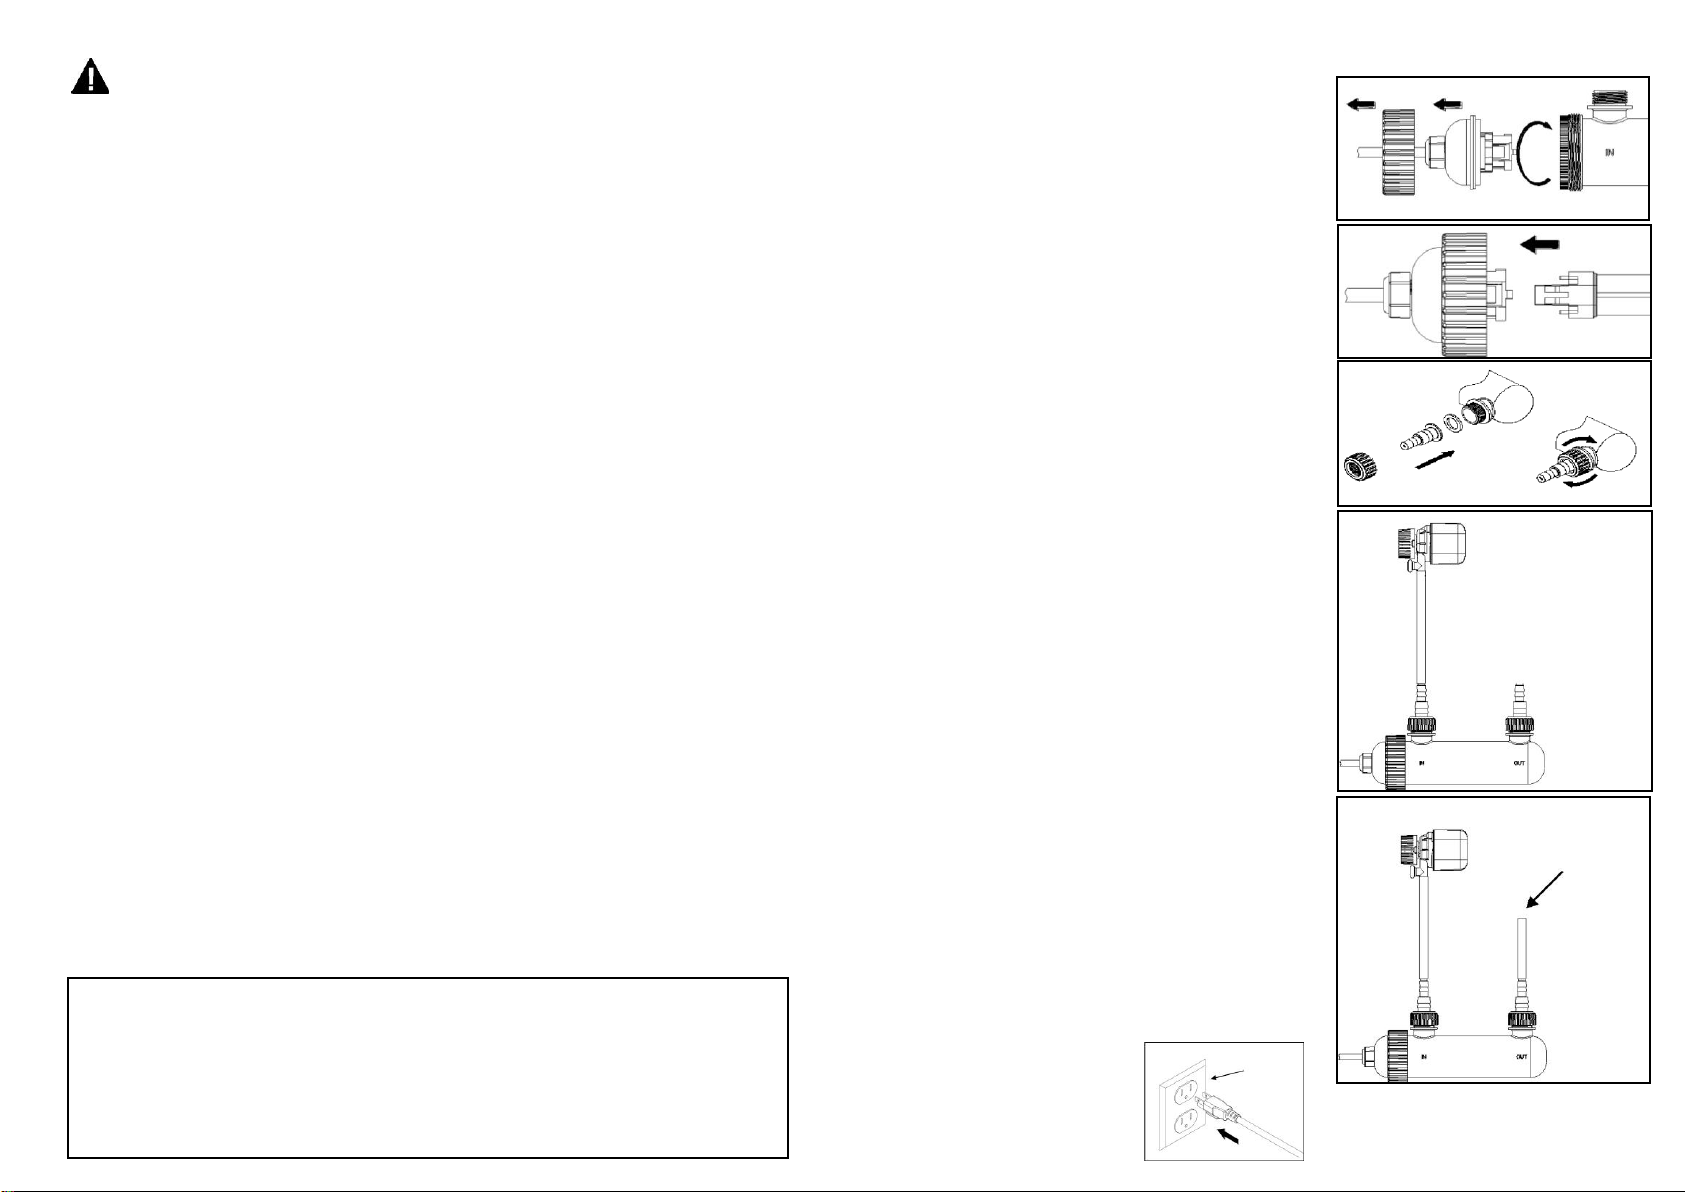
manuals.online logo
Brands
  1. Home
  2. •
  3. Brands
  4. •
  5. Angelo Decor
  6. •
  7. Pond Pump
  8. •
  9. Angelo Decor Pond Building Series User manual

Angelo Decor Pond Building Series User manual

REPLACING THE BULB
1. Unplug the light and allow it to cool.
2. Turn the locking ring counter clockwise to remove the lamp holder (02).
3. Carefully remove the old bulb by firmly pulling on the base. Carefully install the new bulb.
4. Reinstall the lamp holder and locking ring. Plug the light into a properly grounded electrical outlet.
CARE AND MAINTENANCE
To maximize performance, periodically disassemble the unit to clean the glass tube.
IMPORTANT: Be sure that the entire unit is completely dry and gaskets are properly seated when
reassembling. Failure to do so will result in water leakage, which can cause damage.
1. Disconnect the UV light from the outlet. Be sure to allow sufficient time for the light to cool
before disassembling the light.
2. Unscrew the locking ring, and pull out the light unit.
3. Carefully pull out the glass tube holder by twisting and then pull out.
4. Use biodegradable soap and warm water to clean the glass tube.
5. Reassemble and be sure that all gaskets and o-rings are seated properly.
TROUBLESHOOTING:
If the light fails to operate:
Check to ensure the power cord is plugged in and the light is getting power. 
Check to ensure that the lamp holder is screwed completely into the body. (This product will not
operate unless it is fully assembled with the lamp holder screwed completely into the body.) 
Check bulb to ensure that it has not burned out. Replace the bulb as necessary. 
LIMITED WARRANTY
This product is warranted to the original user against defective materials and workmanship for a
period of 12 months. Our limited warranty does not cover any costs associated with the installation
or removal of products subject to warranty claims or the cost of return of the product. The warranty
will commence from the date of purchase. Replacement liability is limited to any part or parts of the
unit which have failed due to defective material or workmanship. Proof of purchase is required for
all claims against the limited warranty. This warranty does not extend to damage of the product or
part resulting from accident, misuse, alteration, neglect, abuse, improper installation or normal wear
and tear to the product(s). This limited warranty extends only to the original user of the product.
9 WATT UV CLARIFIER AD46530
COMPONENTS
01. UV Bulb
02. Lamp Holder
03. Lamp Housing
04. Adapter
05. Adapter nut
06. Adapter Gasket
07. O-ring 1
08. O-ring 2
09. Lamp Holder Gasket
10. Bulb Cover
BEFORE YOU BEGIN
Before you get started check the packaging to ensure you have all parts and compare against
packaging and illustration above. Do not assemble or attempt to operate the unit if any parts are
missing. Contact customer support regarding any missing parts or components.

IMPORTANT INFORMATION
This product will not operate unless it is fully assembled with the lamp base screwed completely
into the housing. 
UV rays are harmful to your eyes and skin. The indicator portal will remove the harmful effects of
the UV light but still allow you to see the bulb operating. 
Do not attempt to operate this product unless the lamp is completely assembled within
the light housing. 
This product is to be operated within the following temperature range: 32°F - 95°F (0°C - 35°C). 
This product conforms to the Code of Federal Regulations (CFR) requirements including,
Title 21, Chapter 1, Subchapter J, Radiological Health. 
For more information on this and other products, please visit our web site:
www.angelodecor.com
To contact us regarding this unit, your options include:
Email:customersupport@angelodecor.com | Phone: (780) 453 - 6646 | Fax: (780) 453- 6620
Angelo Décor International Inc. | 15840 –118th Avenue | Edmonton, AB |T5V 1C4
01
02
03
04
05
06
07
08
09
10
Questions, problems or missing parts?
Email our Customer Support team at: customersupport@angelodecor.com
WARNINGS AND CAUTIONS
WARNING
WARNING –Improper connection of the appliance-grounding conductor can result in a risk of
electric shock. Check with a qualified electrician or service representative if you are in doubt whether
the appliance is properly grounded. Do not modify the plug provided with the appliance; if it will not fit
the outlet, have a proper outlet installed by a qualified technician. 
Do not operate any appliance if it has a damaged cord or plug, or if it is malfunctioning or if it is
damaged in any manner. 
Always unplug the appliance from the outlet before putting on or taking off parts, before cleaning or
when not in use. 
Connect only to a circuit that is protected by a ground-fault circuit-interrupter (GFCI). 
Risk of Electric Shock: Do not use the UV filter if the quartz tubing around the lamp is broken.
Immediately unplug and seek an authorized repair service or discard the unit.
GROUNDING INSTRUCTIONS –This appliance must be grounded. In the event of a malfunction or
break down, grounding will reduce the risk of electric shock by providing a path of least resistance
for electric current. This appliance is equipped with a cord having an appliance-grounding conductor
and a grounding plug. The plug must be plugged into an appropriate outlet that is installed and
grounded in accordance with all local codes and ordinances. 
CAUTION
UV light may cause irritation to the skin and/or eyes. Avoid exposure. 
DANGER –ULTRAVIOLET RADIATION –disconnect power before replacing lamp. 
Prolonged or repeated exposure to UV light may have adverse physical effects including, severe
damage to your skin and eyes. Seek immediate medical attention for overexposure to UV
radiation. 
Keep the cord away from high temperatures or other heat sources. 
Do not lift the light or the transformer by its power cord. 
This light assembly has not been investigated for use in swimming pools or hot tubs. 

ASSEMBLY INSTRUCTIONS
1. Open and remove the light assembly from the
package and untie the power cord. Turn the locking
ring counterclockwise to remove the lamp holder.
2. Install the bulb into lamp holder (02). Reinstall the
lamp holder and locking ring.
3. Install the adapter gasket (06), adapter (04), and
adapter locking nut (05) onto the inlet and outlet of the
lamp housing.
NOTE: FOR A PROPER SEAL, THE PARTS MUST BE
INSTALLED IN THIS SPECIFIC ORDER.
4. Connect tubing from the outlet of your pump to the
inlet . The adapters included can connect to 1/2-in. or
3/4-in. tubing. We recommend 1/2-in. tubing for
optimum performance.
NOTE: THE INLET IS MARKED “IN” ON THE LAMP
HOUSING
5. Connect tubing to the outlet. The other end can be
connected to a spouting statue, waterfall, or any other
water feature for your pond.
NOTE: THE OUTLET IS MARKED “OUT” ON THE LAMP
HOUSING.
6. Plug the unit into a properly grounded electrical outlet.
02
03
01
02
05
04
06
PUMP
(SOLD SEPARATE)
TUBING
(SOLD SEPARATE)
PUMP IN WATER
CONNECT TO
WATER FEATURE
GFCI
SPECIFICATIONS
LAMP VOLTAGE 60V LAMP CURRENT 0.2A
LAMP POWER 9 W RATED FREQUENCY 60 HZ
UV IRRADIANCE 35 µW/cm2 BULB LIFE 8000 HOURS
BULB MODEL NUMBER AD46529 UV WAVE LENGTH UV(C) ·254 nm

This manual suits for next models

1

Other Angelo Decor Pond Pump manuals

Angelo Decor Pond Building AD40251 User manual

Angelo Decor

Angelo Decor Pond Building AD40251 User manual

Angelo Decor Pond Building AD40401 User manual

Angelo Decor

Angelo Decor Pond Building AD40401 User manual

Angelo Decor Pond Building Series User manual

Angelo Decor

Angelo Decor Pond Building Series User manual

Popular Pond Pump manuals by other brands

velda SILENTA OUTDOOR  PRO User instructions

velda

velda SILENTA OUTDOOR PRO User instructions

Little Giant WaterMark Simply Falls SF-1 quick start guide

Little Giant

Little Giant WaterMark Simply Falls SF-1 quick start guide

EasyPro PA90AD Installation, Operation, Maintenance Guidelines

EasyPro

EasyPro PA90AD Installation, Operation, Maintenance Guidelines

EasyPro PA34 Installation operation & maintenance

EasyPro

EasyPro PA34 Installation operation & maintenance

T.I.P. BPF 8000 E operating instructions

T.I.P.

T.I.P. BPF 8000 E operating instructions

Oase AquaMax Eco Titanium 31000 operating instructions

Oase

Oase AquaMax Eco Titanium 31000 operating instructions

Blagdon AMPHIBIOUS Series Leaflet

Blagdon

Blagdon AMPHIBIOUS Series Leaflet

fish mate 9000 instructions

fish mate

fish mate 9000 instructions

Profi-pumpe JR-800LV operating instructions

Profi-pumpe

Profi-pumpe JR-800LV operating instructions

Oase AquaMax Eco Expert 26000 operating instructions

Oase

Oase AquaMax Eco Expert 26000 operating instructions

WilTec 62547 Operation manual

WilTec

WilTec 62547 Operation manual

Fiap Aqua Active 4.500 manual

Fiap

Fiap Aqua Active 4.500 manual

Pond Boss 52735 manual

Pond Boss

Pond Boss 52735 manual

Messner system-X 750 operating instructions

Messner

Messner system-X 750 operating instructions

Hozelock Cyprio EasyClear 3000 1760 Installation and operating instructions

Hozelock Cyprio

Hozelock Cyprio EasyClear 3000 1760 Installation and operating instructions

manuals.online logo
manuals.online logoBrands
  • About & Mission
  • Contact us
  • Privacy Policy
  • Terms and Conditions

Copyright 2025 Manuals.Online. All Rights Reserved.