anko YHL-1722 User manual

1
Chocolate Fountain
YHL-1722
User Manual
PLEASE READ AND SAVE THESE
INSTRUCTIONS FOR FUTURE REFERENCE

2
WARNING
Read and understand all instructions before using this product, and follow all warnings
and cautions in this manual.
CAUTION
INTENDED USE
Only operate the Chocolate Fountain for its intended purpose and within the parameters
specified in this manual.
This appliance is not intended for use by persons with reduced physical, sensory or mental
capabilities, or lack of experience and knowledge, unless supervised or given appropriate
instructions concerning the product’s use by a person responsible for their safety.
This appliance is not intended for use by children.
This appliance is intended to be used in household and similar applications such as:
- staff kitchen areas in shops, offices and other working environments;
- farm houses;
- by clients in hotels, motels and other residential type environments;
- bed and breakfast type environments.
GENERAL PRECAUTIONS
When using an electrical appliance, basic precautions should always be followed, including the
following:
IMPORTANT! Do not allow the appliance to be used as a toy. Children should be supervised to
ensure they do not play with the appliance.
If the Chocolate Fountain is not functioning properly, has been dropped, damaged, left
outdoors, or immersed in liquid, DO NOT use.
DO NOT use the Chocolate Fountain if any parts appear to be faulty, missing ordamaged.
IMPORTANT SAFETY INSTRUCTIONS

3
Ensure all parts are securely attached before use.
The appliance should be cleaned after each use, never immerse the appliance in water or
other liquid for cleaning.
To prevent damage to the appliance do not use alkaline cleaning agents when cleaning, use
a soft cloth and a mild detergent.
CABLES AND PLUGS
Do not handle plug or appliance with wet hands.
Check to ensure your electricity supply matches that shown on the rating plate.
The product should only be used as rated. Preferably, the socket outlet should be
protected by a Residual Current Device (RCD – safety switch).
The use of an extension cable is not recommended.
For electrical safety, do not use with damaged power cable or plug. If the supply
cable is damaged, it must be replaced by a qualified electrical person only or the
product must be disposed of.
Do not pull the cable around sharp edges or corners.
Keep the cord away from heated surfaces.
Do not let the cord hang over the edge of the table or countertop where it
could be pulled on inadvertently by children or pets.
Do not leave the appliance unattended when connected to mains power.
Unplug from mains power outlet when not in use.
Turn off all controls before unplugging.
Do not unplug by pulling on the power cable. To unplug, grasp the plug, not the
power cable.
Switch OFF the appliance and disconnect from mains power before changing
accessories or approaching parts that move in use.
Ensure the cable is stored safely to prevent hazards.
RISK OF PERSONAL INJURY

4
Always place the appliance on a firm, flat and heat- resistant surface with sufficient
space around all sides.
The Chocolate Fountain is not intended to be operated by means of an external timer
or separate remote-control system.
Keep hair, loose clothing, fingers and all body parts away from openings and moving parts.
Do not insert any objects into openings or cover the appliance.
When using for the first time, the Chocolate Fountain may give off a slight odour, which is
normal. This will dissipate after a few minutes of use.
Regularly check the Bowl to make sure it is clear of any food pieces that may clog the motor
and cause the Chocolate Fountain not to flow properly.
Parts of this appliance such as the Base and Bowl may become hot during use. Handle with
care and allow to cool fully before moving.
Do not lift or move the Chocolate Fountain whilst in use.
Do not leave the Chocolate Fountain unattended when in use.
Do not operate continuously for periods longer than those indicated in this manual.
Always allow the Chocolate Fountain to cool completely before cleaning.
Do not lubricate any parts or carry out any maintenance or repair work other than that
shown in this manual. Use only as described in this manual.
WARNING! Do not use this appliance for other than its intended use. It may cause injury and/or
damage to property.
The heating element surface is subject to residual heat after use.

5
1
2
3
4
5
6
7
8
9
KNOW YOUR CHOCOLATE FOUNTAIN
1. Base 4. Bowl 7. Auger
2. Control dial 5. Locating pins 8. Tower
3. Power indicator light 6. Motor drive shaft 9. Collar

6
Note: When using the product for the first time, carefully remove all internal and
external packaging, protective film and accessories.
Clean the base with a damp cloth or sponge. Wipe dry with a soft dry cloth.
WARNING! Do not immerse the base in water or any other liquids to clean.
Wash the tower and auger with warm soapy water. Dry all components thoroughly
before use.
Place the base on a suitable flat, stable and heat-resistant surface.
Place the auger on top of the drive shaft. Ensure that the drive shaft is fully inserted
into the bottom of the auger.
IMPORTANT: If the drive shaft is not correctly inserted, the auger will fail to operate properly,
resulting in minimal chocolate flow when the machine is switched on.
Once the auger is correctly in place, the tower can be placed over it.
IMPORTANT: Make sure to align the 3 location pins with the collar at the bottom of the
tower. This will prevent the tower from moving during operation, allowing the chocolate
to cascade smoothly.
CAUTION: Do not force the collar over the location pins as this may damage the machine.
BEFORE FIRST USE
ASSEMBLY

7
Connect the chocolate fountain to the mains power supply and turn the control dial
right to the heat position.
The power indicator light will illuminate red and the bowl will then begin to heat. Allow
the chocolate bowl to heat up for around 15minutes before adding chocolate.
During this time, fill a microwaveable bowl with 250-290g chocolate chips or grated
chocolate and add 1 teaspoon of oil (vegetable oil is recommended). However, if you
are using Belgian chocolate, oil is not required.
Place the microwaveable bowl and its contents into the microwave for 2 minutes, then
stir the chocolate thoroughly until smooth and runny (liquid consistency). If necessary,
continue to warm the chocolate for a further 2~4 minutes.
CAUTION: always use oven gloves and take extra care when removing the microwaveable
bowl from the microwave as it will be extremely hot during use.
Alternatively, warm the chocolate in a heat-proof bowl over a pan of boiling water (do
not allow the boiling water to touch the bowl). Once the chocolate is melted, add in the
oil and stir until combined. Remove the bowl of chocolate from the pan.
IMPORTANT:
The chocolate to be added to the fountain must be completely melted and of a
thin consistency to allow for optimal flow. Use a large spoon (not supplied) to test the
consistency; if the chocolate drops slowly from the spoon, add more oil to mixture in 1
teaspoon increments.
Once the chocolate is of the correct consistency turn the control dial to heat motor
position. The motor and heater will now operate at the same time.
Carefully pour the melted chocolate from the microwaveable bowl to the heated
chocolate bowl at the base of the tower.
CAUTION:
The chocolate and fountain are hot.
Chocolate will be slowly drawn up through the tower by the auger inside and begin to
cascade down each tier.
IMPORTANT:
Do not add any water or cooled liquids to the melted chocolate as this will
restrict or stop the flow of the fountain.
OPERATION

8
NOTE: We recommend you use solid food pieces for dipping such as strawberries and
marshmallows. Do not use food that can crumble, such as biscuits, as they may fall into the
bowl and can obstruct the flow of the chocolate fountain.
If the chocolate is not flowing properly, switch off the machine and allow for any air
bubbles to travel up the auger for a few seconds before turning on again.
Prepare a fantastic selection of dipping foods for you and your guests to dip into the
flowing chocolate. Some of our favorites include: marshmallows, fudge, strawberries,
cherries seedless grapes, sliced banana, profiteroles, mini doughnuts, mini waffles, mini
sponge cakes, Turkish delight, nougat etc.
What not to dip into the chocolate fountain:
1.
Foods that crumble easily such as biscuits, as they can clog up the Fountain.
2.
Wet fruits, as any liquids will cause the chocolate to seize and slow or stop the
flow.
3.
Ask your guests not to dip their fingers into the flowing chocolate
as this may contaminate it for other users. Always use forks or
skewers (not supplied).
CAUTION: Before carrying out cleaning or maintenance, disconnect the machine from the
mains power supply.
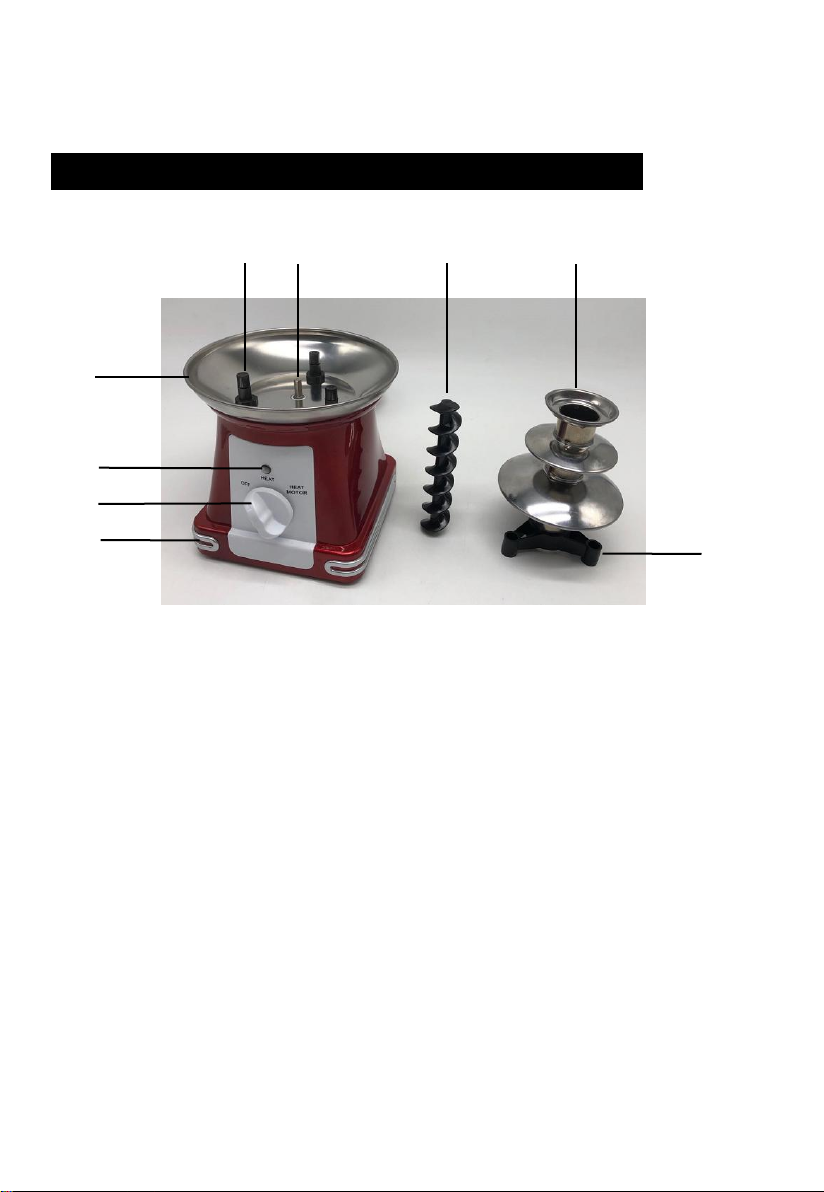
Once the chocolate fountain has completely cooled, remove the auger and tower from
the base and wipe off any remaining chocolate with a paper towel.
Soak the tower and auger in warm, soapy water for around 5 minutes and scrub using a
soft sponge or cloth.
Pour any remaining chocolate out of the bowl and into a bin liner or throwaway
container before disposing in a bin.
CAUTION: Do not discard of liquid chocolate down the sink as it may harden and cause a
blockage.
Wipe any chocolate now left in the bowl with paper towel then clean with a damp cloth
and mild detergent. Buff dry using a soft towel.
CAUTION: Avoid using harsh or abrasive cleaning materials such as scrubbing brushes or
metal scourers as these will damage the surfaces of the machine.
CLEANING & MAINTENANCE

9
WARNING! Never immerse the base and bowl in water or other liquids to clean as there is
a high risk of electric shock and damage to the product.
Store the chocolate fountain with the power cord loosely coiled in a cool, dry area
away from children.
TROUBLE SHOOTING
PROBLEM
MACHINE WILL NOT START.
SOLUTION
•
Check that the Chocolate Fountain is
connected to mains power.
•
Turn the CONTROL DIAL to the ‘HEAT’
setting.
THE CHOCOLATE IS NOT MELTING.
•
Ensure the machine is connected to mains power.
•
Pre-melt the chocolate in a microwave for 2
minutes prior to adding to the BOWL.
•
Different types of chocolate have varied
melting points. Some may take longer to melt
than others. We recommend grating or
chopping the chocolate finely before melting it
in the microwave oven, this will greatly decrease
the time it takes to melt.
THE CHOCOLATE HAS BURNT.
•
Do not allow the chocolate to sit in the BOWL
for an extended period before operating the
motor.
•
Different types of chocolate require varied
temperatures to make it melt successfully;
dark chocolate is the easiest due to its high
cocoa content whilst white chocolate can burn
quite easily.
•
Whilst it is important to keep movement to a
minimum when melting chocolate (so that it is
evenly melted), it is also necessary to give it an
occasional stir to stop it sticking to the bowl
and reduce the risk of sticking and burning.
THE CHOCOLATE APPEARS
GRAINY.
•
It is possible to rectify this by adding a small
amount of vegetable oil.

10
TECHNICAL SPECIFICATIONS
Voltage: 220-240Va.c. 50-60Hz
Power: 70W
Thank you for your purchase from Kmart.
Kmart Australia Ltd warrants your new product to be free from defects in materials and
workmanship for the period stated above, from the date of purchase, provided that the
product is used in accordance with accompanying recommendations or instructions
where provided. This warranty is in addition to your rights under the Australian
Consumer Law.
Kmart will provide you with your choice of a refund, repair or exchange (where possible)
for this product if it becomes defective within the warranty period. Kmart will bear the
reasonable expense of claiming the warranty. This warranty will no longer apply where
the defect is a result of alteration, accident, misuse, abuse or neglect.
Please retain your receipt as proof of purchase and contact our Customer Service Centre
on 1800 124 125 (Australia) or 0800 945 995 (New Zealand) or alternatively, via
Customer Help at Kmart.com.au for any difficulties with your product. Warranty claims
and claims for expense incurred in returning this product can be addressed to our
Customer Service Centre at 690 Springvale Rd, Mulgrave Vic 3170.
Our goods come with guarantees that cannot be excluded under the Australian
Consumer Law. You are entitled to a replacement or refund for a major failure and
compensation for any other reasonably foreseeable loss or damage. You are also
entitled to have the goods repaired or replaced if the goods fail to be of acceptable
quality and the failure does not amount to a major failure.
For New Zealand customers, this warranty is in addition to statutory rights observed
under New Zealand legislation.
12 MONTH WARRANTY
Table of contents
Other anko Kitchen Appliance manuals
Popular Kitchen Appliance manuals by other brands

MS Hometech
MS Hometech HT-621 SUPER CHEF instruction manual

Scarlett
Scarlett SC-JE50C01 instruction manual

Univex
Univex SRM30 Operator's manual

Swann
Swann SP17020N user manual

Nostalgia Products Group
Nostalgia Products Group Vintage Collection CCP300 Instructions and recipes

CANDOR
CANDOR CW-33 Operation manual