ANTIFERENCE DMSD01 User manual

USER MANUAL
DIGITAL MODULATOR DMSD01
AV TO DVB-T ENCODER/MODULATOR
DMSD01 MODULATOR USER GUIDE.indd 1 13/01/2014 18:05

CONTENTS
1 Safety considerations page 3
2 Description of the different elements page 4
3 Installation and menu structure page 5
3.1 Installation page 5
3.2 Powering up page 5
3.3 Menu structure page 5
4 Programming mode page 6
4.1 Description of the INPUT menu page 6
4.2 Description of the OUTPUT menu page 7
4.3 Description EXTRA menu page 8
4.4 Description menu MISC (miscellaneous) page 9
5 Programming using a PC page 10
6 Using HD LCN page 10
7 Technicalspecifications page11
8 Factory settings page 11
9 Declaration of Conformity page 11
DMSD01
2
DMSD01 MODULATOR USER GUIDE.indd 2 13/01/2014 18:05

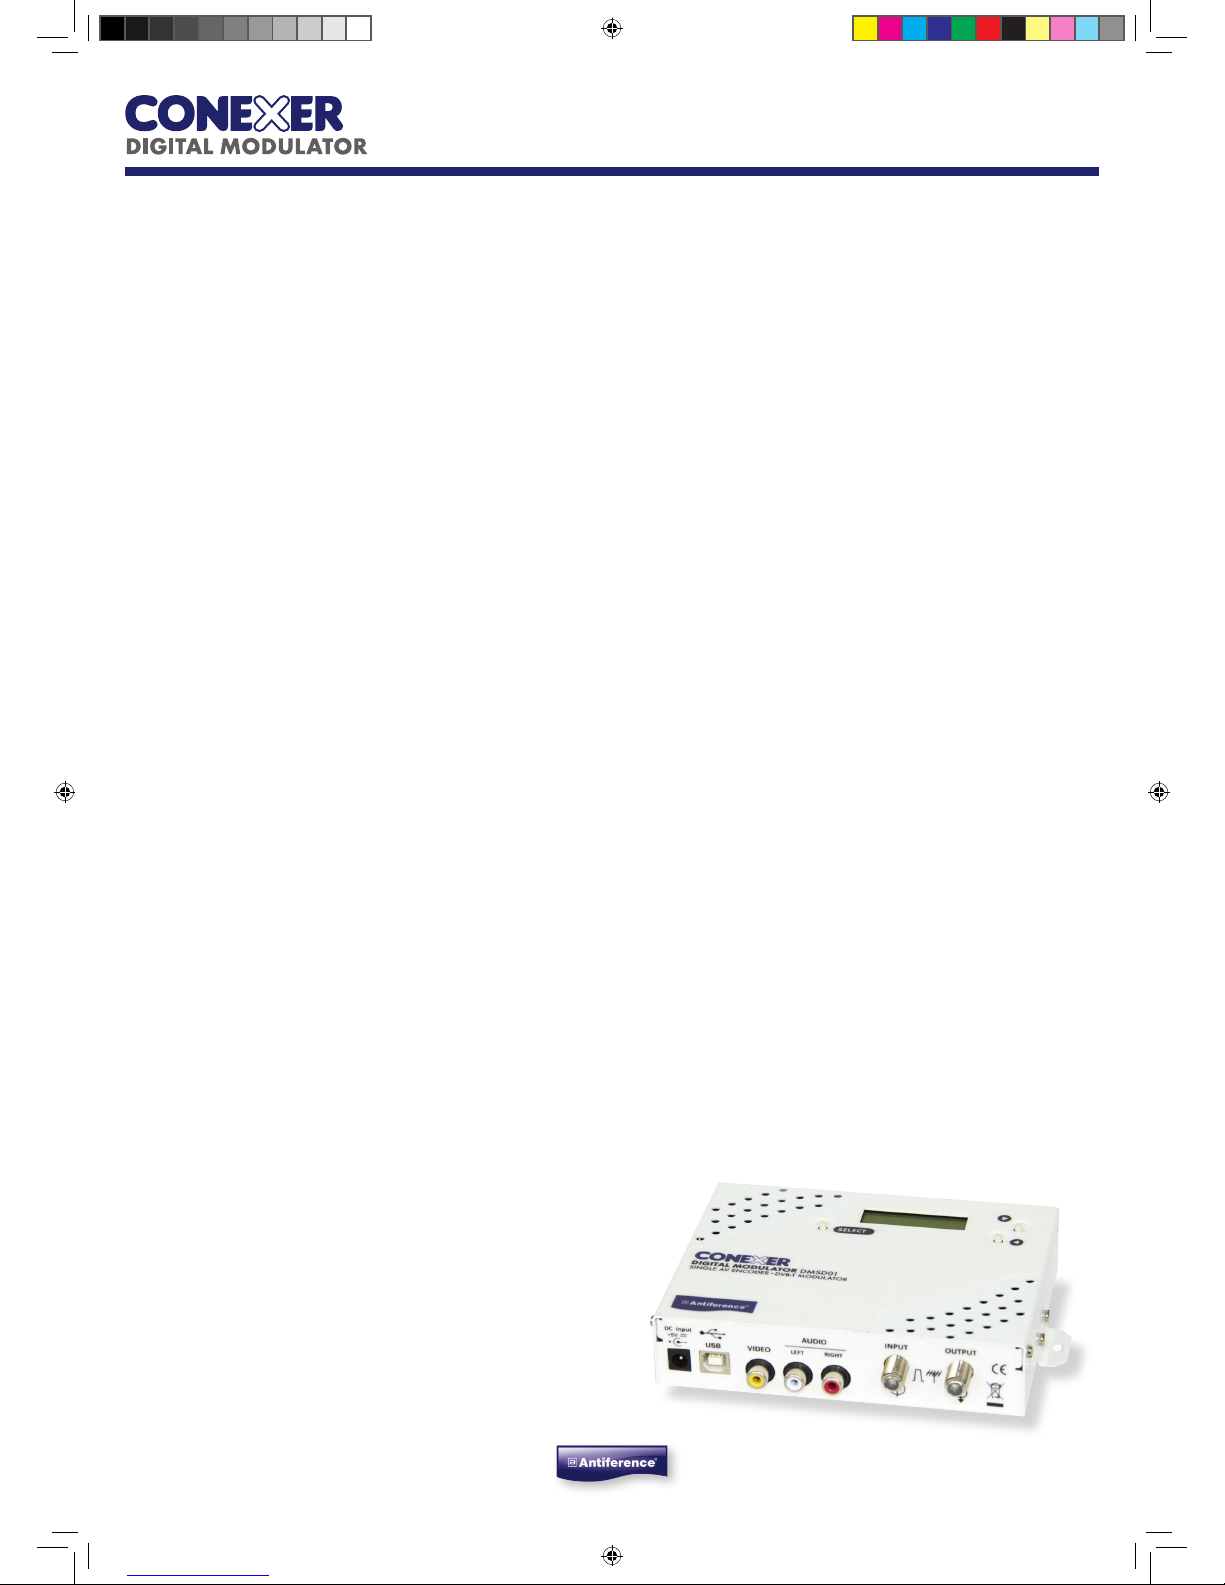
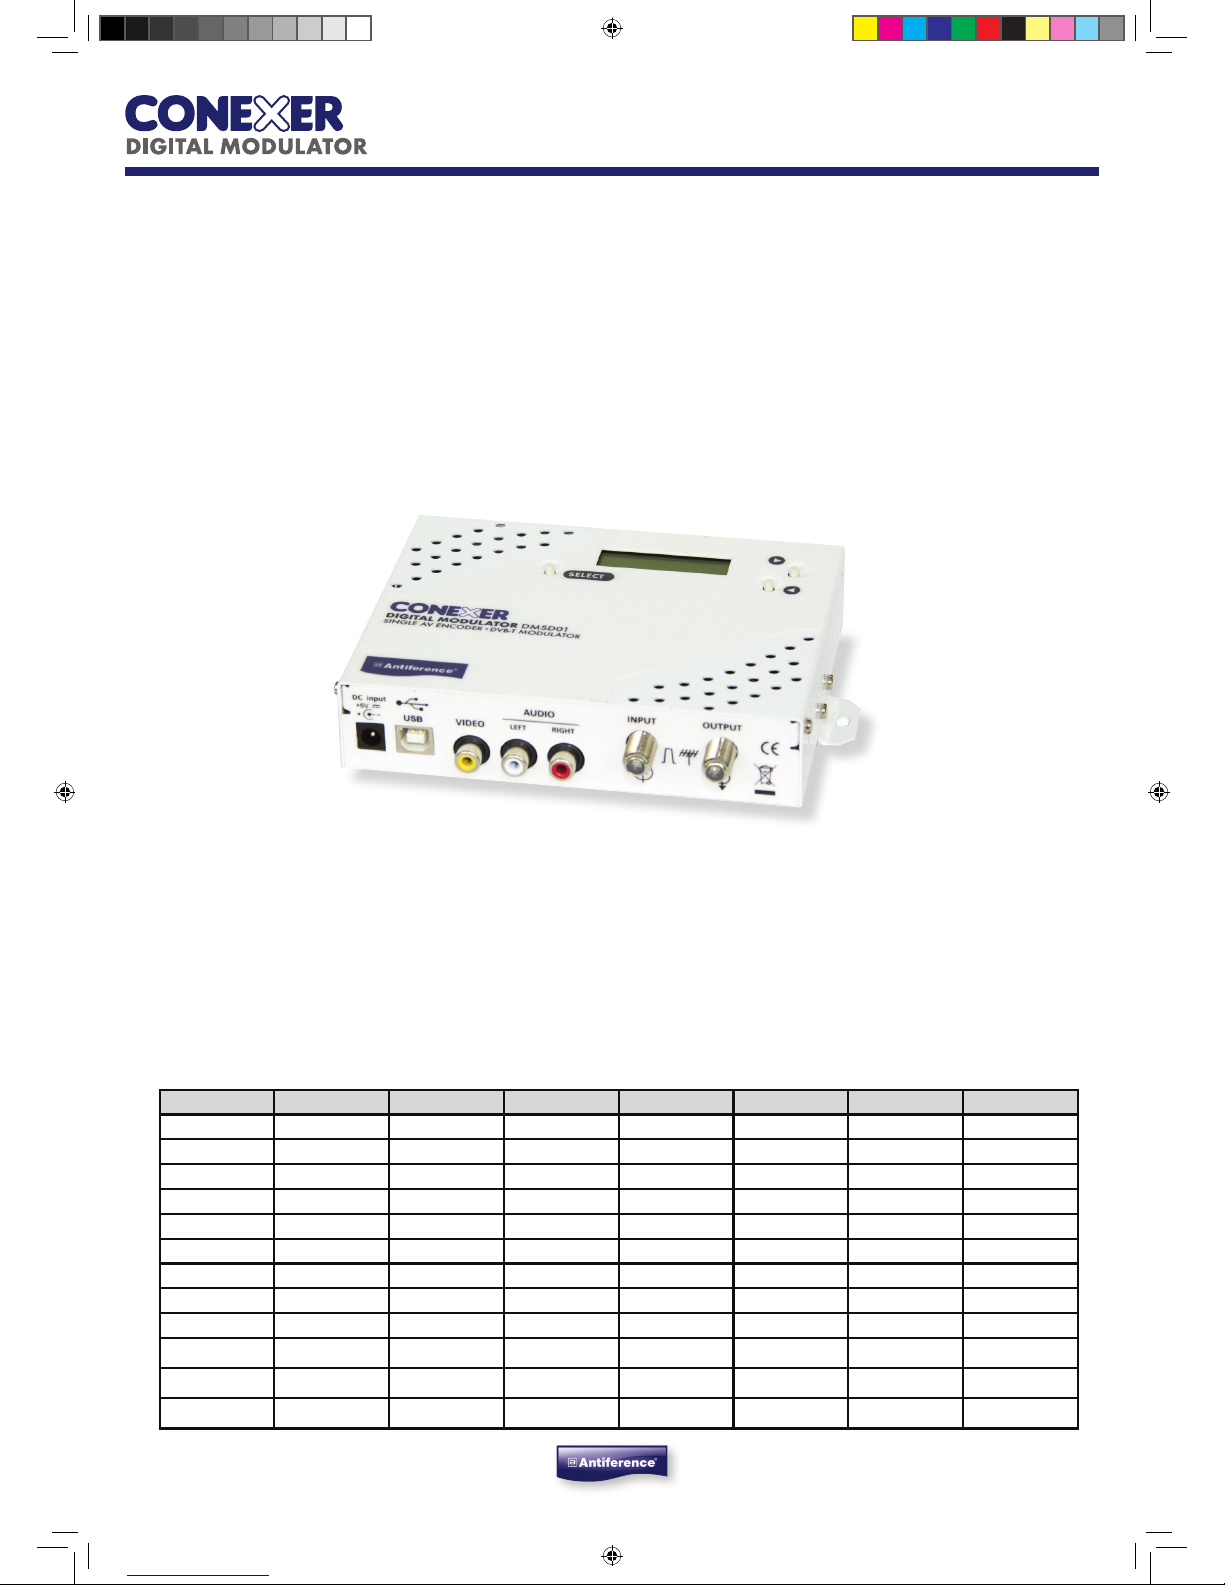
1 SAFETY CONSIDERATIONS
1.1 Connecting to the mains supply
This product has to be connected to the mains supply. If there is the slightest doubt concerning
the type of connection available on the installation, please contact your supplier of electricity.
Beforecarryingoutmaintenanceoperationormodificationoftheinstallation,themodulator
has to be disconnected. Remark : only use the supplied power adaptor.
1.2 Over Voltage
Anovervoltageonthemainssupply,cancauseshortcircuitsandfire.Neveroverloadthe
power lines.
1.3 Liquids
This module should be protected from splashes. Please assure yourself that no containers
containing liquids are placed on this module. Also be aware of other persons splashing liquids
on the module.
1.4 Cleaning
Disconnect the module before cleaning. Use only a damp cloth without solvents.
1.5 Ventilation
In order to assure an adequate air circulation and to prevent overheating, the ventilation
holes should not be obstructed. The module may not be installed in a hermetically sealed
environment. Other electronic products or heat producing items may not be placed upon or
near the module.
1.6 Accessories
The use of accessories not manufactured by the manufacturer can cause damage to the
module.
1.7 Installation of the module
The module must be installed in a place well protected from direct sunlight. All measures have
to be taken to avoid installation in humid or sunny places. Do not install near heating elements
or other devices producing heat. Assure yourself that the module is placed at least 10 cm from
other equipment which is susceptible to electromagnetic radiation. Do not install the module on
unstable items, a fall can cause physical or material damage.
3
DMSD01
DMSD01 MODULATOR USER GUIDE.indd 3 13/01/2014 18:05

2 - Description of the different elements
C1 Power supply input of the modulator (5 VDC / 4 A)
C2 USB input( for programming the DMSD01 by PC)
C3 Video input
C4 Audio left input
C5 Audio right input
C6 RF input
C7 RF output
A1 LCD display 1 x 8 characters with backlight
T1 Select button
T2 Right button
T3 Left button
OUTPUT
AUDIO
VIDEOLEFT RIGHT
DC inputINPUT
C1
T1 A1 T3
C2 C3 C4 C5 C6 C7
4
DMSD01
DMSD01 MODULATOR USER GUIDE.indd 4 13/01/2014 18:05

3 - Installation and menu structure
3.1 - Installation
InstalltheDMSD01againstawallusingthewallfixingbracketstoensurecoolingofthe
housing through natural convection. ( see drawing)
Connect the audio and video source using CVBS RCA connectors. Connect the RF input
cable (if present) and the RF output cable. If the input is not used, please connect a 75 ohm
terminating resistor to it. Once the modulator is installed and the cables connected, please
proceed connecting the power supply to the modulator.
3.2 Powering Up
Plug in the connector of the power supply. The LCD display will light up and shows the
message “Init ...” followed by a bar graph, during starting up of the DMSD01. After starting up
themessage“DMSD01’and“V1.9’(firmwareversion)aredisplayedalternating.
3.3 - Menu structure
The DMSD01 has different menus allowing easy access to the different parameters and to
changethemwhennecessary.Belowyouwillfindthestructureofthedifferentmenus.
INPUTOUTPUTEXTRA MISC.
<STDARD> < FREQ > <TS. ID> <LANG.>
<FORMAT> <BNDWDT> <PRG.ID> <RESET>
< LIGHT ><MODE ><NET ID><RETURN>
<CONTR.> < CONST. > <ONETID>
< SAT. > < FEC > <NETWRK>
<RETURN> <G. INT. ><PMTPID>
<ATTEN.> <VIDPID>
<A. RATE><AUDPID>
<V. RATE><RETURN>
<L.C.N.>
<CHANNL>
<RETURN>
5
DMSD01
DMSD01 MODULATOR USER GUIDE.indd 5 13/01/2014 18:05

4 Programming Mode
To access the menus press and keep pressed the SELECT button. Use the buttons tand u
to choose between menus INPUT / OUTPUT / EXTRA and MISC. When you have reached
the menu of your choice, release the SELECT button. Now you have access to the different
parameters of the selected menu and inspect and change their values if necessary.
Use the buttons tand uto go from one parameter to the other. Once you have reached the
wanted parameter, press and keep pressed the SELECT button : the value of the parameter
is now displayed. To modify this value, use the tand ubuttons while keeping the SELECT
button pressed. Once the parameter changed you can release the SELECT button.
4.1 - The INPUT menu :
1. <STDARD>
Setting the input standard
Use the buttons tand u(while keeping SELECT button pressed) to change this option in PAL
or NTSC
2. <FORMAT>
Setting the picture format
Use the buttons tand u(while keeping SELECT button pressed) to change the picture
format between 4/3 - 16/9 or AUTO (automatic).
3. <LIGHT>
Setting the brightness
Use the buttons tand u(while keeping SELECT button pressed) to adjust the brightness
(0-255)
4. <CONTR.>
Setting the contrast
Use the buttons tand u(while keeping SELECT button pressed) to adjust the contrast (0-
255)
5. <SAT.>
Setting the Saturation
Use the buttons tand u(while keeping SELECT button pressed) to adjust the saturation (0-
255)
6. <RETURN>
To leave this menu.
Press the SELECT button pressed) to leave this menu
6
DMSD01
DMSD01 MODULATOR USER GUIDE.indd 6 13/01/2014 18:05

4.2 - The OUTPUT menu :
1. <FREQ>
Setting the Output Frequency
Use the buttons tand u(while keeping SELECT button pressed) to change the output
frequency 47-862 MHz
2. <BNDWDT>
Setting the Bandwidth
Use the buttons tand u(while keeping SELECT button pressed) to change the bandwidth in
6,7 or 8MHz
3. <MODE>
Setting the Modulation Mode
Use the buttons tand u(while keeping SELECT button pressed) to change the modulation
mode. (2k or 8k)
4. <CONST.>
Setting the Constellation
Use the buttons tand u(while keeping SELECT button pressed) to change the constellation.
(QPSK, QAM16 orQAM64)
5. <FEC>
Setting the FEC.
Use the buttons tand u(while keeping SELECT button pressed) to change the FEC. (1/2.
2/3. 3/4. 5/6 or 7/8)
6. <G.INT>
Setting the Guard Interval
Use the buttons tand u(while keeping SELECT button pressed) to change the guard
interval (1/32. 1/16. 1/8 or 1/4)
7. <ATTEN>
Setting the Output Level
Use the buttons tand u(while keeping SELECT button pressed) to change the value of the
output attenuator. (0-29dB)
8. <A.RATE>
Setting the Audio Bit Rate
Use the buttons tand u(while keeping SELECT button pressed) to change the audio bit
rate. (128Kb/s - 192Kb/s - 256Kb/s - 320Kb/s - 384Kb/s)
7. <V.RATE>
Setting the Video Bit Rate
Use the buttons tand u(while keeping SELECT button pressed) to change the video bit rate.
(100-20000) Kb/s
7
DMSD01
DMSD01 MODULATOR USER GUIDE.indd 7 13/01/2014 18:05

10. <L.C.N.>
Setting the LCN number
Use the buttons tand u(while keeping SELECT button pressed) to change the LCN number
of the programme.
11. <CHANNL>
Setting the Channel name
Use the buttons tand u(while keeping SELECT button pressed) to select a character. Then
release the SELECT button to set the following character.
Some characters have a special function, namely:
gForward space
fBackspace
gdelete whole line
12. <RETURN>
To leave this menu,
Press the SELECT button to leave this menu.
4.3 - The EXTRA menu :
1. <TS.ID>
Setting the Transport Stream ID
Use the buttons tand u(while keeping SELECT button pressed) to change the number of the
transport stream ID.
2. <PRG.ID>
Setting the Programme ID (Service ID)
Use the buttons tand u(while keeping SELECT button pressed) to change the number of
the original network ID.
3. <ONETID>
Setting the Original Network ID
Use the buttons tand u(while keeping SELECT button pressed) to change the number of
the original network ID
4. <NET ID>
Setting the Network ID
Use the buttons tand u(while keeping SELECT button pressed) to change the number of
the network ID
5. <NETWRK>
Use the buttons tand u(while keeping SELECT button pressed) to select a character. Then
release the SELECT button to set the following character.
Some characters have a special function, namely:
gForward space
fBackspace
Delete whole line
8
DMSD01
DMSD01 MODULATOR USER GUIDE.indd 8 13/01/2014 18:05

1. <PMTPID>
Setting the PMT PID.
Use the buttons tand u(while keeping SELECT button pressed) to change the PID of the
PMT (Programme Map Table)
2. <VIDPID>
Setting the Video PID.
Use the buttons tand u(while keeping SELECT button pressed) to change the Video PID
3. <AUDPID>
Setting the Audio PID.
Use the buttons tand u(while keeping SELECT button pressed) to change the Audio PID
4. <RETURN>
To leave this menu,
Press the SELECT button to leave this menu.
4.4 - The MISC. (miscellaneous) menu :
1. <LANG.>
Setting the Language of the menus
Use the buttons tand u(while keeping SELECT button pressed) to change the language
between French, English, Italian, German and Polish
2. <RESET>
Return to Factory Settings
Use the buttons tand u(while keeping SELECT button pressed) to return to the factory
settings of the DMSD01
3. <RETURN>
To leave this menu,
Press the SELECT button to leave this menu.
9
DMSD01
DMSD01 MODULATOR USER GUIDE.indd 9 13/01/2014 18:05

5 - Programming using a PC
The settings of the DMSD01 can also be changed using a PC.
First, please install the software DMSDiFace on your PC. You can download this software from
our internet site www.antiference.co.uk/conexer-dvbt-modulators and select the ‘downloads’
tab.
After installation of this software, connect the DMSD01 using a USB cable (not included) to
your personal computer. Then launch the program DMSDiFace
On the display of the DMSD01 the message <USB> appears, indicating that the programming
is now performed through your PC. The following window appears on your screen
Now,allparametersdiscussedinChapter3ofthisusermanualcanbemodifiedby
DMSDiFace.
6 - Using High Denition HD LCN
InsomesystemsyoumaywanttobroadcastaversionofaprogrammeinStandardDefinition
(SD)atthesametimeasHighDefinition(HD).WithHDLCNnumbering,youcanforceHD
Television sets to follow the HD LCN numbering and SD Television sets to follow the LCN
numbering for those programs which are transmitted in duplicate. For example: You want to
broadcast a BBC television programme in SD version as well as in HD. Application of HD LCN
would be:
BBC1 LCN: 5 HDLCN: 55
BBC1HD LCN: 55 HDLCN: 5
Television sets with the HD tuner will now put BBC1 HD on number 5 and BBC1 on channel 55
Television sets without the HD tuner will now put BBC1 HD on number 55 and BBC1 on
channel 5
10
DMSD01
DMSD01 MODULATOR USER GUIDE.indd 10 13/01/2014 18:05

7 - Technical specications:
8 - Factory Settings:
InputVideo CVBS
Video input level0.7 .... 1.4 Vpp
Impedance75 ohm
StandardsPAL / NTSC
Audio input0.5 - 2.5 Vpp
CompressionVideo MPEG2
Video bitrate 100....20 MBit/s
Audio MPEG1, Layer II
Audio bitrate 128, 160, 192, 224, 256, 320, 384 Kbit/s
DVB Processing PAT, PMT, SDT, NIT
Channel name, SID, LCN, Network Name, Network ID, TSID,
ONID, LCN, PMT PID, Video PID , Audio PID
Output DVBT
Carriers - Bandwidth - MER 2K/8K - 6/7/8 MHz - > 35 dB
Frequency - Output level 47-862 MHz - > 80 dBµV (adjustable 0 / -29 dB)
< 3 dB
Supplied power adaptor Input // Output100 - 240V / 0.5A / 50-60Hz // 5V - 4A
<9 W
Dimensions L / W / H 160 mm / 110 mm / 35 mm
INPUTOUTPUTEXTRA
<STDARD> PAL<FREQ >474 MHz <TS. ID> 100
<FORMAT> AUTO <BNDWDT> 8 MHz<PRG.ID>1
< LIGHT > 128 < MODE > 2K <NET ID> 8442
<CONTR.> 128 < CONST. >64QAM <NETWRK> NoName
< SAT. > 128 < FEC > 7/8 <PMTPID> 32
<G. INT> 1/4 <VIDPID> 48
<ATTEN.> 0 dB <AUDPID> 49
<A. RATE > 384 Kb/s
<V. RATE>6000 Kb/s
<L.C.N.> 801
<CHANNL> Chan A
11
DMSD01
9 - Declaration of Conformity:
We, ANTIFERENCE LIMITED herewith declare that the modulator CONEXER DMSD01 complies with all essential requirements
and any other applicable conditions set forth on directive 1999/05/CE.
According to the WEEE (Waste Electrical and Electronic Equipment) EU Directive, do not dispose of this product as household
waste or commercial waste. Waste electrical and electronic equipment should be appropriately collected and recycled as
required by practices established for your country. For information on recycling of this product, please contact your local
authorities, your household waste disposal service or the shop where you purchased the product.
Date of issue: January 2014
DMSD01 MODULATOR USER GUIDE.indd 11 13/01/2014 18:05

www.antiference.co.uk
DMSD01 MODULATOR USER GUIDE.indd 12 13/01/2014 18:06
Table of contents
Other ANTIFERENCE Modulator manuals
Popular Modulator manuals by other brands

Standard Communications
Standard Communications TVM Series owner's manual

Dynalink
Dynalink A 1127A operating instructions

Pico Macom
Pico Macom PCM55SAW Installation and operation manual

axing
axing HKM 40-02 manual

GBS Elettronica
GBS Elettronica 41980 Instructions for use

Lemco
Lemco HDMOD 5L quick start guide