Apco Adama User manual

www.apcoaviation.com
7 Chalamish St., Ind. Park Caesarea, 3088900 ISRAEL
2020/03/05 (rev. 1.01)
Online

www.apcoaviation.com
2
CONTENTS:
1 DISCLAIMER OF LIABILITY 4
2 INTRODUCTION 4
3 TECHNICAL DATA 5
4 CONSTRUCTION 6
5 MATERIALS 6
6 FLEXON® Batten system: 6
7 TRIMMING 7
8 RISERS with Trimmers 7
9 GENERAL INSPECTION 7
10 INFLATION / TRAINING 8
11 PACKING 9
12 MAINTENANCE & CLEANING 9
13 BUTT HOLE II (Auto Debris release valves) 9
14 STORAGE 9
15 DAMAGE 10
16 ONE YEAR LIMITED WARRANTY 10

www.apcoaviation.com
3
WARNING
This is not a training manual. It is extremely dangerous to yourself and others to attempt to use this or any paraglider without first completing a flying course
given by a qualified instructor.
Apco Aviation's gliders are carefully manufactured and inspected by the factory. Please use the glider only as described in this manual. Do not make any
changes to the glider.
AS WITH ANY SPORT - WITHOUT TAKING THE APPROPRIATE PRECAUTIONS, PARAGLIDING CAN BE DANGEROUS.

www.apcoaviation.com
4
1 DISCLAIMER OF LIABILITY
Taking into consideration the inherent risk in paragliding or hang gliding, (free flying and motorized), it must be expressly understood that the manufacturer and
seller do not assume any responsibility for accidents, losses and direct or indirect damage following the use or misuse of this product.
APCO Aviation Ltd. is engaged in the manufacture and sale of hang gliding, paragliding, motorized Para/hang gliding and emergency parachute equipment.
This equipment should be used under proper conditions and after proper instruction from a qualified instructor. APCO Aviation Ltd. has no control over the use of
this equipment and a person using this equipment assumes all risks of damage or injury.
APCO Aviation Ltd. disclaims any liability or responsibility for injuries or damages resulting from the use of this equipment.
The glider is designed to perform in the frame of the required class as certified.
2 INTRODUCTION
Adama (meaning ‘Earth’) was grown from demand.
After many requests from schools around the world to produce an affordable, dedicated ground handling wing, we have developed the Adama.
It has a full three riser system with trimmers, so caters for both free flight and paramotor schools.
The glider was designed and trimmed to be as close as possible in ground handling behaviour to a full size glider, aiming to teach the student the correct skills in
preparation for his first flights.
It also has a very wide wind range, and can be used in nil wind for forward inflation practice, all the way through to very strong wind conditions according to the
user’s skill and weight.
The materials chosen are extra durable to withstand years of use.
Adama is however not only intended for schools, but becomes a useful training tool for any pilot throughout his or her flying career.
WARNING!
Do not fly this equipment in any conditions. This equipment is for
the purposes of kiting and ground-handling ONLY. Attempting to
fly this equipment may result in serious injury or death. This
equipment is not certified for flight, nor has it been tested for flight.

www.apcoaviation.com
5
3 TECHNICAL DATA
ADAMA / Size
13
Code
54100
Cells
22
Area [m2]
13
Area (projected) [m2]
10.80
Span (incl. Stabilizer) [m]
7.16
Span (projected) [m]
5.53
Aspect Ratio
4
Aspect Ratio (projected)
2.85
Weight Range
N/A
Canopy Weight [kg]
2.45
Root Cord m
2.14
Length of Lines on B [m]
4.01
Total Length of Lines [m]
117

www.apcoaviation.com
6
4 CONSTRUCTION
The glider is constructed with a top and bottom surface, connected by ribs. One top and bottom panel, together with the connecting ribs is called a cell. Each cell
has an opening on the front lower part. The cells fill with air forcing the panels to take the shape dictated by the air-foil (rib) section.
On either side the wing ends in a stabilizer or wing tip, which provides straight-line (Yaw) stability and produces some outward lift to keep the span-wise tension.
The front part of the rib employs APCO's FLEXON batten system to keep the leading edge shaped at high speeds and in turbulent air. The FLEXON battens also
improve the performance and the launch characteristics of the glider.
The line hook-up points are made of Nylon tape.
5 MATERIALS
The glider is made from tear resistant Ripstop Nylon cloth, which is P.U. coated to zero porosity and then siliconized to give the fabric high resistance to the
elements. Different cloth is used for the top, bottom and ribs due to their different functions.
The lines are made of superaramide covered with a polyester sheath for protection against UV, wear and abrasion.
The bottom section of the brake lines is made of polyester because of its better mechanical properties.
The maillon quick links that attach the lines to the risers are made of stainless steel.
6 FLEXON® Batten system:
New generation FLEXON ® batten system incorporated (see below) in the
leading edge of the ribs, insuring perfect profile shape (instead of traditional
Mylar reinforcement). FLEXON ® battens reduce the weight of the glider by an
additional 500gr. and unlike Mylar reinforcement will guarantee no
deterioration in performance or launch.
Additional advantage of FLEXON batten is that it is practically indestructible,
safeguarding the performance and launch over the lifespan of the glider.

www.apcoaviation.com
7
7 TRIMMING
All Apco gliders are trimmed for optimum performance combined with unsurpassed safety. It is very important not to re-trim or tamper with any of the lines or risers
as this may alter the performance and safety. Trimming of the brake line should be done in accordance with this manual.
8 HARNESS
The Adama was developed in combination with APCO’s “First harness” and this is the recommended combination for ground handling training.
9 RISERS
The Adama has a full three riser system, with trimmers. These features help keep the
wing and risers similar to what a student will eventually be flying on, and so caters for
both free flight and paramotor schools.
The A riser is clearly marked in a different color for easy orientation of the risers by the
user.
10 GENERAL INSPECTION
FIRST CHECK AND INSPECTION
With every new glider, the following points should be checked:
•Connection points between the glider and the harness.
•Check that there are no lines twisted, tangled or knotted.
•Check that the trimmers are set to the neutral position.
REGULAR INSPECTION CHECKS
•Damage to lines, webbing and thread on the stitching of the harness and risers.
•The stainless-steel connection links on the risers are not damaged and are fully closed.
•The condition of the brake lines, stainless steel rings and the security of the knot attaching the brake handle to the brake line.
•The sewing and connection of the lines.
•Damage to hook up points on the glider.
•Internal damage to the ribs and diagonal ribs.
•Damage to the top and bottom panels and seams between panels.
LINE MAINTENANCE
Several groups of suspension lines and brakes line are attached to each riser. The groups are called A, B, C and brake lines. Superaramid lines are known to be
sensitive to the influence of the elements. They must be carefully inspected periodically.
•Avoid sharp bending and squeezing of lines.

www.apcoaviation.com
8
•Take care that people do not step on the lines.
•Do not pull or jerk the lines if they are caught on rocks or vegetation.
•Avoid getting the lines wet. If they do get wet, dry them as soon as possible at room temperature and never store them wet.
For replacement lines please refer to our online direct line services.
11 INFLATION / TRAINING
Always wear a helmet before connecting yourself to the wing / putting the harness on.
The most common reason for a bad inflation is a bad layout
LAYOUT
Spread the glider on the ground. Spread the lines, dividing them into eight groups A, B, C and brake lines left and right. Make sure the lines are free and not twisted
or knotted.
Make sure all the lines are on top of the glider and none are caught on vegetation or rocks under the glider. Lay out the glider in a horseshoe shape. This method
ensures that all the lines are equally tensioned on launch, and results in an even inflation.
The Flexon rib reinforcements will keep the leading edge open for easy inflation.
ALPINE LAUNCH OR FORWARD LAUNCH
The Adama has very good launch behaviour in no wind conditions.
For the best results we recommend the use of the following techniques: Lay out the glider and position yourself in the centre of the wing with the lines almost tight.
With a positive and constant force inflate the wing holding only the A-risers, and smoothly increase your running speed. The wing will quickly inflate and settle
above your head without the tendency to stick behind.
After you leave the A-risers, apply about 15% brakes and the Adama will be steady overhead.
STRONG WIND AND REVERSE LAUNCH
It is advisable to have an assistant hold you when attempting a strong wind inflation. It also helps if you walk towards the wing and leave the A-riser just before the
glider gets above your head.
The assistant should let you walk in under the wing on inflation rather than resist the inflation; this reduces the tendency of the glider to lift the student.
COBRA LAUNCH
The Adama will do a perfect Cobra Launch, and it is a good skill to master for strong winds and / or sites with limited space, and in general, will produce a pilot with
a greater skill set if this technique is also taught.

www.apcoaviation.com
9
POWERED FLIGHT GROUND TRAINING
We recommend doing all the initial ground schooling with a ground handling harness, which will reduce fatigue. Only progress onto inflation with the frame and
motor once all the needed ground handling skills have been mastered.
• Never place the power unit downwind of the paraglider during preparation.
• Never start the motor for ground schooling.
12 PACKING
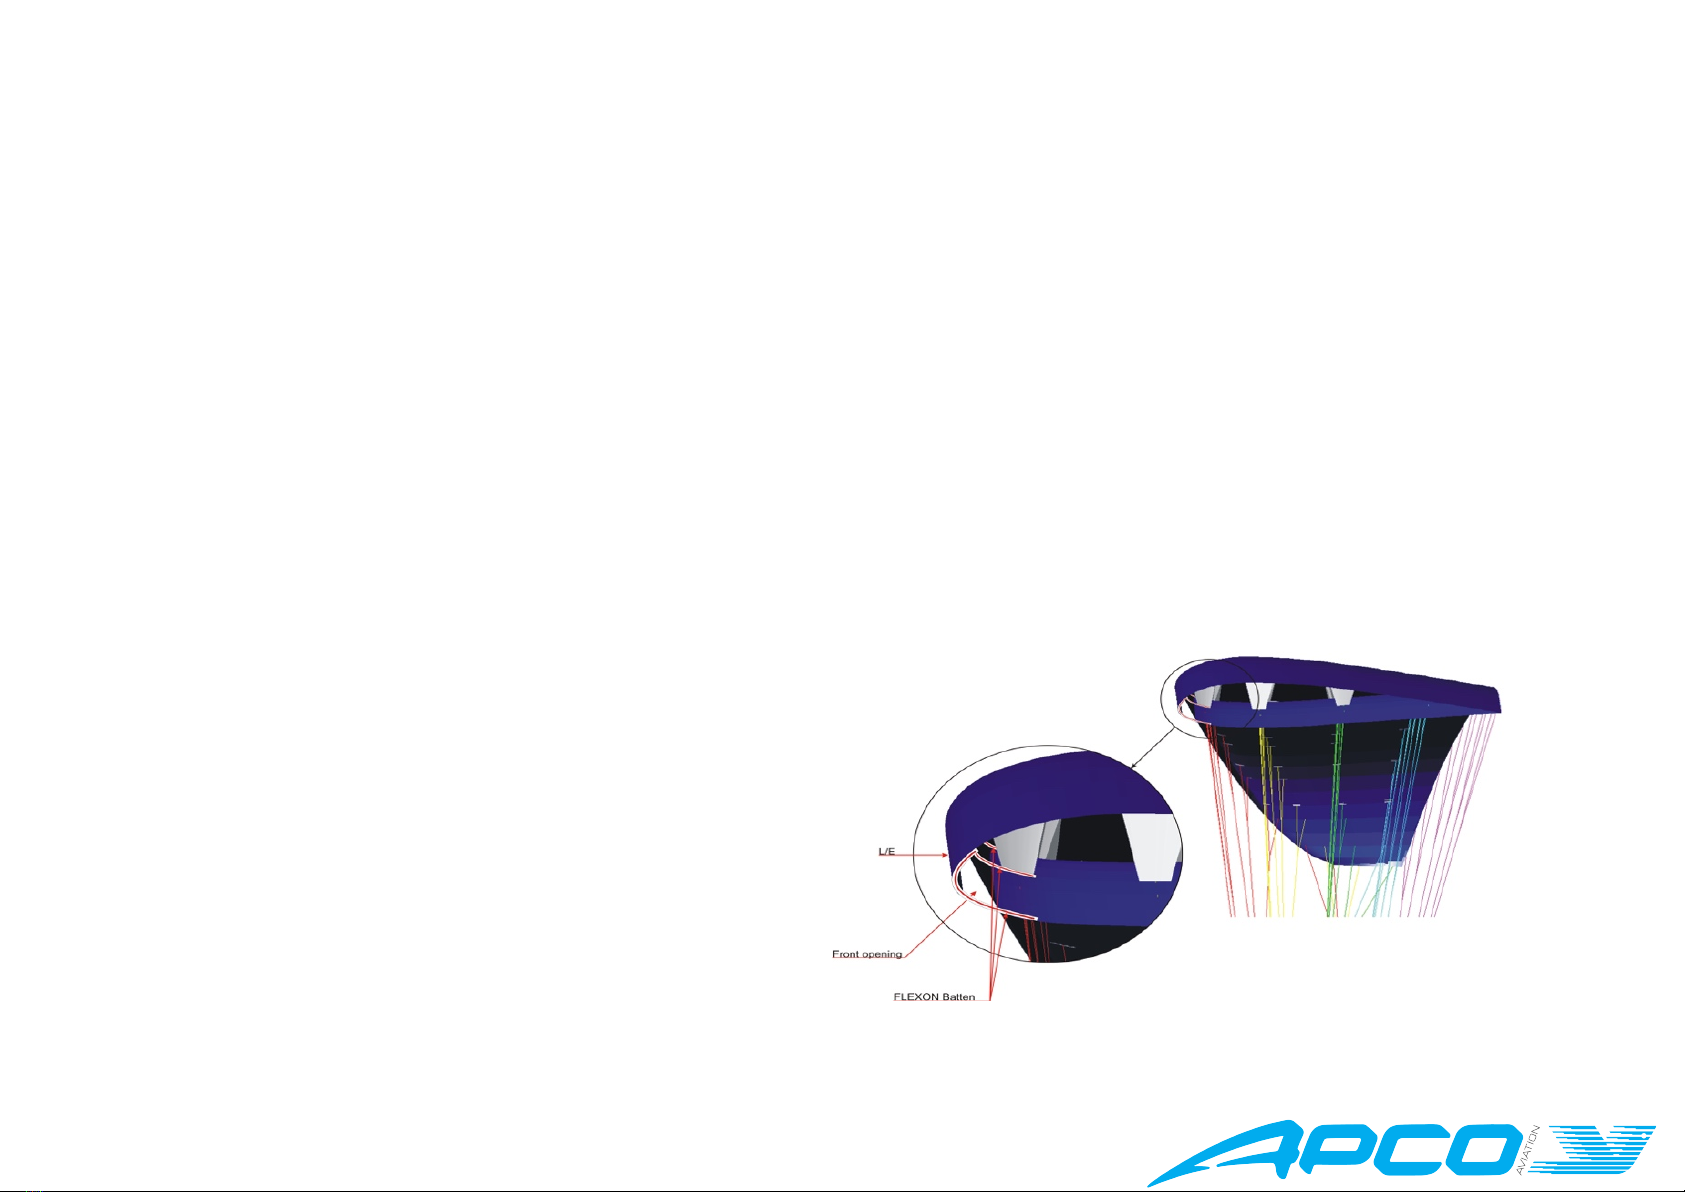
No special needs to be taken with the Flexon battens (Leading Edge Stiffeners) – the wing can be folded “old school” and does not need concertina folding. Spread
the wing completely out on the ground. Separate the lines to the left and the right side of the glider. If the risers are disconnected from the harness, join the two
risers together by passing one carabiner loop through the other. This keeps them neatly together and helps to stop line tangles.
Fold the canopy from the right and left sides, working towards the centre, press out the air, working from the rear towards the front. Place the risers at the trailing
edge of the folded canopy and use them to finally fold the canopy from trailing edge to leading edge.
13 MAINTENANCE & CLEANING
Cleaning should be carried-out with a damp cloth and if necessary, gentle soap. Baby wipes also do
a good job, but be sure to wipe any residue of with a clean cloth. If the glider comes in contact with
salt water, rinse it thoroughly with fresh water. Do not use solvents of any kind, as this may remove
the protective coatings and destroy the fabric.
14 BUTT HOLE II (Auto Debris release valves)
The Adama is equipped with Butt-hole II, which automatically clears smaller particles such as sand,
grass and stones from the wing. If anything too large to pass is seen inside the wing, it should be
removed through the cell openings.
15 STORAGE
When the glider is not in use, it should be stored in a cool, dry place. A wet glider should first be dried (out of direct sunlight). Protect the glider against sunlight (UV
radiation). When on the hill keep the glider covered or in the bag. Never store or transport the glider near paint, petrol or any other chemicals.
Do not leave your paraglider in the trunk of a car or exposed to the sun.
Temperatures on a hot summer’s day in a closed environment: car, etc. can easily reach over 60ºC
At these temperatures Nylon permanently changes its characteristics which may alter the behaviour and shape of the wing.
It will cause permanent damage to the paraglider, rendering it non-airworthy. APCO’s warranty will not be applicable.

www.apcoaviation.com
10
16 DAMAGE
Spinnaker repair tape (for non-siliconized cloth) can repair tears in the wing (up to 5cm). A professional repair facility should repair greater damage.
17 ONE YEAR LIMITED WARRANTY
One Year Manufacturing defects only
18 LINE SKETCH

www.apcoaviation.com
11
Table of contents
Other Apco Aircraft manuals