Apogee SN-500-SS User manual

Revision:08/2021
Copyright © 2018 – 2021
Campbell Scientific, Inc.

Table of contents
1. Introduction 1
2. Precautions 1
3. Initial inspection 1
4. QuickStart 1
5. Overview 4
6. Specifications 6
7. Installation 6
7.1 Wiring to the data logger 6
7.2 Programming 7
7.2.1 CRBasic programming 7
7.3 Siting 8
7.4 Mounting 8
8. Operation 11
8.1 Sensor measurements 11
8.2 Long cables 12
9. Maintenance, calibration, and troubleshooting 13
9.1 Maintenance 13
9.2 Calibration 13
9.3 Troubleshooting 14
Appendix A. Importing Short Cut code into CRBasic Editor 15
Appendix B. SDI-12 sensor support 16
B.1 SDI-12 command basics 16
B.1.1 Acknowledge active command (a!) 17
B.1.2 Send identification command (al!) 17
B.1.3 Start verification command (aV!) 18
B.1.4 Address query command (?!) 18
B.1.5 Change address command (aAb!) 18
B.1.6 Start measurement commands (aM!) 19
Table of Contents - i

B.1.7 Start concurrent measurement commands (aC!) 19
B.1.8 Start measurement commands with cyclic redundancy check (aMC! and aCC!) 21
B.1.9 Stopping a measurement command 21
B.1.10 Send data command (aD0! … aD9!) 21
B.1.11 Continuous measurement command (aR0! … aR9!) 22
B.1.12 Extended commands 22
B.2 SDI-12 transparent mode 22
B.2.1 Changing an SDI-12 address 23
B.3 References 25
Table of Contents - ii

1. Introduction
This four-component net radiometer, manufactured by Apogee Instruments, provides individual
measurement of net radiation components. This sensor features an SDI-12 output, eliminating
the need for multiple analog terminals to measure the individual components of net radiation.
The SN500SS offers a complete package that includes a net radiometer, mounting rod, pigtail
lead cable for data logger interface, and a carrying case.
NOTE:
This manual provides information only for CRBasic data loggers. For retired Edlog data logger
support, contact Campbell Scientific.
2. Precautions
lREAD AND UNDERSTAND the Safety section at the back of this manual.
lCare should be taken when opening the shipping package to not damage or cut the cable
jacket. If damage to the cable is suspected, consult with Campbell Scientific.
lThe SN500SS is a precision instrument. Please handle it with care.
lWhen cleaning the sensor, never use an abrasive material or cleaner on the diffuser.
3. Initial inspection
Upon receipt of the SN500SS, inspect the packaging and contents for damage. File damage
claims with the shipping company.
4. QuickStart
A video that describes data logger programming using Short Cut is available at:
www.campbellsci.com/videos/cr1000x-data logger-getting-started-program-part-3 .Short
Cut is an easy way to program your data logger to measure the sensor and assign data logger
SN500SS Net Radiometer 1

wiring terminals. Short Cut is available as a download on www.campbellsci.com . It is included
in installations of LoggerNet,RTDAQ, and PC400.
The following procedure also shows using Short Cut to program the SN500SS.
1. Open Short Cut and click Create New Program.
2. Double-click the data logger model.
3. In the Available Sensors and Devices box, type SN500SS or locate the sensor in the Sensors
> Meteorological > Solar Radiation folder. Double-click SN500SS. Type the correct SDI-12
Address.
SN500SS Net Radiometer 2

4. Click the Wiring tab to see how the sensor is to be wired to the data logger. Click OK after
wiring the sensor.
5. Repeat steps three and four for other sensors.
6. In Output Setup, type the scan rate, meaningful table names, and Data Output Storage
Interval.
NOTE:
Because of the delays using SDI-12, Campbell Scientific recommends measurement
scans of 10 seconds or more.
SN500SS Net Radiometer 3

7. Select the measurement and its associated output option.
8. Click Finish and save the program. Send the program to the data logger if the data logger
is connected to the computer.
9. If the sensor is connected to the data logger, check the output of the sensor in the data
display in LoggerNet,RTDAQ, or PC400 to make sure it is making reasonable
measurements.
5. Overview
The SN500SS is a four-component instrument with individual upward- and downward-looking
pyranometers and pyrgeometers. Each radiometer consists of a thermopile detector and filter
SN500SS Net Radiometer 4

mounted in an anodized aluminum housing. Each radiometer is heated to minimize the effects of
dew, frost, snow, and ice on the filter and sensor head. Analog signals from each radiometer are
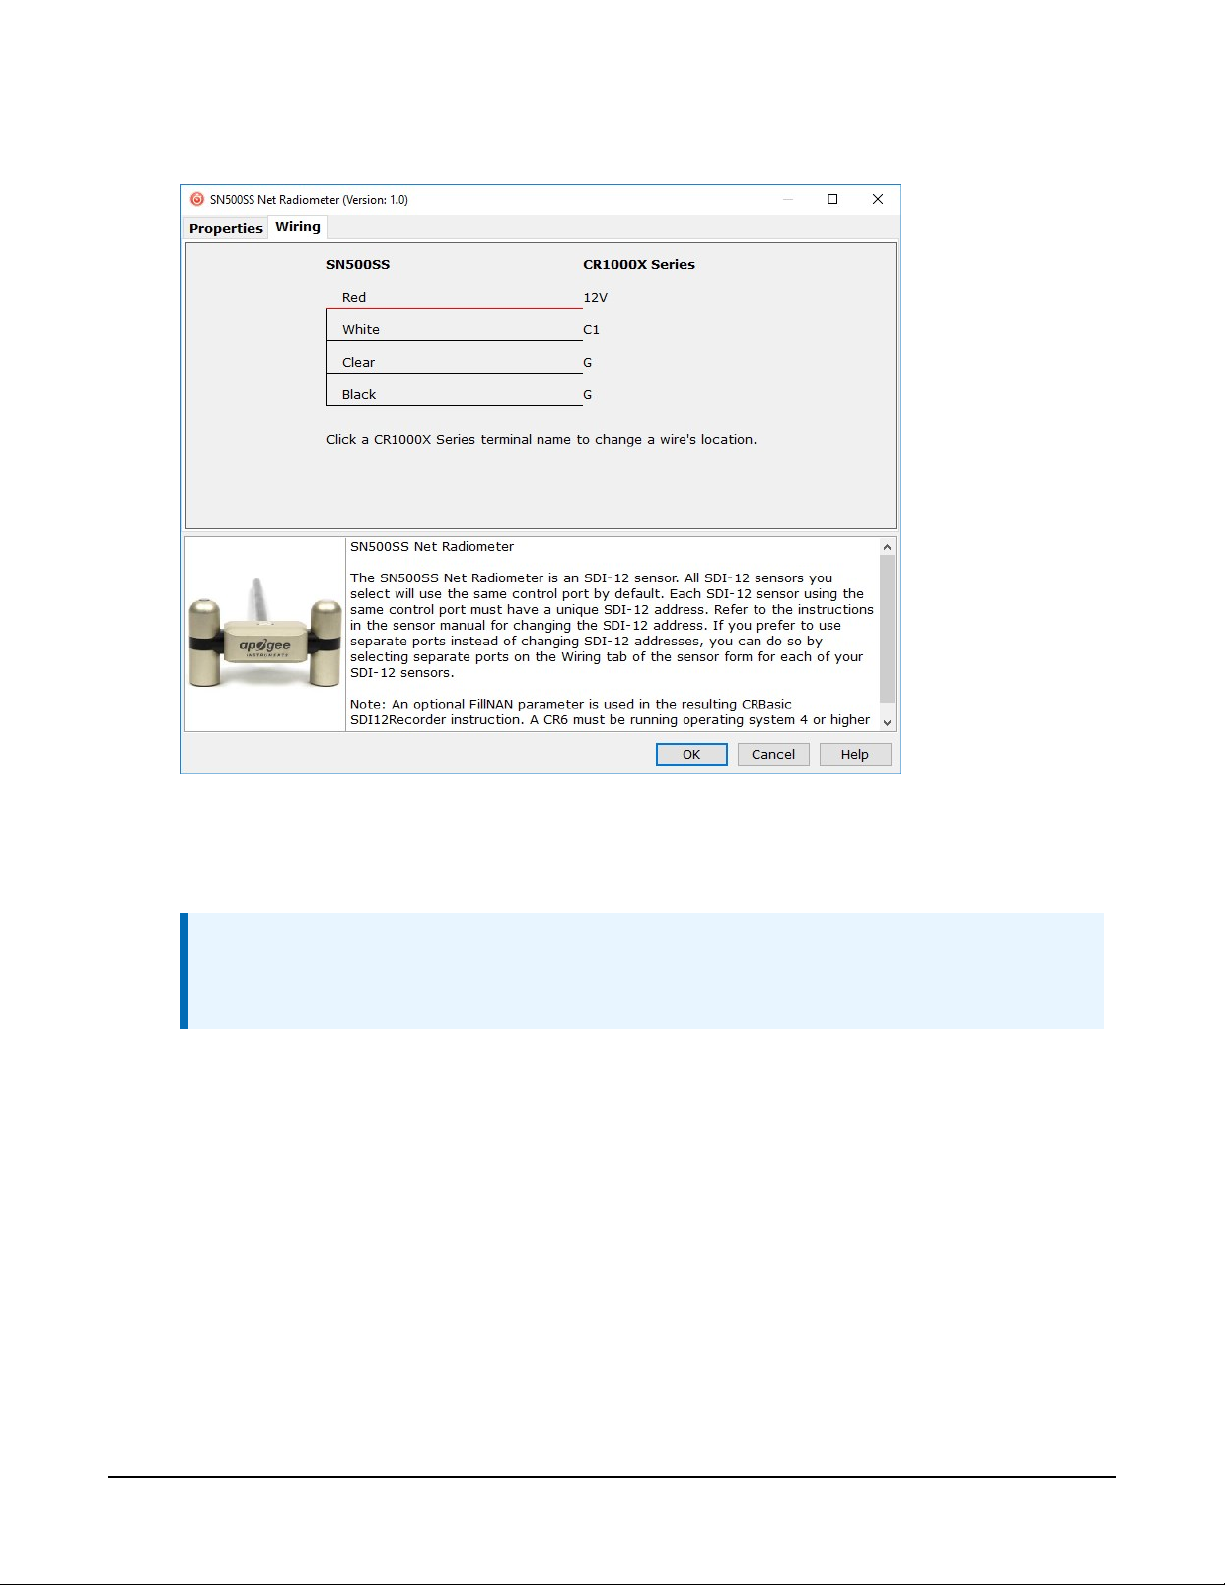
measured with an onboard voltmeter and converted to SDI-12 outputs, eliminating the need for
multiple analog data logger terminals to make the four-component measurement of net
radiation. The SN500SS is small and lightweight to facilitate mounting.
Net radiation at Earth surface is the source of available energy that drives key processes,
including surface and atmospheric heating, evaporation, sublimation, and transpiration.
Shortwave radiation (approximately 280 to 4000 nm) is emitted by the sun, and a fraction
incident at Earth’s surface is reflected. Longwave radiation (approximately 4000 to 100,000 nm) is
emitted by molecules in the atmosphere and land surfaces. Net radiation is the difference
between incoming (downwelling) and outgoing (upwelling) shortwave and longwave radiation.
Net radiation at Earth surface is spatially and temporally variable due to changes in position of
the sun with respect to Earth’s surface, changes in atmospheric conditions, and differences in
land surface conditions. Shortwave radiation accounts for a larger proportion of net radiation
during the day when the sun is shining. Longwave radiation contributes to net radiation during
the day and at night.
Net shortwave radiation is the difference between incoming shortwave (from sun, SWi) and
outgoing shortwave (reflected by surface, SWo). Net longwave radiation is the difference
between incoming longwave (emitted by molecules in the atmosphere, LWi) and outgoing
longwave (emitted by elements at the surface, LWo). Net radiation is the sum of net shortwave
and net longwave radiation. Net radiation changes with solar zenith angle, atmospheric
conditions (for example, degree of cloudiness), and surface conditions (for example, bare soil,
plant cover, snow).
Typical applications of net radiometers include measurement of net radiation on surface flux
towers and weather stations. Net radiation is a key variable in the surface energy balance and
influences turbulent fluxes, including evapotranspiration.
Features:
lIndividual measurement of four net radiation components
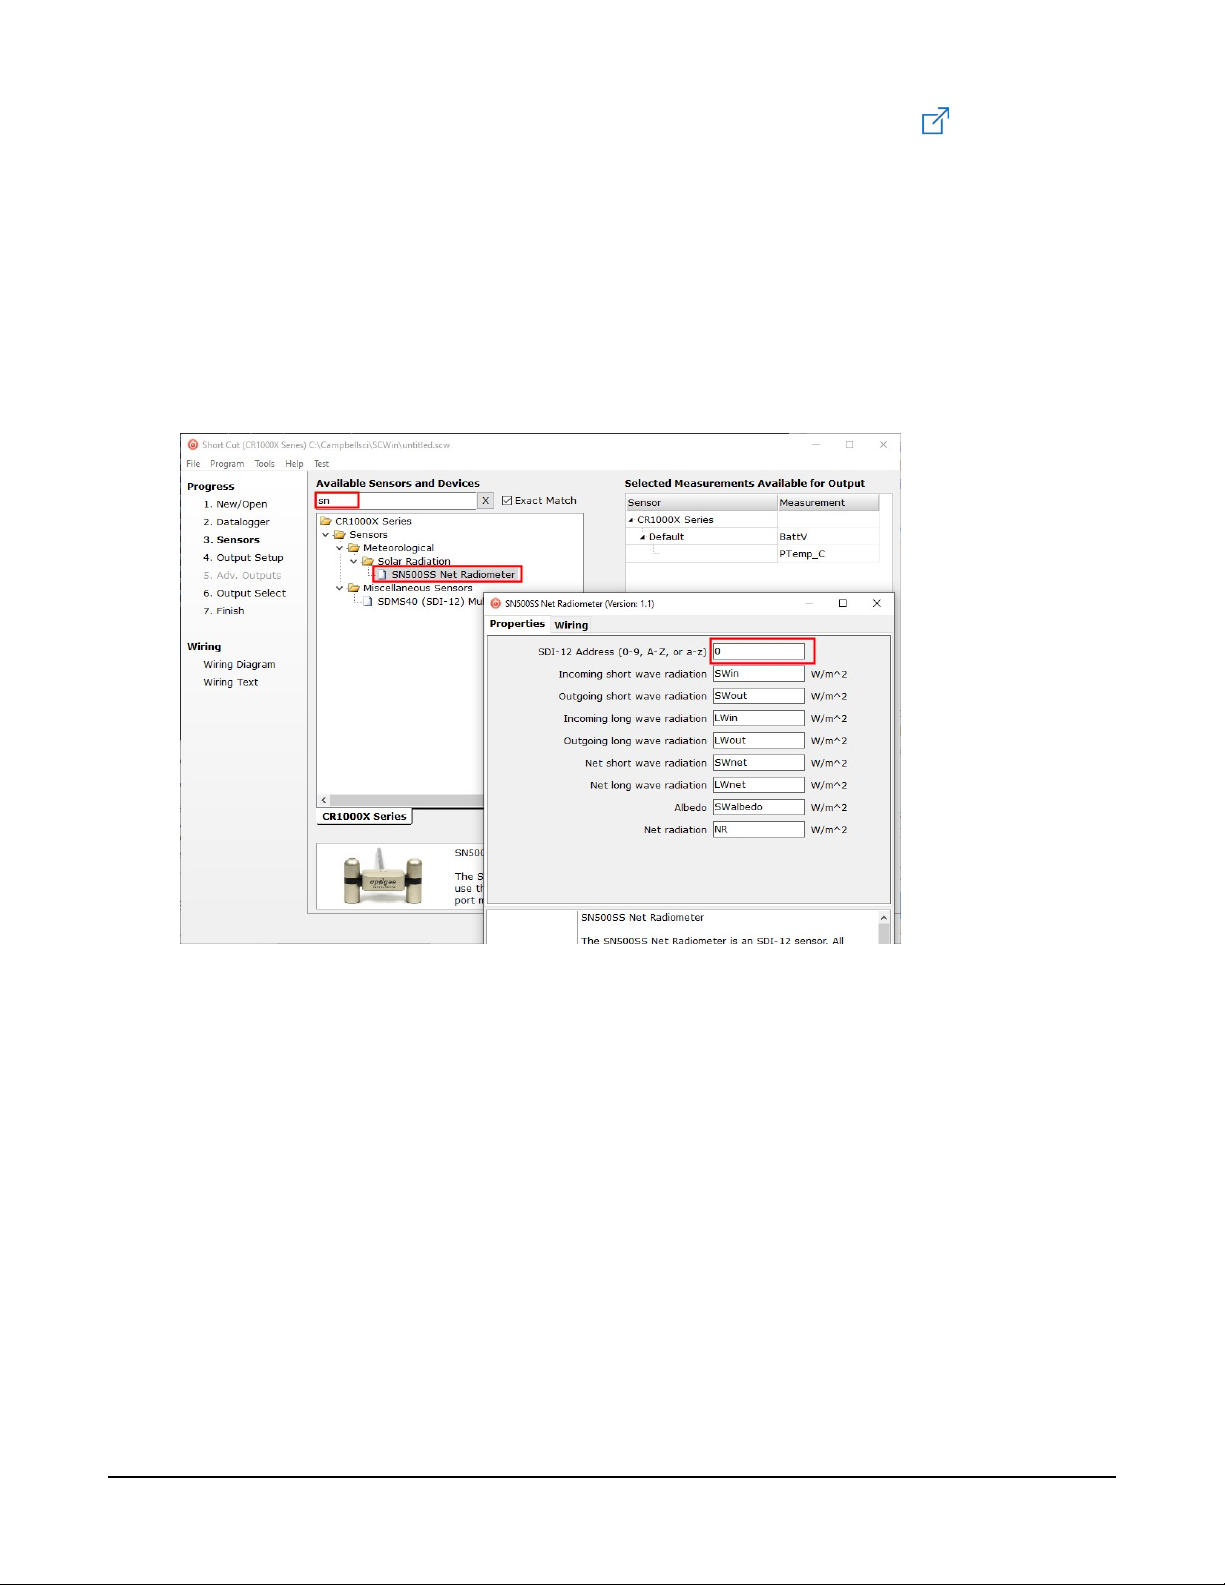
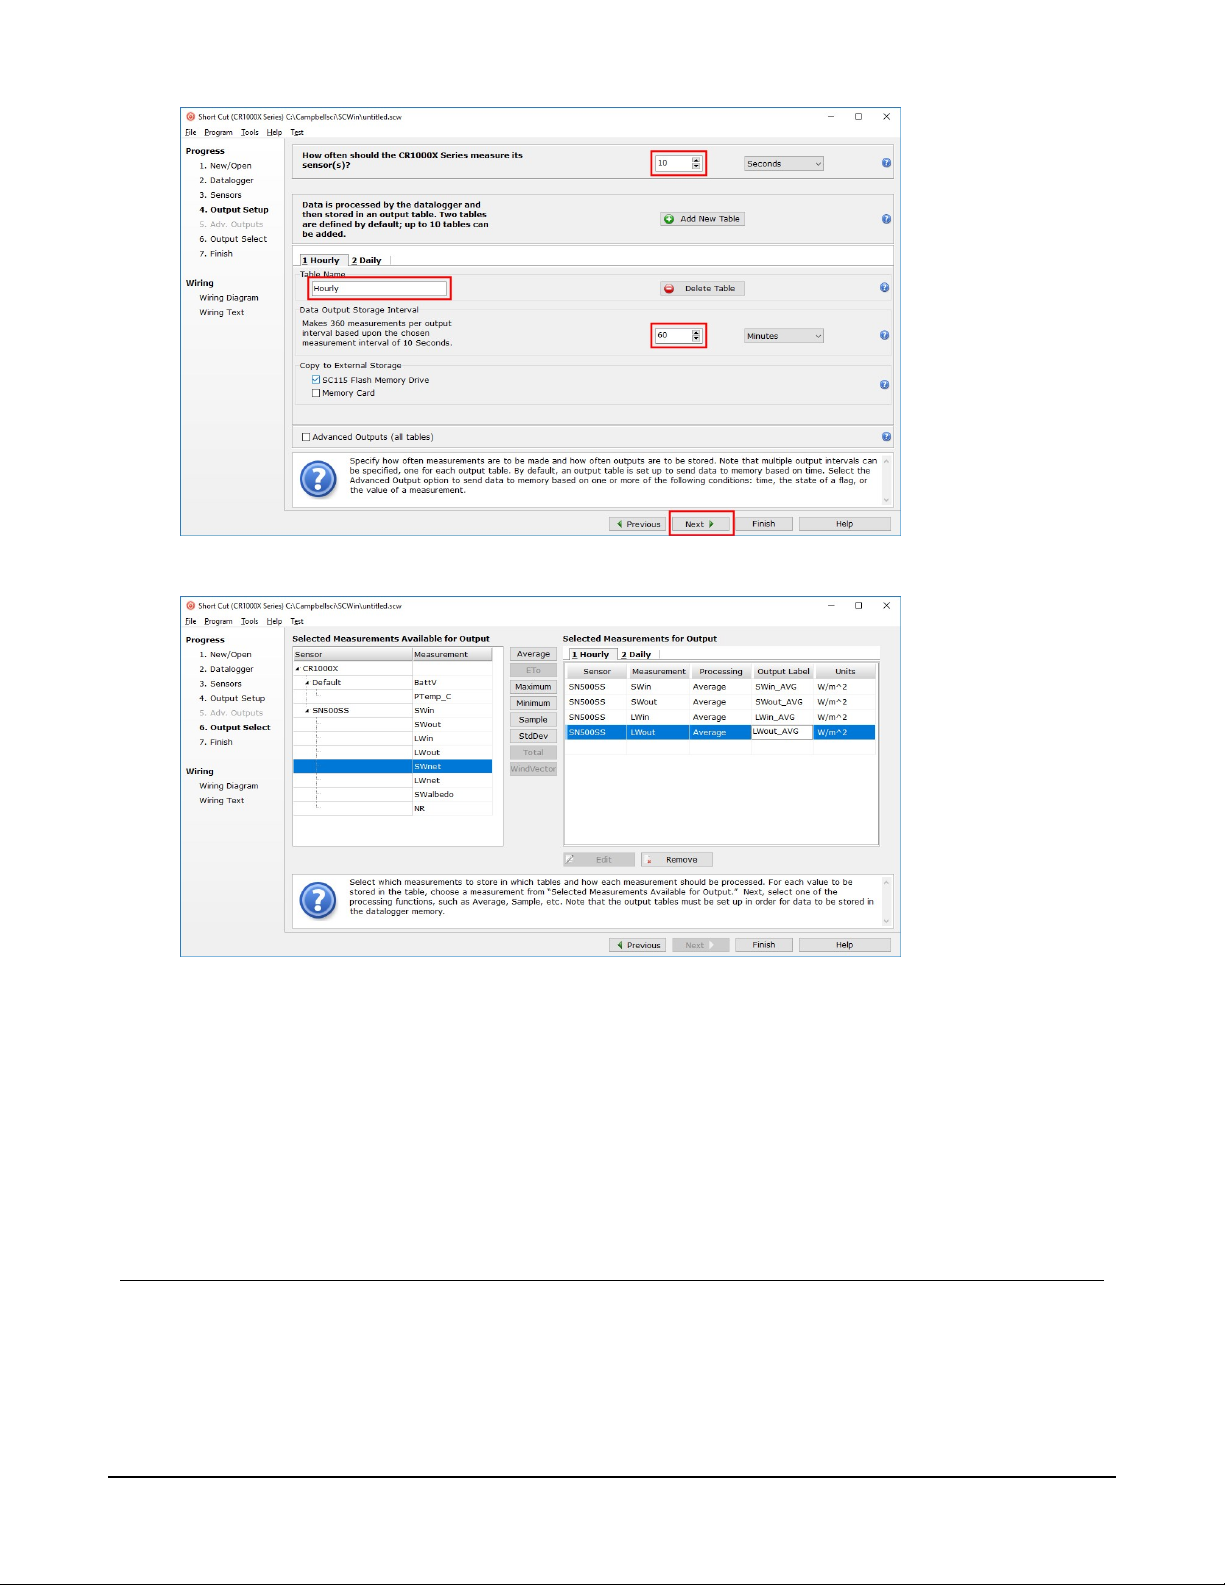
lSDI-12 output, eliminating the need for multiple analog terminals to measure the individual
components of net radiation
lComplete package that includes net radiometer, mounting rod, cable for data logger
interface, and carrying case
lCompatible with Campbell Scientific CRBasic data loggers: GRANITE-series, CR6, CR3000,
CR1000X, CR800-series, CR300-series, CR1000
SN500SS Net Radiometer 5

6. Specifications
Pyranometer spectral response: 385 to 2105 nm (upward-looking)
295 to 2685 nm (downward-looking)
Pyranometer sensitivity range: 0.057 mV per W/m2(upward-looking)
0.15 mV per W/m2(downward-looking)
Pyranometerexpectedoutputrange: 0 to 114 mV (upward-looking)
0 to 300 mV (downward-looking)
Pyrgeometer spectral response: 5,000 to 30,000 nm
Pyrgeometer sensitivity range: 0.12 mV per W/m2
Pyrgeometerexpectedoutputrange: –24 to 24 mV
Operating temperature range: –50 to 80 °C
Relative humidity: 0 to 100%
Response time: 1 s (SDI-12 data transfer rate; detector response times
are 0.5 s)
Heater current drain (at 12 VDC): 63 mA (heaters on; communication enabled)
1.5 mA (heaters off; communication enabled)
0.6 mA (heaters off; communication disabled)
Dimensions: 11.6 x 4.5 x 6.6 cm (4.6 x 1.8 x 2.6 in)
Weight: 320 g (11.29 oz) with mounting rod and 5 m (16.4 ft)
cable
Compliance: View compliance documents at:
www.campbellsci.com/sn500ss
7. Installation
If you are programming your data logger with Short Cut, skip Wiring to the data logger (p. 6) and
Programming (p. 7). Short Cut does this work for you. See QuickStart (p. 1) for a tutorial.
7.1 Wiring to the data logger
Connect the SN500SS to the data logger in the order shown in Table 7-1 (p. 7).
SN500SS Net Radiometer 6

Table 7-1: Wire color, function, and data logger connection
Wire color Wire function Data logger connection
White SDI-12 signal C,SDI-12, or Uconfigured for SDI-121
Clear Shield G
Red Power 12V
Black Power ground G
1Uand Cterminals are automatically configured by the measurement instruction.
For the CR6 and CR1000X data loggers, triggering conflicts may occur when a companion
terminal is used for a triggering instruction such as TimerInput(),PulseCount(), or
WaitDigTrig(). For example, if the SN500SS is connected to C3 on a CR1000X, C4 cannot be
used in the TimerInput(),PulseCount(), or WaitDigTrig() instructions.
7.2 Programming
Short Cut is the best source for up-to-date programming code for Campbell Scientific data
loggers. If your data acquisition requirements are simple, you can probably create and maintain a
data logger program exclusively with Short Cut. If your data acquisition needs are more complex,
the files that Short Cut creates are a great source for programming code to start a new program
or add to an existing custom program.
NOTE:
Short Cut cannot edit programs after they are imported and edited in CRBasic Editor.
AShort Cut tutorial is available in QuickStart (p. 1). If you wish to import Short Cut code into
CRBasic Editor to create or add to a customized program, follow the procedure in Importing
Short Cut code into CRBasic Editor (p. 15). Programming basics for CRBasic data loggers are
provided in the following section. Downloadable example program is available at
www.campbellsci.com/downloads/sn500ss-example-program .
7.2.1 CRBasic programming
The SDI12Recorder() instruction is used to measure an SN500SS. This instruction sends a
request to the sensor to make a measurement and then retrieves the measurement from the
sensor. See Sensor measurements (p. 11) for more information.
For most data loggers, the SDI12Recorder() instruction has the following syntax:
SDI12Recorder(Destination, SDIPort, SDIAddress, “SDICommand”, Multiplier, Offset,
FillNAN, WaitonTimeout)
SN500SS Net Radiometer 7

For the SDIAddress, alphabetical characters need to be enclosed in quotes (for example, “A”).
Also enclose the SDICommand in quotes as shown. The Destination parameter must be an
array. The required number of values in the array depends on the command (see Table 8-1 (p.
12)).
FillNAN and WaitonTimeout are optional parameters (refer to CRBasic Help for more
information).
7.3 Siting
Mount the sensor so no shadows or reflections will be cast on it at any time of day from
obstructions such as trees, buildings, or the mast or structure on which it is mounted. For the
lower sensors, 99% of the input comes from a circular area with a radius of ten times the
mounting height. For example, if the instrument is mounted 6 m above the surface, 99% of the
input of the lower sensors comes from a circular area with a 60 m radius.
To avoid shading or reflection effects and to promote spatial averaging, the SN500SS should be
mounted at least 1.5 m (5 ft) above the ground or crop surface. Campbell Scientific recommends
that the SN500SS be mounted to a separate vertical pipe at least 7.6 m (25 ft) from any other
mounting structures.
The sensor should be mounted with the cable pointing towards the nearest magnetic pole. For
example, in the Northern Hemisphere, point the cable toward the North Pole.
7.4 Mounting
The SN500SS mounting kit secures the sensor directly to a vertical pipe, or to a CM202, CM203,
CM204, or CM206 crossarm. Mount the sensor as follows:
1. Attach the mounting rod to the SN500SS (FIGURE 7-1 (p. 9) and FIGURE 7-2 (p. 9)).
SN500SS Net Radiometer 8

FIGURE 7-1. Back of SN500SS shows the mounting rod port (left) and cable connector
FIGURE 7-2. Back of SN500SS with the mounting rod and cable connected
2. Attach the mounting bracket to the vertical mounting pipe, or CM200-series crossarm
using the provided U-bolt (FIGURE 7-3 (p. 10)). If mounted to a vertical pipe, ensure that the
pipe does not cast a reflection on the sensor. This includes both the incoming and
outgoing sections of the sensor.
SN500SS Net Radiometer 9

FIGURE 7-3. Two views of the SN500SS mounted to a horizontal crossarm
3. Insert the sensor support arm into the mounting block of the mounting bracket kit (FIGURE
7-3 (p. 10)). Make sure the sensor points in the direction of the arrows that appear after the
word SENSOR on top of the bracket.
CAUTION:
Do not attempt to rotate the instrument using the sensor heads, or you may damage
the sensors; use the mounting rod only.
4. Perform a coarse leveling of the sensor using the sensor bubble level.
5. Tighten the four screws on top of the mounting bracket to properly secure the support arm
so that it does not rotate (FIGURE 7-3 (p. 10)).
CAUTION:
The four screws need to be tightened evenly to ensure that the screwhead is in full
contact with the V-plate.
6. Perform the fine leveling using the three spring-loaded leveling screws.
7. Plug the sensor cable into the connector and route the cable to the instrument enclosure.
8. Use the UV-resistant cable ties included with the tripod or tower to secure the cable to the
vertical pipe or crossarm and tripod/tower.
SN500SS Net Radiometer 10

8. Operation
8.1 Sensor measurements
The SN500SS responds to the SDI-12 commands shown in Table 8-1 (p. 12). When using an M!,
M1!,M2!,M3!, or M4! command, the data logger waits for the time specified by the sensor,
sends the D! command, pauses its operation, and waits until either it receives the data from the
sensor or the sensor timeout expires. If the data logger receives no response, it will send the
command a total of three times, with three retries for each attempt, or until a response is
received. Because of the delays this command requires, it is only recommended in measurement
scans of 10 seconds or more.
AC!,C1!,C2!,C3!, or C4! command follows the same pattern as an M!,M1!,M2!,M3!, or
M4! command with the exception that it does not require the data logger to pause its operation
until the values are ready. Rather, the data logger picks up the data with the D! command on the
next pass through the program. Another measurement request is then sent so that data is ready
on the next scan.
NOTE:
This section briefly describes using the SDI-12 commands. Additional SDI-12 information is
available in SDI-12 sensor support (p. 16), or at www.sdi-12.org .
The MC! and CC! commands are the same as the previous commands, but where the C at the
end of the command forces a validation for the data received from the sensor using a checksum.
If the checksum is invalid, the data logger will re-request the data up to three times. The
checksum validation increases the measurement time by about 40 milliseconds if there are no
errors. Retries will increase the measurement time in proportion to the number of retries. The
checksum option is necessary only for long cable lengths or when electronic noise may impact
measurement transmission to the data logger.
SN500SS Net Radiometer 11

Table 8-1: SN500SS SDI-12 commands
SI-12 command
(ais the sensor address) Values returned or function Units
aM!,aC!,
aMC!, or aCC!
1. Incoming short-wave (SW) radiation
2. Outgoing SW radiation
3. Incoming long-wave (LW) radiation
4. Outgoing LW radiation
W m–2
W m–2
W m–2
W m–2
aM1!,aC1!,
aMC1!,oraCC1!
1. Net SW
2. Net LW
3. Total Net Radiation
W m–2
W m–2
W m–2
aM2!,aC2!,
aMC2!, or aCC2!
1. Voltage signal for incoming LW
2. Sensor body temperature for
incoming LW
3. Voltage signal for outgoing LW
4. Sensor body temperature for
outgoing LW
mV
°C
mV
°C
aM4!,aC4!,
aMC4!, or aCC4!
Albedo W m–2
aXHON! Turn heater on
aXHOFF! Turn heater off
?! Returns the SDI-12 Address
See SDI-12 sensor support (p. 16) for additional commands and details of the SDI-12 protocol.
8.2 Long cables
The SDI-12 standard specifies the maximum total cable length to be 61 m (200 ft). Digital data
transfer eliminates offset errors due to cable lengths. However, digital communications can break
down when cables are too long, resulting in either no response from the sensor or corrupted
readings.
SN500SS Net Radiometer 12

9. Maintenance, calibration, and
troubleshooting
NOTE:
All factory repairs and recalibrations require a returned material authorization (RMA) and
completion of the “Statement of Product Cleanliness and Decontamination” form. Refer to
the Assistance page at the end of this manual for more information.
9.1 Maintenance
Moisture or debris on the filters (diffuser for upward-looking pyranometer, glass window for
downward-looking pyranometer, silicon windows for pyrgeometers) is a common cause of
errors. Remove dust or organic deposits by using water or window cleaner and a soft cloth or
cotton swab. Remove salt deposits by using vinegar and a soft cloth or cotton swab.
CAUTION:
Never use an abrasive material or cleaner on the diffuser.
9.2 Calibration
The Clear Sky Calculator (www.clearskycalculator.com ) can be used to determine the need for
pyranometer recalibration. It determines total shortwave radiation incident on a horizontal
surface at any time of day at any location in the world. It is most accurate when used near solar
noon in spring and summer months, where accuracy over multiple clear and unpolluted days is
estimated to be ±4% in all climates and locations around the world. For best accuracy, the sky
must be completely clear, as reflected radiation from clouds causes incoming radiation to
increase above the value predicted by the clear sky calculator. Measured values of total
shortwave radiation can exceed values predicted by the Clear Sky Calculator due to reflection
from thin, high clouds and edges of clouds, which enhances incoming shortwave radiation. The
influence of high clouds typically shows up as spikes above clear sky values, not a constant offset
greater than clear sky values.
To determine recalibration need, input site conditions into the calculator and compare total
shortwave radiation measurements to calculated values for a clear sky. If sensor shortwave
radiation measurements over multiple days near solar noon are consistently different than
calculated values (by more than 6 %), the sensor should be cleaned and re-leveled. If
SN500SS Net Radiometer 13

measurements are still different after a second test, return to Campbell Scientific for recalibration
(see Assistance page).
9.3 Troubleshooting
Symptom: –9999 or NAN readings
1. Check that the sensor is wired to the control or U terminal specified by the
SDI12Recorder() instruction.
2. Check the voltage to the sensor with a digital voltage meter. If a switched 12V terminal is
used, temporarily connect the red wire to a 12V terminal (non-switched) for test purposes.
3. Verify the probe SDI-12 address matches the address entered for the SDI12Recorder()
instruction. The address can be verified or changed with the commands described in SDI-12
sensor support (p. 16).
SN500SS Net Radiometer 14

Appendix A. Importing Short
Cut code into CRBasic Editor
Short Cut creates a .DEF file that contains wiring information and a program file that can be
imported into the CRBasic Editor. By default, these files reside in the C:\campbellsci\SCWin folder.
Import Short Cut program file and wiring information into CRBasic Editor:
1. Create the Short Cut program. After saving the Short Cut program, click the Advanced tab
then the CRBasic Editor button. A program file with a generic name will open in CRBasic.
Provide a meaningful name and save the CRBasic program. This program can now be
edited for additional refinement.
NOTE:
Once the file is edited with CRBasic Editor,Short Cut can no longer be used to edit the
program it created.
2. To add the Short Cut wiring information into the new CRBasic program, open the .DEF file
located in the C:\campbellsci\SCWin folder, and copy the wiring information, which is at
the beginning of the .DEF file.
3. Go into the CRBasic program and paste the wiring information into it.
4. In the CRBasic program, highlight the wiring information, right-click, and select Comment
Block. This adds an apostrophe (') to the beginning of each of the highlighted lines, which
instructs the data logger compiler to ignore those lines when compiling. The Comment
Block feature is demonstrated at about 5:10 in the CRBasic | Features video .
SN500SS Net Radiometer 15

Appendix B. SDI-12 sensor
support
SDI-12, Serial Data Interface at 1200 baud, is a protocol developed to simplify sensor and data
logger compatibility. Only three wires are necessary — serial data, ground, and 12 V. With unique
addresses, multiple SDI-12 sensors can connect to a single SDI-12 terminal on a Campbell
Scientific data logger.
This appendix discusses the structure of SDI-12 commands and the process of querying SDI-12
sensors. For more detailed information, refer to version 1.4 of the SDI-12 protocol, available at
www.sdi-12.org .
For additional information, refer to the SDI-12 Sensors | Transparent Mode and SDI-12 Sensors |
Watch or Sniffer Mode videos.
B.1 SDI-12 command basics
SDI-12 commands have three components:
lSensor address (a) – a single character and the first character of the command. Use the
default address of zero (0) unless multiple sensors are connected to the same port.
lCommand body – an upper case letter (the “command”), optionally followed by one or
more alphanumeric qualifiers.
lCommand termination (!) – an exclamation mark.
An active sensor responds to each command. Responses have several standard forms and always
terminate with <CR><LF> (carriage return and line feed). Standard SDI-12 commands are listed
in Table B-1 (p. 16).
Table B-1: Campbell Scientific sensor SDI-12 command and response set
Name Command Response1
Acknowledge Active a! a<CR><LF>
Send Identification aI! allccccccccmmmmmmvvvxxx...xx
<CR><LF>
Start Verification aV! atttn <CR><LF>
SN500SS Net Radiometer 16

Table B-1: Campbell Scientific sensor SDI-12 command and response set
Name Command Response1
Address Query ?! a<CR><LF>
Change Address aAb! b<CR><LF>
Start Measurement aM!
aM1!...aM9! atttn<CR><LF>
Start Measurement
and Request CRC
aMC!
aMC1!...aMC9! atttn <CR><LF>
Start Concurrent Measurement aC!
aC1!...aC9! atttnn<CR><LF>
StartConcurrentMeasurement
and Request CRC
aCC!
aCC1!...aCC9! atttnn<CR><LF>
Send Data aD0!...aD9! a<values><CR><LF> or
a<values><CRC><CR><LF>
Continuous Measurement aR0!...aR9! a<values><CR><LF>
Continuous Measurement
and Request CRC aRC0!...aRC9! a<values><CRC><CR><LF>
Extended Commands aXNNN! a<values><CR><LF>
1Information on each of these commands is given in the following sections.
B.1.1 Acknowledge active command (a!)
The Acknowledge Active command (a!) is used to test a sensor on the SDI-12 bus. An active
sensor responds with its address.
B.1.2 Send identification command (al!)
Sensor identifiers are requested by issuing command aI!. The reply is defined by the sensor
manufacturer but usually includes the sensor address, SDI-12 version, manufacturer’s name, and
sensor model information. Serial number or other sensor specific information may also be
included.
aI! allccccccccmmmmmmvvvxxx...xx<CR><LF>
a Sensor SDI-12 address
ll SDI-12 version number (indicates compatibility)
SN500SS Net Radiometer 17
Table of contents
Other Apogee Measuring Instrument manuals

Apogee
Apogee MC-100 User manual

Apogee
Apogee SL-510 User manual

Apogee
Apogee MQ-500 User manual

Apogee
Apogee MQ-620 User manual

Apogee
Apogee MP-100 User manual

Apogee
Apogee MQX Series User manual

Apogee
Apogee SP-420 User manual

Apogee
Apogee MP Series User manual

Apogee
Apogee SN-500 User manual

Apogee
Apogee SN-500 User manual

Apogee
Apogee MQ-510 User manual

Apogee
Apogee Quantum User manual

Apogee
Apogee MC-100 User manual

Apogee
Apogee MQ-100 User manual

Apogee
Apogee 2349 DLTM4 User manual

Apogee
Apogee SP-110 User manual

Apogee
Apogee PS-100 User manual

Apogee
Apogee MQ-210 User manual

Apogee
Apogee SI-111 User manual

Apogee
Apogee MQX Series User manual