Appro LC-7244 User manual

Before trying to connect or operate this product, please read this manual completely
INSTALLATION &
OPERATION MANUAL
IP SPEED DOME CAMERA
LC-7244 (NTSC)


1
Table Of Contents
SAFETY PRECAUTIONS .............................................................................3
1. PRODUCT FEATURES.............................................................................4
1.1 PRODUCT INSTRUCTIONS.....................................................................4
1.2 PRODUCT FEATURES ...........................................................................4
2. DESCRIPTION..........................................................................................6
2.1 INSTALLATION INSTRUCTION .......................................................6
2.2 PIN DEFINE......................................................................................8
3. INSTALLATION ........................................................................................9
3.1 UPDATING SYSTEM SOFTWARE...................................................9
3.2 IP CAMERA SD CARD TROUBLESHOOTING ..........................................11
4. Network Configuration..........................................................................12
4.1 CABLE CONNECTIONS........................................................................12
4.2 CONFIGURE YOUR IP CAMERA NETWORK SETTINGS ...........................12
4.2.1 Enable DHCP Function.....................................................................................................................12
4.2.2 Set IP Address ...................................................................................................................................13
4.3 TCP/IP COMMUNICATION SOFTWARE.................................................14
4.4 TCP/IP INSTALLATION .......................................................................15
4.5 TCP/IP CONFIGURATION SETTING ......................................................16
4.6 CONNECTION TESTING.......................................................................17
5. Operating Instructions for Video Software and Network ..................19
5.1 MICROSOFT INTERNET EXPLORER......................................................20
5.1.1 Connecting the IP camera ................................................................................................................20
5.1.2 Change Image Setting......................................................................................................................23
5.1.3 Change the Network Setting............................................................................................................25

2
5.1.4 Change the System Setting ..............................................................................................................34
5.1.5 Change the Application Setting .......................................................................................................41
5.1.6 Change the SD card Setting.............................................................................................................48
5.1.7 PPPoE & DDNS...............................................................................................................................49
5.2 THE IP CAMERA CMS (CENTRAL MANAGEMENT SYSTEM)...................51
5.2.1 Introduction to the CMS ..................................................................................................................51
5.2.2 Install the CMS in your PC..............................................................................................................52
5.2.3 Login the IP Camera software..........................................................................................................53
5.2.4 Operation..........................................................................................................................................55
6. ADVANCED OPERATION......................................................................69
7. SPECIFICATIONS...................................................................................72
8. Functions of client PC...........................................................................73
APPENDIX 1. –IP camera UPnP How To..................................................74
APPENDIX 2. –The ARP function.............................................................84
APPENDIX 3. –Register as a DDNS member ..........................................86
APPENDIX 4. –MPEG4 Bit Rate Lookup Table of IP camera.................90
APPENDIX 5. –FAQ....................................................................................91

3
SAFETY PRECAUTIONS
All the following safety and operational instructions to prevent harm or injury to the operator(s) or
other persons should be read carefully before the unit is activated.
WARNING
To prevent fire or shock hazard, avoid exposing this unit to rain or moisture.
Do not block ventilation openings.
Do not place anything on top of the unit that might spill or fall into it.
Do not attempt to service this unit yourself, as opening or removing covers may
expose you to dangerous voltage or other hazards. Please refer all servicing to
your distributor / retailer.
Do not use liquid cleaners or aerosols for cleaning.
To prevent fire or electric shock, do not overload wall outlets or extension cord.
This unit must be grounded to reduce the risk of electric shocks.
CAUTION
RISK OF EXPLOSION IF BATTERY IS REPLACED BYAN INCORRECT TYPE.
DISPOSE OF USED BATTERIES ACCORDING TO THE INSTRUCTIONS.

4
1. PRODUCT FEATURES
1.1 Product Instructions
The mini IP PTZ camera (LC-7244) is a speed dome camera which delivers dual MPEG4 /
MJPEG video streams at up to 30 (NTSC) frames per second for real-time images. This IP
camera comes with waterproof casing (IP-66) and a 360 degree pan width auto flip for flexible
indoor surveillance. Its small size makes it easy to mount, and it can be moved swiftly to any
angle you want.
The camera is equipped with a total zoom 120X (optical10X, digital 12X) capability and 128
presets to enhance its monitoring options. It supplies user-friendly PnP configurations for smooth
operation, including an SD card for alarm recording and firmware update. Its built-in Web server
supports remote monitoring and control via local area network or the Internet.
The camera comes with a free bundle of recording software for video management and provides
you with cutting edge video surveillance functions at a competitive price, making it the ideal device
to meet your security demands.
1.2 Product Features
• Selectable MPEG4 / MJPEG video compression.
• 1/4” Sony Exview HAD CCD.
• Horizontal resolution: 520 TV lines.
• Built-in motion detection.
• Built-in Web server.
• Supports upgrading by SD card / HTTP.
• Free bundle with recording software.
• Up to 30 (NTSC) fps in all resolutions.
• 360° panning and 90° tilting with auto flip.
• Total 120X zoom (10X optical, 12X digital).
• IP66 casing for waterproof and dust prevention.
• Flexible indoor mounting.

5
Designed Housing
Dimensions:

6
2. DESCRIPTION
2.1 INSTALLATION INSTRUCTION
1. Dimension of product as picture below.
2. Get the products out from the packages.
3. Drill holes and fix base board on the ceiling floor by using of 3 M4 bolts

7
4. Insert three screws in the mini dome into the apertures on the base board (refer to
step 1), then turn 15 degree in clock wise (refer to step 2).
5. Using 3 additional M3 x5 screws to lock tightly.
6. Connect the RJ45 cable, BNC cable, RS-485 control-cable, power cable, alarm I/O.

8
2.2 PIN DEFINE
1. RJ-45 Wire
2. BNC Wire
3. RS-485:
Yellow: RS485-
Green: RS485+
4. Power Wire: AC_24V
5. ALARM Wire:
PIN1: Red ALM1
PIN2: Pink ALM2
PIN3: Yellow ALM3
PIN4: Green ALM4
PIN5: GND
PIN6: N/A
PIN7: White Relay_COM
PIN8: Blue Relay_N.O

9
3. INSTALLATION
Please follow the instructions and the diagram below to set up the system.
3.1 UPDATING SYSTEM SOFTWARE
If the system software of the IP camera needs to be upgraded, please take the following steps to
safely process it.
Important: Before carrying out the following procedures, please ensure the SD card is
working and the file of the system firmware is intact
1. Format an SD card using the FAT16 format if it is unformatted; there are no limitations to an SD
card’s capacity.
2. Create a directory named LANCAM in the SD card if it does not exist.
3. Copy the file of UPDATE.BIN to the LANCAM-directory.
4. If the IP camera is running, please power it off first.
5. Insert the SD CARD into the IP camera.
6. Remove the Ethernet cable from the RJ-45 port and then power on the IP camera.
7. In 5 to 10 seconds, a message reading "UPDATE PROCESSING" will showup on the screen on
a blue background; if not, please check out steps 1 to 6 carefully or else inform your technical
support while ignoring the following steps.
8. DO NOT power off the IP camera while this update process is running until the message
"UPDATE OK RESET PLEASE" appears on the screen; it might take 15 to 30 seconds to
appear.
9. If the message "UPDATE NG RESET PLEASE" appears rather than "UPDATE OK RESET
PLEASE", please write down the error messages shown on the screen and inform your
technical support, while ignoring the following steps.
10. Power off the IP camera when this update process is finished, then remove the SD card from
the IP camera.
11. Reconnect the Ethernet cable to the RJ-45 port as necessary.
12. Power ON the IP camera and it will work normally if the entire update procedure goes correctly.
13. Verify the version of the system software.

10
WARNING:
1. Don’t use FAT32 or NTFS or other file formats in step 1.
2. Steps 1 to 3 have to be done on a PC.
3. Make sure the file of UPDATE.BIN is a correct one in step 3, or the IP camera will not
work normally after being updated.
4. If the power of the IP camera is suddenly lost in step 8, please remove the SD card first
and turn on the IP camera next to test its operation. If the IP camera remains working
normally, please go back to step 4; otherwise, please inform your technical support.
5. In step 10, if the SD card is not removed and the IP camera does not get online as well,
the updating process must be repeated again after rebooting the IP camera.
6. Make sure that the SD card is inserted in a correct position in step 5, or the IP camera
will suffer permanent physical damage.
7. If the message "CSUM ERROR" appears in step 8, it implies a problem in the file of
UPDATE.BIN.
8. Don’t interrupt the process while the unit is updating itself; proceed with an SD card
not including any system software of the unit, or else the unit will crash.

11
3.2 IP camera SD card Troubleshooting
1. Check if the SD card position is correct or not. Please refer to the manual for the related
information.
2. After powering the IP camera on, correctly insert the SD card, and a little icon of "SD" will show
up in the upper-right corner of the monitor screen. If not, it means the device detection has failed.
Please contact your technical support and ignore the following steps.
3. If no cross sign appears beside the "SD" icon, please go on to the next step. If a cross sign
appears, please check the following:
a. Is it really an SD "Memory" Card?
b. Is this SD card formatted in the FAT16 format?
c. Connect the SD card with a PC and test to see whether the PC can read the data or not.
d. Does this SD card still have the capacity for storing data?
e. Is the SD card set to write?
If all the answers are "yes" but the cross sign still persists, please contact your technical support
and ignore the following steps.
4. Please make sure the function of "SD CARD ENABLE" is activated in the ALARM and
SCHEDULE pages if no cross sign appears beside the "SD" icon on the screen.
5. After recording, read the data on the web page of "sdget.htm". If the data cannot be read through
the network, please read it instead in a PC, check the data stored in the "LANCAM" directory
and contact your technical support regardless of whether there is data or not.
WARNING:
1. Performing this troubleshooting process may need a monitor, a PC, a card reader and
some cables.
2. If the SD card is removed while storing or accessing data, the data will be lost.
3. If there is a cross sign beside the "SD" icon, it means the SD card has been inserted into
the IP camera but cannot perform its writing function. Possible reasons are:
a. It is not an SD memory card.
b. The SD card is unformatted or formatted in a non-FAT16 or non-FAT12 format.
c. The file system is damaged.
d. The capacity of the SD card is full.
e. The SD card is set to be read only.
4. Turn off the power before inserting the SD card. Otherwise the unit may shut down.

12
4. Network Configuration
4.1 Cable Connections
Please follow the instructions belowto connect your IP camera to a computer or a network and to
choose a proper RJ-45 cable configuration for connections.
Physical specifications of the RJ-45 cable for Ethernet
Wire Type Cat. 5
Connector Type RJ-45
Max. Cable Length 100 m
Hub Wiring Configuration Straight Through
PC Wiring Configuration Straight
4.2 Configure Your IP Camera Network Settings
Upon connecting with the network hardware, you need to activate the network function and
configure the proper network settings of the IP camera.
4.2.1 Enable DHCP Function
This function can only work if the LAN, which the unit is connected to, has a DHCP server. If the
DHCP server is working, please move the dip switch points up to 3 on the flank panel; now the IP
camera will obtain an IP address automatically from the DHCP server. In this instance, please
skip section 4.2.2 (Set IP address) and follow section 4.3 (TCP/IP Communication Software).
NOTE: If the LAN has no DHCP server, the camera’s IP address will be assigned of the
default 192.168.1.168 after 3 minutes or the unit will request it's last assigned IP address
after 3 minutes.

13
4.2.2 Set IP Address
You need to set an IP address for the unit if the LAN unit isn’t connected to a DHCP server.
Otherwise, please follow the instructions given below:
Set the IP, MASK and GATEWAY. The following is a sample setting.
IP: 192.168.1.X
MASK: 255.255.255.0
GATEWAY: 0.0.0.0
NOTE: When only one unit of the IP camera is connected to a computer or LAN, you can
freely assign an IP address for the IP camera. For example, there is a range of IP
camera IP addresses from 192.168.1.1 to 192.168.1.255. You can pick one for use
from the range of the IP. It’s not necessary to set MASK and GATEWAY; leave the
settings as default.
When an IP camera is connected to a WAN, you must acquire a unique,
permanent IP address and correctly configure the MASK and GATEWAY settings
according to your network architecture. If you have any questions regarding
those settings, please consult a qualified MIS professional or your ISP.
NOTE: When connecting to a network, each connected IP camera must be assigned a
unique IP, which must be in the same class type as your network address. IP
addresses are written as four sets of numbers separated by periods; for example,
192.168.1.1 Therefore, if the connected network is identified as Class C, for
example, the first three sets of numbers of the IP camera IP address must be the
same as the network address. If the connected network is identified as Class B,
the first two sets of numbers of the IP camera IP address must be the same as the
network address. If you have any questions regarding these settings, please
consult a qualified MIS professional or your ISP.

14
4.3 TCP/IP Communication Software
Follow the procedure below to install the TCP/IP communication program in your computer.
1. Open the Start menu from your computer, and select the Settings/Control Panel option.
2. Double click the Network icon to enter the windows.

15
3. Click on the Configuration tag, and check if the TCP/IP is included among the network
components list. If the TCP/IP is included, please process section 4.5. If it is not included,
please follow section 4.4 to install the TCP/IP.
4.4 TCP/IP Installation
During the installation, you will be requested to insert the Windows CD-ROM. After installation,
the PC may be restarted.

16
4.5 TCP/IP configuration setting
Click Start →Settings →Control Panel →Network.
Select TCP/IP, and then click Properties.
Before processing the IP camera installation in a WAN, please make sure the Internet
connection works properly. If not, please contact your ISP provider.
If you are using a DHCP server, please select Obtain an IP address automatically. Any
assigned IP address for the connected IP cameras must be in the same class type as the server.
If there is no DHCP server, please select specify an IP address and type in the IP address of
your PC. This IP address must be different from other network IP devices but in the same class
type.
NOTE: The IP address of an IP camera in a network must be unique to itself as opposed
to those of the other chosen PCs, but in the same class type.

17
4.6 Connection Testing
With the previous settings, follow the instructions below to ensure whether you have established
the connection successfully.
1. Click Start →Programs →MS-DOS Prompt
2. Enter ping 192.168.1.168, then enter. (See the sample screen below).
** This is the IP address of IP camera that is assigned for the connected IP camera in step2.

18
If you receive a response as in the sample screen below, the connection hasn’t been
successfully established. Please re-check all the hardware and software installations by
repeating sections 4.4 and 4.5. If you still can’t establish the connection after rechecking, please
contact your dealer.
If you receive a response as in the sample screen below, you have successfully made the
connection.
Type Camera IP address
Table of contents
Other Appro IP Camera manuals

Appro
Appro LC-7513 User manual

Appro
Appro LC-7222E User manual

Appro
Appro LC-7411 User manual

Appro
Appro LC-7222E User manual

Appro
Appro LC-7311 User manual

Appro
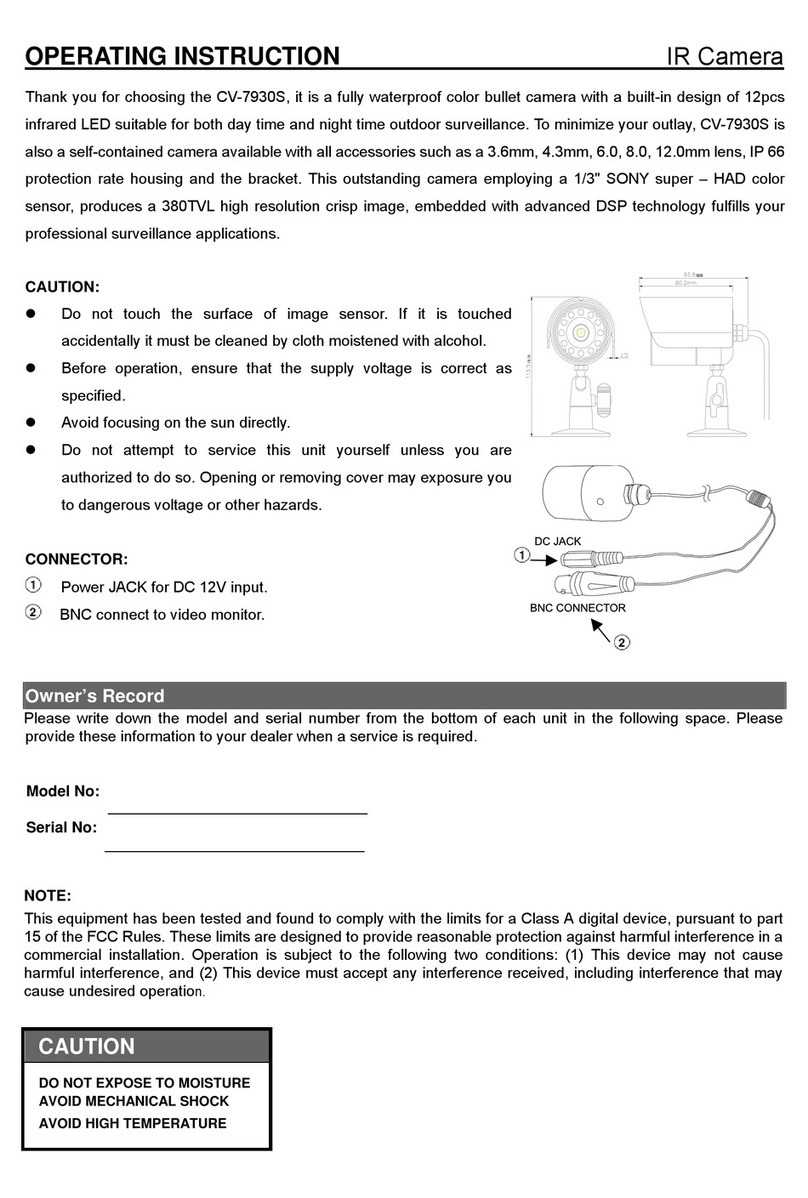
Appro CV-7930S User manual

Appro
Appro CV-7930S User manual

Appro
Appro TMS320DM355 User manual

Appro
Appro LC-7224EP User manual

Appro
Appro LC-6790 User manual