Aqara T1 User manual

01
Single Switch Module T1 (No Neutral) Quick Start Guide
11
單開開關模塊T1(無中性線)快速入門指南20
Einzelschaltmodul T1 (ohne Neutrallinie) Schnellstartanleitung
32
Guide de démarrage rapide de Single Switch Module T1 (No Neutral)
Guía de inicio rápido de módulo de interruptor único T1 (sin neutro) 44
55
Guida Rapida dell’Avviamento Modulo Switch Singolare T1
(senza cavo neutro)
67
Руководство быстрого запуска для Одноканального
Реле-модуля T1 (без нейтрали)
79
シングルスイッチモジュールT1(ニュートラルラインなし)クイックスタートガイド

Product Introduction
Aqara Single Switch Module T1 (No Neutral) is based on the Zigbee 3.0 wireless
communication protocol. It can control the on/off status of lights. With the Aqara
Hub, it can realize functions such as app remote control and timing control. It can
work with other Aqara smart devices to realize more smart scenes.
* This device requires a compatible Zigbee 3.0 hub.
* To work with HomeKit, a specific hub is required.
Visit www.aqara.com/support for more details.
* This product is for indoor use only.
Single Press: Turn on/off
Long Press for 8s: Reset/
Connect to Network
Triple Press: Effective Range Test
* When the external switch is connected,
please turn it on and off 5 times, and then it enters the networking status.
Indicator Light
Button
Antenna
01

Warnings
1.
2.
3.
4.
5.
6.
7.
8.
9.
Do not cover when the plug is working.
Make sure that the main switch of the power supply is off before removing plug.
Do not connect in series.
This product is NOT a toy. Please keep children away from this product.
This product is designed for indoor use only.
Do NOT use in humid environments or outdoors.
Beware of moisture, do NOT spill water or other liquids onto the product.
Do NOT place this product near a heat source. Do NOT place it in an enclosure
unless there is normal ventilation. Do NOT attempt to repair this product by
yourself. All repairs should be performed by an authorized professional.
This product is only suitable for improving the quality of your home life and
reminding you about the device status. If a user violates the product use
instructions, the manufacturer will NOT be liable for any risks and property
losses.
02

1.
Installation
Please make sure that the main switch of the power supply is off before
installation!
Aer the device powers on, all the conductors (including the antenna) of the
device may be connected with strong electricity. Please make sure that the
product is installed in a protective environment that cannot be reached by
hands, such as a switch pattress and a protective cover of the bulb.
According to the requirements, please connect the wires through any of the
following methods;
Method 1: L1 is connected to the load wire. S0 and S1 are connected to the two
ends of the external switch respectively. L is connected to the live wire(Diagram 1).
03
Recommended stripping length for terminal wiring: 6~8 mm.

Method 2: L1 is connected to the load wire. One end of the external switch is
connected to S0, and the other end is connected to the live wire. L is connected to
the live wire(Diagram 2). If the external switch is a dual-control switch, the end of
the original switch, which is connected to the load wire, can be connected to S0 to
realize an external dual control (Diagram 3).
Diagram 1
L
N
L1L S0 S1
04

* The maximum cross-sectional area of the conductor is 2.5mm².
* If no external switch is connected, S0 and S1 can be le in idle and the device can be
controlled by automation or the app.
Diagram 2 Diagram 3
L
N
L1L S0 S1
L
N
L1L S0 S1
05

2. The single switch module is fixedly embedded in the device (such as the
pendant lamp and the switch pattress) to avoid the danger of accidental touch;
3. Paste the fixed antenna;
* The inner conductor of the antenna is connected with strong electricity. Please do not put it
in an environment that could be touched in your daily life; if it is damaged, please do not
touch it, and replace or repair it in time.
* When the control module is installed in the switch pattress, it is recommended to paste the
antenna on the sidewall of the plastic pattress and keep it parallel to the wall; if the switch
panel bracket is made of plastic, it is recommended that the antenna is no more than
06

Quick Setup
1. Before activating the accessory, please make sure you have the Aqara Home
app downloaded and the Aqara Hub installed.
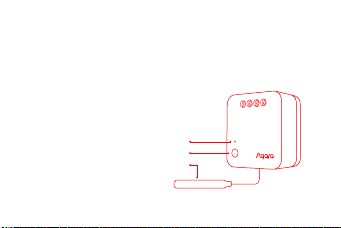
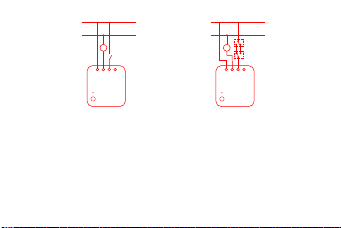
4. Turn on the main power switch, and press the button on the module or on the
external switch. If you can turn on/off the device normally, this indicates that it
works normally.
10mm away from the wall; if the switch panel bracket is made of metal, it is recommended
that the antenna be more than 15mm away from the wall (metal bracket).
* If it is installed in a metal pattress, it is recommended to paste the antenna inside the
plastic switch panel, but sufficient space is required for the panel.
* The pasting position should try to avoid the metal, wire, and module itself; if it is installed
on the ceiling or inside the lights, the antenna should avoid too much shielding.
* Please do not squeeze, bend or pull the antenna with force, otherwise the antenna may be
damaged.
07

Indicator Light Description
2. Please open the app, tap “Home” and then tap “+” in the top right corner to
enter “Add Device (Accessory)” page. Select “Single Switch Module T1 (No
Neutral)”, and add it according to instructions.
Effective Range Test: Quick press the push button on the accessory 3 times. If the
Hub makes voice prompts, it indicates that the accessory can communicate
effectively with the Hub.
* If the connection fails, please move the Hub closer to the Single Switch Module T1
(No Neutral), in and try again.
Indicator Light Status Status Description
Blue light flashes once Device power on
Blue light blinks quickly Zigbee network is connecting
Blue light keeps on Zigbee network works properly
Red light blinks quickly High-temperature alarm
08

Specifications
Model: SSM-U02
Dimensions: 42.9 × 40 × 21.4 mm( 1.69 × 1.57×0.84in.)Wireless Protocol: Zigbee 3.0
Electrical Rating: 100-250VAC,Max.5A,50/60Hz,Min 3W,Max 1250W (Resistive Load), μ
Operating Temperature: 0 – 35°C(32°F – 95°F)Zigbee Operation Frequency: 2405-2480 MHz
Zigbee Maximum Output Power ≤ 13 dBm
Online Customer Service: www.aqara.com/support
Manufacturer: Lumi United Technology Co., Ltd.
Address: 8th Floor, JinQi Wisdom Valley, No.1 Tangling Road, Liuxian Ave,
Taoyuan Residential District, Nanshan District, Shenzhen, China.
* This product is only suitable for non-remote control 3W+ lights.
Red light blinks slowly Zigbee network is not connected
09

Hereby, [Lumi United Technology Co., Ltd] declares that the radio
equipment type [Single Switch Module T1 (No Neutral), SSM-U02] is
in compliance with Directive 2014/53/EU. The full text of the EU
declaration of conformity is available at the following internet address:
http://www.aqara.com/DoC/
All products bearing this symbol are waste electrical and electronic
equipment (WEEE as in directive 2012/19/EU) which should not be mixed
with unsorted household waste. Instead, you should protect human
health and the environment by handing over your waste equipment to a
designated collection point for the recycling of waste electrical and electronic
equipment, appointed by the government or local authorities. Correct disposal and
recycling will help prevent potential negative consequences to the environment and
human health. Please contact the installer or local authorities for more information
about the location as well as terms and conditions of such collection points.
10
Under normal use of condition, this equipment should be kept a separation
distance of at least 20cm between the antenna and the body of the user.

產品介紹Aqara單路控制模塊 T1(單火線版)是基於Zigbee 3.0無線通信協議,可控制燈具電源通斷的繼電器控制模塊。配合網關可實現App遠程控制、定時控制等功能,並且可以與其他智能設備搭配實現更多智能場景。* 本產品需要配合具備閘道器功能的設備使用;* 欲使本產品相容於HomeKit,需要配備Aqara閘道器, 如需更多詳情,請登入www.aqara.com;* 本產品僅限室內使用。單次按壓:打開/關閉長按8s:重設/入網按三下:通訊有效距離驗證* 外接開關時,開、關5次(開 + 關為1次)開關,即進入組網狀態。指示燈重設鍵天線11

1.2.3.4.5.6.本產品非玩具,請讓兒童遠離本產品。本產品僅限室內使用,請勿在潮濕環境或室內使用。注意防潮,請勿將水或液體潑灑在本產品上。請勿將本產品置放於靠近熱源的地方。除非有正常的通風,否則不可放在密閉位置中。請不要嘗試自行維修本產品,應由授權的專業人士進行此項工作。本產品僅適用於提升家居生活娛樂性、便捷度,以及用於設備狀態提醒,如有用戶違反產品使用說明及本注意 事項,製造商對因此造成的任何風險和財產損失不承擔 責任。使用注意事項12

安裝方法安裝前請確認電源總閘已關閉!通電後,本設備所有導體(含天線部分)都可能與強電連通,請確保本產品固定安裝在人手無法觸及的防護環境中,如開關插座安裝盒、燈的防護罩內等。建議端子接線的剝線長度:6~8毫米13
1.根據需要,按以下任一方法接好線路;方法一:L1孔接負載,S0、S1孔分別接入外接開關的兩端,L孔接火線(圖1)。

方法二:L1孔接負載,外接開關一端接S0孔,另一端接火線,L孔接火線(圖2)。如果外接的是雙控開關,則可將原開關接負載的一端接入S0,可實現外接雙控(圖3)。圖1L
N
L1L S0 S1
14

* 最大可支持導體截面面積為2.5mm²的導線。* 如不接入外接開關,S0、S1可以留空,通過自動化或App來控制。圖2圖3L
N
L1L S0 S1
L
N
L1L S0 S1
15

2.把單路控制模塊固定內嵌到設備內(如吊燈、暗盒內),避免誤觸而發生危險;3.粘貼固定天線;* 天線內部導體與強電連接,請勿置於生活中可觸碰的壞境中;如發現破損,請勿觸碰, 並需及時進行更換或維修。* 當控制模塊安裝在暗盒內,建議將天線粘貼在塑料暗盒側壁,並與牆面平行;如果開關 面板支架為塑膠材質,建議天線距離牆面不超過10mm;如果開關面板支架為金屬材 質,則建議天線距離牆面(金屬支架)15mm以上。* 如果安裝在金屬暗盒內,建議將天線粘貼於塑料開關面板內部,但需要面板有充足的空間。16

1.2.3.連接設備前,請確保已下載Aqara Home app並添加了閘道器。開啟app,點選首頁右上角的「+」,進入「加入設備(配件)」頁面,選擇“單路控制模塊 T1(單火線版)”,並依照提示進行操作。*如加入失敗,請將設備移近閘道器後重試。有效距離驗證:在預選的安裝位置,按一下設備重設鍵,閘道器發出提示音,表明設備與閘道器之間可以有效通訊。快速設定4.開啟電源總閘,按下模塊上的按鍵或外接開關按鍵,可正常開關,表示開關工作正常。* 粘貼位置應盡量避開金屬、電線及模塊本身;如果安裝在吊頂或者燈具內部,天線應避 免過多遮擋。* 請勿對天線進行擠壓、折角或用力拉扯,否則可能會損壞天線。17

基本參數產品型號: SSM-U02產品尺寸: 42.9 × 40 × 21.4 mm( 1.69 × 1.57 × 0.84 英尺.)無線連接: Zigbee 3.0電氣額定值: 100-250VAC,Max.5A,50/60Hz,Min 3W,Max 1250W (阻性負載), μ工作溫度: 0 ‒ 35°C(32°F ‒ 95°F)Zigbee運作頻率:2405-2480 MHz指示燈描述指示燈狀態狀態描述藍色閃爍一次設備.上電藍色快閃Zigbee網絡連接中藍色常亮Zigbee網絡連接正常且開關打開紅色快閃過溫警報紅色慢閃Zigbee網絡未連接18

Zigbee發射功率(電場強度)≤ 13 dBm網站支援:www.aqara.com/support製造商:深圳綠米聯創科技有限公司地址:廣東省深圳市南山區留仙大道塘嶺路1號金騏智谷大廈8樓* 本產品只適用於3W(典型值)以上的非遠程控制類燈具。19
Other manuals for T1
9
This manual suits for next models
1
Table of contents
Languages:
Other Aqara Control Unit manuals
Popular Control Unit manuals by other brands

IBM
IBM color LaserJet 5500 Operational, installation, and maintenance guide

ABB
ABB Relion REM615 manual

Pickering
Pickering 40-561A user manual

A.R.I.
A.R.I. Aquestia D-090 Installation operation & maintenance

Proxim
Proxim NGP1058 user manual

Telit Wireless Solutions
Telit Wireless Solutions LN940A11 SERIES user guide

Sea-Bird Electronics
Sea-Bird Electronics SBE 11 plus V2 user manual

Becker
Becker GS2 Assembly and operating instructions

Pilz
Pilz PZE 7 operating instructions

Motorline professional
Motorline professional MC4 EVO manual

Siemens
Siemens ASIsafe K45 F Original operating instructions

Enerpac
Enerpac MHV-1 instruction sheet