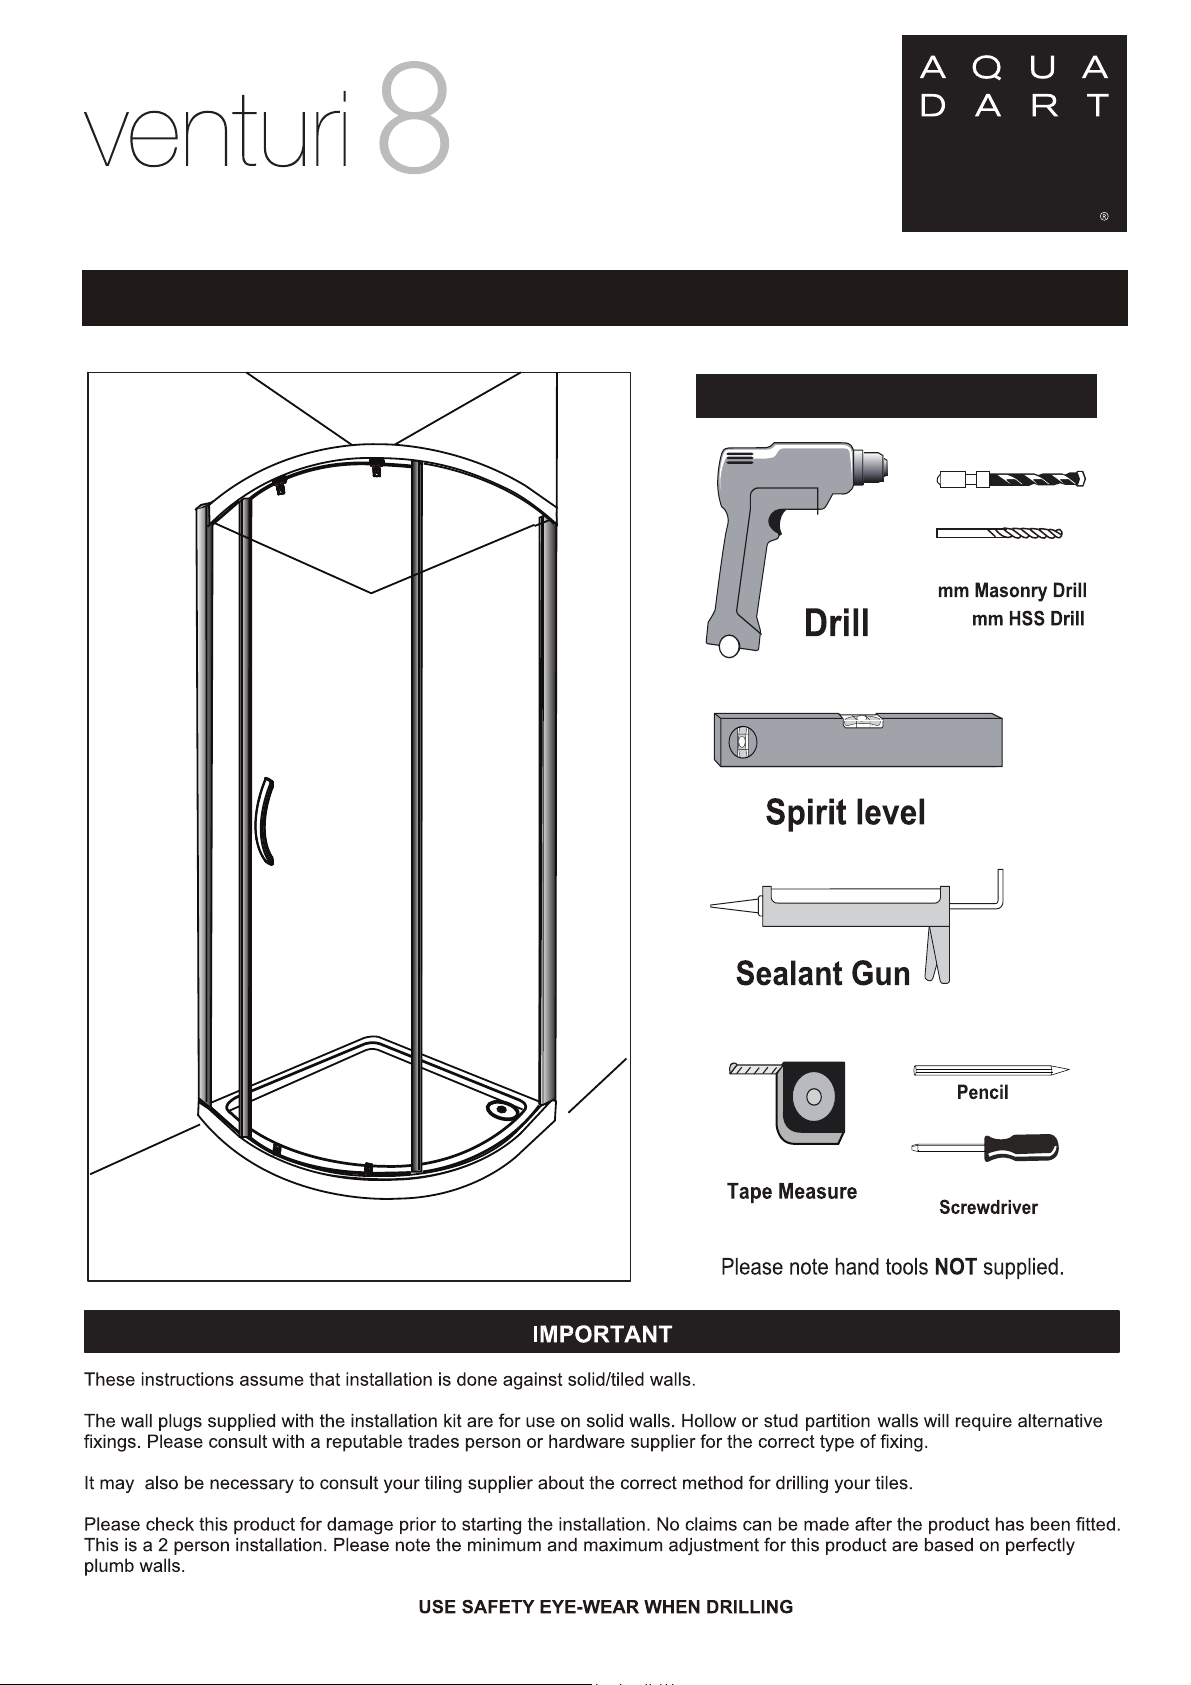
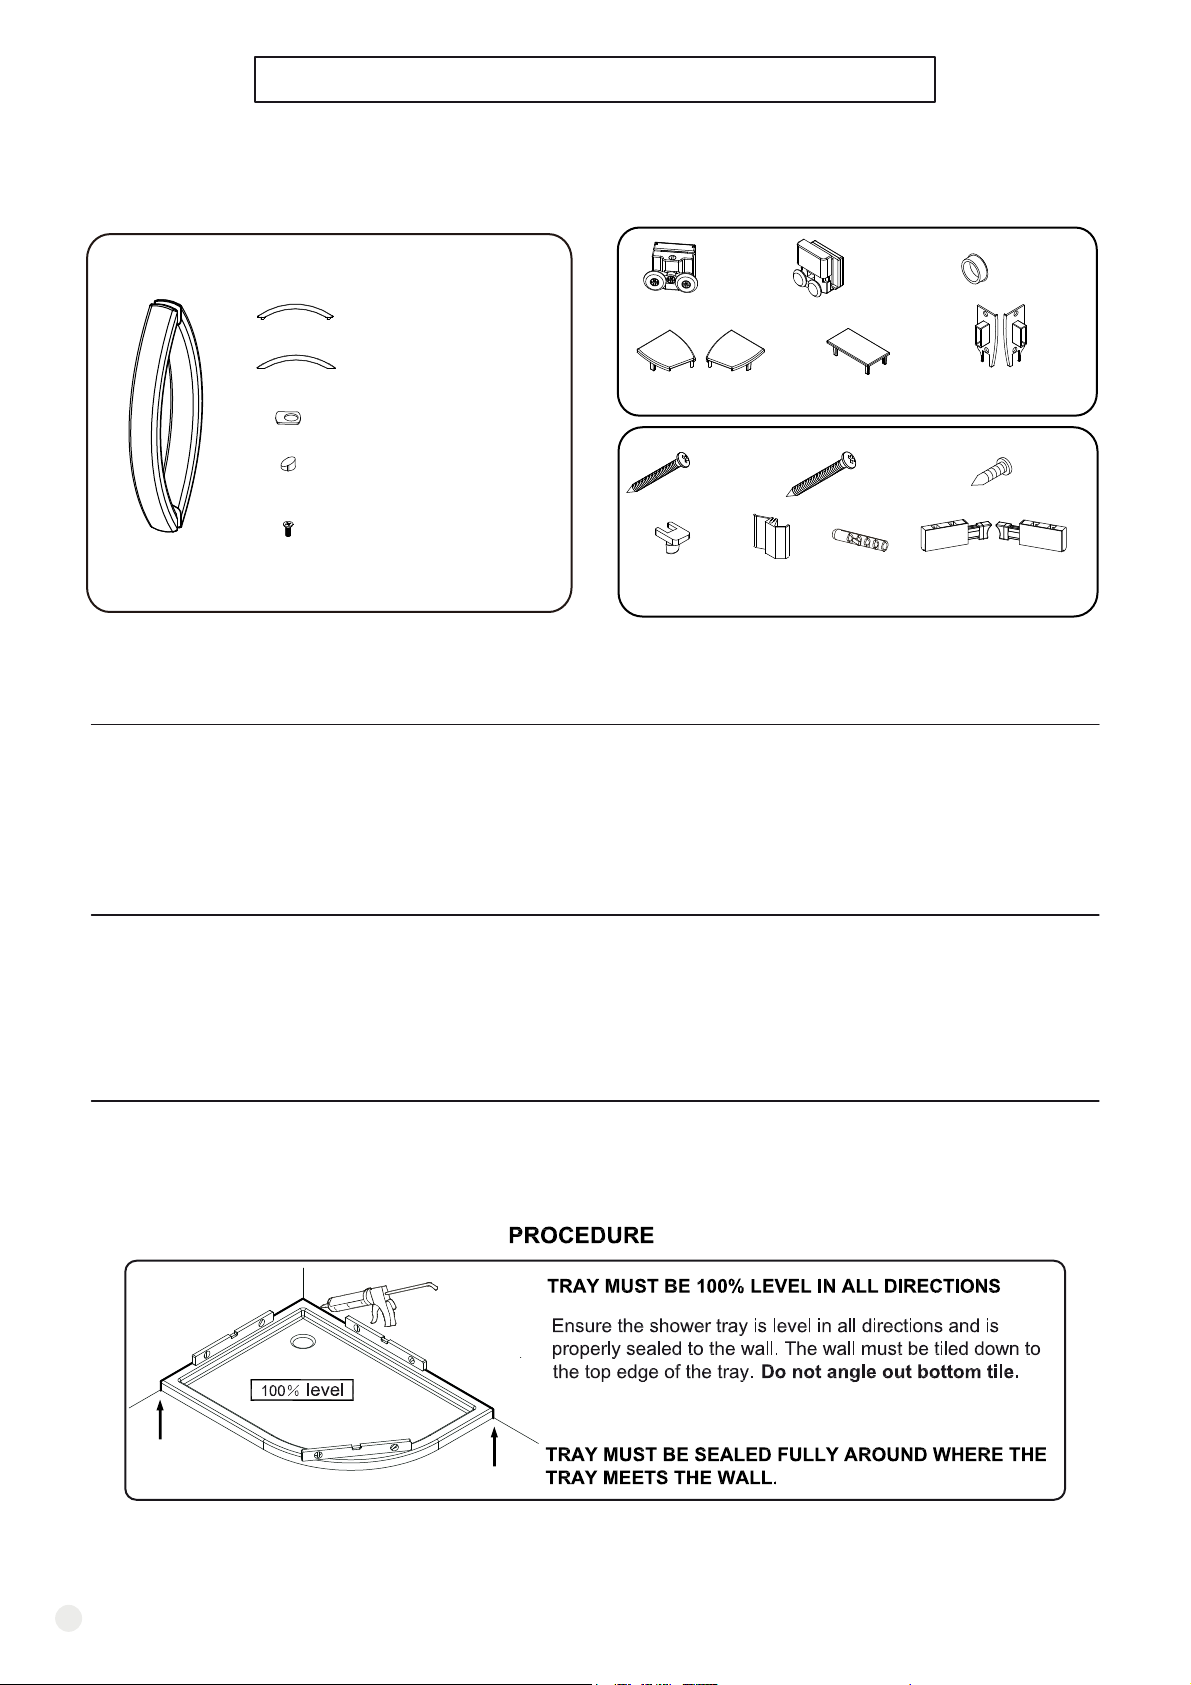
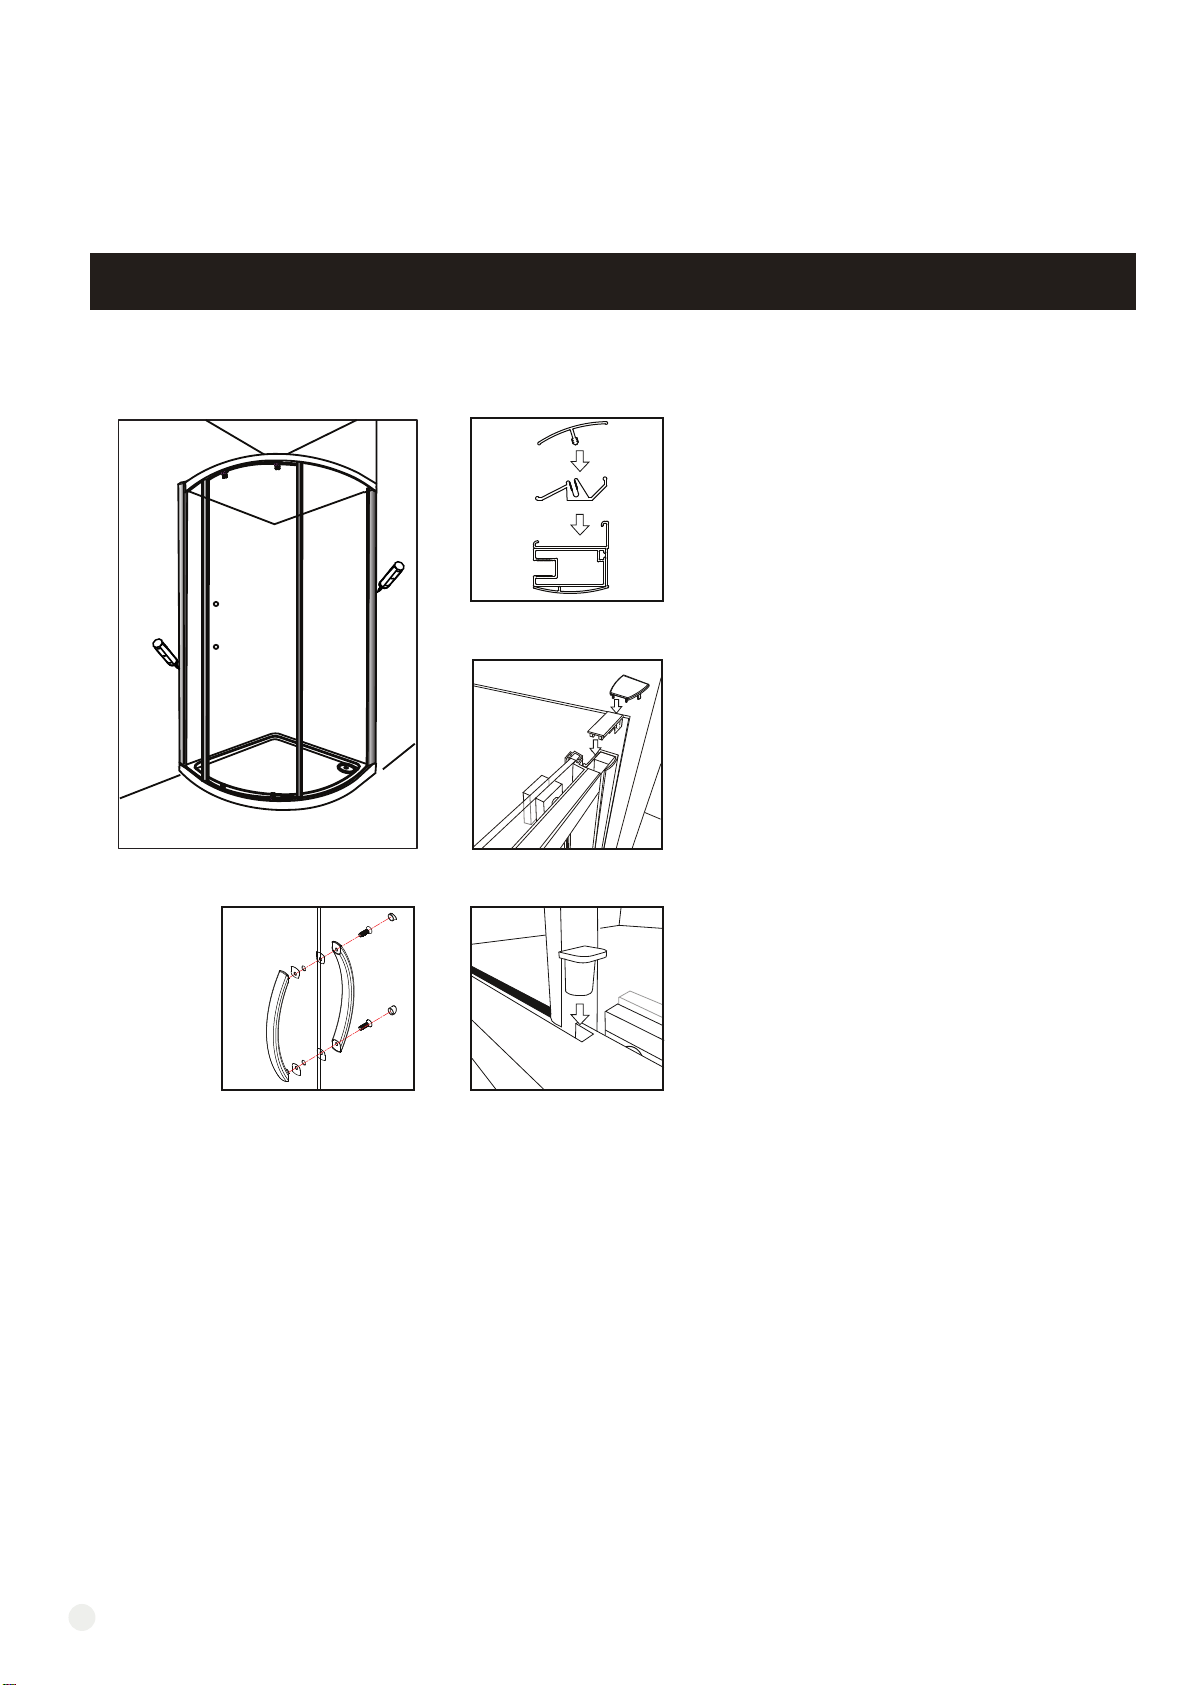
Aquadart Venturi 8 User manual

INSTALLATION INSTRUCTIONS
Single Door Quadrant
www.aquadart.co.uk
Tools Required
8
PH2 TYPE
2.75

Box Contents
COMPONENTS AND BOX CONTENTS
2
SN
1
2
3
4
5
6
7
8
9
10
11
12
13
15
14
16
Wall Profile
Description
Cover Profile
Upright Profile
Horizontal Profile
Seal
U Shape Seal - A
Upright Profile Cap
Wall Profile Cap-L
Glass Clip
Upright Seal-6-14.5mm
Upright Seal-8-16.5mm
Horizontal Profile Cap-L
U Shape Seal - B
Upright Seal-6-24mm
Wall Profile Cap-R
Horizontal Profile Cap-R
Description
Qty
2
2
2
2
2
2
1
1
2
1
1
2
2
4
2
1
Qty
17
18
19
20
21
22
23
24
25
26
27
28
29
30
SN
31
Stopper
Cover Cap
Buffer
Soft Closing Buffer
Profile Clip
Top Roller
Bottom Roller
Handle
Wall Plug
Screw ST3.5x10
Screw ST3.5x40
Screw ST4x45
Side Glass Panel - A
Side Glass Panel - B
Moving Glass Panel
4
4
4
10
2
2
1
6
12
6
8
1
1
1
1
SET
1
2
3
45
6
7
9
10 11
13
12
14 15
16
17 18 19
21
22
23
24
25
26
28
27
29
31
30
8
20

IMPORTANT - Missing Components
Please check this product for missing components prior to installation.
For spare parts visit www.aquadart.co.uk
IMPORTANT - Installation site
1. Ensure the top surface of the shower tray on which the enclosure will be installed is level in every direction.
2. The tiles or other wall finishing should be effectively sealed at tray edges.
3. Tiles should extend at least to the corner of the tray and a minimum of 1.9 meters from the top of the tray.
FIXING KIT COMPONENTS, SITE CONDITIONS
FIXING KIT
3
Wall Profile Cap
× 2
Screw
ST4x45
6 pcs
Screw
ST3.5x45
8 pcs
Screw
3.5x10
12 pcs
Upright Profile Cap
× 2
Cover Cap
x 4
Handle × 1
Outside Handle × 1
Screw Cap × 2
Washer × 4
Countersunk Screw × 2
M5×16
Venturi Handle
Inside Handle × 1
Horizontal Profile Cap
× 4
Wall Plug
6 pcs
Glass Clip
x 4
Profile Clip
x 10
Soft Closing Buffer
x2
Top Roller
x 2
Bottom Roller
x 2

1
2a 2b
1 - Install the shower tray following the tray
installation guide.
4
INSTALLATION INSTRUCTIONS
Single Door Quadrant

5
INSTALLATION INSTRUCTIONS
Single Door Quadrant
4b
4a
4a - Push the wall channels onto the edges
of the assembly as illustrated and then posi-
tion the assembly onto the shower tray as
shown (roughly 10mm from the outer edge
of the tray).
4b - Level the wall channels using a spirit
level and mark the 3 pre-drilled screw points
through each of the wall channels onto the
wall.
NOTE: you may find it easier to mark and
drill the wall if you apply masking tape to it
first.
Inside enclosure
Outside enclosure
Inside enclosure
Outside enclosure
3a - Drop the silicone into the groove of the raill profile along with the pre-fitted seal,then push 1x horizontal rail onto the
bottom of 1x fixed panel.
3b - Insert the horizontal profile cap(left and right) then fix the pieces together using 2 x ST 3.5 x 45 fixing screws through
the metal profile of the fixed panels and into the end of the horizontal rail,then attach the other fixed panel tothe horizontal
profile in the same way. Once both fixed panels are attached tothe bottom horizontal rail repeat for the top horizontal rail.
Note:put a little bit of silicone in the corner of the profile cap and the horizontal profile as the diagram shown(B),the other
size needs sealing in the same way(b1).
3a
3a
3b
b1
3

5
6
5 - Remove the assembly and drill the
marked points using an 8 mm masonry drill
bit, once this is done insert 6 x wall plugs
into the holes.
6 - Reposition the assembly and fix the wall
channels to the wall using 6 x ST4x45 long
screws (3 per channel)
6
INSTALLATION INSTRUCTIONS
Single Door Quadrant

7
8
Inside enclosure
Outside enclosure
7 - Whilst ensuring that the bottom of the
assembly
is held snug to the shower tray
and
that all parts are level and upright, fix the
assembly
to the wall channels by drilling
through the pre drilled holes in the wall
channels into the profiles of the fixed panels
using a 2.75 mm metal drill bit. Then secure
using 6 x ST3.5x10 short screws (3 per wall
7
channel).
INSTALLATION INSTRUCTIONS
Single Door Quadrant
8- Push seal No.8 the samaller fixed panel
seal onto the large fixed panel and seal No.9
the larger of the fixed panel seal onto the
small fixed panel where the door closes onto
Note: if all seals are the same length
then some trimming may be required

9
10
If the wheels do not fit into the rail, the door
can be lowered by adjusting the top runners,
The bottom runners are also adjustable.
10 - Once the door is ready it needs to
be
hung in the enclosure.
8
Inside enclosure
Outside enclosure
Inside enclosure
Outside enclosure
Start by lifting the door up and
guiding
the top support wheels into the top
horizontal
rail, then using the quick release mechanism
on the bottom wheels guide
them into
the bottom horizontal rail as
shown.
INSTALLATION INSTRUCTIONS
Single Door Quadrant
9-Attach the handle making sure that the rubber
washers that come with the handle are placed
between the handles and the galss.
The next step is to push seal No.10 the longer
water seal onto the back edge of the door,(the
flipper seal should be facing the fixed panel)
Fit the rollers to the door. Ensure that the
wheels of the rollers are facing away from the
enclosure. Ensure the top roller are fixed to the
top of the door and the bottom rollers are fixed
to the bottom of the door
Top Roller Bottom Roller

11 - Once you are happy that the
installation
is correct and that the doors are running
smoothly, push the cover caps onto the top
of the wall channels as shown, (smaller top
cap first followed by the larger wall channel
top cap).
Next push the wall channel snap on covers
onto the inside edge of the wall channels.
Once this is done silicone the outside of the
enclosure where the metal profiles meet the
walls and the tray.
To finally seal the installation, plug the small
holes at the end of the fixed panel glass with
a dab of silicone and insert the glass clips as
illustrated.
Do not use the enclosure for 24 hours.
INSTALLATION INSTRUCTIONS
Single Door Quadrant
9
TION INSTRUCTIO N S
11

AFTERCARE
This product has been treated with Clean & Clear
TM
easy clean glass treatment, a protective barrier which creates
a ‘non-stick’ surface on your glass, helping to resist lime scale build up and water spots. For further information on
Clean & Clear please visit
Aftercare
Clean & Clear glass can be cleaned with any suitable nonabrasive glass cleaner - with PH value of between 3-
11; the coating wi ll not be damaged. Avoid surfactants and heavily perfumed products. Vinegar and water based
products are very effective. Do not use abrasive scrubbing cleaners or equipment for cleaning.
Warranty
Limited 5 year Warranty for Clean & Clear treatment: To guarantee treated surfaces will remain more repellent
than untreated glass for 5 years from start of use, as long as basic manufacturer maintenance recommendations
are foll ow ed and no harsh or abrasive cleaners are used.
Aftercare & Reapplication Kit
To continue the benefits of the Clean & Clear glass treatment an aftercare & reapplication kit is available at
Cleaning Instructions
It is important to clean your Aquadart shower enclosure after every use. Please wipe down all glass and metal
with a clean soft cloth. Ensure that all residual water on the glass is removed after every use.
Usage
For reliable, watertight performance from your Aquadart enclosure your shower head should not be positioned so
the shower sprays directly onto the enclosure door. Failure to comply with this may cause the shower to leak.
Outward opening doors may cause water to drip onto the floor, please ensure that the floor covering immediately
outside the enclosure will not be affected by water.
AQUADART PRODUCTS
North Dean Road, West Yorkshire,Keighley, BD22 6QY
parts
that
TM
www.aquadart.co.uk
TM
TM
TM
www.aquadart.co.uk
For technical / aftersales queries , please visit our website : www.aquadart.co.uk
or Sales Tel : 0845 0262 55 Fax : 01535 613831 Technical : 01535 613860
Other manuals for Venturi 8
3
Table of contents
Popular Other manuals by other brands

Hong Kong RFID
Hong Kong RFID Garrison HKRAT-RT02 user manual

Digital Innovations
Digital Innovations Disc Repair System user guide

Elvox
Elvox EBR2 Series Installation and operation manual

Koganei
Koganei IONIZER Technical Information Guidebook

Red Sea
Red Sea MAX NANO Installation and operation manual

Micronta
Micronta 22-201U instruction manual

Rothenberger
Rothenberger Roklima Plus 4F Instructions for use

Allen-Bradley
Allen-Bradley E300 Quick start instructions

Capetti Elettronica
Capetti Elettronica WSD12T-AV user manual

curt
curt 11376 installation instructions

Panasonic
Panasonic EW-DL80-S operating instructions

Rotronic
Rotronic HL-1D Short instruction manual