RIDGID K-60SP User manual

K-60SP Drain Cleaning
Machine
•Français – 15
•Castellano – pág. 31
Drain Cleaner
Manual
www. .com information@itm.com1.800.561.8187

Table of Contents
Recording Form for Machine Serial Number ..............................................................................................................1
Safety Symbols ..............................................................................................................................................................2
General Power Tool Safety Warnings
Work Area Safety ........................................................................................................................................................2
Electrical Safety...........................................................................................................................................................2
Personal Safety ...........................................................................................................................................................3
Tool Use and Care ......................................................................................................................................................3
Service ........................................................................................................................................................................3
Specific Safety Information
Drain Cleaner Safety ...................................................................................................................................................4
RIDGID®Contact Information........................................................................................................................................4
Description, Specifications and Standard Equipment
Description ..................................................................................................................................................................5
Specifications ..............................................................................................................................................................5
Standard Equipment....................................................................................................................................................5
Machine Inspection .......................................................................................................................................................6
Machine Setup ...............................................................................................................................................................6
Operating Instructions ..................................................................................................................................................8
Special Procedures
Reverse Operating Instructions...................................................................................................................................9
Jaw Set Adjustment.....................................................................................................................................................9
Accessories .................................................................................................................................................................10
Maintenance Instructions
Lubrication.................................................................................................................................................................11
Cables .......................................................................................................................................................................11
Clutch Jaw Assembly ................................................................................................................................................11
Drive Belt Replacement.............................................................................................................................................12
Machine Storage..........................................................................................................................................................13
Service and Repairs ....................................................................................................................................................13
Wiring Diagrams ..........................................................................................................................................................14
EC Declaration of Conformity ..........................................................................................................Inside Back Cover
Lifetime Warranty..........................................................................................................................................Back Cover
*Original Instructions - English
999-997-050.10_REV. Aii
K-60SP Drain Cleaning Machine
www. .com information@itm.com1.800.561.8187

K-60SP Drain Cleaning Machine
Record Serial Number below and retain product serial number which is located on nameplate.
Serial
No.
K-60SP
Drain Cleaning Machine
Drain Cleaner
WARNING!
Read this Operator’s Manual
carefully before using this
tool. Failure to understand
and follow the contents of
this manual may result in
electrical shock, re and/or
serious personal injury.
www. .com information@itm.com1.800.561.8187

999-997-050.10_REV. A2
K-60SP Drain Cleaning Machine
General Power Tool Safety
Warnings*
WARNING
Read all safety warnings, instructions, illustra-
tions and specifications provided with this power
tool. Failure to follow all instructions listed below
may result in electric shock, fire, and/or serious in-
jury.
SAVE ALL WARNINGS AND INSTRUCTIONS
FOR FUTURE REFERENCE!
The term "power tool" in the warnings refers to your
mains-operated (corded) power tool or battery-operated
(cordless) power tool.
Work Area Safety
•Keep work area clean and well lit. Cluttered or dark
areas invite accidents.
•Do not operate power tools in explosive atmo-
spheres, such as in the presence of flammable
liquids, gases, or dust. Power tools create sparks
which may ignite the dust or fumes.
•Keep children and by-standers away while operat-
ing a power tool. Distractions can cause you to lose
control.
This symbol indicates the risk of hands, fingers or other
body parts being caught, wrapped or crushed in the
drain cleaning cable.
Safety Symbols
In this operator’s manual and on the product, safety symbols and signal words are used to communicate important safety
information. This section is provided to improve understanding of these signal words and symbols.
This is the safety alert symbol. It is used to alert you to potential personal injury hazards. Obey all safety messages that follow this
symbol to avoid possible injury or death.
DANGER indicates a hazardous situation which, if not avoided, will result in death or serious injury.
WARNING indicates a hazardous situation which, if not avoided, could result in death or serious injury.
CAUTION indicates a hazardous situation which, if not avoided, could result in minor or moderate injury.
NOTICE indicates information that relates to the protection of property.
This symbol means read the operator’s manual carefully
before using the equipment. The operator’s manual con-
tains important information on the safe and proper
operation of the equipment.
This symbol means always wear safety glasses with
side shields or goggles when handling or using this
equipment to reduce the risk of eye injury.
NOTICE
DANGER
WARNING
CAUTION
This symbol indicates the risk of electrical shock.
This symbol means always wear RIDGID drain cleaning
mitts while operating drain cleaner.
This symbol indicates the risk of entanglement in a belt
and pulley.
* The text used in the General Power Tool Safety Warnings section of this manual is verbatim, as required, from the applicable UL/CSA/EN 62841-1 standard.
This section contains general safety practices for many different types of power tools. Not every precaution applies to every tool, and some do not apply to this
tool.
Electrical Safety
•Power tool plugs must match the outlet. Never
modify the plug in any way. Do not use any
adapter plugs with earthed (grounded) power
tools. Unmodified plugs and matching outlets will re-
duce risk of electric shock.
•Avoid body contact with earthed or grounded sur-
faces such as pipes, radiators, ranges and
refrigerators. There is an increased risk of electrical
shock if your body is earthed or grounded.
•Do not expose power tools to rain or wet condi-
tions. Water entering a power tool will increase the risk
of electrical shock.
•Do not abuse the cord. Never use the cord for
carrying, pulling or unplugging the power tool.
Keep cord away from heat, oil, sharp edges or
moving parts. Damaged or entangled cords increase
the risk of electric shock.
•When operating a power tool outdoors, use an
extension cord suitable for outdoor use. Use of a
cord suitable for outdoor use reduces the risk of elec-
tric shock.
•If operating a power tool in a damp location is un-
avoidable, use a ground fault circuit interrupter
www. .com information@itm.com1.800.561.8187

999-997-050.10_REV. A 3
K-60SP Drain Cleaning Machine
•Disconnect the plug from the power source and/or
the battery pack from the power tool before making
any adjustments, changing accessories, or storing
power tools. Such preventive safety measures re-
duce the risk of starting the power tool accidentally.
•Store idle power tools out of the reach of children
and do not allow persons unfamiliar with the power
tool or these instructions to operate the tool. Power
tools are dangerous in the hands of untrained users.
•Maintain power tools and accessories. Check for
misalignment or binding of moving parts, breakage
of parts and any other condition that may affect the
power tool’s operation. If damaged, have the power
tool repaired before use. Many accidents are caused
by poorly maintained power tools.
•Keep cutting tools sharp and clean. Properly main-
tained cutting tools with sharp cutting edges are less
likely to bind and are easier to control.
•Use the power tool, accessories and tool bits etc. in
accordance with these instructions, taking into ac-
count the working conditions and the work to be
performed. The use of the power tool for operations dif-
ferent from those intended could result in a hazardous
situation.
•Keep handles and grasping surfaces dry, clean
and free from oil and grease. Slippery handles and
grasping surfaces do not allow for safe handling and
control of the tool in unexpected situations.
Service
•Have your power tool serviced by a qualified repair
person using only identical replacement parts. This
will ensure that the safety of the power tool is main-
tained.
Specific Safety Information
WARNING
This section contains important safety informa-
tion that is specific to this tool.
Read these precautions carefully before using the
K-60SP Drain Cleaner to reduce the risk of elec-
trical shock or other serious injury.
SAVE ALL WARNINGS AND INSTRUCTIONS
FOR FUTURE REFERENCE!
Keep this manual with machine for use by the operator.
(GFCI) protected supply. Use of a GFCI reduces the
risk of electric shock.
Personal Safety
•Stay alert, watch what you are doing and use com-
mon sense when operating a power tool. Do not
use a power tool while you are tired or under the in-
fluence of drugs, alcohol, or medication. A moment
of inattention while operating power tools may result in
serious personal injury.
•Use personal protective equipment. Always wear
eye protection. Protective equipment such as dust
mask, non-skid safety shoes, hard hat, or hearing
protection used for appropriate conditions will reduce
personal injuries.
•Prevent unintentional starting. Ensure the switch
is in the OFF position before connecting to power
source and/or battery pack, picking up or carrying
the tool. Carrying power tools with your finger on the
switch or energizing power tools that have the switch
ON invites accidents.
•Remove any adjusting key or wrench before turn-
ing the power tool ON. A wrench or a key left attached
to a rotating part of the power tool may result in per-
sonal injury.
•Do not overreach. Keep proper footing and balance
at all times. This enables better control of the power
tool in unexpected situations.
•Dress properly. Do not wear loose clothing or jew-
elry. Keep your hair, and clothing away from
moving parts. Loose clothes, jewelry, or long hair
can be caught in moving parts.
•If devices are provided for the connection of dust
extraction and collection facilities, ensure these are
connected and properly used. Use of dust collection
can reduce dust-related hazards.
•Do not let familiarity gained from frequent use of
tools allow you to become complacent and ig-
nore tool safety principles. A careless action can
cause severe injury within a fraction of a second.
Power Tool Use and Care
•Do not force power tool. Use the correct power
tool for your application. The correct power tool will
do the job better and safer at the rate for which it is de-
signed.
•Do not use power tool if the switch does not turn it
ON and OFF. Any power tool that cannot be con-
trolled with the switch is dangerous and must be
repaired.
www. .com information@itm.com1.800.561.8187

999-997-050.10_REV. A4
K-60SP Drain Cleaning Machine
Drain Cleaner Safety
•Before using the tool, test the ground fault circuit in-
terrupter (GFCI) provided with the power supply
cord to insure it is operating correctly. A properly
operating GFCI reduces the risk of electrical shock.
•Only use extension cords that are protected by a
GFCI. The GFCI on the machine power cord will not
prevent electrical shock from extension cords.
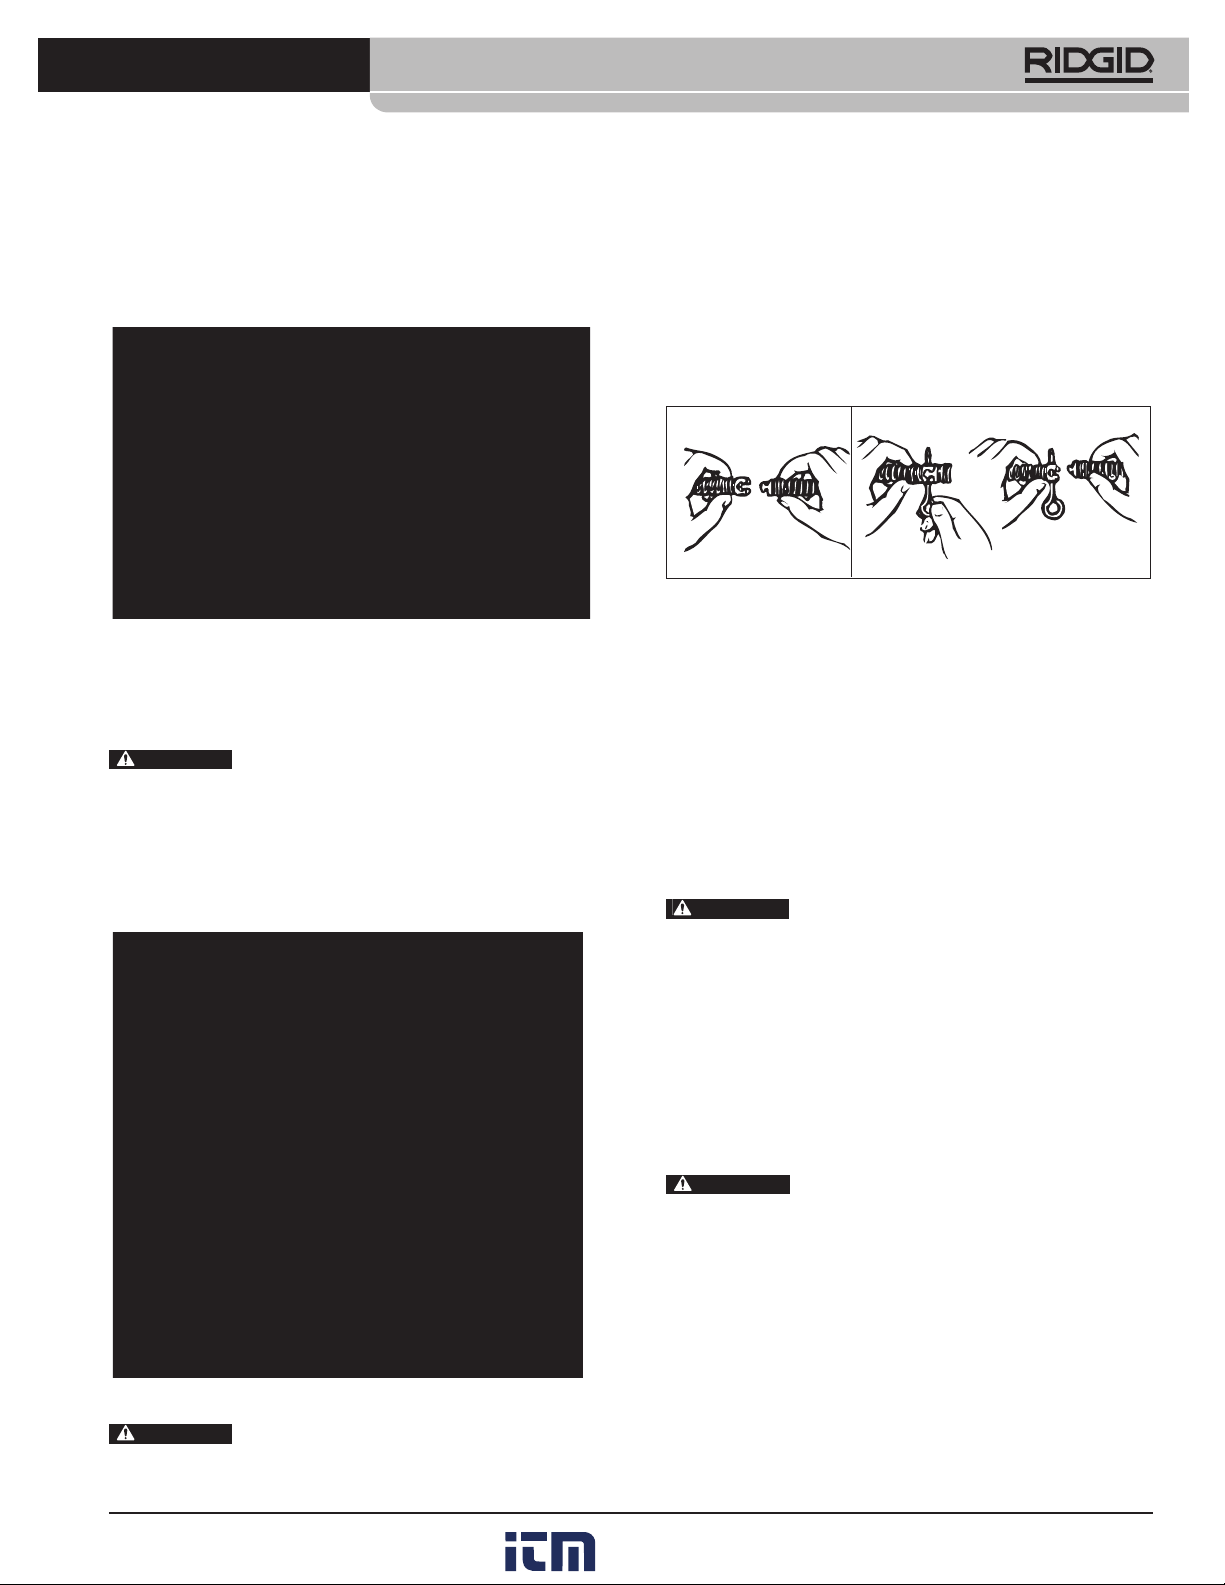
•Only grasp the rotating cable with gloves recom-
mended by the manufacturer. Latex or loose fitting
gloves or rags can become wrapped around the cable
and may result in serious personal injury.
•Do not allow the cutter to stop turning while the
cable is turning. This can overstress the cable and may
cause twisting, kinking or breaking of the cable and
may result in serious personal injury.
•One person must control both the cable and switch.
If the cutter stops rotating, the operator must be able to
turn the tool OFF to prevent the cable from twisting, kink-
ing and breaking.
•Use latex or rubber gloves inside the gloves rec-
ommended by the manufacturer, goggles, face
shields, protective clothing, and respirator when
chemicals, bacteria or other toxic or infectious
substances are suspected to be in a drain line.
Drains may contain chemicals, bacteria and other sub-
stances that may cause burns, be toxic or infectious or
may result in other serious personal injury.
•Practice good hygiene. Do not eat or smoke while
handling or operating the tool. After handling or op-
erating drain cleaning equipment, use hot, soapy
water to wash hands and other body parts ex-
posed to drain contents. This will help reduce the risk
of health hazards due to exposure to toxic or infectious
material.
•Only use the drain cleaner for the recommended
drain sizes. Using the wrong size drain cleaner can lead
to twisting, kinking or breaking of the cable and may re-
sult in personal injury.
•Always use the rear guide hose while operating
the tool and ensure the cable does not extend be-
yond the rear guide hose. This prevents the cable
from whipping which may result in entanglement and
personal injury.
•Keep mitt-covered hand on the cable whenever the
machine is running. This provides better control of the
cable and helps prevent twisting, kinking and breaking
of the cable and may result in serious personal injury.
•Position machine cable outlet within 2' (0.6 m) of
the drain inlet or properly support exposed cable
when the distance exceeds 2' (0.6 m). Greater dis-
tances can cause control problems leading to twisting,
kinking or breaking of the cable. Twisting, kinking or
breaking cable may cause striking or crushing injuries.
•One person must control both the cable and the
clutch. Do not lock clutch handle during opera-
tion. If the cutter stops rotating, the operator must be
able to release the clutch to prevent twisting, kinking and
breaking of the cable and reduce the risk of injury.
•Do not operate the machine in REV (reverse) rota-
tion except as described in this manual. Operating in
reverse can result in cable damage and is used to
back the cable end out of blockages.
•Do not wear loose clothing or jewelry. Keep your
hair and clothing away from moving parts. Loose
clothing, jewelry or hair can be caught in moving parts.
•Do not operate this machine if operator or machine
is standing in water. Operating machine while in
water increases the risk of electrical shock.
•Do not engage drain cleaner clutch (rotate cable)
while any part of the cable is in the cable carrier.
This may cause striking or crushing injuries.
•Do not use if there is the risk of contact with other
utilities (such as natural gas or electric) during op-
eration. Visual inspection of the drain with a camera is
a good practice. Crossbores, improperly placed utilities
and damaged drains could allow the cutter to contact
and damage the utility. This could cause electrical
shock, gas leaks, fire, explosion or other serious dam-
age or injury.
•Read and understand these instructions and the in-
structions and warnings for all equipment and
materials being used before operating this tool to
reduce the risk of serious personal injury.
RIDGID Contact Information
If you have any question concerning this RIDGID®product:
www. .com information@itm.com1.800.561.8187

999-997-050.10_REV. A 5
K-60SP Drain Cleaning Machine
Standard Equipment
Model No. Description
K-60SP ..........................K-60SP Sectional Machine
115 volts/60 Hz includes:
A-1 Operator’s Mitt
A-60-12 Rear Guide Hose
Figure 1 – K-60SP Drain Cleaner
K-60SP-SE ....................K-60SP as above, plus:
A-61 Tool Kit:
– T-101 Straight Auger
– T-102 Funnel Auger
– T-107 Spade Cutter
– T-125 Retrieving Auger
– T-150-1 Sharktooth Cutter
– A-3 Tool Box
– A-12 Pin Key
A-62 Cable Kit:
– Five Sections C-10,
7/8" x15' Cable
– A-8 Cable Carrier
Figure 2 – K-60SP-SE Drain Cleaner
Description, Specifications and
Standard Equipment
Description
The RIDGID®K-60SP is a portable Drain Cleaning Machine
designed to clean 11/4" to 4" drain lines. Applications include
laundry tubs, floor drains, roof vents and stack lines. Rear
handle allows for transporting up ladders and cleaning
roof-top vent stacks.
The machine is driven by a 1/2 HP motor that has a
grounded electrical system. An integral Ground Fault In-
terrupter (GFCI) is built into the line cord. A toggle switch
provides FOR/OFF/REVERSE control of the motor.
The K-60SP is designed to use sectional-type cable that
has a quick change coupling system for disconnecting
tools. The cable is manually fed in and out of the drain and
rotates at a speed of 600 RPM. The rotation of the cable
is controlled by a clutch handle. The cable stops instantly
when the clutch handle is released. An adjustment knob al-
lows the K-60SP to use both 5/8" and 7/8" sectional cable.
Specifications
Line Capacity ...............Depends on choice of cable.
Refer to the following chart for
recommendations.
Cable Sizes ..................7/8" and 5/8" sectional
Cable Speed.................600 rpm
Motor
Type ..............................115V/60 Hz, Reversible
Rating ............................1/2HP
Amps .............................7
Weight ..........................43 lbs. (19,5 kgs.)
Dimensions:
Length ...........................18.0" (450mm)
Width .............................9.5" (240mm)
Height ............................14.0" (356mm)
Sound Pressure (LPA)* ......68.7 dB(A), K=3
Sound Power (LWA)*...........76.6 dB(A), K=3
* Sound measurements are measured in accordance with a standardized test per
Standard EN 62841-1.
- Sound emissions may vary due to your location and specific use of these tools.
- Daily exposure levels for sound need to be evaluated for each application and ap-
propriate safety measures taken when needed. Evaluation of exposure levels
should consider the time a tool is switched off and not in use. This may signifi-
cantly reduce the exposure level over the total working period.
Cable Size Line Size Reach
5/8" Cable 11/4- 4 125'
7/8" Cable 2 - 4 150'
Recommended Line Size and Reach
www. .com information@itm.com1.800.561.8187

999-997-050.10_REV. A6
K-60SP Drain Cleaning Machine
job successfully and safely. Accessories suitable for
use with other equipment may be hazardous when
used with this drain cleaner.
7. Clean any oil, grease or dirt from all equipment han-
dles and controls. This reduces the risk of injury due
to a tool or control slipping from your grip.
8. Inspect the cutting edges of your tools. If necessary,
have them sharpened or replaced prior to using the
Drain Cleaning Machine. Dull or damaged cutting
tools can lead to binding and cable breakage.
9. Inspect cables and couplings for wear and damage.
Cables should be replaced when they become
severely worn or corroded. A worn cable can be
identified when the outside coils become flat.
Worn or damaged cables can break caus-
ing serious injury.
Machine Set-Up
WARNING
Do not place machine in water. Water entering
the motor can result in electrical shock.
To prevent serious injury, proper set-up of the
machine and work area is required. The following
procedures should be followed to set-up the ma-
chine:
1. Check work area for:
• Adequate lighting
• Grounded electrical outlet
• Clear path to the electrical outlet that does not
contain any sources of heat or oil, sharp edges or
moving parts that may damage electrical cord.
• Dry place for machine and operator. Do not use the
machine while standing in water.
• Flammable liquids, vapors or dust that may ignite.
2. Position the Drain Cleaning Machine within 2' of
sewer inlet. Greater distance can result in cable twist-
ing or kinking.
3. Remove the pin key from the clutch handle. With
pin key removed, handle should be in its upper-most
position.
Machine Inspection
WARNING
To prevent serious injury, inspect your Drain Clean-
ing Machine. The following inspection procedures
should be performed before each use.
1. Make sure the Drain Cleaning Machine is unplugged
and the directional switch is set to the OFF position
(Figure 3).
2. Inspect the power cord, Ground Fault Circuit Inter-
rupter (GFCI) and plug for damage. If the plug has
been modified, is missing the grounding prong or if the
cord is damaged, do not use the Drain Cleaning
Machine until the cord has been replaced.
Figure 3 – K-60SP Drain Cleaner
3. Check bottom cover to insure it is properly fastened to
the frame.
Do not operate this machine without the
bottom cover attached. Fingers can be caught in rotating
parts.
4. Inspect the Drain Cleaning Machine for any broken,
missing, misaligned or binding parts as well as any
other conditions which may affect the safe and normal
operation of the machine. If any of these conditions
are present, do not use the Drain Cleaning Machine
until any problem has been repaired.
5. Lubricate the Drain Cleaning Machine, if necessary,
according to the Maintenance Instructions.
6. Use tools and accessories that are designed for your
drain cleaner and meet the needs of your application.
The correct tools and accessories allow you to do the
Clutch Handle
Rear Guide Tube
Electrical
Switch
Bottom Cover
WARNING
WARNING
www. .com information@itm.com1.800.561.8187

999-997-050.10_REV. A 7
K-60SP Drain Cleaning Machine
NOTE! When not in use, the clutch handle should be in
its locked (down) position in order to protect
the handle and to allow the operator to carry the
unit by the clutch handle if desired.
4. Make sure FOR/OFF/REV switch is in the OFF po-
sition.
Figure 4 – Rear Guide Hose Attachment
5. Attach the rear guide hose by lifting up the lock pin
and sliding guide hose onto the jaw housing adjust-
ment knob (Figure 4).
Do not use machine without rear guide
hose attached. Prevents cable whipping and possible en-
tanglement.
6. Insert first cable into front of machine (female end
first) and push through guide hose until approxi-
mately one foot remains out the front of the machine
(Figure 5).
Figure 5 – Inserting Cable Into Front Of Machine
Never couple more than one cable at a
time. Cable will extend behind rear guide tube.
NOTE! Adjust the jaw set as required. The K-60SP
has a jaw set adjustment which allows the ma-
chine to accept 5/8" and 7/8" diameter cable.
Refer to “Special Procedures” section.
7. Select and install the proper tool to the end of the
cable. The T-Slot Coupler allows the tool to be
snapped into the cable coupler (Figure 6). To re-
move tool, use the pin key to depress the plunger and
slide the coupling apart.
Figure 6 – Coupling and Uncoupling Tools
NOTE! Proper Tool Selection
A good rule of thumb is to use a tool at least 1"
smaller than the line to be cleaned. The style of the
tool is determined by the nature of the job and is
left up to the operator.
8. Plug the Drain Cleaning Machine into the electrical
outlet, making sure to position the power cord along
the clear path selected earlier. If the power cord
does not reach the outlet, use an extension cord in
good condition.
To avoid electric shock and electrical
fires, never use an extension cord that is damaged or
does not meet the following requirements:
• The cord has a three-prong plug similar to shown in
Electrical Safety section.
• The cord is rated as “W” or “W-A” if being used out-
doors.
• The cord has sufficient wire thickness (16 AWG below
50'/14 AWG 50' - 100'). If the wire thickness is too
small, the cord may overheat, melting the cord’s insu-
lation or causing nearby objects to ignite.
To reduce risk of electrical shock, keep all
electrical connections dry and off the ground. Do not
touch plug with wet hands. Test the Ground Fault Circuit
Interrupter (GFCI) provided with the electric cord to in-
sure it is operating correctly. When test button is pushed
in, the indicator light should go off. Reactivate by push-
ing the reset button in. If indicator light goes on, the
machine is ready to use. If the GFCI does not function
correctly, do not use the machine.
To Couple Cable
and Tools
Snap Together Insert Pin Slide Apart
To Uncouple Cable and Tools
WARNING
WARNING
WARNING
WARNING
www. .com information@itm.com1.800.561.8187

999-997-050.10_REV. A8
K-60SP Drain Cleaning Machine
Operating Instructions
WARNING
Wear mitts with rivets provided with machine.
Never grasp a rotating cable with a rag or loose fit-
ting cloth that may become wrapped around the
cable causing serious injury.
Always wear eye protection to protect your eyes
against dirt and other foreign objects. Wear rubber
soled, non-slip shoes.
Be very careful when cleaning drains where clean-
ing compounds have been used. Wear gloves when
handling cable and avoid direct contact to the
skin and especially the eyes and facial area as se-
rious burns can result.
Do not operate with clutch handle locked in place.
Clutch is a safety feature designed to stop rotation
of cable when released.
It is very important to know approximate dis-
tance from inlet to main sewer or septic tank. Over-running
cable too far into main sewer or septic tank can cause ca-
bles to knot up and prevent their return through small line.
1. Assume the correct operating posture in order to
maintain proper balance (Figure 7).
Should an unexpected situation arise, this
posture provides you with the opportunity to safely keep
control of the machine and cable.
• Be sure you can quickly release the clutch handle.
• Hand must be on the cable to control its twisting
action when it hits an obstruction.
• Must have access to FOR/OFF/REVERSE switch.
Figure 7 – Proper Operating Position
2. Pull sufficient cable out of the machine to start tool and
cable into the sewer inlet. If going through a “P” trap,
push cable into inlet as far as it will go.
3. Pull enough extra cable through machine to form al-
most a half circle between machine and line opening.
4. Hold cable loosely in mitted hand. Put FOR/OFF/RE-
VERSE switch in FOR (forward) position.
NOTE! The motor will start but cable will not rotate.
5. With mitted hand on cable, push down on clutch han-
dle with opposite hand to engage cable. Push down
on top of the cable loop with a definite snap to ad-
vance the cable.
NOTE! A slow or gradual engaging of the clutch handle
causes excessive wear of the jaw set. The clutch
is instant-acting and returning clutch handle to its
original position frees cable instantly.
6. As soon as excess cable has gone into line, release
clutch handle and pull six to ten inches of cable out of
machine with mitted hand.
7. Continue to feed the cable into the line until resistance
or obstruction is encountered. This will become ap-
parent to operator as it will be difficult to feed additional
cable into line and/or the cable will have a tendency to
twist sideways in operator’s hands.
8. If cable loads down in the obstruction, relieve load by
pulling back on cable with short, quick jerks to free
cutter. Slowly advance cable back into the obstruc-
tion. Repeat this process until the obstruction is clear.
Remember, make sure the cutter is rotating at all
times and never force the cable. At this point, pro-
gress depends upon the sharpness of the tool and
nature of the obstruction.
WARNING
Do not allow tension to build up in the cable. This
will happen if the cutting tool hits a snag and stops
turning, but the motor and cable continue to ro-
tate. Torque builds until the cable suddenly twists,
potentially wrapping around your hand or arm. This
can happen quickly and without warning, so proceed
slowly and carefully as you feed the cable into the
drain. Releasing clutch handle will stop the cable ro-
tating and releases the torque. If tool gets hung
up in an obstruction, refer to Reverse Operating
Instructions in the “Special Procedures” section.
9. Once obstruction is cleared, it is recommended that
operator flush debris from line with running water.
Repeat Step 8 several times if necessary for thorough
cleaning job and then work cable through additional
stoppages as required.
10. To add cable, the following procedure should be fol-
lowed:
CAUTION
WARNING
www. .com information@itm.com1.800.561.8187

999-997-050.10_REV. A 9
K-60SP Drain Cleaning Machine
• After reaching the end of each cable section, turn
the machine OFF.
• Secure the cable by looping it in the line (Figure 8).
This procedure is especially useful when cleaning
a line has a large slope.
Figure 8 – Looping Cable In Line
• With line secured, insert another section of cable
in through the front of the machine (female end
first) until approximately one foot remains out the
front of the machine.
• Attach cable to cable in line and resume operation.
11. To retrieve cable from drain line, the following proce-
dure should be followed:
• Leave FOR/OFF/REV switch in FOR (forward) po-
sition.
• Push down on clutch handle to engage cable.
With mitted hand pull cable out of line (if possible)
or hold cable against edge of inlet to thread the
cable out until loop forms in front of the machine.
NOTE! By holding the cable against the edge of the
inlet, the rotation will rapidly “thread” the cable out
of the line.
• When loop forms, release clutch handle and push
excess cable back through machine. Disconnect
one section at a time.
When disconnecting sections, remem-
ber to turn unit off and secure cable in line.
• Once section of cable is removed, insert the se-
cured cable in through the front of the machine and
continue removing sections until tool on last section
of cable is just inside sewer inlet.
Never retract tool from sewer inlet while
cable is rotating. Tool can whip causing serious injury.
12. Turn FOR/OFF/REV Switch to OFF position and re-
move cord from power source.
13. Pull remaining cable and tool from sewer.
After using, thoroughly flush and drain cables,
couplings and tools with water due to damaging effects of
some drain cleaning compounds.
Special Procedures
Reverse Operation
Running machine in reverse will cause premature failure
of cable. Use reverse only to free a tool caught in an ob-
struction. If this should occur, immediately release clutch
handle and place FOR/OFF/REV switch to OFF position.
After motor comes to a complete stop, place
FOR/OFF/REV switch in the REV (reverse) direction.
Engage clutch handle only until tool is free of obstruction.
Once tool is free, release clutch handle immediately. turn
unit OFF. Run unit in FOR (forward) direction and follow
normal operating procedure.
Never operate this machine in REV (re-
verse) for any other purpose. Operating in reverse can
damage a cable and cause serious injury.
Jaw Set Adjustment
7/8" Diameter Cable
• If 7/8" cable will not slide through the front of the ma-
chine, the jaw set is not open wide enough.
• Remove the rear guide hose from the jaw housing
adjustment knob.
• Loosen the adjustment knob set screw with 1/4" hex
key (Figure 9).
• Turn the Adjustment Knob counter-clockwise when
viewed from the rear (approximately 2 turns) until the
cable will slide through the machine (Figure 10).
• With cable through the jaw set, press the clutch han-
dle DOWN to make sure the jaw set engages the
cable. If not, turn the knob clockwise until there is en-
gagement.
• If necessary, turn the adjustment knob in the direc-
tion required so that the clutch handle engages the
cable at the position desired by the operator.
Figure 9 – Loosen the Set Screw
• Tighten the set screw.
• Reattach the rear guide hose.
CAUTION
WARNING
WARNING
WARNING
www. .com information@itm.com1.800.561.8187

999-997-050.10_REV. A10
K-60SP Drain Cleaning Machine
Catalog Model
No. No. Description
62275 C-10 15'All-Purpose Wind (4.6m)
30007 T-127 7/8"Trap Leader
Catalog Model
No. No. Description
51317 C-9 10'Heavy-Duty (3m)
62270 C-8 71/2'All-Purpose Wind (2.3m)
62265 C-7 71/2'Tight-Wind (2.3m)
7/8"Cable and Leader
5/8"Cables
Catalog Model
No. No. Description
61630 A-62 Standard Equipment Cable Kit for
K-60SP-SE, includes:
– Five Sections C-10, 7/8"x15'Cable (75-',23m)
– A-8 Cable Carrier
61625 A-61 Standard Equipment Tool Kit for K-60SP-SE
includes:
– T-101 Straight Auger
– T-102 Funnel Auger
– T-107 Spade Cutter
– T-125 Retrieving Auger
– T-150-1 Sharktooth Cutter
– A-3 Tool Box
– A-12 Pin Key
48472 A-35 5/8"Cable Kit, includes:
– Six Sections C-8, 5/8"x 71/2"Cable (45',14m)
– A-10 Cable Carrier
– T-201 Straight Auger
– T-202 Bulb Auger
– T-205 “C” Cutter
– T-211 Spade Cutter
– A-13 Coupling Pin Key
48477 A-35TW 5/8"Tight-Wind Cable Kit, substitutes C-7
for C-8 in above package
Cable Kits and Tool Kit
Cable Selection Chart
Model Length Size/Type
C-7 71/2'5/8" (16mm)
C-8 71/2'5/8" (16mm)
C-9 10' 5/8" (16mm)
C-10 15' 7/8" (22mm)
Typical Application
2" & 3" Floor drains
Drain Lines 11/4" – 2".
Ideal for proper cleaning of small lines
Drain Lines 2" – 4".
Ideal for drains and stacks
Drain Lines 2" – 4". Roof-top vent stacks
Characteristics
Tight wind cable providing good rigidity in a hollow core cable. Not recommended for tree roots.
Open wind cable that is more flexible than C-7. Open wind acts as an auger to thoroughly remove
blockages in small lines.
Heavy-duty open wind cable ideal for long runs in indoor lines.
Standard all-purpose open wind. Excellent flexibility.
Figure 10 – Jaw Set Adjustment
5/8" Diameter Cable
• If the jaw set does not engage the cable when the
clutch handle is pressed, the jaw set is open too
wide.
• Remove the rear guide hose from the jaw housing
adjustment knob.
• Loosen the set screw with 1/4" hex key (Figure 9).
• Turn the adjustment knob clockwise until the cable
is engaged by the jaw set when the clutch handle is
pressed (approximately 2 turns) (Figure 10).
• If necessary, turn the adjustment knob in the direction
required so that the clutch handle engages the cable
at the position desired by the operator.
• Tighten the set screw.
• Reattach the rear guide hose.
Accessories
Only the following RIDGID products have
been designed to function with the K-60SP Drain Cleaning
Machine. Other accessories suitable for use with other
tools may become hazardous when used on the K-60SP.
To prevent serious injury, use only the recommended ac-
cessories.
NOTE! See Ridge Tool Catalog for complete list of
tools and accessories.
WARNING
www. .com information@itm.com1.800.561.8187

999-997-050.10_REV. A 11
K-60SP Drain Cleaning Machine
Catalog Model
No. No. Description
62850 T-101 Straight Auger
62855 T-102 Funnel Auger
27642 T-125 Retrieving Auger
62860 T-103 Sawtooth Cutter, 21/2"
62865 T-104 “H” Cutter, 21/2"
62870 T-105 Grease Cutter, 21/2"
62875 T-106 Grease Cutter, 31/2"
62880 T-107 Spade Cutter, 13/4"
62915 T-109 Spiral Sawtooth Cutter, 13/4"
62920 T-110 Spiral Sawtooth Cutter, 21/4"
62925 T-111 Spiral Sawtooth Cutter, 3"
62930 T-112 4-Blade Cutter, 13/4"
62935 T-113 4-Blade Cutter, 3"
98050 T-150 Sharktooth Cutter, 3" and 4"
98055 T-150-1 Sharktooth Cutter, 3" Blade
98060 T-150-2 Sharktooth Cutter, 4" Blade
62940 T-114 Chain Knocker
Catalog Model
No. No. Description
62990 T-201 Straight Auger
62995 T-202 Bulb Auger, 11/8" O.D.
63000 T-203 Bulb Auger, 7/8", O.D.
55457 T-225 Retrieving Auger
63065 T-217 Drop Head
54837 T-204 “C” Cutter, 1"
63005 T-205 “C” Cutter, 13/8"
63010 T-206 Funnel Auger
63015 T-207 Spiral Cutter, 11/4"
63020 T-208 Spiral Cutter, 11/2"
63025 T-209 Spiral Cutter, 2"
63030 T-210 Spade Cutter, 1"
63035 T-211 Spade Cutter, 13/8"
63040 T-212 Spade Cutter, 13/4"
63045 T-213 4-Blade Cutter, 1"
63050 T-214 4-Blade Cutter, 13/8"
63055 T-215 4-Blade Cutter, 13/4"
63060 T-216 Chain Knocker, 2"
63280 T-218 Flue Brush, 3"
63070 T-219 Flue Brush, 21/2"
63080 T-220 Flue Brush, 2"
63220 T-221 Flue Brush, 11/2"
52812 T-230 H-D “C” Cutter, 2"
52817 T-231 H-D “C” Cutter, 21/2"
52822 T-232 H-D “C” Cutter, 3"
48482 T-250 Tool Set includes:
– T-203 – T-217
– T-205 – A-13
– T-210
Tools for C-10 Cable
Tools for C-7, C-8, and C-9 Cables
NOTE! See Ridge Tool Catalog for complete list of tools
and accessories.
Maintenance Instructions
WARNING
Make sure machine is unplugged from power source
before performing maintenance or making any ad-
justment.
Lubrication
Lubricate machine with grease at grease fitting (located on
jaw housing) once a week if used every day; once a
month if used less.
NOTE! No lubrication of the Motor Shaft is required.
Cables
Cables should be thoroughly flushed with water to prevent
damaging effects of drain cleaning compounds. Periodi-
cally lubricate cables and couplings with RIDGID Cable
Rust Inhibitor.
When not in use, store cables indoors to prevent deterio-
ration by the elements.
Cables should be replaced when they become severely
corroded or worn. A worn cable can be identified when out-
side of coils become flat.
Clutch Jaw Assembly (Jaw Set)
The clutch jaw assembly should be periodically cleaned.
1. Stand the machine up on the front of the frame.
Make sure clutch handle is in its uppermost position.
Remove the two (2) socket head cap screws from the
jaw housing with a 1/4" hex key (Figure 11).
Catalog Model
No. No. Description
59360 A-3 Tool Box
59205 A-1 Left-Hand Mitt
59295 A-2 Right-Hand Mitt
59225 A-12 Pin Key, 7/8" Cable
59230 A-13 Pin Key, 5/8" Cable
61615 A-60-12 12' Rear Guide Hose for 7/8" Cable/C-10
59235 A-14-6 6' Rear Guide Hose for 5/8" Cable/C-7, C-8,
C-9
84325 A-14-10 10' Rear Guide Hose for 5/8" Cable/C-7,
C-8, C-9
59470 A-8 Cable Carrier (Holds 75' 7/8" Cable/C-10)
59210 A-10 Cable Carrier (Holds 45' 7/8" Cable/C-10)
Cable Carrier (Holds 90' 5/8" Cable/C-8, C-9)
59425 A-36 Cable Caddy
65687 K-60SP Jaw Set
Miscellaneous
www. .com information@itm.com1.800.561.8187

Figure 11 – Remove Socket Head Cap Screws
2. Remove the jaw housing. The clutch jaw assembly is
contained in the jaw housing.
3. Remove the jaw set cover by rotating counter-clock-
wise (Figure 12).
Figure 12 – Remove Jaw Set Cover
4. Clean the clutch jaw assembly, jaw cover, and the in-
side of the jaw housing.
5. If worn, replace the clutch jaw assembly.
6. Reinstall the jaws into the jaw housing and replace the
jaw set cover.
7. Rotate the adjustment knob clockwise until the jaw set
touches the jaw set cover. This will insure that the jaw
set is properly aligned.
8. Attach jaw housing to machine with socket head cap
screws.
NOTE! Make sure flanges on plastic shroud are con-
tained inside the jaw housing.
Drive Belt Replacement
1. Stand the machine up on the front of the frame.
Make sure clutch handle is in its uppermost posi-
tion. Remove the two (2) socket head cap screws
from the jaw housing with a 1/4" hex key. (Figure 11)
2. Remove the jaw housing.
3. Loosen the jam nut on the side of the machine
(Figure 13).
4. Rotate motor adjustment set screw counter-clock-
wise with 3/16" hex key until belt is loose enough to be
removed.
Figure 13 – Loosen Jam Nut
5. Install new belt and set unit down on bottom of frame
(operating position), so belt will become tensioned by
the weight of the motor.
6. Rotate the motor adjustment set screw until it just
touches the motor. Once the set screw touches
motor, rotate set screw 1/2turn clockwise.
999-997-050.10_REV. A12
K-60SP Drain Cleaning Machine
www. .com information@itm.com1.800.561.8187

NOTE! Do not tighten this set screw by driving it into the
motor.
7. While holding the set screw in place with the 3/16"
hex key, tighten the jam nut (Figure 14).
Figure 14 – Tighten Jam Nut
8. Attach jaw housing to machine with socket head cap
screws.
Machine Storage
Motor-driven equipment must be kept in-
doors or well covered in rainy weather. Store the machine
in a locked area that is out of reach of children and people
unfamiliar with drain cleaners. This machine can cause se-
rious injury in the hands of untrained users.
If machine has been exposed to freezing weather, unit
must be run for ten (10) to twenty (20) minutes without
load to warm up. Failing to do this will result in frozen bear-
ings. If machine is exposed to weather for a period of time,
moisture will form across motor windings causing motor to
burn out.
Service and Repair
WARNING
The “Maintenance Instructions” will take care of most of
the service needs of this machine. Any problems not ad-
dressed by this section should only be handled by an au-
thorized RIDGID service technician.
Tool should be taken to a RIDGID Independent Auth-
orized Service Center or returned to the factory. All repairs
made by Ridge service facilities are warranted against de-
fects in material and workmanship.
When servicing this machine, only iden-
tical replacement parts should be used. Failure to follow
these instructions may create a risk of electrical shock or
other serious injury.
If you have any questions regarding the service or repair
of this machine, call or write to:
999-997-050.10_REV. A 13
K-60SP Drain Cleaning Machine
WARNING
WARNING
www. .com information@itm.com1.800.561.8187

999-997-050.10_REV. A14
K-60SP Drain Cleaning Machine
Wiring Diagram
115V/60 Hz
Service Cord
Motor
White
Black
Green
230V/50 Hz
Service Cord
Motor
1 Black
3 Blue
7 Red
4 White
2 Brown
1 Black
3 Blue
7 Red
4 White
2 Brown
Green
Blue
Brown
Grn/Yel
www. .com information@itm.com1.800.561.8187

What is covered
RIDGID®tools are warranted to be free of defects in workmanship and material.
How long coverage lasts
This warranty lasts for the lifetime of the RIDGID®tool. Warranty coverage ends when the product
becomes unusable for reasons other than defects in workmanship or material.
How you can get service
To obtain the benefit of this warranty, deliver via prepaid transportation the complete product to
RIDGE TOOL COMPANY, Elyria, Ohio, or any authorized RIDGID®INDEPENDENT SERVICE CENTER.
Pipe wrenches and other hand tools should be returned to the place of purchase.
What we will do to correct problems
Warranted products will be repaired or replaced, at RIDGE TOOL’S option, and returned at no charge;
or, if after three attempts to repair or replace during the warranty period the product is still
defective, you can elect to receive a full refund of your purchase price.
What is not covered
Failures due to misuse, abuse or normal wear and tear are not covered by this warranty. RIDGE
TOOL shall not be responsible for any incidental or consequential damages.
How local law relates to the warranty
Some states do not allow the exclusion or limitation of incidental or consequential damages, so the
above limitation or exclusion may not apply to you. This warranty gives you specific rights, and you
may also have other rights, which vary, from state to state, province to province, or country to coun-
try.
No other express warranty applies
This FULL LIFETIME WARRANTY is the sole and exclusive warranty for RIDGID®products. No
employee, agent, dealer, or other person is authorized to alter this warranty or make any other war-
ranty on behalf of the RIDGE TOOL COMPANY.
Qué cubre
Las herramientas RIDGID®están garantizadas contra defectos de la mano de obra y de los
materiales empleados en su fabricación.
Duración de la cobertura
Esta garantía cubre a la herramienta RIDGID®durante toda su vida útil. La cobertura de la garantía
caduca cuando el producto se torna inservible por razones distintas a las de defectos en la mano de
obra o en los materiales.
Cómo obtener servicio
Para obtener los beneficios de esta garantía, envíe mediante porte pagado, la totalidad del producto
a RIDGE TOOL COMPANY, en Elyria, Ohio, o a cualquier Servicentro Independiente RIDGID®. Las
llaves para tubos y demás herramientas de mano deben devolverse a la tienda donde se adquirieron.
Lo que hacemos para corregir el problema
El producto bajo garantía será reparado o reemplazado por otro, a discreción de RIDGE TOOL, y
devuelto sin costo; o, si aún resulta defectuoso después de haber sido reparado o sustituido tres
veces durante el período de su garantía, Ud. puede optar por recibir un reembolso por el valor total
de su compra.
Lo que no está cubierto
Esta garantía no cubre fallas debido al mal uso, abuso o desgaste normal. RIDGE TOOL no se hace
responsable de daño incidental o consiguiente alguno.
Relación entre la garantía y las leyes locales
Algunos estados de los EE.UU. no permiten la exclusión o restricción referente a daños incidentales
o consiguientes. Por lo tanto, puede que la limitación o restricción mencionada anteriormente no rija
para Ud. Esta garantía le otorga derechos específicos, y puede que, además, Ud tenga otros dere-
chos, los cuales varían de estado a estado, provincia a provincia o país a país.
No rige ninguna otra garantía expresa
Esta GARANTIA VITALICIA es la única y exclusiva garantía para los productos RIDGID®. Ningún
empleado, agente, distribuidor u otra persona está autorizado para modificar esta garantía u ofre-
cer cualquier otra garantía en nombre de RIDGE TOOL COMPANY.
Ce qui est couvert
Les outils RIDGID®sont garantis contre tous vices de matériaux et de main d’oeuvre.
Durée de couverture
Cette garantie est applicable durant la vie entière de l’outil RIDGID®. La couverture cesse dès lors que
le produit devient inutilisable pour raisons autres que des vices de matériaux ou de main d’oeuvre.
Pour invoquer la garantie
Pour toutes réparations au titre de la garantie, il convient d’expédier le produit complet en port payé
à la RIDGE TOOL COMPANY, Elyria, Ohio, ou bien le remettre à un réparateur RIDGID®agréé. Les clés
à pipe et autres outils à main doivent être ramenés au lieu d’achat.
Ce que nous ferons pour résoudre le problème
Les produits sous garantie seront à la discrétion de RIDGE TOOL, soit réparés ou remplacés, puis réex-
pédiés gratuitement ; ou si, après trois tentatives de réparation ou de remplacement durant la période
de validité de la garantie le produit s’avère toujours défectueux, vous aurez l’option de demander le rem-
boursement intégral de son prix d’achat.
Ce qui n’est pas couvert
Les défaillances dues au mauvais emploi, à l’abus ou à l’usure normale ne sont pas couvertes par cette
garantie. RIDGE TOOL ne sera tenue responsable d’aucuns dommages directs ou indirects.
L’influence de la législation locale sur la garantie
Puisque certaines législations locales interdisent l’exclusion des dommages directs ou indirects, il se
peut que la limitation ou exclusion ci-dessus ne vous soit pas applicable. Cette garantie vous donne des
droits spécifiques qui peuvent être éventuellement complétés par d’autres droits prévus par votre lég-
islation locale.
Il n’existe aucune autre garantie expresse
Cette GARANTIE PERPETUELLE INTEGRALE est la seule et unique garantie couvrant les produits
RIDGID®. Aucun employé, agent, distributeur ou tiers n’est autorisé à modifier cette garantie ou à offrir
une garantie supplémentaire au nom de la RIDGE TOOL COMPANY.
FULL LIFETIME
WARRANTY
Against Material Defects
& Workmanship
FULL LIFETIME WARRANTY (garantie légale étendue à la durée de vie du produit,
voir conditions de garantie / legal warranty extended to the product lifecyle,
see warranty conditions)
Printed 11/18 999-997-050.10
EC43911 REV. A
©2018, 2004 RIDGID, Inc.
The Emerson logo and RIDGID logo are registered trademarks of Emerson Electric Co. or RIDGID, Inc. in the U.S. and other countries.
All other trademarks belong to their respective holders.
www. .com information@itm.com1.800.561.8187
Other manuals for K-60SP
1
This manual suits for next models
2
Table of contents
Other RIDGID Other manuals