AQUARATE Hydracup v1.0 User manual


1
Hydracare User Guide www.aquarate.com
Contents
Read Me First 3
The Hydracare System 4
Health & Safety Information 5
Electronic Devices 5
Operating Environment 5
Cleaning 5
Charger Safety 6
Battery Safety 6
Personal Information and Data Security 7
Disposal & Recycling Information 7
Manufacturer Information 8
Address 8
Contact Information 8
Third Party Devices & Digital Services 8
Minimum Requirements 8
Hydracup Features 9
Technical Information 9
Install Instructions 11
Setting up the Gateways 11
Setting up Hydracups 11
Setting Up a Wristband 11
Cleaning & Maintenance 12
How to Hand Clean the Hydracup 12
How to Clean the Hydracup in a Commercial/ Industrial Dishwasher 13
How to Hand Clean the Wristband 14
Device Overheating Situations 14
Storage Instructions 14
Hydracup Instructions 15
Wireless Charging 15
Charging Lights 15
Reducing Battery Consumption 16
Battery Charging Tips 16
Sleep Mode 16
Filling the Hydracup 17
Spill Detection 17
Hydratrack Instructions 19
Logging In 19
Dashboard Navigation 20
Resident Card Navigation 21

2
Hydracare User Guide www.aquarate.com
Add a New Hydracup User 21
Add Manual Fluid 21
View & Manage Manual Fluid 21
Admin User Account 22
How to Add New Wristbands 22
How to Add or Remove a New User Account 22
How to Change a Users Password 22
Standard User Account 22
How to Sort the Resident List 22
How to View Fluid History 23
Stop Fluid Monitoring 23
Spill Detection 23
How to Sign Out 23
How to Delete a Resident 24
Certication 25
Troubleshooting 25
Disclaimer 25

3
Hydracare User Guide www.aquarate.com
Read Me First
This appliance can be used by children aged from 8 years and above and persons with reduced
physical, sensory or mental capabilities or lack of experience and knowledge if they have been
given supervision or instruction concerning use of the appliance in a safe way and understand the
hazards involved.
Children shall not play with the appliance.
Cleaning and user maintenance shall not be made by children without supervision.
Use only Aquarate-approved chargers, and cables. The appliances are only to be used with the
power supply unit provided with the appliance. It must only be supplied at safety extra low voltage
corresponding to the marking on the appliance.
The Hydracup and wristband each contain a non-replaceable battery. DO NOT attempt to modify
the battery, insert foreign objects into it, doing so may lead to re, explosion or other hazards.
Please read this manual before using the device to ensure safe and proper use and to learn how
to dispose of your device properly.

4
Hydracare User Guide www.aquarate.com
The Hydracare System
Hydracups Wireless Chargers
AC Adapters
Anti-spill Lids
Wristbands
BLE-WIFI Gateways

5
Hydracare User Guide www.aquarate.com
Health & Safety Information
Electronic Devices
The Aquarate Hydracup contains radio transmission equipment. DO NOT use your device if it’s use
is prohibited or if it may cause danger or interference with other electronic devices.
Operating Environment
DO NOT take on an aeroplane.
Keep away from direct sunlight.
The device is designed for a maximum operating temperature of +60°C. Keep away from sources
of heat and re, such as heater, microwave oven, stove, water heater, radiator or candle.
DO NOT boil the Hydracup. It is only designed to withstand hot drinks & specic dishwasher
cycles, not extended exposure to boiling water.
DO NOT microwave.
DO NOT disassemble.
You may experience skin allergies or other discomfort if you are allergic to the materials used in
the device. If so, discontinue use and consult a physician.
Aquarate is not responsible for subjects health or hydration levels. The Restricted uid should not
be relied upon for clinical decisions.
Cleaning
DO NOT drop the Hydracup on a hard surface from more than 1 metre. If dropped, check for
damage. If dropped, your device may become unsafe or lose its IP rating credentials.
DO NOT use the Hydracup if it becomes damaged in any way.
Your device has been tested in a controlled environment and certied to be water resistant
in specic situations (meets requirements of classication IPX6 & IPX7 as described by the
international standard IEC 60529-Degrees of Protection).
Always clean the Hydracup after use by following the guidance below.
Hand clean where possible.
Remove stains (e.g. coffee) by scrubbing the Hydracup by hand.
Hydracup is designed to allow cleaning via commercial/ industrial dishwashers only and not for
general household dishwasher cycles. DO NOT place it in a Dishwasher that has a wash cycle
exceeding 60°C temperature and for more than 240 seconds, with a rinse cycle of 85°C for
more than 10 seconds. Before dishwashing, make sure you have fully understood the maximum

6
Hydracare User Guide www.aquarate.com
allowable settings and read the dishwashers manual. Hydracup must be placed upside down in a
dishwasher.
Store the Hydracup, in an inverted position in a cool and dry place.
Ensure a wristband allocated to the kitchen(s) has been placed in a sensible location. Use one
wristband for each cleaning location.
WARNING: If a ‘kitchen wristband’ is not present, Hydracup might associate any uid uctuation
from cleaning as resident consumption.
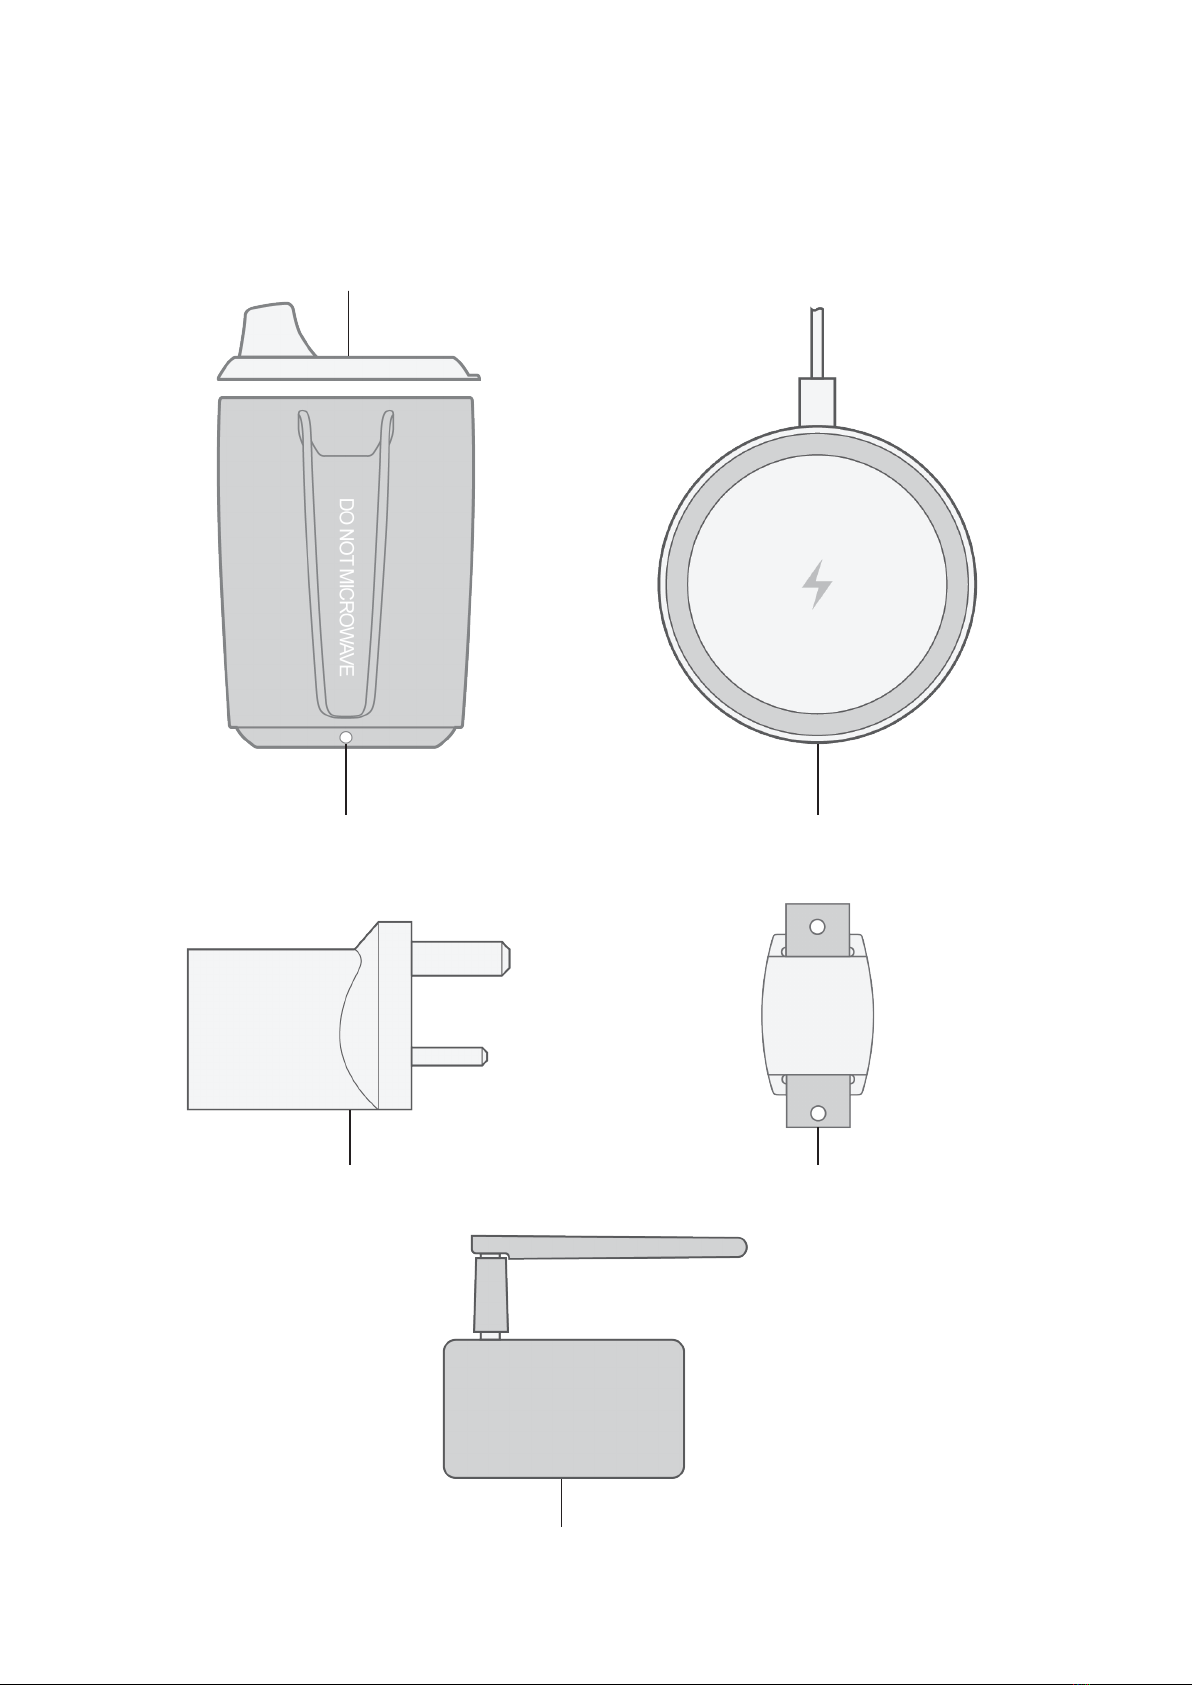
Charger Safety
WARNING: To avoid electric shock and/or damage to your device, DO NOT charge the device while
it is wet or in an area where it could get wet. DO NOT handle the device, charger or cords with wet
hands while charging.
Use only Aquarate-approved chargers, and cables. The appliances are only to be used with the
power supply unit provided with the appliance. It must only be supplied at safety extra low voltage
corresponding to the marking on the appliance.
If the device is damaged it may become unsafe. DO NOT use the device and contact Aquarate
support.
DO NOT charge the Hydracup with any uid inside it.
DO NOT place the device on the wireless charger when conductive materials, such as metal
objects and magnets, are placed between the device and the wireless charger. The device may not
charge properly or may overheat, or the device may be damaged.
Connecting the wireless charger improperly may cause serious damage to the device. Any damage
caused by misuse is not covered by the warranty.
Use only the Micro-USB cables supplied with the device. The device may be damaged if you use
different USB cables.
Battery Safety
The Hydracup and wristband each contain a non-replaceable battery. DO NOT attempt to modify
the battery, insert foreign objects into it, doing so may lead to re, explosion or other hazards.
If the battery leaks, ensure that the electrolyte does not make contact with your skin or eyes. If
contact is made immediately ush with clean water and consult a doctor.
In case of battery deformation, discoloration or overheating whilst charging or storing, or if the
operational time shortens signicantly, the battery may be damaged. Continued use may lead to
battery leakage, re or explosion.
DO NOT dispose of batteries in a re as they may explode.
DO NOT mechanically crush or cut the battery, this can cause re or explosion.

7
Hydracare User Guide www.aquarate.com
Keep away from sources of heat and re, such as heater, microwave oven, stove, water heater,
radiator or candle.
DO NOT expose to low air pressures as this may result in a risk of re or explosion.
Dispose of the battery in accordance with local regulations. Improper battery use may lead to re,
explosion or other hazards.
Personal Information and Data Security
The Aquarate system securely transmits data that represent an item of personal daily activity.
Aquarate is not responsible for any potential breaches to the Web Application caused by
inadequate access & security measures set by you.
Disposal & Recycling Information
The crossed-out wheelie bin symbol on your product, battery, literature or packaging reminds you
that all electronic products or batteries must be taken to separate waste collection points at the
end of their working lives; they must not be disposed of in normal household waste.
It is the responsibility of the user to return the product to Aquarate for separate recycling of
waste electrical and electronic equipment (WEEE) and batteries according to local laws.
Safe removal and disposal of non-replaceable batteries should be by skilled personnel ensuring
the battery safety requirements are followed. At the end of the product use period please contact
Aquarate for return of all equipment.

8
Hydracare User Guide www.aquarate.com
Manufacturer Information
Address
57 Jordan Street, Liverpool, Merseyside, United Kingdom, L1 0BW.
Contact Information
Email: support@aquarate.com
Third Party Devices & Digital Services
The Aquarate Hydracare system may or may not be provided with Aquarate approved Gateways
and the Hydratrack Web Application depending on your care provider. If you are using a third party
system with Hydracare components, please consult your care provider for any differences in setup,
installation and servicing. This manual is for Aquarate supplied components only.
Minimum Requirements
WIFI
WIFI & Broadband must be available throughout the building.
If your WIFI router does not cover all intended areas of use, we recommend purchasing WIFI
extenders prior to installation.
The wi router should be compatible with your service providers gateway frequency. Most WIFI
routers are 2.4GHz.
Power
Power sockets must be available to charge the Hydracups in suitable, cool & dry locations.
Power sockets must be available for powering Aquarate Gateways in suitable locations for
receiving Hydracup uid data.
Hydratrack Web Application
To view the Aquarate Hydratrack Web Application, you must have access to a laptop or desktop
computer.
Mobile phones are not suitable for use with Hydratrack.
Setup
We recommend that during installation, a computer administrator is present to ensure full
understanding of the system.

9
Hydracare User Guide www.aquarate.com
Technical Information
Hydracup
Manufacturer Aquarate
Model Hydracup v1.0
Input Power 5W Wireless Charger
Ingress Rating IPX6 & IPX7
Battery Life Upto 5 days (depending on usage)
Charge Time 6 Hours (using Aquarate approved charger)
Fluid Volume 250ml
Hydracup Features
Anti-spill Lid
Drinking Spout With
Straw Hole
Carry Handle
Light

10
Hydracare User Guide www.aquarate.com
AC Power Adapter
Manufacturer XP Power
Model VEU10US050-UK
Output Voltage 5.0V
Output Current 2100mA
Input Connector UK
Output Power 10W
Wireless Charger
Manufacturer Aircharge
Model AIR0001
Output Voltage 5.0V
Output Current 1500mA
Input Connector Micro-USB
BLE-WIFI Gateway
Manufacturer INGICS Technology
Model iGS01S
Frequency Band 2.4GHz
Input 5V, 500mA, Micro-USB
Wristband
Manufacturer Shenzhen Minew Technologies Co., Ltd
Model B6-9
Non-replaceable Battery CR2032, 3.0V, 220mAh

11
Hydracare User Guide www.aquarate.com
Install Instructions
Setting up the Gateways
IMPORTANT: The BLE-WIFI gateways have been pre-congured to your Wi details. If they do not
function as intended, please contact Aquarate Support or your care provider.
Gateways must be placed strategically around the building to ensure all Hydracups are able to
connect to it.
All buildings affect the gateway communication range differently, and as such, a site survey must
be conducted to ensure the right amount of gateways are installed and in the right locations.
DO NOT press the gateway button, you may reset it causing the system to fail. If the gateways
are mistakenly reset, contact Aquarate support.
1. Plug the Micro-USB cable into the gateway and the AC Adapter provided
2. Apply the reusable sticker to the gateway and stick to the wall plug to ensure they stay
together neatly
3. Review the oorplan as provided as part of the subscription process
4. Plug each gateway and wall plug into the power socket locations pre-dened
5. Switch the power sockets on
6. The gateways are ready to use
Setting up Hydracups
1. Unpack the Hydracups from the packaging and place them upside down
2. Follow cleaning instructions as stated in cleaning instructions section
3. Place the Hydracups on charge as per the charging instructions
4. When 100% charged, place the Hydracups upside down to preserve battery life and
store in a cool and dry place
5. The Hydracups are ready to use
Setting Up a Wristband
Please refer to the software instructions on how to assign wristbands to residents/ patients.
Wristbands have been pre-switched on by Aquarate.
IMPORTANT: Wristbands and Hydracups should only be used as a pair for each subject. If either
a Hydracup or a wristband is used singularly, Aquarate will not function as intended.
1. Take the wristband out of the packaging
2. Clean the wristband as per the cleaning instructions

12
Hydracare User Guide www.aquarate.com
3. Place the wristband around your residents/ patients wrist
4. Button up the wristband so that it is not too tight, but comfortable ensuring it can not
fall off
5. The wristband is now ready to use. Please refer to the software instruction on how to
assign the wristband to a person for consumption data.
Wristband Replacements and Low Battery
Each wristband will last approximately 250 days depending on usage before the battery runs low.
The light on the front of the wristband will ash red when low in battery. When the battery is low,
replace the wristband as soon as possible with a new one.
To replace a wristband, contact your care provider or contact Aquarate support.
Cleaning & Maintenance
IMPORTANT: We recommend that you clean the Hydracup by hand where possible to prolong the
life of the battery. Ensure that the Hydracups and wristbands are cleaned in accordance with the
requirements set out above and for the purposes for which it is designed.
How to Hand Clean the Hydracup
Warnings
DO NOT clean the Hydracup if it is damaged
Precautions
Check the Hydracup for damage prior to hand cleaning
1. Decontaminate Hydracups with disposable cloths/paper towel and a fresh solution of
general purpose detergent and water or detergent impregnated wipes.
2. Rinse and thoroughly dry
3. Disinfect with 70% isopropyl alcohol
4. Store the Hydracups upside down (to preserve battery) in a clean, cool & dry place
Tips
Discard disposable cloths/paper roll immediately into the healthcare waste receptacle.
Discard detergent/disinfectant solution in the designated area.
Clean, dry and store re-usable decontamination equipment.
Remove and discard PPE.
Perform hand hygiene.

13
Hydracare User Guide www.aquarate.com
How to Clean the Hydracup in a Commercial/ Industrial Dishwasher
Warnings:
Only use in an industrial/ commercial dishwasher. DO NOT use in a domestic dishwasher with long
cycle times.
DO NOT exceed the below dishwasher settings:
• Max rinse cycle time: 10 seconds (up to 85°C)
• Max total cycle time: 240 seconds (Max 60°C)
• Wash cycle max temp: 60°C
• Rinse cycle max temp: 85°C
DO NOT use in a domestic dishwasher.
Precautions
Check the Hydracup for any damage before placing it into a dishwasher. If the Hydracup is
damaged DO NOT clean or place it in a dishwasher.
Check the dishwasher settings meet the requirements stated (if exceeded the Hydracup may
become damaged).
Tips
Rinse the Hydracup to remove dirt before placing in to the dishwasher.
Place the Hydracup upside down during cleaning (to preserve battery life and avoid Hydracup
lling with water).
Remove stains by hand scrubbing (if required).
Turn the Hydracup upside down and place onto the dishwasher rack.
Run the dishwasher cycle based on the dishwasher manufacturers instructions.
Once the cycle is over, remove the Hydracups from the dishwasher and dry thoroughly.
Store the Hydracups upside down (to preserve battery) in a clean, cool & dry place.

14
Hydracare User Guide www.aquarate.com
How to Hand Clean the Wristband
Hand Clean Only:
1. Remove and separate the wrist-strap from the Battery unit
2. Decontaminate & scrub each component with a brush (with long bristles) to get into
any corners or crevices and a fresh solution of general purpose detergent and water.
3. Rinse and thoroughly dry
4. Disinfect with 70% isopropyl alcohol
5. Store in a clean, cool & dry place
Tips
Clean the piece of equipment from the top or furthest away point.
Discard disposable cloths/paper roll immediately into the healthcare waste receptacle.
Discard detergent/disinfectant solution in the designated area.
Clean, dry and store re-usable decontamination equipment.
Remove and discard PPE.
Perform hand hygiene.
Device Overheating Situations
• During charging.
• Hot drinks.
• Direct sunlight.
• Placed in a non-compatible dishwasher.
Storage Instructions
Store in a cool dry place.
Turn the Hydracup upside down to preserve battery life.
Ensure the Hydracup is cleaned properly before storing (follow cleaning guidelines).
Recommended storage temperature range: -20°C to +25°C.

15
Hydracare User Guide www.aquarate.com
Hydracup Instructions
Wireless Charging
Your device is powered by a rechargeable battery. A wireless charger (charging dock, plug and
Micro-USB Type cable) is included with the device for charging the battery from a power outle.t
Your device is designed to charge wirelessly only.
Charge time: Approximately 6 hours.
We recommend you charge the devices as soon as you receive them before use.
1. Remove the wireless charger and plug from the packaging
2. Place the wireless charger pad in a suitable location for charging (in a cool, dry place)
3. Insert the Micro-USB cable into the wireless charger
4. Insert the opposing end to the USB cable into the wall plug
5. Plug the wall plug in and switch on
6. Place the Hydracup on top of the wireless charger within the centre of the pad
7. Your Hydracup should now be charging (observe the light status matrix below).
IMPORTANT: When placing the Hydracup on to the wireless charger, ensure it is central to the
wireless charger. If the Hydracup is not aligned to the middle of the charger it will not charge.
Check the Hydracup is aligned by ensuring the light ashes when placed on the charge dock
Charging Lights
The below table illustrates what each light status means when the Hydracup is on charge only.
Light Status Description
During Charging
Solid Green Battery 100%
Flashing Green Battery 0% - 99%
Not Charging
Light Off Battery 25% - 100% OR Battery 0%
Flashing Red Low Battery - Charge device right away
3 X Green Flashes, followed by 1 long ash Exiting Sleep Mode (turned upright)
1 Long Green Flash (upto 10 seconds) Spill Event

16
Hydracare User Guide www.aquarate.com
Reducing Battery Consumption
Your device provides various options that help you conserve battery power.
When you are not using the device, turn it upside down and store in a cool & dry place. Ensure
there is no liquid inside the device when turned upside down.
Battery Charging Tips
If the battery is completely discharged, the device will not turn on immediately when the charger is
connected.
Using a power source other than mains power, such as a computer, may result in a slower charging
speed due to a lower electric current.
The Hydracup should not be used while charging due to the risk of the charger becoming wet.
If the device receives an unstable power supply while charging, the device may not function.
While charging, the device and the charger may heat up. This is normal and should not affect
the device’s lifespan or performance. If the battery gets hotter than usual, the charger may stop
charging.
If you charge the device while the USB port is wet, the device may be damaged. Thoroughly dry the
USB port before charging the device.
If the device is not charging properly, stop using it, and notify Aquarate through Customer support.
To save energy, unplug the wireless charger when not in use. The charger does not have a power
switch, so you must unplug the charger from the electric socket when not in use to avoid wasting
power. The charger should remain close to the electric socket and easily accessible while
charging.
Sleep Mode
The Hydracup has a ‘sleep mode’ to conserve battery life when it is upside down only.
Note: When the Hydracup is in sleep mode, bluetooth will be periodically inactive and therefore the
Hydracup will not be tracking uid consumption.
Situations for sleep mode:
• During cleaning
• Storing away
• At night during rest hours

17
Hydracare User Guide www.aquarate.com
How To Enter Sleep Mode
1. Ensure the Hydracup does not have any uid inside
2. Turn the Hydracup upside down
3. Wait 10 seconds
4. The Hydracup is now in sleep mode.
How To Exit Sleep Mode
Warning: DO NOT ll the Hydracup up with liquid until it has nished the exiting sleep mode cycle.
The Hydracup will not function correctly unless done so.
To exit sleep mode:
1. Turn the Hydracup upright
2. Wait 10 seconds
3. Ensure the light ashes as per the matrix table
4. Ready to use.
Filling the Hydracup
IMPORTANT: Before using the Hydracup, ensure it has exited sleep mode fully. Failure to do so
willresultininaccurateuidreadings.AlwayslltheHydracuponaatsurface.
Note: DO NOT drink from the Hydracups with other items such as tea bags, ice or garnish. Remove
these once the drink has been made to ensure accurate uid readings. Before drinking from the
Hydracup, always wait 6 seconds after the cup has been lled. Use the Hydracup with a lid to avoid
spillages.
Only rell the Hydracup when it is still, level and exited sleep mode fully:
1. Turn the Hydracup upright from ‘sleep mode’. Wait 10 seconds to ensure calibration
has nished by waiting for the green light to STOP ashing.
2. Only ll the Hydracup when it is upright, level and has exited sleep mode fully.
3. Fill the Hydracup up with uid on a at surface
4. Wait 6 seconds (repeat every time the Hydracup is relled) and it is ready to use
Spill Detection
The Hydracups are programmed to detect spills so that uid intake is as accurate as possible.
When a spill occurs the Hydracup will ash a solid green light for approximately 10 seconds.
When a spill occurs you will be notied in the Web Application. Please refer to software
instructions.

18
Hydracare User Guide www.aquarate.com
Pour Detection
The Hydracup is programmed to ignore potential ‘pour’ events so that when remaining liquid is
disposed of, it is not recorded as consumption.
Pour events are recorded under certain conditions:
• When there is between 75ml - 250ml of liquid remaining
• When the remaining uid is poured within a set time period which varies between
volume
Ensure that the Hydracup is operated, used and maintained in accordance with the requirements
set out above and for the purposes for which it is designed. DO NOT make any alterations to the
Hydracup.
This manual suits for next models
1
Table of contents
Popular Personal Care Product manuals by other brands

Bauerfeind
Bauerfeind CoxaTrain manual

Clas Ohlson
Clas Ohlson 48812X manual

IMT Analytics
IMT Analytics SmartLung 2000 user manual

Petra electric
Petra electric Manicure+ Plus PC71 Instructions for use

Bauerfeind
Bauerfeind GloboPed Mobil quick start guide

Bangtang Network Technology
Bangtang Network Technology Femometer FM-IVY-101 manual