Aquarium Guardian Monitor and Controller User manual

USER MANUAL
www.AquariumGuardian.com
2.4GHz, 802.11 b/g/n

Contents
About Aquarium Guardian .................... 1.0
.................. 1.1
Requirements.................................... 1.2
In the Box........................................... 1.3
Status LEDs ........................................ 1.4
Wiring Panel....................................... 1.5
Installation...................................................2.0
Installation Warning.......................... 2.1
. 2.2
............................................... 2.3
Installing the Water Level Sensor ....2.4
Installing the Leak Sensor................ 2.5
Powering On ............................................. 3.0
Product Registration Portal .................. 4.0
Connect with WPS
........................... 4.1
Connect with Hotspot
....................................... 5.0
Create Portal Account
.......................... 5.1
................................. 5.2
Account Registration
............................... 6.0
Claim Device ...................................6.1
USER MANUAL
+HDG8QLW6SHFLȴFDWLRQV
Mounting to Aquarium Stand/Wall
Installing the Water Temperature
Sensor
Connect to Wi-Fi
Contacts .................................................. 6.2
Personal Information ............................ 6.3

USER MANUAL
...............................................7.0
Per Device Detail...................... 7.1A – 7.1G
1RWLȴFDWLRQV3HU6HQVRU .............7.2A – 7.2D
1RWLȴFDWLRQV3HU2XWSXW.7.2E -7.2G
6LOHQFLQJDQ$ODUPRQWKH'HYLFH.......7.2H
9LHZLQJ$TXDULXP'DWD*UDSKV
9LHZLQJ$TXDULXP/RJV...............................
Testing Per Sensor............................
8.1-8.6
3HU'HYLFH7HVWLQJ
Maintenance...............................................9.0
Wi-Fi Password Reset...........................10.0
Battery Warning..................................... 11.0
Service Disclaimer...................................12.0
Warranty...................................................13.0
Test Log..................................................... 14.0
Trouble Shooting..................................... 15.0
Revision Log
............................................. 16.0
Support...................................................... 17.0
Device Detail
1RWLȴFDWLRQ+LVWRU\
7.4

1
1.0
About Aquarium Guardian
Aquarium Guardian is a Wi-Fi based aquarium monitor and
FRQWUROOHU$TXDULXP*XDUGLDQPRQLWRUVȴYHFULWLFDOHOHPHQWVRIWKH
aquarium as alarm inputs:
ȏ6XVWDLQHG3RZHU/RVV
ȏ$TXDULXP:DWHU/HYHO
ȏ$TXDULXP:DWHU7HPSHUDWXUH
ȏ:DWHU/HDNV
ȏ$PELHQW7HPSHUDWXUH+XPLGLW\
(DFKRIWKHȴYHDODUPLQSXWVFDQEHFRQȴJXUHGLQGLYLGXDOO\DVDODUP
WULJJHUVEDVHGRQWKHLUVWDWHRUOHYHO7KHUHDUHIRXURXWSXWVRIWKH
Aquarium Guardian:
ȏ(0DLO
ȏ6067H[W0HVVDJH
ȏ$XGLEOH6LUHQ
ȏ$ODUP5HOD\&RQWDFWV
7KHUHOD\FDQDOVREHXVHGWRFRQWURODQ$XWRPDWLF7RS2$72
SXPSWKHDTXDULXPKHDWHURUOLJKWLQJEXWQRWPRUHWKDQZKDWLV
OLVWHGDERYH$GGLWLRQDOGHWDLORIWKHDODUPRXWSXWVFDQEHIRXQGLQ
WKHDODUPRXWSXWVVHFWLRQRIWKHPDQXDO
Please read the User Manual carefully before using the
Aquarium Guardian device.
1.1
Head Unit Specifications
Operating Temperature:r)r&
Ambient Temperature Sensor Accuracy: sr)r&
Operating Humidity: 0-95% RH, non-condensing
Humidity Sensor Accuracy: ± 3%
Water Temperature Accuracy:sȻ)sȻ&
Wi-Fi Network:*K]2QO\EJQ:HUHFRPPHQGDJDLQVW
XVLQJPL[HGQHWZRUNV
Input Power: 9'&P$
Battery: 9/LWKLXPΖRQ3RO\PHUP$+5HDG%DWWHU\:DUQLQJ
Duty: ΖQGRRU2QO\
Siren: 90db
Wi-Fi Antenna:ΖQWHUQDOO\LQWHJUDWHG
Relay Contact:$PS0D[
Dimensions: ȋ[ȋ[ȋFP[FP[FP
Weight: R]J
Contains FCC ID: $&=(63(;
1.2 Requirements
9$&RU+]3RZHU2XWOHW
*K]:L)LLQWHUQHWZLWKLQUDQJHRI$TXDULXP*XDUGLDQ
:L)LGHYLFHZLWKZHEEURZVLQJ
6FUHZGULYHUȵDWKHDGRU6HQVRU

1. Level Sense Pro 2. Power Supply
3. Float Switch & Bracket 4. Leak Sensor
5. Level Sensor Wire 6. Accessories
1.3 In the Box
(Optional Accessory)
2
1. Aquarium Guardian 2. Power Supply
5. Piggyback Plug 6. Accessories
Silence Reset
USER MANUAL
www.AquariumGuardian.com
2
3. Water Level &S4. Leak ensor
Temperature Sensor

1.4 Status LEDs
The status LEDs on the Level Sense Pro provide a visual indication
of the control state. The below table is a system status guide. If the
four lights have a pattern not shown it is a claim code, and you
should reference section 5.2.
Color /LED Blue Yellow Red White
Power AC Power
Good
No AC
Power
No AC Power
Low Battery —
Cloud Connected
to Wi-Fi
Flash:
Connecting
Solid: WPS
Mode
Wrong
Password
Or out-of-
range
Hotspot
Mode
Calibrate Calibrated Learning
Level — —
Alarm No Alarms —Active Alarm —
1.5 Wiring Panel
RESET
DC
USER LEVEL
SENSOR
FLOAT
SWITCH
LEAK
SENSOR
ALARM
NC COM NO
3
To connect sensors, turn the terminal screw counterclockwise to
open the wiring clamp. Insert wire into the clamp
and turn terminal screw clockwise to close clamp on
wire.Ensure the jaw closes on the conductor and not
the insulation of the wire.
Color / LED Power Cloud Calibrate Alarm
Blue
Yellow
Red
White
Purple
Incoming AC
Power Good
Connected
to Server
Calibrated No Alarms
NO
Incoming
Power
Flashing:
Connecting in
Process
Learning
Calibration
Solid: WPS Mode
NO
Incoming
Power
Wrong SSID /
Password or unit
out-of-range
Active Alarm(s)
Hotspot Mode
Unit Upgrading Firmware /
Server Maintenance
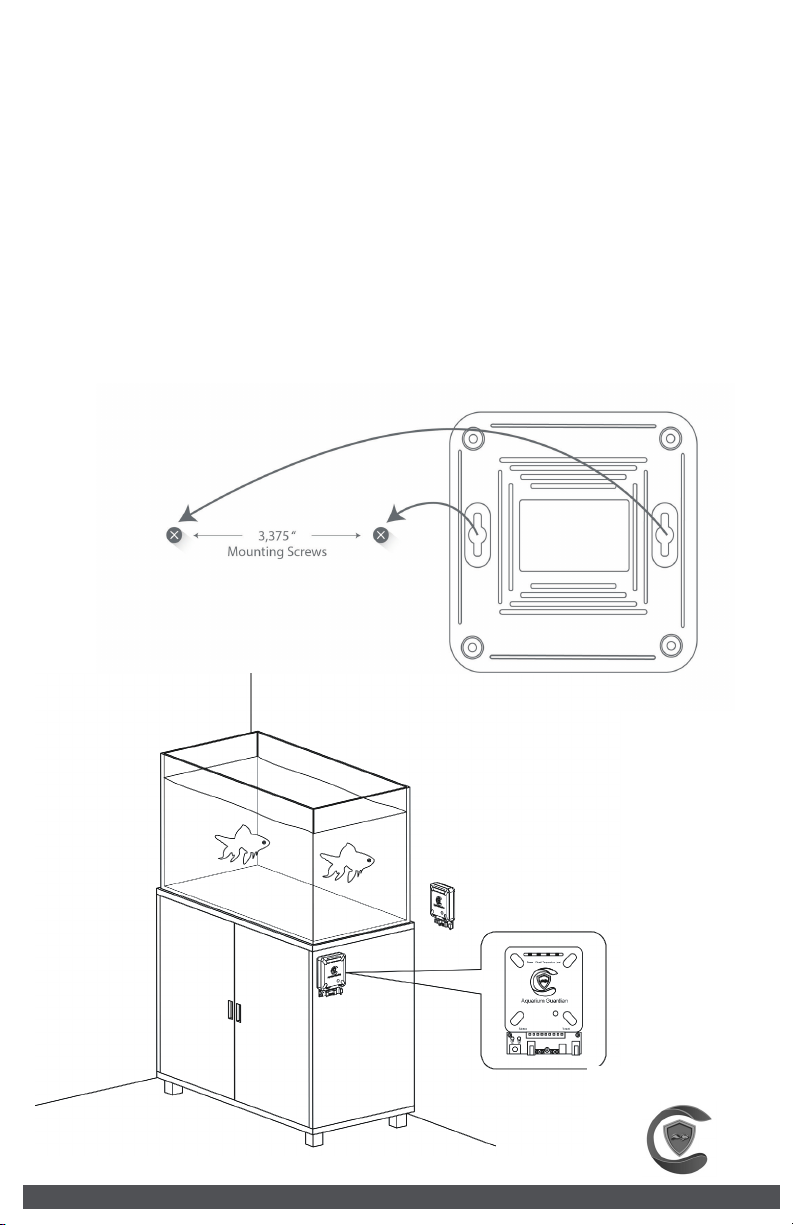
The sensors connect to the removable green terminal block at the
bottom of the unit.
3
ΖIWKHUHOD\KDVEHHQHQDEOHGWRFRQWURODQ$72SXPSWKHQWKHXVHUZLOOVHOHFWDWZKDWZDWHU
OHYHOWKH\ZRXOGOLNHWKHSXPSWRWXUQRQDQGRDW:KHQWKHZDWHUOHYHOUHDFKHVSXPSRQ
SRLQWWKHUHOD\ZLOOEHDFWLYDWHG7KH/HYHO/('ZLOOEOLQNZKHQWKHUHOD\LVDFWLYHDQGZLOO
FRQWLQXHWRGRVRXQWLOWKHZDWHUOHYHOUHDFKHVWKHSXPSRSRLQW$WWKLVWLPHWKHUHOD\ZLOO
GLVHQJDJHDQGWKH$72SXPSZLOOEHWXUQHGRDQGWKH/HYHOOHGZLOOQRWEOLQN
$VWKHZDWHUWHPSHUDWXUHJRHVWRZDUGVWKHXSSHUVHWSRLQWWKHWHPSHUDWXUH/('ZLOO
WUDQVLWLRQWRWUXHUHG:KHQWKHZDWHUWHPSHUDWXUHPRYHVWRZDUGVWKHPLGSRLQWEHWZHHQWKH
XSSHUVHWSRLQWDQGORZHUVHWSRLQWWKHQWKH7HPS/('ZLOOEHFRPHWUXHJUHHQΖIWKHZDWHU
WHPSHUDWXUHGURSVWRZDUGVWKHORZHUVHWSRLQWWKHQWKH7HPS/('ZLOOPRYHWRZDUGVWUXH
EOXHΖWLVLPSRUWDQWWRQRWHWKDWLIWKHUHOD\LVHQDEOHGIRUFRQWUROOLQJWKHDTXDULXPKHDWHU
DQGWKHUHOD\LVDFWLYHWKHQWKHWHPSHUDWXUH/('ZLOOEOLQNUHJDUGOHVVRIWKHFRORU7KHUHOD\
ZLOOWXUQRQDVWKHZDWHUWHPSHUDWXUHJRHVEHORZWKHPLGSRLQWDQGZLOOWXUQRDWWKH
PLGSRLQWEHWZHHQWKHXSSHUVHWSRLQWDQGORZHUVHWSRLQW
7KHVWDWXV/('VRQWKH$TXDULXP*XDUGLDQSURYLGHDYLVXDO
LQGLFDWLRQRIWKHFRQWUROVWDWH7KHEHORZWDEOHLVDV\VWHPVWDWXV
JXLGHΖIWKHIRXUOLJKWVKDYHDSDWWHUQQRWVKRZQLWLVDFODLPFRGH
DQG\RXVKRXOGUHIHUHQFHVHFWLRQ
Color /LED Blue Yellow Red White
Power AC Power
Good
No AC
Power
No AC Power
Low Battery —
Cloud Connected
to Wi-Fi
Flash:
Connecting
Solid: WPS
Mode
Wrong
Password
Or out-of-
range
Hotspot
Mode
Calibrate Calibrated Learning
Level — —
Alarm No Alarms —Active Alarm —
Device State Power Cloud Temp Level
Green Green Green Green
No Alarms
Relay Active (Water
Level or Temp) * Blinking Blinking Green
Water Level Too
Low/High
Red
Water Temperature
Above Setpoint
Red
Blue
Fault Red (No Power) Red (No Local Internet) Red
Purple
AP Active
(Network Broadcasts) White
Yellow
Water Temperature
Under Setpoint
Firmware Upgrade/
Server Maintenance
Wi-Fi Connection
in Progress

4
1.5 Wiring Panel
3OHDVHQRWHWKDWWKHFRQQHFWLRQERDUGQHHGVWREHȴUPO\VHDWHGLQWRWKH
KHDGXQLW:LULQJRIVHQVRUVOHDNZDWHUWHPSHUDWXUHUHOD\DQGZDWHU
OHYHOKDYHQRSRODULW\7KHZDWHUWHPSHUDWXUHDQGZDWHUOHYHOVHQVRU
ERWKXVHDKLQJHW\SHFRQQHFWRUΖQVHUWWKHXQVWULSSHGFRQGXFWRUVLQWR
WKHRSHQLQJVDWWKHWRSRIWKHFRQQHFWLRQ2QFHWKHZLUHFDQQRORQJHUEH
LQVHUWHGLQWRWKHFRQQHFWLRQDQ\IXUWKHUȴUPO\SUHVVGRZQRQWKHWRSRI
the connector until the jaw of the connection is shut.
2.0 Installation
$TXDULXP*XDUGLDQLVGHVLJQHGIRULQGRRU
LQVWDOODWLRQRQO\&RQVLGHUDWLRQVKRXOGEHWDNHQ
WRNHHSZLWKLQUDQJHRIWKHKRPHȇV:L)LURXWHU
:L)LUDQJHYDULHVEDVHGRQWKHURXWHUDQG
HQYLURQPHQWDOFRQGLWLRQV:HUHFRPPHQGUDQJH
WHVWLQJEHIRUHLQVWDOODWLRQΖIWKHGHYLFHLVRXWRI
range, contact us, and we can troubleshoot
SRVVLEOHFDXVHVDQGVROXWLRQV
7KH$TXDULXP*XDUGLDQFDQEHPRXQWHGE\
IROORZLQJWKHVWHSVLQVWHS
)RUWKHOHDNDQGUHOD\FRQQHFWLRQWKHVWULSSHGFRQGXFWRUVZLOOEHLQVHUWHG
LQWRDWHUPLQDOEORFN)LUVWXVHDVPDOOȵDWKHDGVFUHZGULYHUWRRSHQWKH
MDZVE\WXUQLQJWKHVFUHZGULYHUFRXQWHUFORFNZLVHWXUQWRWKHOHIW2QFH
IXOO\RSHQLQVHUWWKHFRQGXFWRUVLQWRWKHWHUPLQDOEORFNDQGWLJKWHQE\
WXUQLQJWKHVFUHZGULYHUFORFNZLVHWRWKHULJKWXQWLOWKHZLUHLVȴUPO\
VHFXUHG5HIHUWRWKHSLJJ\EDFNLPDJHIRXQGEHORZWRLQVHUWWKHDTXDULXP
OLJKWKHDWHURUDXWRPDWLFWRSRSXPSSOXJLQWRWKHSLJJ\EDFNSOXJ

2.1 Installation Warning
Working around water and electricity is inherently dangerous.
Disconnect all electrical circuit breakers near the aquarium area before
beginning work. If you are unfamiliar or uncomfortable, please contact
a licensed electrician to perform the installation.
2.2
Mounting to Aquarium Stand/ Wall
The back of the Aquarium Guardian accepts two #6 screws, which are
included. The screws are placed 3.375” apart and are mounted horizontally.
The head unit can be mounted on a wall near the aquarium, or on or
inside of the aquarium stand.
5

6
2.3 Installing the Water Temperature Sensor
The temperature sensor is designed to be mounted directly to the side of
the water sensor. There are two slots in the board. Feed the provided zip
ties though each of the holes in the sensor. Next tighten the zip ties onto
the temperature sensor and trim the excess tie material.
2.4
Installing the Water Level Sensor
The water level sensor is used to monitor and has the ability to control the
water level of an aquarium. This sensor gives an approximation of water
level after the user has entered information regarding their aquarium
through the “Device Detail” page on the website. The water level in the
aquarium can be monitored real-time through the Aquarium Guardian
website, which allows the user to monitor their water level while away
from home. The approximate water level reading can be valuable to keep
an eye on water loss through evaporation, or even a leak. Maintaining the
water level is especially important for saltwater aquariums which need a
stable salinity.
The level sensor must be installed vertically. Follow the “This Side Up” label
on the sensor correctly mount the sensor. The suction cups will provide the
means to adhere the sensor to the aquarium wall. It is important for sensor
wires to be kept away from power cables of aquarium components if
possible. Do not modify the length of the wires for the water level or
temperature sensor.

There is a level-control enable switch on the connection board as a
convenience for use with water changes. When the green LED is lit, then
water level sensing and ATO are enabled. When conducting water
changes, push the button. Once pressed the red LED will illuminate
demonstrating that water level sensing and ATO are disabled. While
disabled, the relay will not activate for ATO. If the relay is being used to
control lights or temperature, it will continue to function. When the
water change is complete, push the button once more. The green LED
will be displayed and the level sensing and ATO are now re-enabled.
Water Change:
7

2.5 Installing the Leak Sensor
7KHOHDNVHQVRUPRQLWRUVIRUSRROLQJZDWHURQDȵDWVXUIDFH7KHOHDN
VHQVRUFDQEHPRXQWHGQHDUWKHDTXDULXPRURWKHUDUHDZKHUHZDWHU
ZRXOGSRROLQWKHHYHQWRIDOHDN7KHVHQVRUQHHGVWREHSODFHGȵDWRQ
WKHȵRRUZLWKWKHPHWDOVHQVLQJHOHPHQWVGRZQ7KHVHQVRUPXVWEH
VXEPHUJHGLQDPLQLPXPSRRORIZDWHUȋLQGHSWKEHIRUHDFWLYDWLQJ
7KHZLUHVGRQRWKDYHSRODULW\DQGFDQQRWEHZLUHGEDFNZDUGV
'RQRWLQFUHDVHZLUHOHQJWKRIWKHOHDNVHQVRUEH\RQGWKHOHQJWKSURYLGHG
3.0 Powering On
$IWHUPRXQWLQJWKH$TXDULXP*XDUGLDQKHDGXQLWDQGVXFFHVVIXO
LQVWDOODWLRQRIVHQVRUVSRZHUXSWKHKHDGXQLW)LUVWFRQQHFWWKH'&MDFN
RIWKHSRZHUVXSSO\WRWKH$TXDULXP*XDUGLDQFRQWURO
6HFRQGFRQQHFWWKH$&ZDOODGDSWHUWRDVWDQGDUG9$&SRZHU
RXWOHW8VHRQO\WKHVXSSOLHGSRZHUDGDSWHU8SRQSRZHUXSWKHFORXG
/('LQGLFDWRUZLOOEHJLQWRGLVSOD\DVZKLWH
8

9
4.0 Product Registration—Portal
The Aquarium Guardian is set up and managed via a cloud service called
3RUWDO7RDFFHVVWKH$TXDULXP*XDUGLDQ3RUWDO\RXȴUVWQHHGWRFUHDWHDQ
account. With an account, you can claim your device, setup alarm
contacts and set alarms.
4.1 Create Portal Account
Using an internet browser, preferably on a laptop or desktop, navigate
to the Aquarium Guardian Portal:
https://aquariumguardian.com/account/login
Within Portal, click “Register” to create an account. You will need to
provide a valid email address. Within 5 minutes of registration, you
ZLOOUHFHLYHDFRQȴUPDWLRQHPDLOΖI\RXKDYHQRWUHFHLYHGDQHPDLO
please check your spam folder for an email from
alarm@aquariumguardian.com
Password Requirements for Aquarium Guardian Portal:
You Must Have a Password
Any Length above 8 Characters
Special Characters Allowed
5.0 Connect to Wi-Fi
The Aquarium Guardian is immediately ready to join your 2.4 Ghz Wi-Fi
network after power up. When the Aquarium Guardian has not been
FRQȴJXUHGWRD:L)LQHWZRUNWKHFORXG/('ZLOOGLVSOD\DVZKLWHDQG$3LV
DFWLYH5HIHUWR6WDWXV/('VFKDUWLQ6HFWLRQIRUDJXLGHRQ/('
FRQȴJXUDWLRQ7KHUHDUHWZRPHWKRGVRIFRQQHFWLQJWRDKRPHQHWZRUN
GHSHQGLQJRQ\RXU:L)LURXWHU7KHȴUVWPHWKRGWXUQVWKH$TXDULXP
Guardian into a hotspot which you temporarily join with a smart device to
FRQȴJXUH:L)LFUHGHQWLDOV7KH6HFRQGPHWKRGLVFDOOHG:36
Password Requirements for Your Local 2.4Ghz Wi-Fi Network:
SSID (Local Network Name) and Password are Case Sensitive
You must have a password 8 – 48 Characters in Length
The following Characters are not supported in Wi-Fi Passwords or
network names at the moment: <> \ ^ ‘ { } | “ %
THIS APPLIES TO CONNECTING WITH WPS OR CONNECTING WITH HOTSPOT!
There are a series of articles on more advanced troubleshooting for Wi-Fi
Connections on the Aquarium Guardian website at
https://aquariumguardian.com/blogs/news

10
5.1 Connect with Hotspot
To connect to Wi-Fi with hotspot mode you will need a Wi-Fi enabled device like a
smart phone or laptop. The cloud LED of the Aquarium Guardian should be white,
which indicates the device is broadcasting a Wi-Fi hotspot. If you are using a smart
SKRQHRUWDEOHWZLWKDFHOOXODUFRQQHFWLRQLWLVJRRGSUDFWLFHWRWXUQFHOOXODUGDWDR
for this process. Use your Wi-Fi device to search for and join the network called
“AquariumGuardianXXXX” (The last 4 of the SSID are the last 4 digits of the device’s
MAC address). Your device may indicate that this network has no internet.
This is normal.
2QFHFRQQHFWHGWRWKHQHWZRUNȊ$TXDULXP*XDUGLDQ;;;;ȋD:L)LFRQȴJXUDWLRQSDJH
will appear as shown below. If this page does not appear automatically, then open a
web browser and enter the Devices IP address into the address bar: 192.168.4.1
On the webpage at 192.168.4.1 you will select the bubble next to your home 2.4ghz
Wi-Fi network. Next you will enter the password for your home network into the
SDVVZRUGȴHOG1RWHWKDWWKHSDVVZRUGȴHOGLVFDVHVHQVLWLYH
Once complete,press the submit button. The next webpage instructs you to reset the
device by pressing the RESET button on the Aquarium Guardian.
After restarting, the Cloud LED will pulse yellow until it connects to your Wi-Fi.
Upon successful connection, the device will either:
1. blink with random colors on all four positions (present a claim code) OR
2. change the cloud LED to green (device has been auto claimed via email) OR
3. change the cloud LED to RED (no local internet connection). This can be caused
by incorrect password or the network is out of range. If this happens, press RESET
to try again. If it does not connect on subsequent attempts, reference section 10
to reset the unit to AP mode and enter new credentials.
Once you’ve successfully connected to your home Wi-Fi, please move on to
Product Registration.
NOTE: If all four LEDs do not illuminate, and the Cloud LED turns red, press the
reset button on the device. If the cloud appears as red again, then the password
was entered incorrectly. Refer to Password Reset, Section 10.0, of the manual.

11
5.2 Connect with WPS
7RFRQQHFWWR:L)LZLWK:36ȴUVWFKHFNWRVHHLI\RXU:L)LURXWHUKDVDEXWWRQ
ODEHOHGȊ:36ȋ*HQHUDOO\GHQRWHGZLWKWKHJUDSKLFDWULJKWΖI\RXUURXWHUGRHV
QRWSURFHHGWRFRQQHFWLQJZLWKKRWVSRWPRGH6RPHURXWHUVUHTXLUH:36WR
EHHQDEOHGRUGLUHFWLWWRDFKDQQHOLH*+]RU*+]:HUHFRPPHQG
XVLQJDGHGLFDWHG*+]QHWZRUNDQG:36PXVWEHHQDEOHG
7HPSRUDULO\PRYHWKH$TXDULXP*XDUGLDQXQLWLQWRSUR[LPLW\RIWKH:L)LURXWHU
7KH$TXDULXP*XDUGLDQZLOORSHUDWHRQEDWWHU\EDFNXSWRFRPSOHWHWKLVVWHSLI
DOORZHGWRFKDUJHIRUPLQXWHVSULRU2QFHWKHWZRGHYLFHVDUHQHDUHDFK
RWKHUSUHVVWKH:36EXWWRQRQ\RXUURXWHU:LWKLQVHFRQGVGRXEOHFOLFNWKH
6Ζ/(1&(EXWWRQRQWKH$TXDULXP*XDUGLDQ7KH&ORXG/('ZLOOWXUQIURPZKLWH
WRVROLG\HOORZ7KH:36SURFHVVFDQWDNHXSWRȴYHPLQXWHV8SRQVXFFHVVIXO
FRQQHFWLRQDOOIRXU/('VZLOOLOOXPLQDWHDQGSXOVH
3OHDVHQRWHWKHFRORUVIURPOHIWWRULJKWDVWKH\DUHXVHGODWHULQWKHFODLPSURFHVV
6HFWLRQ<RXKDYHVXFFHVVIXOO\FRQQHFWHGWR\RXUKRPH:L)LSOHDVHPRYHRQ
WR$FFRXQW5HJLVWUDWLRQ
If the Cloud LED turns red following a WPS attempt, press the RESET
button to restart the device. If the Cloud LED returns to red after restarting,
refer to section 10.0 for password reset instructions and check the router
settings to see if WPS is enabled on the 2.4G network. Alternatively, try
connecting with hotspot mode.

12
6.1 Claim Device
ΖI\RXW\SHGLQ\RXU(0DLODGGUHVVRQWKH:L)LFRQȴJXUDWLRQSDJHWKHQ\RXUGHYLFHZLOO
EHFODLPHGDXWRPDWLFDOO\DQGLWZLOOEHLQ\RXUDFFRXQWXSRQORJLQLQWKHSRUWDOΖI\RXGLG
QRWHQWHU\RXUHPDLODGGUHVVRQWKH:L)LFRQȴJXUDWLRQSDJHRUWKH:36PHWKRGZDV
XVHGWRFRQQHFWLWZLOOEHQHFHVVDU\WRȊFODLPȋWKHGHYLFH2QFHFRQQHFWHGWR:L)LWKH
$TXDULXP*XDUGLDQȵDVKHVDFODLPFRGHZKLFKLVXVHGWROLQNWKHGHYLFHWR\RXUDFFRXQW
7KHFODLPFRGHLVDVHTXHQFHRIIRXUXQLTXHFRORUVZKLFKSXOVHLQXQLVRQ$IWHUORJJLQJ
LQWR3RUWDOZLWK\RXUDFFRXQWFOLFNȊ&ODLPȋ)ROORZWKHRQVFUHHQLQVWUXFWLRQVWRHQWHU\RXU
XQLTXHFODLPFRGH7KLVVWHSFDQEHVNLSSHGE\HQWHULQJWKHHPDLORIDQH[LVWLQJ
DTXDULXPJXDUGLDQDFFRXQWRQWKH:L)LFRQȴJXUDWLRQSDJHOLVWHGLQVWHS
6.0 Account Registration
6.2 Contacts
2QFH\RXDUHORJJHGLQWR\RXUDFFRXQWRQWKH$TXDULXP*XDUGLDQZHEVLWHFOLFNRQWKH
Ȋ&217$&76ȋWDE$SRSXSZLQGRZZLOODSSHDU&OLFNRQWKHSOXVEXWWRQQH[WWR\RXU
GHIDXOWFRQWDFW8SGDWHWKHLQIRUPDWLRQIRUWKLVFRQWDFW6HOHFWWKHVHUYLFHSURYLGHU
ZKLFK\RXXVHIRU\RXUFHOOSKRQHΖI\RXUVHUYLFHSURYLGHULVQRWOLVWHGSOHDVHHPDLOXV
DWFXVWRPHUVHUYLFH#DTXDULXPJXDUGLDQFRP1H[WFOLFNHQDEOHIRU(0DLODQGWH[WDQG
FOLFNWKHVXEPLWEXWWRQ<RXFDQDOVRFOLFNWKHWHVWEXWWRQWRYHULI\WKDW\RXDUHDEOHWR
UHFHLYHWKHQRWLȴFDWLRQV
6.3 Personal Information
1H[WFOLFNRQWKHȊ3(5621$/Ζ1)250$Ζ721ȋER[RQWKHZHEVLWH(QWHU\RXU
LQIRUPDWLRQLQWRWKHWH[WER[HV9HULI\WKDWWKHFRUUHFWWLPH]RQHDQGXQLWRI
SUHIHUHQFHLVVHOHFWHG:KHQ\RXDUHGRQHFOLFNWKHVXEPLWEXWWRQ

13
7.0 Device Detail
7.1A: Device Name
By default, the Aquarium Guardian is named“My Aquarium Guardian” in the Portal.
The device name can be modied and is useful if you have multiple devices in your Portal.
7.1B Update Frequency
Set the update frequency between two minutes (default) and ve minutes. Conguring for
less frequent updates consumes less Wi-Fi data.
7.1C Oine Threshold
The oine threshold is how long our system will wait after it loses connection with your device
to send out an alert. The lower the number of minutes is, the more notications you will receive.
We recommend a minimum of 10 minutes (or 5 times the Update Frequency).
7.1D Aquarium Water Volume Units
Select the water volume units that you prefer, either Gallons or Liters.
7.1E Aquarium Size
Select the aquarium size that best ts your aquarium.
7.1F Water type
Select in the drop-down menu if your aquarium has fresh or salt water.
7.1 G Aquarium Maintenance Alerts (Optional)
This is an optional alert to notify and send reminders when aquarium maintenance is due.
In the drop-down list select the number of days that you would like to have between each
maintenance alert. The alerts can be used for aquarium-related tasks such as water changes,
feedings, etc. The notications will be sent at 12pm.
The information gathered from the Device Detail page is needed to appropriately monitor and
control aquarium components. Aquarium Maintenance alerts however are optional.

14
7.2 Notification Settings
Enable and Disable sensor inputs to suit your application. Sensors can be
UHHQDEOHGDWDODWHUSRLQW&RQȴJXUHDVDIHWHPSHUDWXUHDQGKXPLGLW\UDQJHE\
VHWWLQJPLQLPXPDQGPD[LPXPVDIHOHYHOV
7.2A Power Loss Alarms
$TXDULXP*XDUGLDQSURYLGHVWZRW\SHVRISRZHUORVVQRWLȴFDWLRQV
ȏ7ULSSHG%UHDNHU1RWLȴFDWLRQV
ȏ3RZHU2XWDJH1RWLȴFDWLRQV
$QDODUPZLOORFFXUDIWHUVHFRQGVRILQFRPLQJSRZHUORVVIURPWKHZDOOPRXQWHGSRZHUVXSSO\
7KHGHYLFHVLQWHUQDOEDWWHU\ZLOONLFNLQDQGLWZLOOFRQWLQXHWRRSHUDWHΖIWKHGHYLFHVWLOOKDVD:L)L
FRQQHFWLRQLWZLOODOHUWWKHVHUYHUWKDWLWVLQFRPLQJSRZHUKDVEHHQORVW%HFDXVHWKH:L)LLVVWLOOHQDEOHG
WKHV\VWHPDVVXPHVWKHSRZHURXWDJHLVLVRODWHGWR\RXUDTXDULXPȇVFLUFXLWDQGVHQGVRXWWKH
QRWLȴFDWLRQWKDWLQFRPLQJSRZHUKDVEHHQORVWZLWKDUHFRPPHQGDWLRQWRFKHFNWKHEUHDNHU
ΖI:L)LFRQQHFWLRQLVORVWGXHWRZLGHVSUHDGSRZHUIDLOXUHRUORVW:L)LDQDODUPPHVVDJHFDQQRWEH
VHQW+RZHYHUWKH3RUWDOZLOOVHQGDGHYLFHRɞLQHPHVVDJHDIWHUWKHGHYLFHPLVVHVPXOWLSOHFRQVHFXWLYH
FKHFNLQV7KHVHQRWLȴFDWLRQVDUHVHQWEDVHGRQWKHRɞLQHWKUHVKROGVHWLQ6HFWLRQ&'HYLFHRɞLQH
UHPLQGHUVDUHVHQWDIWHUKRXUVGD\VDQGGD\VRIFRQWLQXHGIDLOHGFKHFNLQV<RXZLOOQRWRQO\
UHFHLYHQRWLȴFDWLRQVZKHQSRZHULVORVWWRWKHGHYLFH<RXZLOODOVREHQRWLȴHGLIWKHGHYLFHGRHVQRW
UHSRUWLQGXHWRDORVVRILQWHUQHWFRQQHFWLRQ
7.2B Water Temperature Alarms
$QDODUPIRUZDWHUWHPSHUDWXUHZLOOEHDFWLYDWHGLIWKHZDWHUOHYHOJRHVEHORZWKHORZHUVHWSRLQWRUDERYH
WKHXSSHUVHWSRLQW$VWKHZDWHUWHPSHUDWXUHJRHVWRZDUGVWKHXSSHUVHWSRLQWWKHWHPSHUDWXUH/('ZLOO
WUDQVLWLRQWRWUXHUHG:KHQWKHZDWHUWHPSHUDWXUHPRYHVWRZDUGVWKHPLGSRLQWEHWZHHQWKHXSSHU
VHWSRLQWDQGORZHUVHWSRLQWWKHQLWZLOOEHFRPHWUXHJUHHQΖIWKHZDWHUWHPSHUDWXUHGURSVWRZDUGVWKH
ORZHUVHWSRLQWLWZLOOPRYHWRZDUGVWUXHEOXH1RWHWKDWLI\RXZRXOGOLNHWRFKDQJH\RXUXQLWRISUHIHUHQFH
|)WR|&IRU\RXUHLWKHU\RXUZDWHUWHPSHUDWXUHVHQVRURUDPELHQWWHPSHUDWXUHVHQVRUWKLVFDQEHGRQH
XQGHUȊ3HUVRQDOΖQIRUPDWLRQȋ7KLVLQIRUPDWLRQLVKHOGLQWKHXVHUUHFRUGDQGWKXVWKHVFDOHVHOHFWHGZLOO
EHXVHGIRUDOODTXDULXPVLQ\RXUDFFRXQW
7.2C Water Level Alarms
7KHZDWHUOHYHOVHQVRUFDQEHXVHGWRQRWLI\ZKHQWKHZDWHUOHYHOUHDFKHVWKHXQGHUȴOODQGRYHUȴOOVHFWLRQ
RQWKHZDWHUOHYHOVHQVRU8VHUFRQȴJXUDEOHDXWRPDWLFWRSRVWDWHVFDQEHVHOHFWHG7KHOHWWHUVRQWKH
VHQVRUUHSUHVHQWRSWLRQVIRUSXPSRQDQGRVWDWHV
7.2D Leak Alarms
7KHOHDNVHQVRUZLOODODUPZKHQWKH
VHQVRULVLQDPLQLPXPZDWHUSRRO
RIȋIRUPRUHWKDQVHFRQGV

15
7.2E Audible Alarm (Siren)
Enable the 90 dB audible alarm in the Portal for the conditions desired. The audible alarm can be
temporarily silenced by pressing the Silence button on the device. The silence button is intended to
silence the horn, while the change is made in the Portal. The device periodically cycles it’s own power for
health and connection sustenance, which can disable the silence.
7.2F E-Mail and Text
(QDEOH(0DLODQGRUWH[WQRWLȴFDWLRQVIRUHDFKDODUPW\SHΖI\RXDUHQRWUHFHLYLQJ(0DLODOHUWVFKHFN
your spam folder.
<RXPD\QHHGWRFRQȴJXUHVSDPVHWWLQJVWRDOORZHPDLOVIURPalarm@aquariumguardian.com
7.2G Relay Output
(QDEOLQJWKHUHOD\WRFKDQJHVWDWHVZKHQDQHYHQWLVDFWLYHLVWKHȴUVWVWHSLQFRQWUROOLQJDQH[WHUQDO
DTXDULXPIHDWXUHΖIWKH$TXDULXP*XDUGLDQGHYLFHZLOOEHXVHGWRFRQWURODQDTXDULXPFRPSRQHQWVHOHFW
WKHLWHPZKLFKZLOOEHFRQWUROOHGIURPWKHGURSGRZQOLVWODEHOHGȊ)XQFWLRQRIWKH5HOD\ȋΖIWKHUHOD\ZLOOQRW
EHXVHGWKHQVHOHFWȊ1RWLQ8VHȋ7KHUHOD\LVDODWFKLQJW\SHDQGZLOOQRWUHPDLQDFWLYHLIWKHEDWWHU\
YROWDJHGURSVWR97KHUHOD\FDQEHXVHGWRFRQWURO21(RIWKHIROORZLQJLWHPVLQDQDTXDULXP
2. Aquarium Lighting:6HOHFWLQWKHGURSGRZQER[DOLJKWRQDQGRWLPH
3. Aquarium Heater:
(QWHUYDOXHVIRUWKHXSSHUDQGORZHUWHPSHUDWXUHVHWSRLQWVLQWKHDSSURSULDWHȴHOGV
in the water temperature section.From the upper and lower setpoints, system will calculate the “midpoint
or mean” and begin to activate the heater based on the following conditions.
3UHVHQWO\WKHVHFRQGLWLRQVDUHXQLYHUVDODQGQRWGHYLFHVSHFLȴFRUXVHUFRQȴJXUDEOH
Example: $XVHUKDVDORZHUVHWSRLQWRI)DQGDQXSSHUVHWSRLQWRI)WKHQWKHKHDWHUZLOOWXUQRQDW
)DQGWXUQRDW)
8SSHU6HWSRLQW/RZHU6HWSRLQW
0LGSRLQW /RZHU6HWSRLQW(
(
2
+HDWHU213RLQW RI0LGSRLQW
+HDWHU2))3RLQW RI0LGSRLQW
1. ATO pump: There are letters listed on the water level sensor represent options for states for the
SXPSWRWXUQRQDQGRΖI\RXȴQGWKDW\RXU$72SXPSLVQRWWXUQLQJRQDQGRDWWKHVWDWHVWKDW
you have selected this is correctable. Contact us at customerservice@aquariumguardian.com
7.2E Audible Alarm (Siren)
Enable the 90 dB audible alarm in the Portal for the conditions desired. The audible alarm can be
temporarily silenced by pressing the Silence button on the device. The silence button is intended to
silence the horn, while the change is made in the Portal. The device periodically cycles it’s own power for
health and connection sustenance, which can disable the silence.
7.2F E-Mail and Text
(QDEOH(0DLODQGRUWH[WQRWLȴFDWLRQVIRUHDFKDODUPW\SHΖI\RXDUHQRWUHFHLYLQJ(0DLODOHUWVFKHFN
your spam folder.
<RXPD\QHHGWRFRQȴJXUHVSDPVHWWLQJVWRDOORZHPDLOVIURPalarm@aquariumguardian.com
7.2G Relay Output
(QDEOLQJWKHUHOD\WRFKDQJHVWDWHVZKHQDQHYHQWLVDFWLYHLVWKHȴUVWVWHSLQFRQWUROOLQJDQH[WHUQDO
DTXDULXPIHDWXUHΖIWKH$TXDULXP*XDUGLDQGHYLFHZLOOEHXVHGWRFRQWURODQDTXDULXPFRPSRQHQWVHOHFW
WKHLWHPZKLFKZLOOEHFRQWUROOHGIURPWKHGURSGRZQOLVWODEHOHGȊ)XQFWLRQRIWKH5HOD\ȋΖIWKHUHOD\ZLOOQRW
EHXVHGWKHQVHOHFWȊ1RWLQ8VHȋ7KHUHOD\LVDODWFKLQJW\SHDQGZLOOQRWUHPDLQDFWLYHLIWKHEDWWHU\
YROWDJHGURSVWR97KHUHOD\FDQEHXVHGWRFRQWURO21(RIWKHIROORZLQJLWHPVLQDQDTXDULXP
2. Aquarium Lighting:6HOHFWLQWKHGURSGRZQER[DOLJKWRQDQGRWLPH
3. Aquarium Heater:(QWHUYDOXHVIRUWKHXSSHUDQGORZHUWHPSHUDWXUHVHWSRLQWVLQWKHDSSURSULDWHȴHOGV
in the water temperature section.From the upper and lower setpoints, system will calculate the “midpoint
or mean” and begin to activate the heater based on the following conditions.
3UHVHQWO\WKHVHFRQGLWLRQVDUHXQLYHUVDODQGQRWGHYLFHVSHFLȴFRUXVHUFRQȴJXUDEOH
Example: $XVHUKDVDORZHUVHWSRLQWRI)DQGDQXSSHUVHWSRLQWRI)WKHQWKHKHDWHUZLOOWXUQRQDW
)DQGWXUQRDW)
8SSHU6HWSRLQW/RZHU6HWSRLQW
0LGSRLQW /RZHU6HWSRLQW(
(
2
+HDWHU213RLQW RI0LGSRLQW
+HDWHU2))3RLQW RI0LGSRLQW
1. ATO pump: There are letters listed on the water level sensor represent options for states for the
SXPSWRWXUQRQDQGRΖI\RXȴQGWKDW\RXU$72SXPSLVQRWWXUQLQJRQDQGRDWWKHVWDWHVWKDW
you have selected this is correctable. Contact us at customerservice@aquariumguardian.com

16
7.2H Silencing an Alarm on the Device
Alarms can be temporarily disabled by pressing the SILENCE button on the Aquarium Guardian.
This is particularly useful to silence the audible alarm once you are aware of the alarm. This will
disable the audible alarm temporarily. If the alarm cannot be quickly resolved it will be necessary to
disable the SIREN checkbox for that condition in the Portal.
7.3 Viewing Aquarium Data (Graphs)
Once logged into your account, select the View Charts button. When the pop-up window appears,
you can view one weeks’ worth of data from your device. Use the “grow” or “shrink” button to correct
the water level reading. There are charts for the following items: Aquarium Water Level, Aquarium
Water Temperature, Ambient Temperature & Humidity, Wi-Fi Signal Strength, and Battery Voltage.
7.4 Viewing Aquarium Logs(Notification History)
The chronology of device events and logs can be found by clicking on the Logs icon internal to the
SRUWDO$Q\FRQGLWLRQWKDWVHQWDQRWLȴFDWLRQZLOOVKRZLQWKLVȊDODUPKLVWRU\ȋΖI\RXEHOLHYH\RXPD\
QRWKDYHUHFHLYHGDQRWLȴFDWLRQ\RXFDQWURXEOHVKRRWE\ȴUVWVHHLQJLIWKHFRQGLWLRQZDVȵDJJHGDV
an alert in this section.

17
8.0 Device and Alarm Testing
The Aquarium Guardian and sensors should be tested monthly to ensure
proper operation.
8.1 Humidity and Air Temperature Testing
Testing for temperature and humidity sensors is done by comparing
current levels in Portal with a calibrated reference. Readings of +/-3%
are expected.
8.2 Water Temperature Testing
Testing for water temperature can be done by comparing the readings in
the Portal to a thermometer. The accuracy of the sensor can be found
under Section 1.1.
8.3 Water Level Sensor Testing
Examine the sensor for sediment build up, if present, wipe down with a soft
sponge. Examine the water level with relation to the water level sensor and
compare the reading to what the Aquarium Water Level reading is displaying
RQWKHSRUWDOΖIWKHZDWHUOHYHOORRNVRDGMXVWZLWKWKHJURZDQGVKULQN
EXWWRQWRȴQHWXQHWKHZDWHUOHYHOUHDGLQJ
8.4 Water Level Sensor Testing
Test the leak sensor by dipping both metal tabs of the sensor into a cup of
water and waiting 60 seconds for an alarm. For testing purposes, use fresh
water as it is not corrosive to the protective coating on the leak sensors feet.
The plastic housing of the sensor can be submerged. However, it will take a
lengthy time to dry and therefore it’s generally not recommended.
Lastly, dry the metal tabs after testing.
8.5 Power Loss Detection Testing
Test power loss detection by removing the power adapter from the wall and
wait 60 seconds for alarm. Reconnect the power adapter after testing.
8.6 Battery Condition Testing
Remove the power adapter from the wall and allow the device to run for three
KRXUVRQWKHLQWHUQDOEDWWHU\SDFNΖIWKHGHYLFHWXUQVREHIRUHWKUHHKRXUV
replace the battery. Dispose battery according to local rules and regulations.
The battery voltage can be found in the “View Charts” section in the portal.
If power is lost due to a tripped breaker, the device will continue to operate
until the battery voltage reaches 3.2-3.3V. Note that the relay will be switched
RRQFHWKHEDWWHU\UHDFKHVDYROWDJHRI9
Table of contents