manuals.online logo
Brands
  1. Home
  2. •
  3. Brands
  4. •
  5. AquaticLife
  6. •
  7. Water Filtration System
  8. •
  9. AquaticLife 540565 Owner's manual

AquaticLife 540565 Owner's manual

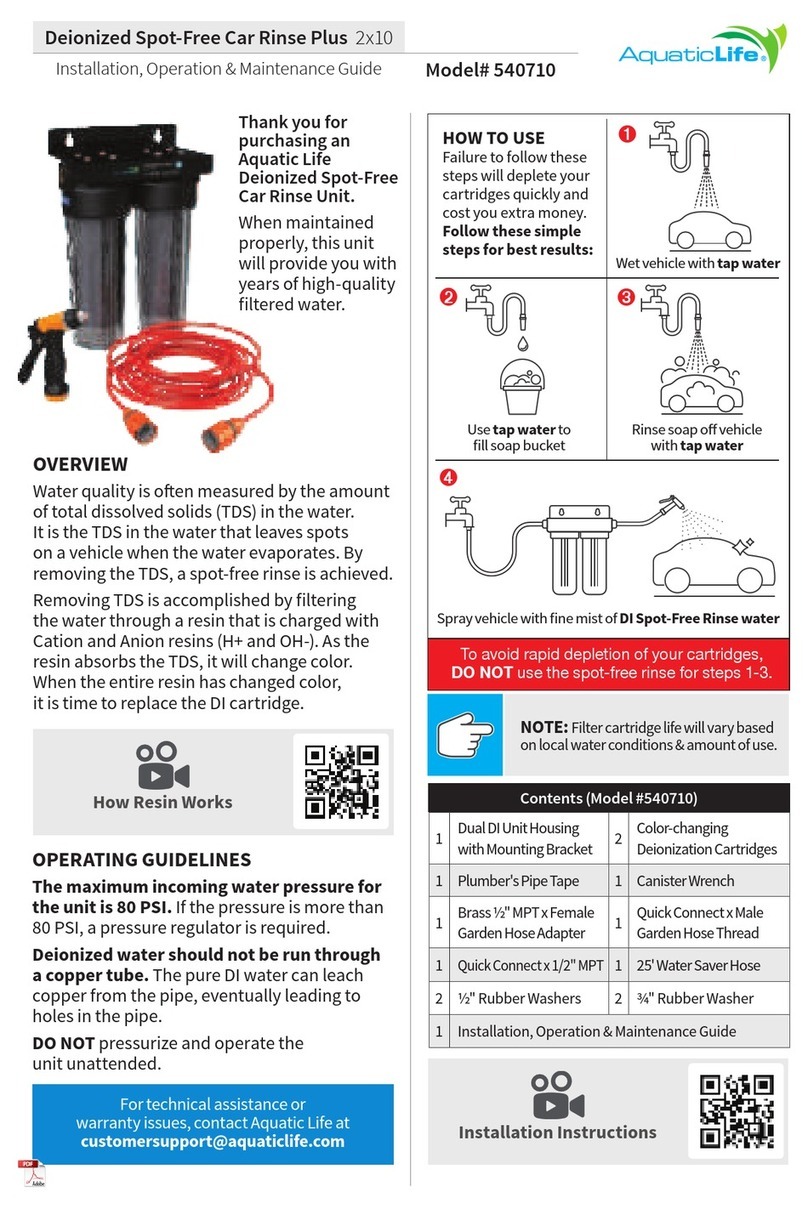
Deionized Spot-Free Car Rinse 2x10
Installation, Operation & Maintenance Guide Model# 540565
Thank you for
purchasing an
Aquatic Life
Deionized Spot-Free
Car Rinse Unit.
When maintained
properly, this unit
will provide you with
years of high-quality
filtered water.
OVERVIEW
Water quality is oen measured by the amount
of total dissolved solids (TDS) in the water.
It is the TDS in the water that leaves spots
on a vehicle when the water evaporates. By
removing the TDS, a spot-free rinse is achieved.
Removing TDS is accomplished by filtering
the water through a resin that is charged with
Cation and Anion resins (H+ and OH-). As the
resin absorbs the TDS, it will change color.
When the entire resin has changed color,
it is time to replace the DI cartridge.
The spot-free rinse is what is important
to ensure spots do not form on the vehicle.
DO NOT use the spot-free rinse for steps 1-3.
OPERATING GUIDELINES
The maximum incoming water pressure for
the unit is 80 PSI. If the pressure is more than
80 PSI, a pressure regulator is required.
Deionized water should not be run through
a copper tube. The pure DI water can leach
copper from the pipe, eventually leading to
holes in the pipe.
DO NOT pressurize and operate the
unit unattended.
HOW TO USE
Failure to follow these
steps will deplete your
cartridges quickly and
cost you extra money.
Follow these simple
steps for best results:
Contents (Model #540565)
1Dual DI Unit Housing
with Mounting Bracket 2Color-changing
Deionization Cartridges
1Plumber's Pipe Tape 1Canister Wrench
1Brass ½" MPT x Female
Garden Hose Adapter 1Installation, Operation &
Maintenance Guide
1Brass ½" MPT x Male
Garden Hose Adapter 1Misting Nozzle
2½" Rubber Washers 1¾" Rubber Washer
Recommended Installation Tools
Adjustable Wrench Phillips Screwdriver
How Resin Works
Installation Instructions
For technical assistance or
warranty issues, contact Aquatic Life at
customersupport@aquaticlife.com
NOTE:
Filter cartridge life will vary based
on local water conditions & amount of use.
Deionized Spot-Free Car Rinse
2x10
Model# 540565
Installation, Operation & Maintenance Guide www.aquaticlife.com
MOUNTING THE UNIT
Mount to a secure surface so the cartridges can
be easily replaced as needed.
Use screws designed for the type of surface
that the DI unit will hang on. Leave the screws
extending about 1/8" from the surface then
hang the metal bracket on the screws.
INSTALL THE ADAPTERS
Step 2
– Insert a ½" rubber washer into the side
labeled
SUPPLY
then thread the
FEMALE
hose
fitting into that side.
Step 1
– Apply three wraps of the pipe tape to
each of the ½" MPT fittings.
Step 3
– Insert a ½" rubber washer into the side
labeled
FILTERED
then thread the
MALE
hose
fitting into that side.
Step 4
– Tighten both brass fittings with a
wrench.
Do not over-tighten.
INSTALLING THE CARTRIDGES
Remove the resin cartridges from the wrappers
and center them in the clear canisters.
Hand-tighten the canisters to canister heads
and use the canister wrench to tighten
approximately another 1/4 turn.
HOSE INSTALLATION
Use a hose with standard garden hose threads
to connect the
SUPPLY
side of the deionization
unit to a water supply.
Use a second hose to connect to the
FILTERED
side of the deionization unit. For this connection,
a smaller diameter hose is recommended to
reduce the amount of filtered water sitting in
the hose. This is the hose to use for rinsing your
vehicle (hose not included).
UNIT STORAGE
Between use, it is important for the resin to
remain wet. Ideal storage would be leaving
the water hoses attached and canisters filled
with water. If you remove the water hoses from
the ends of the Spot Free Rinse, ensure that
the water in the canisters is not allowed to
evaporate.
Avoid storing in an area that could freeze
or temperatures could raise above 100°F.
Never store the unit in direct sunlight.
UNIT MAINTENANCE
The deionization cartridges are designed
to change color when the resin inside is
exhausted. When the entire cartridge has
changed color, it is time to replace.
1
2
Cartridge #2 only
partially exhausted.
Move to #1 location
Cartridge #1 exhausted.
Remove and place new
cartridge in #2 location
Additional Purchase Considerations
5L Bulk Resin
Fills about 6 cartridges
Scan to order on Amazon
Cartridge 3-Pack
WARNING: DO NOT mount
the unit outside or in a direct
sunlight area. This will aect the
performance of the unit.
IMPORTANT: For best results,
use the included adjustable
rinsing nozzle. This nozzle
provides the proper final misting
for the optimal spot free rinse.
NOTE:
When changing the exhausted
cartridge, move the second cartridge
to the first position & install the new
cartridge in the second position. This
will maximize the use of the resin.
32º100º
Deionized Spot-Free Car Rinse 2x10
Installation, Operation & Maintenance Guide Model# 540565
TROUBLESHOOTING
Q. Water is leaking?
A. The most common point of water leak
is where the clear canisters screw onto the
heads. Each canister includes an O-ring. It
is important the O-ring is seated properly to
prevent leaks. Do not over-tighten the
canisters as this will not fix a leaking seal.
Q. Why does my DI Cartridge not last as long
as the next guy?
A. The resin in DI cartridges remove a set
amount of TDS from water. The higher the
TDS going into the DI cartridge, the quicker
the resin will be depleted. For example, if
the water going into your DI cartridge is
100 TDS and your neighbor has water with
200 TDS, your DI cartridge will last two
times longer than your neighbors.
REV 07/2021
1-YEAR LIMITED WARRANTY
Lifetime Products LLC warrants that this Dual Deionization Unit
(excluding cartridges) shall be free from defective components
and leaks or cracks due to defects in materials or workmanship
for a period of one (1) year from the date of purchase. If a defect
is shown, Lifetime Products LLC will, at Lifetime Product’s sole
discretion, either repair or replace the product without charge.
No cash refunds will be made. This warranty is provided solely
to the original consumer purchaser of the product and may
not be transferred or assigned. If Lifetime Products chooses to
replace the equipment, Lifetime Products may replace it with
reconditioned equipment. Parts used in repairing or replacing
the equipment will be warranted for 90 days from the date the
equipment is returned to you or the remainder of the original
warranty period, whichever is longer.
This warranty does not apply to damage resulting from
accident, misuse, abuse, lack of reasonable care, failure to
follow safety and installation instructions.
This warranty will be void if defects occur due to failure to
observe the following conditions:
The Aquatic Life unit should only be connected to a potable
municipal or potable well cold water supply.
Do not use with water that is of unknown quality without
adequate disinfection before or aer the unit.
• Incoming water to the DI unit cannot exceed 100°F.
• Incoming water pressure must be between 40 and 80 PSI.
• Do not store in direct sunlight or subject to
freezing temperatures.
This warranty will not be eective unless and until the Aquatic
Life product is shown to have been used in accordance with
the installation and maintenance instructions accompanying
the product.
THIS CONSTITUTES LIFETIME PRODUCTS ENTIRE WARRANTY
AND LIFETIME PRODUCTS MAKES NO OTHER WARRANTIES,
WHETHER EXPRESS OR IMPLIED, WITH RESPECT TO THE
PRODUCT. LIFETIME PRODUCTS, LLC SPECIFICALLY DISCLAIMS
ANY AND ALL IMPLIED WARRANTIES, INCLUDING, WITHOUT
LIMITATION, WARRANTIES OF MERCHANTABILITY AND FITNESS
FOR A PARTICULAR PURPOSE. IF LIFETIME PRODUCTS, LLC
CANNOT LAWFULLY DISCLAIM IMPLIED WARRANTIES UNDER
THIS LIMITED WARRANTY, ALL SUCH WARRANTIES, INCLUDING
WARRANTIES OF MERCHANTABILITY AND FITNESS FOR A
PARTICULAR PURPOSE ARE LIMITED IN DURATION TO THE
DURATION OF THIS WARRANTY.
LIFETIME PRODUCTS IS NOT RESPONSIBLE FOR DIRECT,
SPECIAL, INCIDENTAL OR CONSEQUENTIAL DAMAGES
RESULTING FROM ANY BREACH OF WARRANTY OR CONDITION,
OR UNDER ANY OTHER LEGAL THEORY. LIFETIME PRODUCTS,
LLC EXPRESSLY DISCLAIMS ALL ALLEGED DAMAGES FOR LOSS
OF MARINE LIFE, PERSONAL INJURY, AND/OR PROPERTY
DAMAGE.
Some states and provinces do not allow the exclusion
or limitation of incidental or consequential damages or
exclusions or limitations on the duration of implied warranties
or conditions, so the above limitations or exclusions may not
apply to you. This warranty gives you specific legal rights, and
you may also have other rights that vary by state or province.
Lifetime Products, LLC shall not have any obligations under
this warranty unless the owner notifies Lifetime Products, LLC
in writing of any alleged defect(s) within 30 days of discovery
of the defect(s).
Any notice to Lifetime Products, LLC must be delivered by
United States or electronic mail to the following address: U.S.
Mail: Lifetime Products, LLC, 9710 Klingerman St., S. El Monte,
CA 91733 or electronic mail: customersupport@aquaticlife.
com. Lifetime Products shall be allowed a reasonable period
of time to investigate any warranty claim and to perform any
testing Lifetime Products deems necessary to determine the
cause of the defect. This warranty shall be interpreted under
the laws of the State of California.
Lifetime Products, LLC
9710 Klingerman St. | S. El Monte, CA 91733
customersuppor[email protected]
www.aquaticlife.com
OPERATION & CONSIDERATIONS
• Clear canisters have a limited life and
should be replaced on an annual basis
to prevent possible failure.
• Operating pressure greater than 80 PSI
requires a pressure regulator.
• With initial operation, check for leaks.
If a leak is observed, verify there is enough
plumber’s tape on the brass fittings and
the 1/2" rubber washers are installed.
Also check that the canisters and caps are
sealed properly with their o-rings.
• Most of the components in the
deionization unit are plastic and subject
to damage by ultraviolet light.
• Never store or operate the unit in direct
sunlight or other bright lights.
• Do not store or operate the unit in
temperatures above 100°F.
• Do not store or operate the unit in
freezing temperatures.
• Do not leave the unit unattended while
connected to a water supply.
• Do not operate unit if canisters or other
components show any signs of damage.
Other AquaticLife Water Filtration System manuals

AquaticLife 540374 Owner's manual

AquaticLife

AquaticLife 540374 Owner's manual

AquaticLife 420343 Owner's manual

AquaticLife

AquaticLife 420343 Owner's manual

AquaticLife Twist-In 100 GPD 4-Stage RO/DI Unit Owner's manual

AquaticLife

AquaticLife Twist-In 100 GPD 4-Stage RO/DI Unit Owner's manual

AquaticLife 540372 Owner's manual

AquaticLife

AquaticLife 540372 Owner's manual

AquaticLife Internal Mini Skimmer 115 Owner's manual

AquaticLife

AquaticLife Internal Mini Skimmer 115 Owner's manual

AquaticLife KP-30 Owner's manual

AquaticLife

AquaticLife KP-30 Owner's manual

AquaticLife 540500 Owner's manual

AquaticLife

AquaticLife 540500 Owner's manual

AquaticLife 540229 Owner's manual

AquaticLife

AquaticLife 540229 Owner's manual

AquaticLife 540695 Owner's manual

AquaticLife

AquaticLife 540695 Owner's manual

AquaticLife Deionized Spot-Free Car Rinse Plus Owner's manual

AquaticLife

AquaticLife Deionized Spot-Free Car Rinse Plus Owner's manual

AquaticLife RO Buddie Series Owner's manual

AquaticLife

AquaticLife RO Buddie Series Owner's manual

AquaticLife Classic Hydroponics 200 GPD Owner's manual

AquaticLife

AquaticLife Classic Hydroponics 200 GPD Owner's manual

Popular Water Filtration System manuals by other brands

carbonit SANUNO Installation

carbonit

carbonit SANUNO Installation

Pall UR629 Series Service instructions

Pall

Pall UR629 Series Service instructions

EGT EGT-300 user manual

EGT

EGT EGT-300 user manual

Hamilton Beach AquaFusion 87325 Replacement

Hamilton Beach

Hamilton Beach AquaFusion 87325 Replacement

Luxor DM 2018 Technical data sheet

Luxor

Luxor DM 2018 Technical data sheet

Oerlikon ARS 16-25 operating instructions

Oerlikon

Oerlikon ARS 16-25 operating instructions

UJETA CARE operating instructions

UJETA

UJETA CARE operating instructions

Vision Aqua VA-Mini instructions

Vision Aqua

Vision Aqua VA-Mini instructions

Bibo BIBO bar manual

Bibo

Bibo BIBO bar manual

Pool Technologie JUSTSALT UNO user manual

Pool Technologie

Pool Technologie JUSTSALT UNO user manual

Pentair RAINBOW HC 3315 quick start guide

Pentair

Pentair RAINBOW HC 3315 quick start guide

SunSun HBL-801 operating manual

SunSun

SunSun HBL-801 operating manual

Nederman FilterCart Carbon instruction manual

Nederman

Nederman FilterCart Carbon instruction manual

Hahn HF-SH-R Replacement instructions

Hahn

Hahn HF-SH-R Replacement instructions

Aquafine RBE Series Installation, maintenance and operation manual

Aquafine

Aquafine RBE Series Installation, maintenance and operation manual

Sharp E-Filter user manual

Sharp

Sharp E-Filter user manual

Clean Water Systems Fleck 9100 Installation & start?up guide

Clean Water Systems

Clean Water Systems Fleck 9100 Installation & start?up guide

Kärcher WPC 120 UF manual

Kärcher

Kärcher WPC 120 UF manual

manuals.online logo
manuals.online logoBrands
  • About & Mission
  • Contact us
  • Privacy Policy
  • Terms and Conditions

Copyright 2025 Manuals.Online. All Rights Reserved.