manuals.online logo
Brands
  1. Home
  2. •
  3. Brands
  4. •
  5. AquaticLife
  6. •
  7. Water Filtration System
  8. •
  9. AquaticLife Classic Hydroponics 200 GPD Owner's manual

AquaticLife Classic Hydroponics 200 GPD Owner's manual

1
Classic Hydroponics 200 GPD 5-Stage RO Unit
Installation, Operation & Maintenance Guide Model# 540474
Thank you for purchasing an Aquatic Life Reverse Osmosis Unit.
When maintained properly, this unit will provide you with years of service.
OVERVIEW
Reverse osmosis is the process of removing
contaminants from tap water using special
semi-permeable membranes. By applying
water pressure across the membranes,
contaminants are concentrated on one side
of the membranes and filtered water on the
other side of the membranes. This is why
reverse osmosis units have a waste water
line as well as a filtered line.
In addition to the membranes, water
is filtered prior to the membrane with
a sediment cartridge to remove larger
particulates, and two carbon blocks to
remove chlorine and other materials.
The cartridges and membrane on your
unit are designed for placement inside the
canisters. It is important the cartridges be
installed in the correct order to eectively
filter the water.
OPERATING GUIDELINES
DO NOT use with water that is micro-
biologically unsafe or of unknown quality
without adequate disinfection before or
aer the unit.
The maximum incoming water pressure
for the unit is 80 PSI.
If the pressure is more than 80 PSI, a pressure
regulator is required. If the water pressure is
less than 40 PSI, a booster pump is needed.
Water hardness should not exceed 10
grains per gallon or 170 parts per million.
Operating above this may shorten the
membrane life.
Reverse osmosis filtered water should
not be run through a copper tube.
RO water can leach copper from the pipe,
eventually leading to holes in the pipe.
DO NOT operate the unit unattended.
See Installation
Video
For technical assistance or
warranty issues, contact Aquatic Life at
customersupport@aquaticlife.com
WARNING: Please read
carefully before proceeding with
installation. Your failure to follow
any attached instructions and
operating parameters may lead
to the product’s failure.
WARNING: This unit will remove
chlorine, but NOT chloramines.
Test your water and/or check
with your local water company to
find out if you have chloramines
in your water.
2 3
Classic Hydroponics 200 GPD
5-Stage RO Unit
Model# 540474
Installation, Operation & Maintenance Guide www.aquaticlife.com
RECOMMENDED TOOLS FOR INSTALLATION
Phillips Screwdriver • Pliers • Drill • 7/8" Drill Bit
Contents
RO Unit Housing with Mounting Bracket Float Valve Assembly Tubing 1/4" x 20' Collet Tool
Cartridge Canisters (2) White (1) Clear
1/4" Manual On/O Valve
Canister Wrench Membrane Wrench
Razor Blade
Plumbers Tape
O-Ring LubricantMounting Screws Installation, Operation
& Maintenance Guide
Flush Valve Assembly (pre-installed)
100 GPD
RO Membrane Cartridges
Hose Bib
Adapter
Auto-Shuto Solenoid
(pre-installed)
Sediment
Cartridge
Carbon Block
Cartridges
Contents
4 5
Classic Hydroponics 200 GPD
5-Stage RO Unit
Model# 540474
Installation, Operation & Maintenance Guide www.aquaticlife.com
STAGE 1 - SEDIMENT FILTER
Recommended change 3-6 months
The first stage of your RO unit is a five-micron sediment filter that traps sediment and other
particulate matter like dirt, silt and rust which aect the taste and appearance of your water.
STAGES 2 & 3 - CARBON BLOCK FILTER
Recommended change 3-6 months
The second and third stages of your RO unit are carbon block filters. The activated carbon in
the filter reduces chlorine and conditions the water prior to the RO Membrane.
STAGE 4 & 5 - RO MEMBRANES
Recommended change 12-24 months
The RO Membranes reduce impurities known as Total Dissolved Solids (TDS) from the water
down to 1/10,000 of a micron, reducing arsenic, lead, parasitic cysts, copper and more.
Because the process of filtering the high-quality water takes time, it is common to use a
storage tank to collect filtered water, making it available on demand.
USING THE PRESS FITTINGS
Tubing
Push 2x
Tubing
Pull
✓
Correct
✗
Incorrect
1 4
5
2
3
Remove the blue clip from the press fitting.
Pull back on the tubing to ensure it is secure.
Replace the blue clip back onto the fitting.
Push the tubing into the fitting. You will hit
the first stop. The tubing is still not secured
properly. Push the tubing a second time and
you will feel the tubing insert completely
(5/8") into the press fitting.
Cut tubing evenly and not at an angle.
Collet
Blue
Clip
See Instructional
Video
S
C
RO
WARNING: This unit will remove chlorine,
but NOT chloramines. Test your water and/
or check with your local water company to find
out if you have chloramines in your water.
NOTE:
Filter cartridges and membrane life
may vary based on local water conditions
and amount of use.
NOTE: To remove a piece of
tubing, remove the blue clip,
then press and hold down on
the collet while pulling out
the tubing.
NOTE: Cut the tubing with the
included razor blade to prevent
pinching. If the tubing is pinched,
it will not seal properly. Fittings
use a “double push” connection.
You will feel a two-step insert
to verify the tubing is inserted
completely into the connectors.
BECOMING FAMILIAR WITH YOUR RO SYSTEM BECOMING FAMILIAR WITH YOUR RO SYSTEM
6 7
Classic Hydroponics 200 GPD
5-Stage RO Unit
Model# 540474
Installation, Operation & Maintenance Guide www.aquaticlife.com
RO UNIT HOUSING &
MOUNTING BRACKET
The unit housing includes one clear and two
solid canisters. The clear canister allows for
easy viewing of the sediment cartridge. All
three canisters include O-rings that should be
coated with the lubricant prior to installation.
It is important to make sure the O-rings are
seated properly.
Auto Shuto Solenoid (ASO)
and Elbow Check Valves
The pre-plumbed ASO will shut-o the
incoming water supply when you turn o the
filtered water line.
For example, you are filling a barrel with
RO water and turn o the fill valve when
the barrel is full. The ASO will then stop the
incoming water from flowing through the
unit and existing the waste line. To ensure
the unit works properly, two check valves are
built into the 90 degree elbows exiting the RO
membrane housing. These special elbows are
identified with a gray ring.
Membrane Housing
The two membrane housings are plumbed parallel, meaning that water flows through both 100
GPD membranes at the same time to produce a total of 200 GPD under ideal water temperature
and pressure. The membranes must be inserted properly into the housings.
Flush Valve
The pre-plumbed flush valve should be used
at least once a week if using the RO unit on a
regular basis. This will help prolong the life of
the membrane. While the unit is operating,
open the valve for 45 seconds and then close.
Pressure Gauge
The pressure gauge will measure the water
PSI against the membrane. The ideal pressure
for a membrane is 65 PSI. If aer the unit is
operating for a while, you see the pressure
drop, this is an indication that the sediment
and/or carbon cartridges are plugged and
should be replaced.
Auto Shuto Valve (ASO)
Tubing
Cut the tubing as needed to connect the
various components. Use the razor blade to
ensure a clean, even cut.
IN
CLOSED
OPEN
OUT
BECOMING FAMILIAR WITH YOUR RO SYSTEM BECOMING FAMILIAR WITH YOUR RO SYSTEM
Float Valve
Like the float in a toilet tank, this Float Valve
allows you to fill tanks, containers and
aquariums automatically. Drill a 7/8” hole
in the container to install the Float Valve.
8 9
Classic Hydroponics 200 GPD
5-Stage RO Unit
Model# 540474
Installation, Operation & Maintenance Guide www.aquaticlife.com
Filtered Water
(connect at
Solenoid)
Manual
Shut-o
Valve
Waste Water
to Drain
Faucet
Supply Water
RO Membrane
RO Membrane
Carbon
Carbon
Sediment
Filtered Water
(connect at Solenoid)
Waste Water
to Drain
Faucet
Supply Water
RO Membrane
RO Membrane
Carbon
Carbon
Sediment
Adjustable
Float
Adjustable
Float
Filtered Water
to Shut-o Valve
or Float Valve
Waste Water
to Drain
Faucet RO Membrane
RO Membrane
Carbon
Carbon
Sediment
Pressure
Guage
Auto Shut-o
Solenoid
IN OUT
Supply
Water
Flow
Restrictor
Shut-o
Valve
Elbows with
Check Valve
Filtered Water
(connect at
Solenoid)
Manual
Shut-o
Valve
Waste Water
to Drain
Faucet
Supply Water
RO Membrane
RO Membrane
Carbon
Carbon
Sediment
Filtered Water
(connect at Solenoid)
Waste Water
to Drain
Faucet
Supply Water
RO Membrane
RO Membrane
Carbon
Carbon
Sediment
Adjustable
Float
Adjustable
Float
Filtered Water
to Shut-o Valve
or Float Valve
Waste Water
to Drain
Faucet RO Membrane
RO Membrane
Carbon
Carbon
Sediment
Pressure
Guage
Auto Shut-o
Solenoid
IN OUT
Supply
Water
Flow
Restrictor
Shut-o
Valve
Elbows with
Check Valve
Installation
AInstalled using the manual shut-o valve included with the unit.
When you turn o the filtered water, the waste water will also stop.
Installation
BInstalled using the float valve included with the unit. When the container is
full, the float will shut o the filtered water and the waste water will also stop.
MOUNTING THE REVERSE OSMOSIS UNIT
The Aquatic Life Classic RO Unit is designed to be mounted to a secure surface. This will allow for
the cartridges to easily be replaced as needed. A metal bracket with screw holes is provided.
Use screws designed for the type of surface that the RO Unit will hang on. Leave the screws
extending about 1/8” from the surface and then hang the metal bracket on the screws. Tighten
screws fully.
WATER SUPPLY INSTALLATION
Connect to a standard water faucet
(oen found on the exterior of houses,
utility sinks, and washing machines)
with the Hose Bib Adapter.
10 11
Classic Hydroponics 200 GPD
5-Stage RO Unit
Model# 540474
Installation, Operation & Maintenance Guide www.aquaticlife.com
Filtered Water
(connect at
Solenoid)
Manual
Shut-o
Valve
Waste Water
to Drain
Faucet
Supply Water
RO Membrane
RO Membrane
Carbon
Carbon
Sediment
Filtered Water
(connect at Solenoid)
Waste Water
to Drain
Faucet
Supply Water
RO Membrane
RO Membrane
Carbon
Carbon
Sediment
Adjustable
Float
Adjustable
Float
Filtered Water
to Shut-o Valve
or Float Valve
Waste Water
to Drain
Faucet RO Membrane
RO Membrane
Carbon
Carbon
Sediment
Pressure
Guage
Auto Shut-o
Solenoid
IN OUT
Supply
Water
Flow
Restrictor
Shut-o
Valve
Elbows with
Check Valve
NOTE:
This unit will not work with the
Aquatic Life Smart Buddie Booster Pump
PLUMBING
SCHEMATIC
DIAGRAM
If your water pressure is below 40 psi or you wish to increase the eiciency of the unit,
a booster pump can be added. Because some pumps include high pressure and/or
low-pressure switches, the plumbing will vary. Please check with the pump manufacturer
for information on how to plumb to this unit.
This plumbing diagram can be supplied to
a booster pump manufacturer so they can advise
on the best installation.
12 13
Classic Hydroponics 200 GPD
5-Stage RO Unit
Model# 540474
Installation, Operation & Maintenance Guide www.aquaticlife.com
INSTALL THE MEMBRANES (cont.)
INSTALL THE MEMBRANES
Remove the tubing from both membrane caps
and remove the caps. PREPARE MEMBRANES FOR USE
Remove the protective wraps from the
membranes and install into the housings.
Insert membranes completely with the black
ring closest to the cap.
Reattach the caps and use the wrench to
finish tightening. Reinstall tubing and clips.
PREPARE CARTRIDGES FOR USE
CARTRIDGE INSTALLATION
Remove the protective wrap from each cartridge and place the cartridges in the canisters. Make
sure the cartridges are centered in the canisters. The carbon cartridges have rubber gaskets on
the top and bottom of the cartridges. Ensure these are seated properly.
With your finger, place a small amount of the O-ring lubricant on each canister O-ring and then
reinstall into the top of the canister.
Thread each canister onto the housing and hand-tighten. Use the included canister wrench to
tighten 1/8 to 1/4 of a turn to finish tightening. DO NOT OVER-TIGHTEN.
Prior to installing the membranes, turn on the
water supply and let the water run through
the unit for one minute to rinse any carbon
dust out of the cartridges. The water will flow
through the unit much quicker without the
membrane installed. Turn o the water supply.
THE CARBON CARTRIDGES MAY
CONTAIN CARBON DUST THAT MUST
BE FLUSHED OUT PRIOR TO INSTALLING
THE MEMBRANES.
If it is not rinsed, carbon dust can plug
the membranes and shorten their life.
IMPORTANT:
Flush carbon cartridges
prior to use.
IMPORTANT: Flush the RO
membranes before using the
RO unit.
Supply
Water
Waste
water
Filtered
water
Gasket
O-ring
Center
Cartridges
Insert fully
All RO membranes contain a packing material
to keep them sterile. IT IS IMPORTANT TO
FLUSH THE MEMBRANE PRIOR TO USING
THE FILTERED WATER. Turn on the water to
the RO unit and allow to run for 30 minutes.
Discard all the water from the first 30 minutes
of operation.
14 15
Classic Hydroponics 200 GPD
5-Stage RO Unit
Model# 540474
Installation, Operation & Maintenance Guide www.aquaticlife.com
REVERSE OSMOSIS
FILTER BASICS
The membrane does most of the work by
removing up to 98% of the TDS from your
water. The sediment and carbon filters protect
the membrane from the many malicious
elements that shorten its life. The sediment
cartridge removes suspended particles larger
than 5 microns (3 times smaller than a mold
spore). The carbon block removes chlorine.
Timely replacement of the cartridges will
increase the membrane’s life.
The carbon cartridge is the most important
cartridge to change frequently. The carbon
cartridge can filter about 3,500 gallons of
water before being replaced if your chlorine
level is 1 ppm (parts per million). With a
2 ppm you can filter 1,750 gallons of water
before needing to change, with a 3 ppm
you can filter 1,166 gallons, and so on. Any
chlorine not absorbed by a spent carbon
cartridge will break down your membrane,
thus greatly shortening its life.
The 3,500 gallon threshold is TOTAL water
that passes through the unit. The RO unit
has an average rejection ratio of 1:1.5.
That means for every 1 gallon of good water
produced you will reject 1.5 gallons for a total
of 2.5 gallons of water passed through the
unit.
When the sediment cartridge needs to be
changed, the production of water will reduce.
Even with reduced water production, the
cartridge will not allow anything larger than
one micron to pass through the chamber. On
average the sediment cartridge should be
changed at every other carbon change.
With proper filter changes, the membrane
could last up to two years. The membrane’s
water production rating is based on 77°F
water at 65 PSI. Any deviation from this
will aect the water production. Reference
the conversion table that follows. You will
notice that the warmer the water, the better
the production. It is not advised that you
introduce water from your water heater to
increase water temperature. The membrane
cannot handle temps over 100°F.
Example
The RO membrane production rate at 77ºF,
65 PSI = 200 gallons per day.
What is the production rate at 50º F?
Answer
Use the temperature correction factor
(from table above) = 0.58
New production flow rate at 50ºF is
200 x 0.58 = 116 gallons per day.
Temperature
Correction
Temp.
F/C
Correction
Factor
50/10 0.58
60/16 0.73
70/21 0.87
77/25 1.00
80/27 1.06
90/32 1.23
100/38 1.45
Pressure
Correction
Pressure
PSI
Correction
Factor
Less than 40 PSI
requires a
booster pump
40 0.67
50 0.83
65 1
70 1.17
80 1.33
UNIT MAINTENANCE
Weekly Maintenance
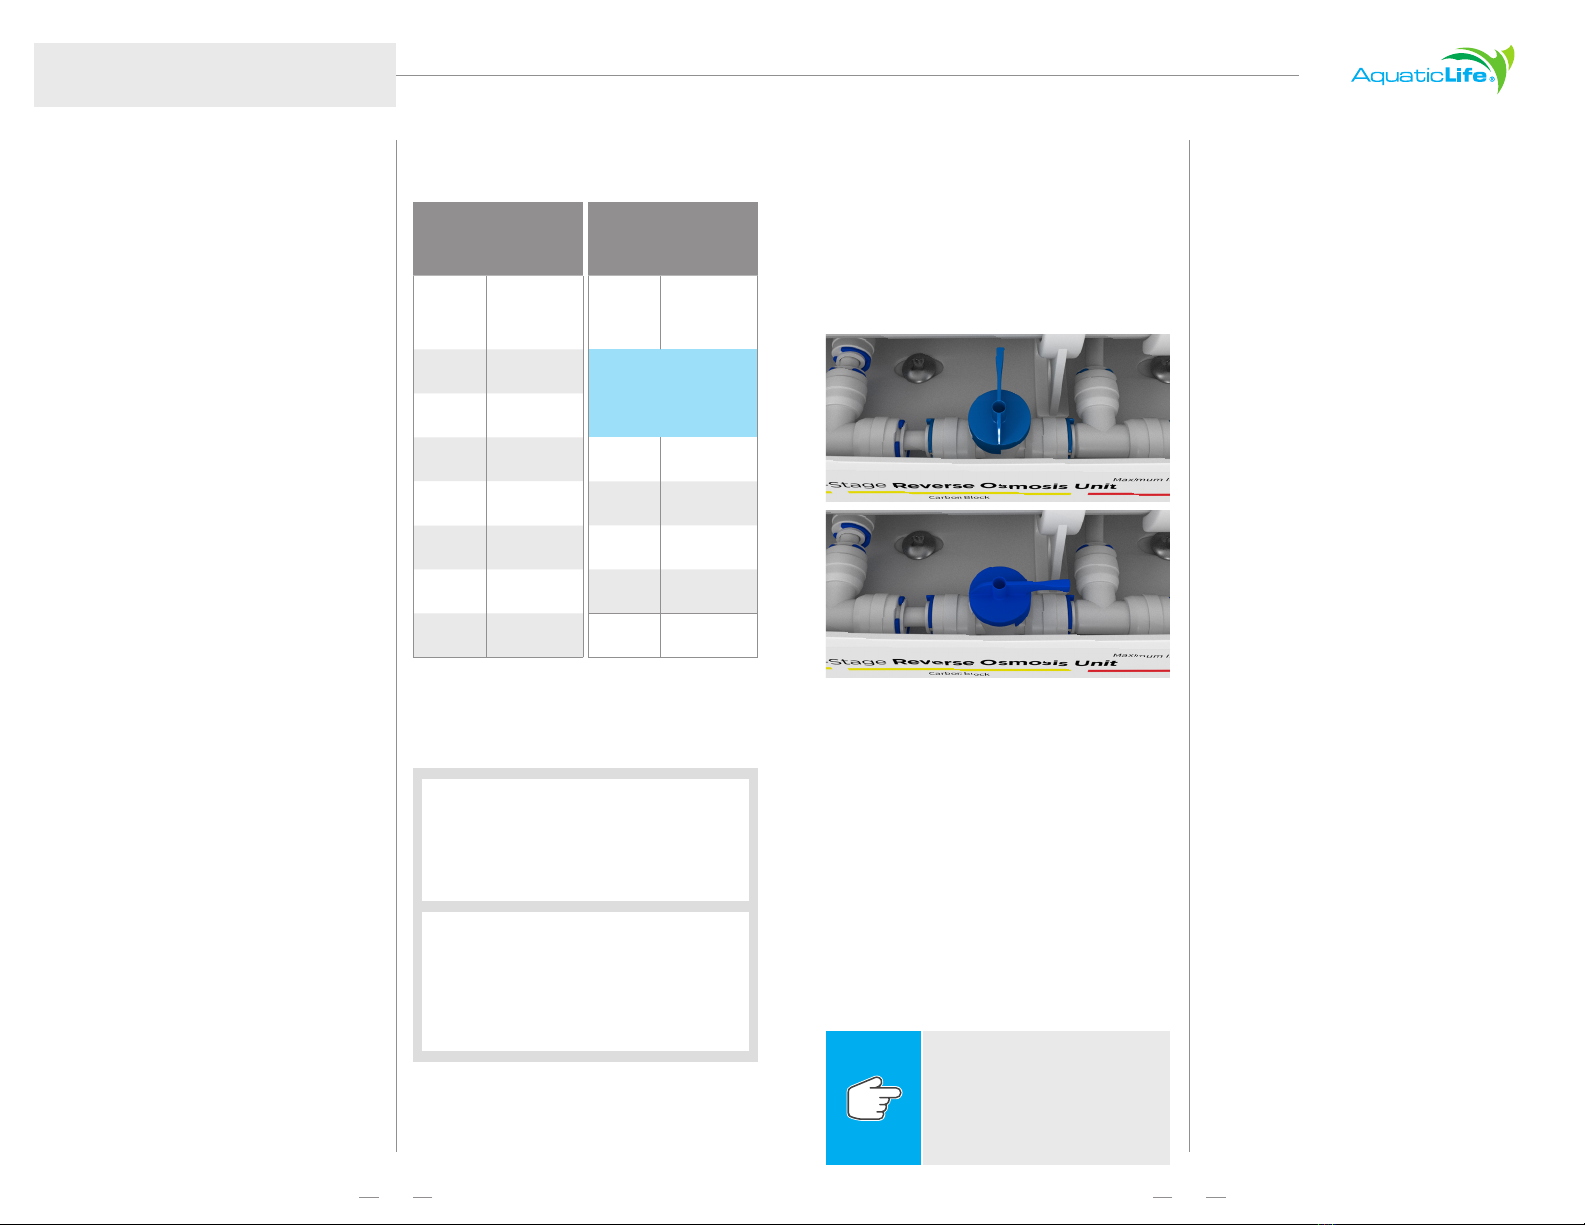
This unit includes a flush valve to prolong the
life of the membrane. IT IS IMPORTANT TO
PERIODICALLY OPEN THE FLUSH VALVE FOR
45 SECONDS PRIOR TO MAKING FILTERED
WATER. This will clear debris that may have
built-up on the membrane.
Recommended change 3-6 months
or 3,500 gallons total or 900 gallons
of filtered water
Sediment Cartridge (Item # 330088)
Carbon Cartridge (Item # 330090)
12 Month Maintenance
100 GPD Membrane Cartridge
(Item # 330093)
Replace Clear Canister & O-ring
(Part # 9000928)
NOTE: The life span of the
cartridges are dependent on
water supply quality and amount
of use. Our recommended
replacement intervals are based
on average usage.
CLOSED
OPEN
OPERATION & CONSIDERATIONS
The unit includes a pressure gauge to show
the incoming water pressure. Your target
pressure is 60- 65 PSI. You will produce less
filtered water if your water pressure is below
60 PSI. Pressure above 60 PSI may produce
more water. If the incoming water pressure
is less than 40 PSI, you will need to add a
booster pump.
• Operating the RO unit using soened feed
water greatly reduces the chances of
membrane failure.
• Clear canisters have a limited life and
should be replaced on an annual basis
to prevent possible failure.
• Operating pressure less than 40 PSI
may require a booster pump.
• Water supply operating pressure greater
than 80 PSI requires a pressure regulator.
• With initial operation, check for leaks.
If a leak is observed, verify that the
tubing is pushed into the push-fitting far
enough to seal the tubing against the
o-ring and that the canisters and caps
are sealed properly with their o-rings.
• Many of the components in this unit
are plastic and subject to damage by
ultraviolet light.
• Never store or operate the unit in direct
sunlight or other bright lights.
• Do not store or operate the unit in
temperatures above 100°F.
• Do not store or operate the unit in
freezing temperatures.
• Do not leave the unit unattended while
connected to a water supply.
16
Classic Hydroponics 200 GPD 5-Stage RO Unit
Installation, Operation & Maintenance Guide Model# 540474
LIMITED WARRANTY
Lifetime Products LLC warrants that this Reverse Osmosis
unit (excluding cartridges and membrane) shall be free
from defective components and leaks or cracks due to
defects in materials or workmanship for a period of one (1)
year from the date of purchase. If a defect is shown, Lifetime
Products LLC will, at Lifetime Product’s sole discretion,
either repair or replace the product without charge. No
cash refunds will be made. This warranty is provided solely
to the original consumer purchaser of the product and may
not be transferred or assigned. If Lifetime Products chooses
to replace the equipment, Lifetime Products may replace it
with reconditioned equipment. Parts used in repairing or
replacing the equipment will be warranted for 90 days from
the date the equipment is returned to you or the remainder
of the original warranty period, whichever is longer.
This warranty does not apply to damage resulting from
accident, misuse, abuse, lack of reasonable care, failure to
follow safety and installation instructions.
This warranty will be void if defects occur due to failure to
observe the following conditions:
The Aquatic Life RO Unit should only be connected to a
potable municipal or potable well cold water supply.
Do not use with water that is of unknown quality without
adequate disinfection before or aer the unit.
• Incoming total dissolved solids (TDS)
not to exceed 1,800 ppm.
• Incoming water to the RO cannot exceed 100°F.
• Incoming water pressure must be between
40 and 80 PSI.
• Incoming water pH must not be lower than
2 or higher than 11.
• Incoming water iron content must be
less than 0.2 ppm.
• Incoming water hardness must not exceed
10 grains per gallon or 170 ppm.
• Do not use outdoors or in a location that is
subjected to direct sunlight or freezing.
This warranty will not be eective unless and until
the Aquatic Life product is shown to have been used
in accordance with the installation and maintenance
instructions accompanying the product.
THIS CONSTITUTES LIFETIME PRODUCTS ENTIRE
WARRANTY AND LIFETIME PRODUCTS MAKES NO OTHER
WARRANTIES, WHETHER EXPRESS OR IMPLIED, WITH
RESPECT TO THE PRODUCT. LIFETIME PRODUCTS,
LLC SPECIFICALLY DISCLAIMS ANY AND ALL IMPLIED
WARRANTIES, INCLUDING, WITHOUT LIMITATION,
WARRANTIES OF MERCHANTABILITY AND FITNESS FOR
A PARTICULAR PURPOSE. IF LIFETIME PRODUCTS, LLC
CANNOT LAWFULLY DISCLAIM IMPLIED WARRANTIES
UNDER THIS LIMITED WARRANTY, ALL SUCH WARRANTIES,
INCLUDING WARRANTIES OF MERCHANTABILITY AND
FITNESS FOR A PARTICULAR PURPOSE ARE LIMITED IN
DURATION TO THE DURATION OF THIS WARRANTY.
LIFETIME PRODUCTS IS NOT RESPONSIBLE FOR DIRECT,
SPECIAL, INCIDENTAL OR CONSEQUENTIAL DAMAGES
RESULTING FROM ANY BREACH OF WARRANTY OR
CONDITION, OR UNDER ANY OTHER LEGAL THEORY.
LIFETIME PRODUCTS, LLC EXPRESSLY DISCLAIMS ALL
ALLEGED DAMAGES FOR LOSS OF MARINE LIFE, PERSONAL
INJURY, AND/OR PROPERTY DAMAGE.
Some states and provinces do not allow the exclusion
or limitation of incidental or consequential damages
or exclusions or limitations on the duration of implied
warranties or conditions, so the above limitations or
exclusions may not apply to you. This warranty gives you
specific legal rights, and you may also have other rights
that vary by state or province.
Lifetime Products, LLC shall not have any obligations
under this warranty unless the owner notifies Lifetime
Products, LLC in writing of any alleged defect(s) within 30
days of discovery of the defect(s).
Any notice to Lifetime Products, LLC must be delivered by
United States or electronic mail to the following address:
U.S. Mail: Lifetime Products, LLC, 9710 Klingerman St., S.
El Monte, CA 91733 or electronic mail: customersupport@
aquaticlife.com. Lifetime Products shall be allowed a
reasonable period of time to investigate any warranty
claim and to perform any testing Lifetime Products deems
necessary to determine the cause of the defect. This
warranty shall be interpreted under the laws of the State
of California.
Lifetime Products, LLC
9710 Klingerman St. | S. El Monte, CA 91733
customersuppor[email protected]
www.aquaticlife.com

This manual suits for next models

1

Other AquaticLife Water Filtration System manuals

AquaticLife Twist-In 100 GPD 4-Stage RO/DI Unit Owner's manual

AquaticLife

AquaticLife Twist-In 100 GPD 4-Stage RO/DI Unit Owner's manual

AquaticLife 540229 Owner's manual

AquaticLife

AquaticLife 540229 Owner's manual

AquaticLife Deionized Spot-Free Car Rinse Plus Owner's manual

AquaticLife

AquaticLife Deionized Spot-Free Car Rinse Plus Owner's manual

AquaticLife Internal Mini Skimmer 115 Owner's manual

AquaticLife

AquaticLife Internal Mini Skimmer 115 Owner's manual

AquaticLife 540695 Owner's manual

AquaticLife

AquaticLife 540695 Owner's manual

AquaticLife 540374 Owner's manual

AquaticLife

AquaticLife 540374 Owner's manual

AquaticLife 540565 Owner's manual

AquaticLife

AquaticLife 540565 Owner's manual

AquaticLife RO Buddie Series Owner's manual

AquaticLife

AquaticLife RO Buddie Series Owner's manual

AquaticLife 540500 Owner's manual

AquaticLife

AquaticLife 540500 Owner's manual

AquaticLife 540372 Owner's manual

AquaticLife

AquaticLife 540372 Owner's manual

AquaticLife KP-30 Owner's manual

AquaticLife

AquaticLife KP-30 Owner's manual

AquaticLife 420343 Owner's manual

AquaticLife

AquaticLife 420343 Owner's manual

Popular Water Filtration System manuals by other brands

Aquasana AQ-5300+ installation instructions

Aquasana

Aquasana AQ-5300+ installation instructions

Pentair Pool Products SM/SMBW 2000 Installation and user guide

Pentair Pool Products

Pentair Pool Products SM/SMBW 2000 Installation and user guide

Prio AVANTGARDE SDX Series user guide

Prio

Prio AVANTGARDE SDX Series user guide

GreenAire RAH-1000 series Installation and operation guide

GreenAire

GreenAire RAH-1000 series Installation and operation guide

Ispring RCT600 Installation instructions & operating manual

Ispring

Ispring RCT600 Installation instructions & operating manual

Halsey Taylor HydroBoost HTHBWF-HRFER quick start guide

Halsey Taylor

Halsey Taylor HydroBoost HTHBWF-HRFER quick start guide

Alfaa EcoStream ECS60R Operation and maintenance manual

Alfaa

Alfaa EcoStream ECS60R Operation and maintenance manual

Master Water Conditioning Clarifier MCA Series Installation and operation manual

Master Water Conditioning

Master Water Conditioning Clarifier MCA Series Installation and operation manual

Cleveland SteamerGard System WT-90 Installation, Use and Care Instructions

Cleveland

Cleveland SteamerGard System WT-90 Installation, Use and Care Instructions

AquaScape Ultraklean 2000 Instructions & maintenance

AquaScape

AquaScape Ultraklean 2000 Instructions & maintenance

Pentair INTELLICHLOR COMSYS-8 installation guide

Pentair

Pentair INTELLICHLOR COMSYS-8 installation guide

Vega KFD0 Series Product information

Vega

Vega KFD0 Series Product information

TRIGHTFILTERS FLT4825 quick start guide

TRIGHTFILTERS

TRIGHTFILTERS FLT4825 quick start guide

HTW PURE DUCT Owners and installation manual

HTW

HTW PURE DUCT Owners and installation manual

Stream Nano N1 user manual

Stream

Stream Nano N1 user manual

CalUltra UV-CalUltra 12 Operation & installation instructions

CalUltra

CalUltra UV-CalUltra 12 Operation & installation instructions

ECO Zero AQUA Eri Instructions for use

ECO Zero

ECO Zero AQUA Eri Instructions for use

AQVA Finland AQ002-1 user guide

AQVA Finland

AQVA Finland AQ002-1 user guide

manuals.online logo
manuals.online logoBrands
  • About & Mission
  • Contact us
  • Privacy Policy
  • Terms and Conditions

Copyright 2025 Manuals.Online. All Rights Reserved.