Aqueon Betta Falls User manual
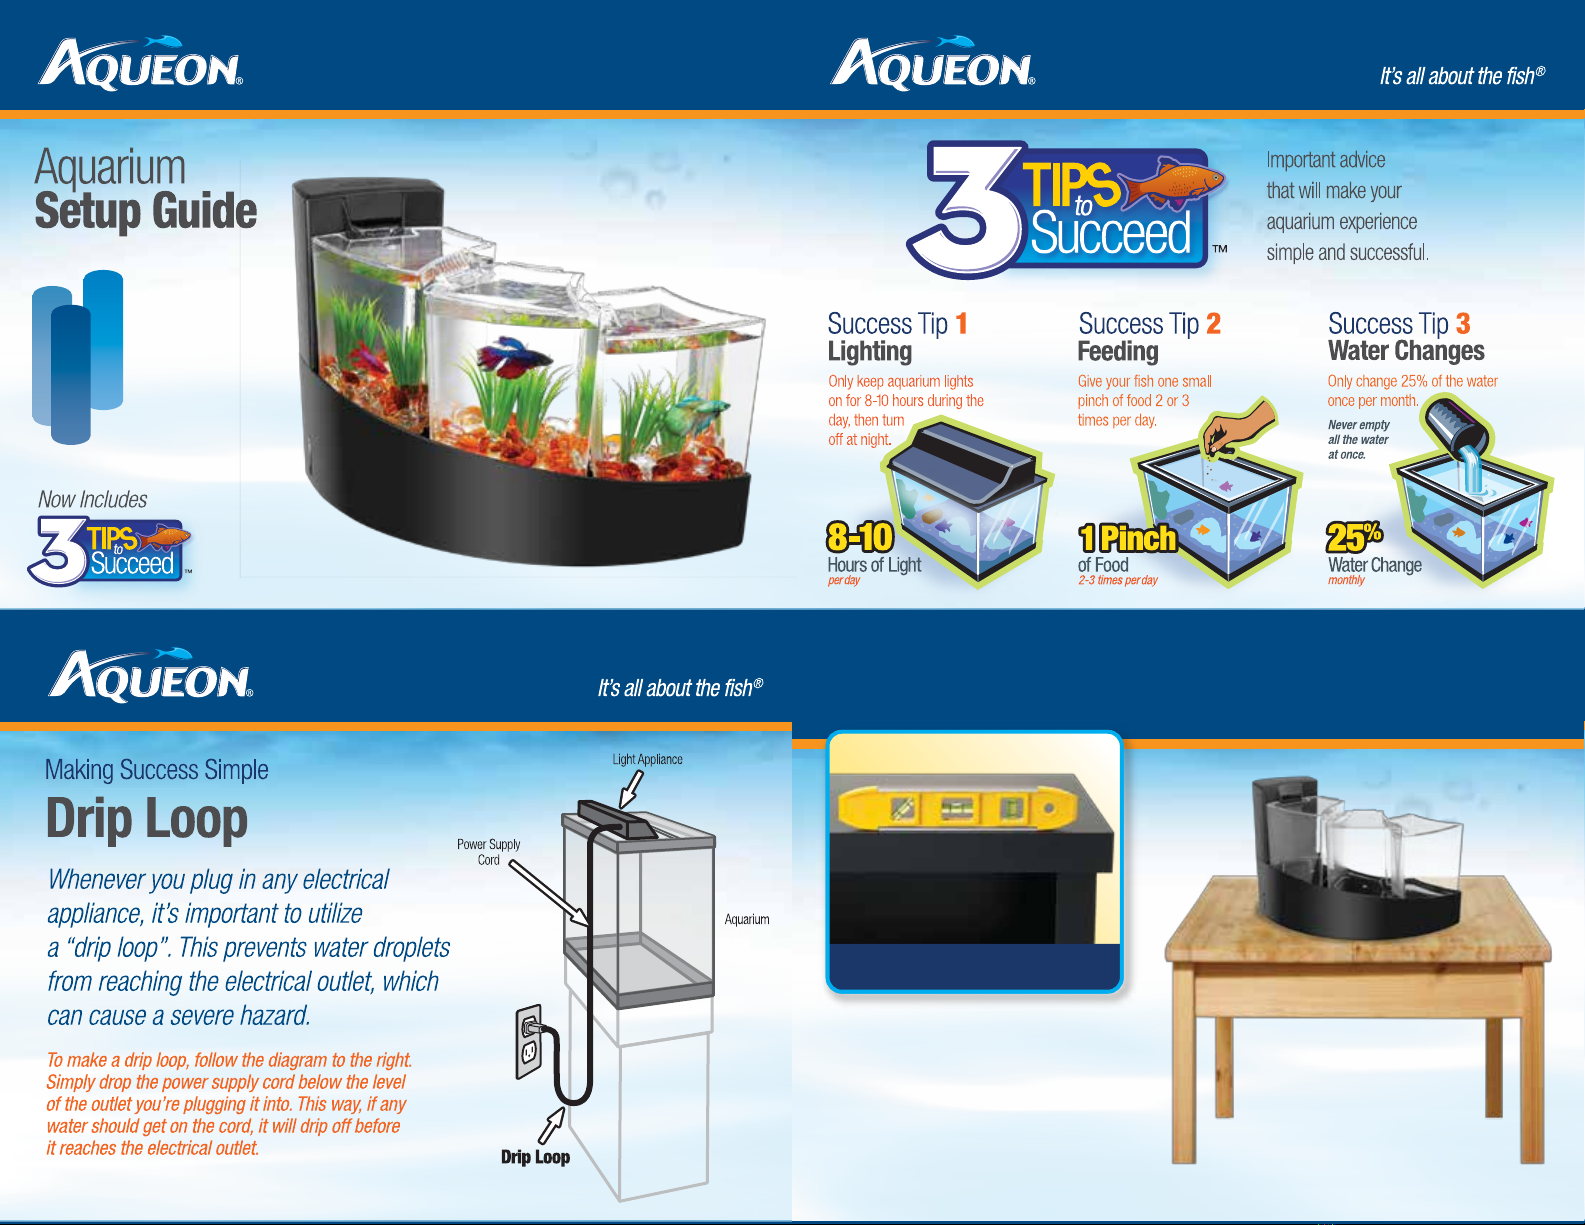
•Place aquarium evenly on a level
surface so that all sides of aquarium
are supported.
•Surface should be able to easily
support more than 50 lbs.
Make sure surface is level
1. place aquarium on Strong, Stable Surface
•Carefully pour rinsed gravel
into middle of each aquarium.
• Spread gravel evenly
around aquarium bottom.
•Gravel depth should measure
about 1" from the bottom.
Betta
Falls
See reverse for additional information.
•Place aquarium evenly on a level
surface so that all sides of aquarium
are supported.
•Surface should be able to easily
support more than 50 lbs.
Make sure surface is level
1. place aquarium on Strong, Stable Surface
Betta
Falls
•Place aquarium evenly on a level
surface so that all sides of aquarium
are supported.
•Surface should be able to easily
support more than 50 lbs.
Make sure surface is level
1. place aquarium on Strong, Stable Surface
Fill to “Max” level on indicator
•Slowly pour room-temperature water into
lter chamber until it lls completely without
overowing in the aquarium chamber.
• Once water in lter chamber has emptied,
check “Max” level indicator to see if more
water should be added. If so, repeat step
above until water level reaches “Max”.
4. add Water to Filter Chamber

•Place plants and décor items into
each aquarium in desired location.
• Cover base of plants and bottom
of décor items with gravel to hold
securely in place.
See reverse for additional information.
•Place plants and décor items into
each aquarium in desired location.
• Cover base of plants and bottom
of décor items with gravel to hold
securely in place.
See reverse for additional information.
•Carefully pour rinsed gravel
into middle of each aquarium.
• Spread gravel evenly
around aquarium bottom.
•Gravel depth should measure
about 1" from the bottom.
•Place plants and décor items into
each aquarium in desired location.
• Cover base of plants and bottom
of décor items with gravel to hold
securely in place.
•Pour room-temperature water into
aquariums over your hand to avoid
moving gravel, plants and décor.
• Fill aquarium with water to 1/2"
from top of frame.
•Add water conditioner to lter
chamber.
•Place lter cartridge in slots in lter
chamber to t securely.
• The word “FRONT” on lter
cartridge should face the aquarium
chambers for proper t.
6. add Filter Cartridge5. add Water to Aquarium Chambers
Add Water Conditioner to lter chamber
as directed
•Place aquarium evenly on a level
surface so that all sides of aquarium
are supported.
•Surface should be able to easily
support more than 50 lbs.
Make sure surface is level
1. place aquarium on Strong, Stable Surface
•Carefully pour rinsed gravel
into middle of each aquarium.
• Spread gravel evenly
around aquarium bottom.
•Gravel depth should measure
about 1" from the bottom.
Fill to “Max” level on indicator
•Slowly pour room-temperature water into
lter chamber until it lls completely without
overowing in the aquarium chamber.
• Once water in lter chamber has emptied,
check “Max” level indicator to see if more
water should be added. If so, repeat step
above until water level reaches “Max”.
•Pour room-temperature water into
aquariums over your hand to avoid
moving gravel, plants and décor.
• Fill aquarium with water to 1/2"
from top of frame.
•Add water conditioner to lter
chamber.
4. add Water to Filter Chamber
5. add Water to Aquarium Chambers
Add Water Conditioner to lter chamber
as directed
•Place aquarium evenly on a level
surface so that all sides of aquarium
are supported.
•Surface should be able to easily
support more than 50 lbs.
•Carefully pour rinsed gravel
into middle of each aquarium.
• Spread gravel evenly
around aquarium bottom.
•Gravel depth should measure
about 1" from the bottom.
Fill to “Max” level on indicator
•Slowly pour room-temperature water into
lter chamber until it lls completely without
overowing in the aquarium chamber.
• Once water in lter chamber has emptied,
check “Max” level indicator to see if more
water should be added. If so, repeat step
above until water level reaches “Max”.
•Pour room-temperature water into
aquariums over your hand to avoid
moving gravel, plants and décor.
• Fill aquarium with water to 1/2"
from top of frame.
•Add water conditioner to lter
chamber.
7. add Covers and Turn Power On
Adjust ow rate of pump as needed
•Remove aquarium chamber covers.
• Test water in aquarium chambers to be sure it is
approximately the same temperature as the water
that the betta is in.
• Add an ounce of aquarium water to the water
the betta is in. Wait 5 minutes. Repeat.
•Place covers on lter chamber and each
of the three aquarium chambers beginning
with the third (end) aquarium chamber.
• Plug power cord into proper outlet using
“drip loop” method (see above).
8. add Fish
4. add Water to Filter Chamber 5. add Water to Aquarium Chambers
Add Water Conditioner to lter chamber
as directed
Flow Rate
Adjustment
• Using a net, carefully remove betta from store
container and gently place it in one aquarium
chamber
. Place cover on aquarium chamber.
WARNING: Only ONE betta should be in each
aquarium chamber.
•Place aquarium evenly on a level
surface so that all sides of aquarium
are supported.
•Surface should be able to easily
support more than 50 lbs.
Fill to “Max” level on indicator
•Slowly pour room-temperature water into
lter chamber until it lls completely without
overowing in the aquarium chamber.
• Once water in lter chamber has emptied,
check “Max” level indicator to see if more
water should be added. If so, repeat step
above until water level reaches “Max”.
7. add Covers and Turn Power On
Adjust ow rate of pump as needed
•Place covers on lter chamber and each
of the three aquarium chambers beginning
with the third (end) aquarium chamber.
• Plug power cord into proper outlet using
“drip loop” method (see above).
4. add Water to Filter Chamber
Flow Rate
Adjustment

•Place plants and décor items into
each aquarium in desired location.
• Cover base of plants and bottom
of décor items with gravel to hold
securely in place.
•Place lter cartridge in slots in lter
chamber to t securely.
• The word “FRONT” on lter
cartridge should face the aquarium
chambers for proper t.
6. add Filter Cartridge
•Place lter cartridge in slots in lter
chamber to t securely.
• The word “FRONT” on lter
cartridge should face the aquarium
chambers for proper t.
6. add Filter Cartridge
• Using a net, carefully remove betta from store
container and gently place it in one aquarium
chamber
. Place cover on aquarium chamber.
WARNING: Only ONE betta should be in each
aquarium chamber.
7. add Covers and Turn Power On
Adjust ow rate of pump as needed
•Place covers on lter chamber and each
of the three aquarium chambers beginning
with the third (end) aquarium chamber.
• Plug power cord into proper outlet using
“drip loop” method (see above).
Flow Rate
Adjustment
•Carefully pour rinsed gravel
into middle of each aquarium.
• Spread gravel evenly
around aquarium bottom.
•Gravel depth should measure
about 1" from the bottom.
•Pour room-temperature water into
aquariums over your hand to avoid
moving gravel, plants and décor.
• Fill aquarium with water to 1/2"
from top of frame.
•Add water conditioner to lter
chamber.
•Place lter cartridge in slots in lter
chamber to t securely.
• The word “FRONT” on lter
cartridge should face the aquarium
chambers for proper t.
6. add Filter Cartridge
•Remove aquarium chamber covers.
• Test water in aquarium chambers to be sure it is
approximately the same temperature as the water
that the betta is in.
• Add an ounce of aquarium water to the water
the betta is in. Wait 5 minutes. Repeat.
8. add Fish
5. add Water to Aquarium Chambers
Add Water Conditioner to lter chamber
as directed
• Using a net, carefully remove betta from store
container and gently place it in one aquarium
chamber
. Place cover on aquarium chamber.
WARNING: Only ONE betta should be in each
aquarium chamber.
Other Aqueon Aquarium manuals


Popular Aquarium manuals by other brands

PAPILLON
PAPILLON AquaParts MAGIC BUBBLE LED operating instructions

JBL
JBL PROFLORA pH Control Touch manual

Amtra
Amtra FILPRRO EX 500 manual

Aquarium Guardian
Aquarium Guardian Monitor and Controller user manual

Current
Current SERENE quick start guide

Interpet
Interpet Tri-Spec 2 Instruction manual and set up guide

Van Gerven
Van Gerven Anti Algae manual

D-D The Aquarium Solution
D-D The Aquarium Solution REEF-PRO 900 installation instructions

Casa Del Vetro
Casa Del Vetro Acquario Milo 80 Luxline Black manual

Red Sea
Red Sea REEFER XL200 Assembly manual

Red Sea
Red Sea REEFER 170 Assembly manual

Aquatop
Aquatop SKYAQUA MARINE-MINI owner's manual


