Arcadia ThermalZooPro Setup guide

Safety, Installation and Maintenance Instructions
ThermalZooPro

1
1
22
Depending on the variant the ThermalZooPro may
contain the following.
1. Supplied with either dual 24W ProT5 UVB Kits or mix
with 34W Jungle Dawn LED BAR.
2. Supplied with dual 5” Clamp ttings to power any heat
lamp combination up to 250W.
LIGHTING
CODE PRODUCT UV-B WATT
RARTP24DX ProT5 UVB Kit Dragon 14% 24W
RARTP24RX ProT5 UVB Kit Desert 12% 24W
RARTP24FX ProT5 UVB Kit Forest 6% 24W
RFD3D24T5 D3+Dragon T5 Lamp 14% 24W
RFD3P24T5 D3+Desert T5 Lamp 12% 24W
RFD324T5 D3 Forest T5 Lamp 6% 24W
RAJDP3X JUNGLE DAWN LED BAR - 34W
CODE PRODUCT LENGTH
CPSMINLC
Link cable 1.2M
HEATING
CODE PRODUCT WATT
RSBF100
Solar Basking Flood 100W
RSBF150
Solar Basking Flood 150W
RSBS100
Solar Basking Spot 100W
RSBS150
Solar Basking Spot 150W
RARHP50 Deep Heat Projector 50W
RSHA100E27 Halogen Heat Lamp PAR38 100W
REORDER LAMPS

38cm (15”) 61cm (24”)
TEMPERATURE DISTANCE TEMPERATURE DISTANCE
A B C D E F A B C D E F
PAR 38 HALOGEN
100W FLOOD LAMPS X 2 70ºC 70ºC 48ºC 38cm
15”
23cm
9”
51cm
20” 55.8ºC 55.8ºC 48ºC 61cm
24”
30cm
12”
72cm
28”
RSBF 100W FLOOD X 2 44ºC 44ºC 33ºC 38cm
15”
23cm
9”
51cm
20” 28ºC 28ºC 18ºC 61cm
24”
30cm
12”
72cm
28”
RSBF 150W FLOOD X 2 50.8ºC 50.8ºC 38ºC 38cm
15”
40cm
16”
92cm
36” 40ºC 40ºC 26ºC 61cm
24”
92cm
36”
92cm
36”
RSBS 100W SPOT X 2 52ºC 52ºC 32ºC 38cm
15”
18cm
7”
61cm
24” 48ºC 48ºC 32ºC 61cm
24”
61cm
24”
61cm
24”
RSBS 150W SPOT X 2 65ºC 65ºC 34ºC 38cm
15”
21cm
8”
61cm
24” 55ºC 55ºC 36ºC 61cm
24”
61cm
24”
61cm
24”
PAR38 100W X 1,
DHP 50W X 1 70ºC 70ºC 48ºC 38cm
15”
23cm
9”
51cm
20” 55.8ºC 55.8ºC 38ºC 61cm
24”
23cm
9”
61cm
24”
D3+DRAGON X 2 D3+DESERT X 2 D3 FOREST X 2 D3 FOREST
/ JD LED BAR
24W 24W 24W 24W / 34W
UVI kLux UVI kLux UVI kLux UVI kLux
8” / 200mm 15.5 8.4 11.2 7.8 5.1 7.5 5.1 12
12” / 300mm 10.10 5.6 8.1 5.2 4.2 5 4.2 10
15” / 375mm 6.9 4.1 6.0 3.7 3.4 3.55 3.4 7.10
18” / 450mm 5.2 1.9 4.8 1.7 2.8 1.6 2.8 4.5
20” / 500mm 4.5 0.6 3.9 0.52 2.1 0.5 2.1 3
24” / 600mm 3.3 0.11 2.7 0.1 1.6 0.1 1.6 1.9
Caution: High UVI All light readings taken in a live vivarium with light coloured rock.
PERFORMANCE PARAMETERS
Illustration 1
Surface
temperature Up to
40ºC 11 kLux
UVI = 4.5
T5
UVI 4.5
LED
10kLux
30cm (12”)

KEEP THESE INSTRUCTIONS FOR FUTURE REFERENCE. READ AND FOLLOW ALL SAFETY INSTRUCTIONS.
The ThermalZoo Pro hybrid luminaire is a very powerful ng that has been specically designed to provide high levels of heat, illuminaon and UV. Follow all safety
and installaon instrucons carefully.
DANGER- To avoid possible electric shock, special care should be taken during Installaon and maintenance.
Do not aempt repairs yourself; return the appliance to an authorised service facility or discard the appliance.
For assistance contact info@arcadia-reple.com.
This product is designed for indoor use and the illuminaon of vivariums only and will provide a good and safe service life, provided that these instrucons are
followed. Failure to do so may result in serious personal injury or property damage.
If you are in any doubt about the installaon or operaon of this product, please consult a qualied and experienced electrician.
Check that the voltage and frequency rang on the product label is the same as your electrical supply before proceeding further.
WARNING - To guard against injury, basic safety precauons should be observed, including the following:
1. Disconnect all appliances in the enclosure from the mains supply socket before carrying out maintenance on the Luminaire.
2. Always support the Luminaire when ng or adjusng the suspension height.
3. Do not operate the Luminaire less than the recommended distance above the animal.
It is advised that no human or animal should be allowed to be any closer than 20cm to the unit during normal use but the suitable distance for use above animals
is dependent on the UVI and heat projecon of each type of lamp installed and the needs of each species. Greater minimum distances apply for UVB lamps (see
individual lamp instrucons). Please email info@arcadia-reple.com or see the lighng guide at www.arcadiareple.com/lighng/guide/ for further advice.
4. Regularly check all mounngs and suspension parts.
5. Do not look directly into the light source.
6.
Do not touch the light or heat sources while they are on. Turn all the lamps o and allow the light and heat sources to cool before performing maintenance on them.
7.
The Luminaire can get HOT. Never touch the Luminaire while it is operang. Turn all the lamps o and allow adequate me for it to cool before aempng any maintenance.
8.
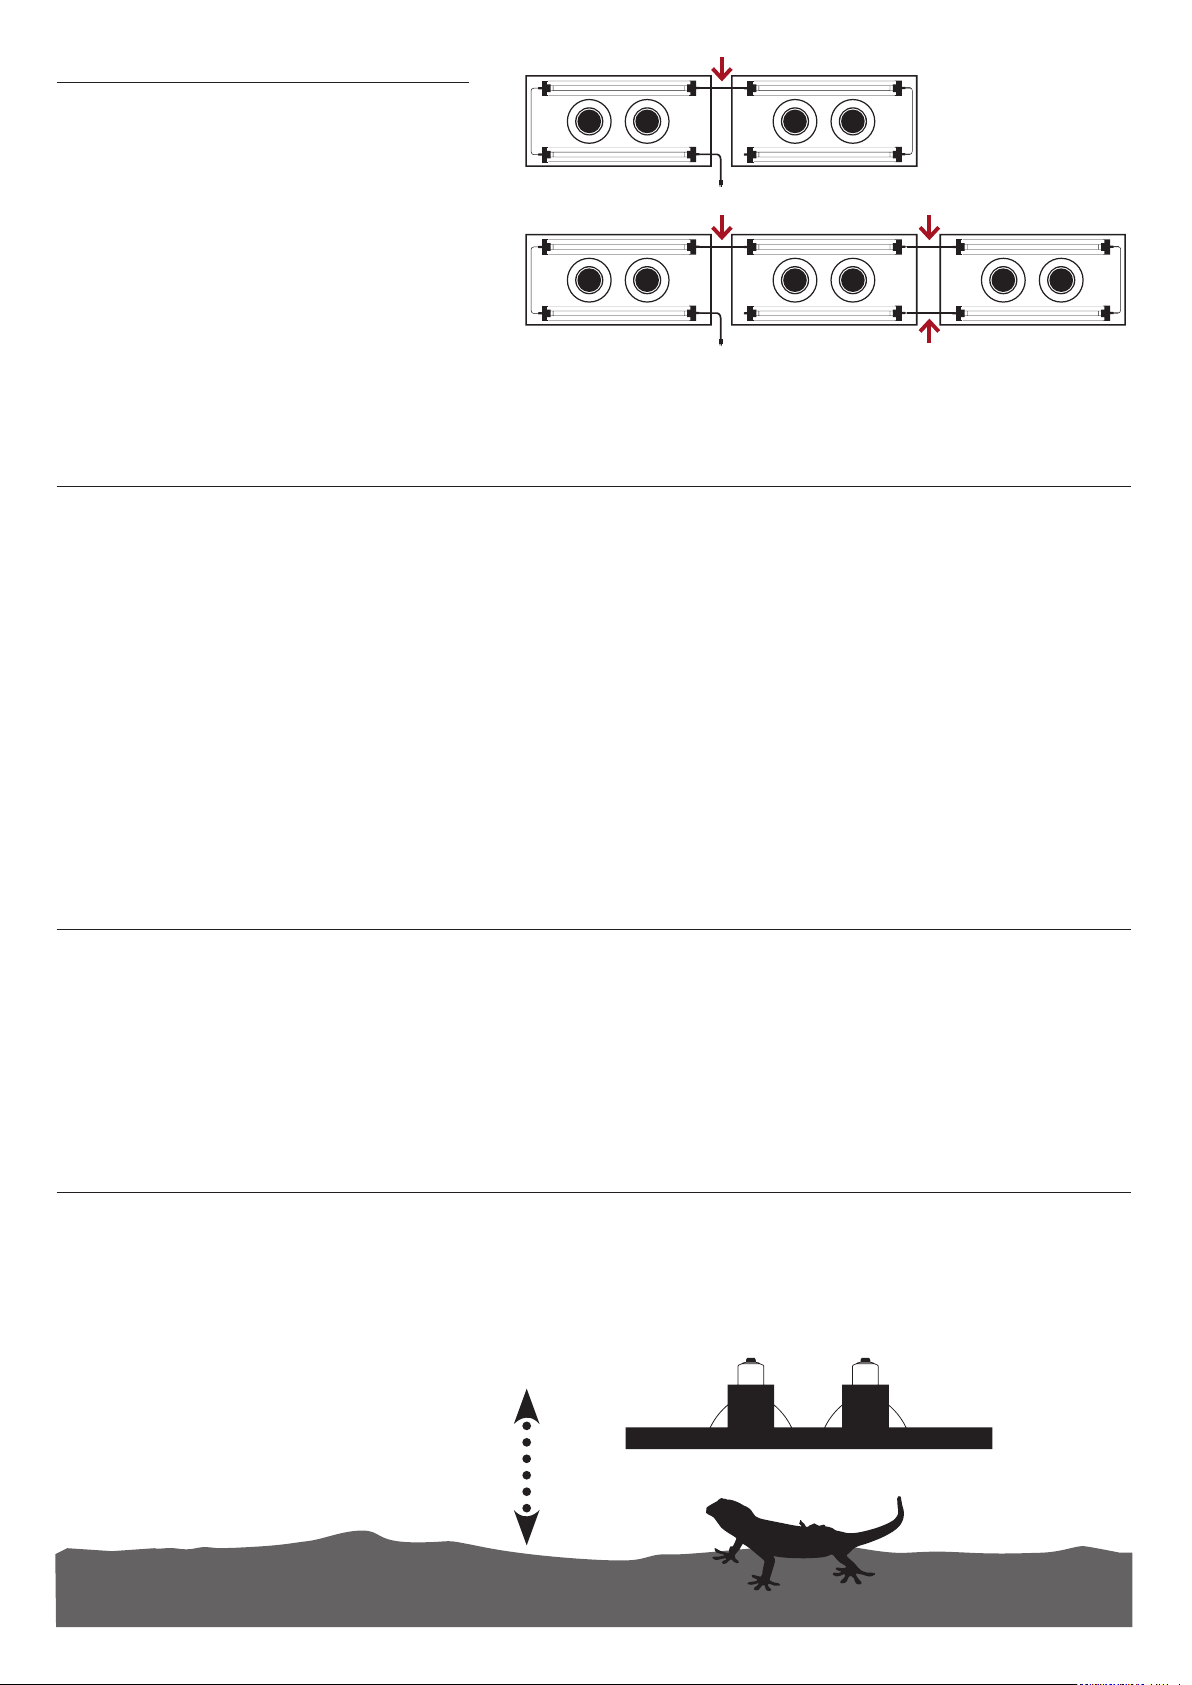
A thermal, UV and photo gradient should be maintained underneath the ng as shown In Illustraon 1 and aer consultaon on the type of species being illuminated.
9. Do not operate the Luminaire with defecve or faulty lamps – circuit damage may occur. Replace lamps promptly with a lamp of the correct type and waage. It
is advisable to keep spare lamps available.
10. Do not use the appliance other than for providing vivarium illuminaon. The use of non-Arcadia aachments, lamps or accessories is not recommended and may
cause an unsafe condion.
11. Do not install or store the appliance where it will be exposed to extremes of temperature or water ingress.
PHYSICAL INSTALLATION
Select a suitable site close to your electricity supply. Do not connect appliance to the mains supply socket during installaon. This appliance is for indoor use only.
Ensure the appliance is kept in a venlated area and away from other heat sources. Make sure that the light from the appliance is aimed within the vivarium. This unit
is IP20 and is not protected against ingress of water, it should be mounted away from all water sources.
Place the luminaire in the desired posion either on top of the Vivarium mesh or suspended by the suspension kit.
Ensure the mains lead and the luminaire are kept well out of reach of animals that might bite or damage them.
ELECTRICAL INSTALLATION
Before installing, ensure that the rated voltage and frequency of the Luminaire match that of your power supply, and that the mains lead plug is fully compable with
your mains supply socket. If in doubt, please return the unit to the point of purchase for vericaon.
Before connecng any of the mains leads to the mains ensure that the inline switches are o and that any switches at the mains sockets are o. This is an extra
precauon to prevent any surge damage to electrical components.
Cut a slit in the cable inlet socket and push the two-pin plug through the hole and into the socket of the luminaire. Ensure it is pushed fully home.
The mains leads for the ceramic clamp lamps should be connected to a suitable thermostat to prevent animals becoming overheated.
Plug in the mains leads to the mains sockets and switch on any socket switches. Turn on the inline switches.
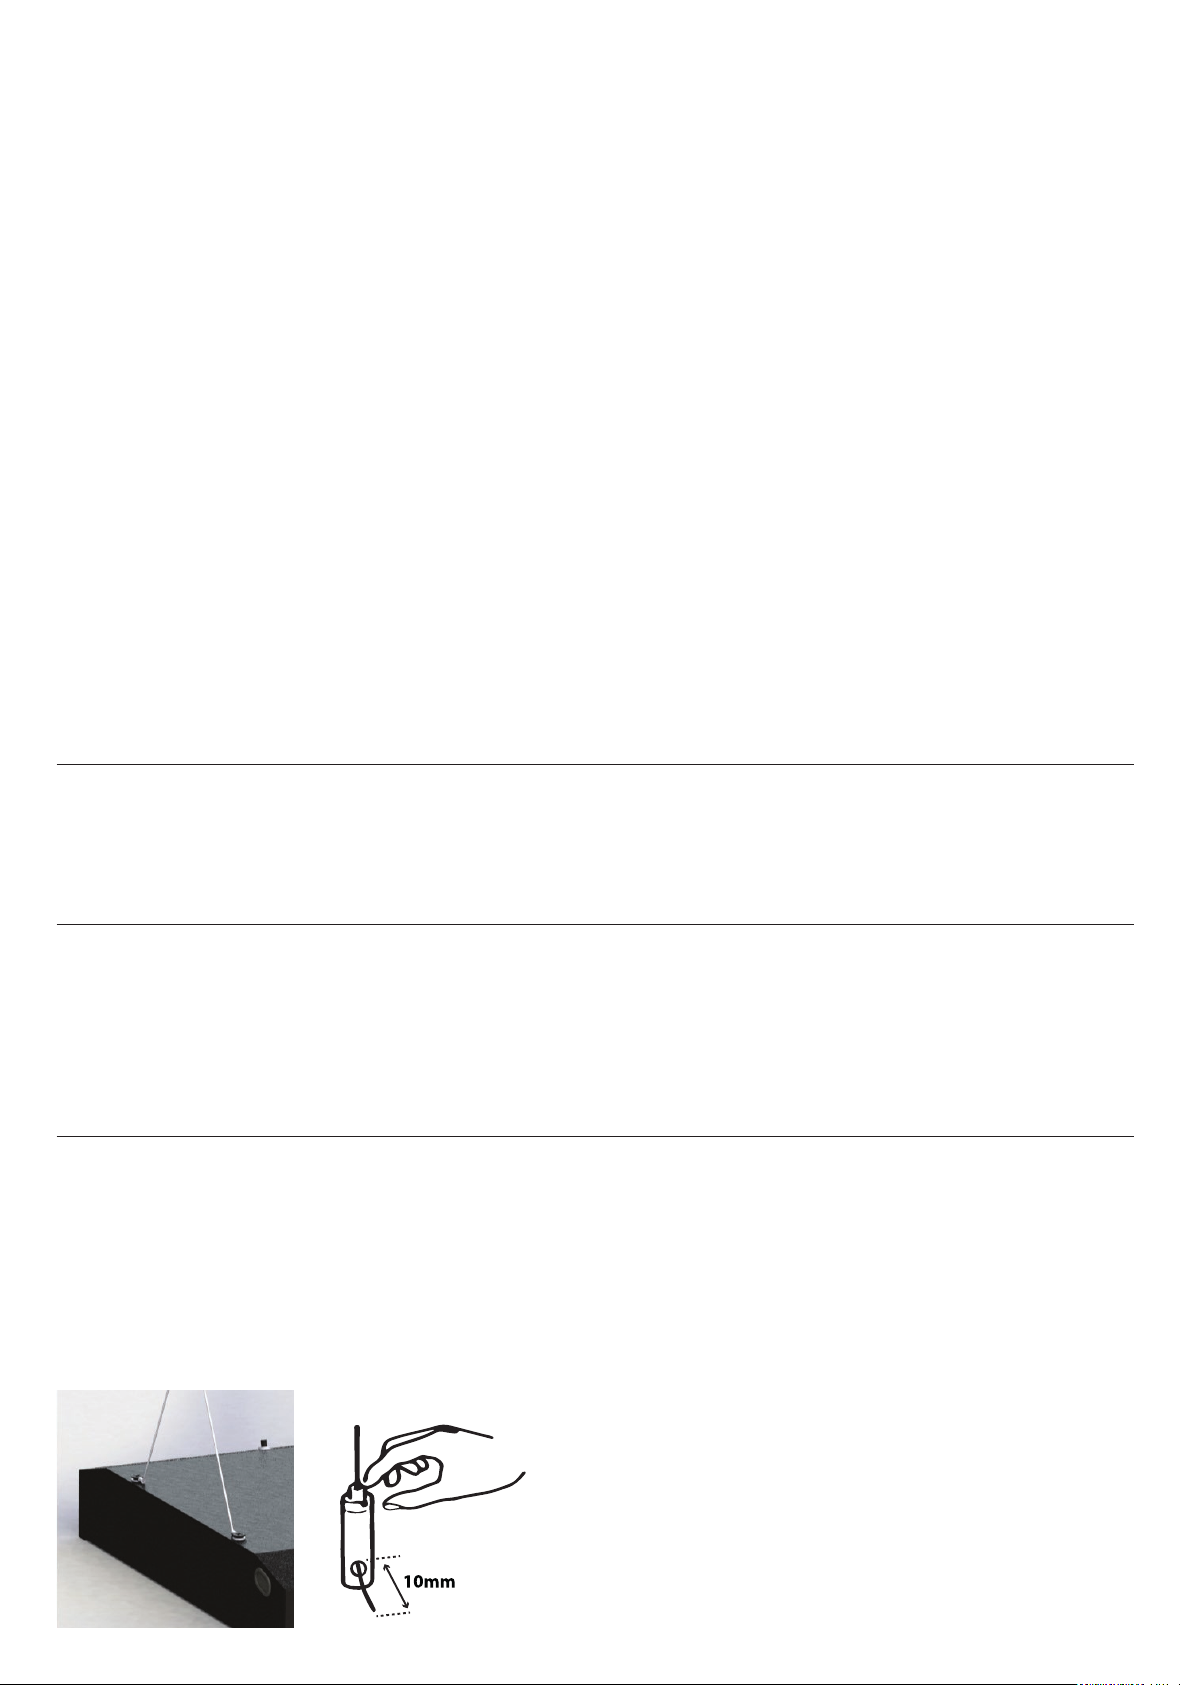
WIRE SUSPENSION KIT
Aach the Quick-adjust holders to either end of the unit using the countersunk screws provided.
Aach the suspension wires to ceiling hooks or loop them around a convenient beam. When both suspension wires are in place, feed the wires down through the
buons on top of the Quick-adjust holders which will automacally hold the wires in posion.
To lower the height of the unit, support the ng one end at a me, and release the wire by depressing the buon at the top of the quick-adjust. To raise the ng,
support it and pull the wire through the hole in the side of the quick-adjust holders.
When adjusng the ng always ensure that there is enough wire to achieve your target height. Always leave a minimum 10 mm of wire showing. Excess wire can
be concealed on the top. If cung the wire, wrap the wire with masking tape and cut with sharp, heavy duty side cuers. Place the plasc bung on the end of the
wire aer cung it.

TROUBLESHOOTING
Fluorescent lamps strike almost immediately at nearly full brightness (dependent on ambient temperature) and reach their operang temperature soon aer. Aer
switching the lamps o, they can be switched on straight away.
If the Luminaire does not light:
• Check that the mains power is connected and switched on, including mer if used.
• Check the fuse box.
• Check that the luminaire is rated for the same supply voltage that you are using.
• Check that the lamps are of the correct waage, type and length for the Luminaire.
• Check that the lamps are installed correctly.
If the heat lamps do not heat up:
• Check that the mains power is connected and switched on, including mer if used.
• Check that the thermostat is working and is set correctly.
• Check the fuse box.
• Check that the luminaire is rated for the same supply voltage that you are using.
• Check that the heat lamps are of the correct waage, type and length for the Luminaire.
• Check that the lamps are installed correctly. Power in and link cables should be rmly inserted. Loose cables cause the unit to icker. These should be checked
monthly.
MAINTENANCE
Cauon! Disconnect all appliances in the enclosure from the mains supply before carrying out maintenance on the luminaire or if any prolonged maintenance is to be
carried out within the illuminated area in the enclosure. These units can emit high levels of UV when in use which can cause skin burns.
Always support the luminaire when adjusng its height or mounngs.
Regularly check the security of all parts of your hanging mechanism or mounngs.
Cleaning: Disconnect from the power supply and wait ll the Luminaire is cool before cleaning, this not only avoids smears but also reduces the likelihood of any
damage from moisture entering the Luminaire.
Both the appearance and performance of your Luminaire can benet from regular cleaning. A damp cloth is normally adequate to clean the body.
Reectors should be maintained and gently cleaned as required with a dry macrobre cloth to ensure good reecon and the opmum output.
ProT5 and Jungle Dawn LED Bars are clip mounted and can easily be removed for maintenance, replacement or upgrade.
ANIMAL CARE
Visit the lighng guide on the Arcadia Reple web site for species specic informaon. www.arcadiareple.com/lighng/guide/
If there is any risk of animals gaining access to the unit, a mesh guard or screen must be placed between the unit and the animals.
Linking 3 units, add 3 link cables
Linking 2 units,
add 1 link cable
MAX 3 UNITS!
Minimum distance
300mm / 12”
LINKING UNITS
The luminaires within the ThermalZoo Pro can be linked
together to be operated from a single power source. The
maximum number of ThermalZoo Pros that can be linked
together is 3. The heat lamps cannot be linked together as they
should be operated by separate thermostats.
Link cables are not provided with the units but can be purchased
separately. Part number CPSMINLC.
To link two units one link cable is required.
To link three units three link cables are required. The internal
link cable in the centre unit needs to be removed. This can be
used to link the rst and second unit instead of a link cable if
the length is sucient.
The link cables are connected in the same way as the power
cables.

Do not look directly
at light source.
Class II Luminaire.
Double insulated.
Monkfield Nutrition Ltd,
Arthur Rickwood Farm, Chatteris Road,
Mepal, Ely, Cambs CB6 2AZ. United Kingdom
info@arcadia-reptile.com
JBR016
For use with Reptiles,
Amphibians,
Invertebrates & Plants.
Conformity to relevant EU Directives.
Conformity to Restriction of Hazardous Substances Directive.
Double insulation. No earth required.
Not suitable for normal household lighting or heating.
Do not look directly into light source.
Level of ingress protection. IP20 does not provide protection against
water ingress.
END OF USE RECYCLING INFORMATION
This product is covered by European Direcve 2002/96/EC. Please do not
dispose of this product or replacement lamps with your normal household
waste. To safely and responsibly dispose of the product please ensure all
the components are deposited in the appropriate areas of your local civic
recycling centre. Proper disposal of this product helps to prevent potenal
negave consequences for the environment and human health.
All electronic components (this includes the power supply and the lamp
holder) should be placed in the electronic waste recycling area.
If a uorescent lamp is provided with this product it contains mercury and
cannot be disposed of with normal household waste; it should be deposited
in the uorescent lamp recycling area at your local civic recycling centre or
taken to any approved recycling point for uorescent lamps.
EU Authorised Representative:
Comply Express LDA,
StartUp Madeira EV41, Campus da
Penteada, 9020 105 Funchal, Portugal.
Table of contents
Other Arcadia Lighting Equipment manuals